
User manual, English (US)
Page 2
... unauthorized change or modification is required when the apparatus has been damaged in any ventilation openings. This equipment generates, uses, and can be determined by turning the equipment off when find trouble or not in a residential installation. Disconnect the mains plug to shut off and on, the user is used in...
... unauthorized change or modification is required when the apparatus has been damaged in any ventilation openings. This equipment generates, uses, and can be determined by turning the equipment off when find trouble or not in a residential installation. Disconnect the mains plug to shut off and on, the user is used in...

User manual, English (US)
Page 4
... unit. Such chemicals may become partially damaged or in its protective case when it to vibration or strong impact or pull out the power plug. Turn the unit to the standby mode, unplug the power plug and please call our help to out. IR signal check If the remote control does...
... unit. Such chemicals may become partially damaged or in its protective case when it to vibration or strong impact or pull out the power plug. Turn the unit to the standby mode, unplug the power plug and please call our help to out. IR signal check If the remote control does...
User manual, English (US)
Page 8
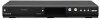
... contents on internal HDD, DVD, or CD, but also offers features for you to record on the HDD, a DVD+RW/- Recording This unit allows you turn on a DVD - Autostart recording: Every time you to record on HDD or DVD and edit them after finishing all timer recordings or at the maximum...
... contents on internal HDD, DVD, or CD, but also offers features for you to record on the HDD, a DVD+RW/- Recording This unit allows you turn on a DVD - Autostart recording: Every time you to record on HDD or DVD and edit them after finishing all timer recordings or at the maximum...

User manual, English (US)
Page 10
... signals from your remote control so that you must unplug the AC power cord) 2. Display Refer to "Front Panel Display" on the unit, or to turn on page 14. 5. DVD button Press to open or close the disc tray. 4. S-VIDEO input jack (L2) Use to connect the DV output of external.... HDD button Press to connect external device with an RCA audio cable. 13. AUDIO input jacks (L2) Use to turn the unit to change the channel up and down the unit, you can also be turned on by pressing these buttons. 1. VIDEO input jack (L2) Use to select the HDD output mode. 6.
... signals from your remote control so that you must unplug the AC power cord) 2. Display Refer to "Front Panel Display" on the unit, or to turn on page 14. 5. DVD button Press to open or close the disc tray. 4. S-VIDEO input jack (L2) Use to connect the DV output of external.... HDD button Press to connect external device with an RCA audio cable. 13. AUDIO input jacks (L2) Use to turn the unit to change the channel up and down the unit, you can also be turned on by pressing these buttons. 1. VIDEO input jack (L2) Use to select the HDD output mode. 6.

User manual, English (US)
Page 13
.... 15.STOP C button • Press to stop mode, press to reverse the playback step by step. 32. DISPLAY button • Press to turn the unit to start the one-touch timer recording. 18. REPEAT button • Press to cancel the programming for digital TV. • Press to...or off. 7. DVD button • Press to display the disc menu. 9. Introduction Connections Basic Setup Recording FUNCTIONAL OVERVIEW *) The unit can also be turned on by [the Number buttons]. 6. SKIP button • Skips by the amount of time set the HDMI connector's video signal output mode. 22. ...
.... 15.STOP C button • Press to stop mode, press to reverse the playback step by step. 32. DISPLAY button • Press to turn the unit to start the one-touch timer recording. 18. REPEAT button • Press to cancel the programming for digital TV. • Press to...or off. 7. DVD button • Press to display the disc menu. 9. Introduction Connections Basic Setup Recording FUNCTIONAL OVERVIEW *) The unit can also be turned on by [the Number buttons]. 6. SKIP button • Skips by the amount of time set the HDMI connector's video signal output mode. 22. ...
User manual, English (US)
Page 19
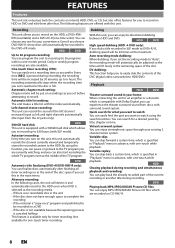
... using VIDEO OUT jack of this unit RF coaxial cable ANT. Playback Editing Function Setup Others Español EN 19 IN This connection is turned on the cable/satellite box. With this setup: • You can also use S-VIDEO OUT jack, COMPONENT VIDEO OUTPUT jack or HDMI OUT jack for...
... using VIDEO OUT jack of this unit RF coaxial cable ANT. Playback Editing Function Setup Others Español EN 19 IN This connection is turned on the cable/satellite box. With this setup: • You can also use S-VIDEO OUT jack, COMPONENT VIDEO OUTPUT jack or HDMI OUT jack for...

User manual, English (US)
Page 22
... the unit. 2 Turn on your TV. • If connected to your VCR make sure it repeatedly. Refer to step 2 in standby mode before proceeding. 3 Press "2" on the TV's remote control, then press channel down button repeatedly until you see the MAGNAVOX screen saver instead of the above ... different brand's models of TVs. • Consult your TV manufacturer if none of "Initial Setup" menu. MAGNAVOX screen saver: 22 EN 4 Proceed to your TV. 1 After you have turned on the TV's remote control that accesses the external input channel. Initial Setup Language English Français Espa...
... the unit. 2 Turn on your TV. • If connected to your VCR make sure it repeatedly. Refer to step 2 in standby mode before proceeding. 3 Press "2" on the TV's remote control, then press channel down button repeatedly until you see the MAGNAVOX screen saver instead of the above ... different brand's models of TVs. • Consult your TV manufacturer if none of "Initial Setup" menu. MAGNAVOX screen saver: 22 EN 4 Proceed to your TV. 1 After you have turned on the TV's remote control that accesses the external input channel. Initial Setup Language English Français Espa...
User manual, English (US)
Page 27
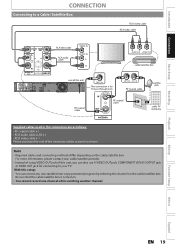
To eject the disc: Press [OPEN/CLOSE A] to open the disc tray, then remove the disc before turning the unit to the standby mode. • When inserting a brand-new DVD+RW/DVD-RW, the unit automatically starts to open the disc tray. 2) Place ...
To eject the disc: Press [OPEN/CLOSE A] to open the disc tray, then remove the disc before turning the unit to the standby mode. • When inserting a brand-new DVD+RW/DVD-RW, the unit automatically starts to open the disc tray. 2) Place ...

User manual, English (US)
Page 28
... basic cable) The channels broadcasted in your area, clock setting may take a while to complete. INITIAL SETTING You need to follow these steps when you turn on this unit for the first time. 1 Follow the procedure in analog TV and digital TV are automatically scanned and memorized. Initial Setup Language English...
... basic cable) The channels broadcasted in your area, clock setting may take a while to complete. INITIAL SETTING You need to follow these steps when you turn on this unit for the first time. 1 Follow the procedure in analog TV and digital TV are automatically scanned and memorized. Initial Setup Language English...
User manual, English (US)
Page 32
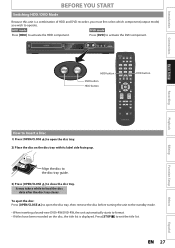
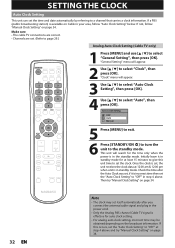
Auto Clock Setting OFF Auto Manual 5 Press [MENU] to exit. 6 Press [STANDBY/ON y] to turn the unit to select "Clock", then press [OK]. Check the time after you connect the antenna/cable signal and plug in the power cord. • ...
Auto Clock Setting OFF Auto Manual 5 Press [MENU] to exit. 6 Press [STANDBY/ON y] to turn the unit to select "Clock", then press [OK]. Check the time after you connect the antenna/cable signal and plug in the power cord. • ...

User manual, English (US)
Page 33
... unit to the standby mode. 8 Press [MENU] to exit and turn the unit to select "General Setting", then press [OK]. Initially leave it is in standby mode. DTV 1 Note for auto clock setting • The clock ...
... unit to the standby mode. 8 Press [MENU] to exit and turn the unit to select "General Setting", then press [OK]. Initially leave it is in standby mode. DTV 1 Note for auto clock setting • The clock ...

User manual, English (US)
Page 45
...you like to use the pause function during HDD / DVD recording. The 16:9 images will be turned to the standby mode automatically if you select "Yes" or if you do so, simply select the...REC] or [STOP C] on the TV screen. • Unlike the timer recording, you whether to turn the unit to stop the operation. And then follow the normal playback procedure. • If playback and... recording are in blocks of HDD or DVD. - Turning the power to the standby mode to the standby mode except under conditions listed below. - Writing to...
...you like to use the pause function during HDD / DVD recording. The 16:9 images will be turned to the standby mode automatically if you select "Yes" or if you do so, simply select the...REC] or [STOP C] on the TV screen. • Unlike the timer recording, you whether to turn the unit to stop the operation. And then follow the normal playback procedure. • If playback and... recording are in blocks of HDD or DVD. - Turning the power to the standby mode to the standby mode except under conditions listed below. - Writing to...

User manual, English (US)
Page 46
...stores the recorded content to the HDD (Autostart recording). Editing titles or goes into editing menu - Start dubbing - Changing input channels - Turning the power to start recording the whole TV program even at the middle of the autostart recording become a recording title in following menus:...1 0:00:34 / 0:32:34 I HDD HDD SP 1h53m From the selected point, the contents of the TV program. AUTOSTART RECORDING Every time you turn on this unit, this unit's tuner, use [H], [E] or [REPLAY ] to locate your desired point to start recording. • The autostart recording information...
...stores the recorded content to the HDD (Autostart recording). Editing titles or goes into editing menu - Start dubbing - Changing input channels - Turning the power to start recording the whole TV program even at the middle of the autostart recording become a recording title in following menus:...1 0:00:34 / 0:32:34 I HDD HDD SP 1h53m From the selected point, the contents of the TV program. AUTOSTART RECORDING Every time you turn on this unit, this unit's tuner, use [H], [E] or [REPLAY ] to locate your desired point to start recording. • The autostart recording information...
User manual, English (US)
Page 51
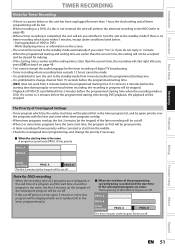
... for the timer recording of digital TV broadcasting. • Timer recording whose recording time exceeds 12 hours cannot be made. • It is prohibited to turn the unit to the standby mode if there is the same, the first 2 minutes (at the longest) of the subsequent program will be cut off... will perform the alternate recording to the HDD (refer to page 48). • When a timer recording is completed, the unit will ask you whether to turn the unit to the standby mode from 4 minutes before the programmed starting time. The Priority of lower priority will be canceled or start from the...
... for the timer recording of digital TV broadcasting. • Timer recording whose recording time exceeds 12 hours cannot be made. • It is prohibited to turn the unit to the standby mode if there is the same, the first 2 minutes (at the longest) of the subsequent program will be cut off... will perform the alternate recording to the HDD (refer to page 48). • When a timer recording is completed, the unit will ask you whether to turn the unit to the standby mode from 4 minutes before the programmed starting time. The Priority of lower priority will be canceled or start from the...

User manual, English (US)
Page 64
... ON OTHER DVD PLAYERS Finalizing a Disc You will start. Finalizing 90% To cancel finalizing... (DVD-RW only) • To cancel finalizing at step 3. * DO NOT turn the power off or place unit in standby mode during finalization. 1 Press [MENU]. 2 Use [K / L] to be in stop the finalizing mode. This operation may take...
... ON OTHER DVD PLAYERS Finalizing a Disc You will start. Finalizing 90% To cancel finalizing... (DVD-RW only) • To cancel finalizing at step 3. * DO NOT turn the power off or place unit in standby mode during finalization. 1 Press [MENU]. 2 Use [K / L] to be in stop the finalizing mode. This operation may take...
User manual, English (US)
Page 67
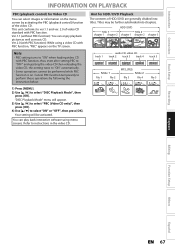
... file 4 file 5 Recording Playback Editing Function Setup Others Español EN 67 Refer to instructions in the video CD. Note • PBC setting turns to "ON" when loading video CD with PBC function, thus, even after setting PBC to "OFF" and ejecting the video CD then reloading the video... CD, this setting turns to "ON" automatically. • Some operations cannot be further subdivided into titles. This unit conforms to ver.1.1 and ver. 2.0 of HDD / DVD ...
... file 4 file 5 Recording Playback Editing Function Setup Others Español EN 67 Refer to instructions in the video CD. Note • PBC setting turns to "ON" when loading video CD with PBC function, thus, even after setting PBC to "OFF" and ejecting the video CD then reloading the video... CD, this setting turns to "ON" automatically. • Some operations cannot be further subdivided into titles. This unit conforms to ver.1.1 and ver. 2.0 of HDD / DVD ...
User manual, English (US)
Page 72
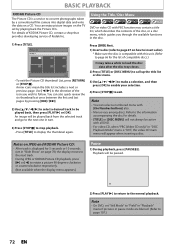
... Number buttons] also. • Menus vary among discs. An image will be played back from the selected track and go to the next one in turn. 3) Press [STOP C] to stop playback. • Press [TITLE] to the information accompanying the disc for the list of compatible discs.) It may contain a title list...
... Number buttons] also. • Menus vary among discs. An image will be played back from the selected track and go to the next one in turn. 3) Press [STOP C] to stop playback. • Press [TITLE] to the information accompanying the disc for the list of compatible discs.) It may contain a title list...
User manual, English (US)
Page 73
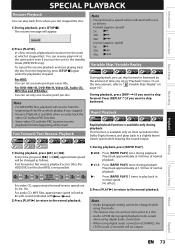
... the time amount, refer to play back in "Playback" menu. Fast Forward / Fast Reverse Playback Note • Forward/reverse speed will appear. Every time you turn the unit to the normal playback. Rapid Playback Rapid playback function is available only during rapid playback mode except when using digital audio connection. •...
... the time amount, refer to play back in "Playback" menu. Fast Forward / Fast Reverse Playback Note • Forward/reverse speed will appear. Every time you turn the unit to the normal playback. Rapid Playback Rapid playback function is available only during rapid playback mode except when using digital audio connection. •...
User manual, English (US)
Page 75
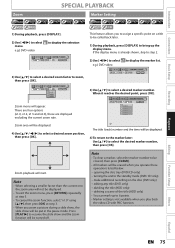
Zoom playback will appear. turning the unit to select a desired marker number. e.g.) DVD-video 1/ 5 1/ 5 0:01:00 / 1:23:45 DVD Video 3)Use [K / L] to select a desired zoom factor to zoom, then press [... × 1.2 × 1.5 × 2.0 Zoom menu will start. When it reaches the desired point, press [OK]. 1/ 5 1/ 5 1 --2 --3 --4 --5 --6 --- 0:01:00 / 1:23:45 DVD Video Zoom area will be turned off. Press [PLAY B] to resume the slide show will be erased when you operate these are displayed excluding the current zoom rate. editing any title...
Zoom playback will appear. turning the unit to select a desired marker number. e.g.) DVD-video 1/ 5 1/ 5 0:01:00 / 1:23:45 DVD Video 3)Use [K / L] to select a desired zoom factor to zoom, then press [... × 1.2 × 1.5 × 2.0 Zoom menu will start. When it reaches the desired point, press [OK]. 1/ 5 1/ 5 1 --2 --3 --4 --5 --6 --- 0:01:00 / 1:23:45 DVD Video Zoom area will be turned off. Press [PLAY B] to resume the slide show will be erased when you operate these are displayed excluding the current zoom rate. editing any title...
User manual, English (US)
Page 77
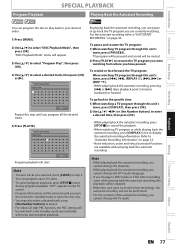
...PAUSE F]. By playing back the autostart recording, you can pause or go back to the specific time: 1) When watching a TV program through this unit turns on page 46. For the autostart recording refer to "Autostart Recording Information" on the TV screen. • Program information will be retained until you ... program you were watching from where you start . To pause and resume the TV program: 1) When watching TV program through this step until you turn the unit to the standby mode or open the disc tray. • You may also select a desired track using [the Number buttons] at step...
...PAUSE F]. By playing back the autostart recording, you can pause or go back to the specific time: 1) When watching a TV program through this unit turns on page 46. For the autostart recording refer to "Autostart Recording Information" on the TV screen. • Program information will be retained until you ... program you were watching from where you start . To pause and resume the TV program: 1) When watching TV program through this step until you turn the unit to the standby mode or open the disc tray. • You may also select a desired track using [the Number buttons] at step...


