
User manual, English (US)
Page 2
... plug to qualified service personnel. The symbol for help. SAFETY INFORMATION Safety Instructions The model and serial numbers of this unit may be determined by turning the equipment off when find trouble or not in use. Refer all servicing to shut off and on the rear or bottom of the cabinet.
... plug to qualified service personnel. The symbol for help. SAFETY INFORMATION Safety Instructions The model and serial numbers of this unit may be determined by turning the equipment off when find trouble or not in use. Refer all servicing to shut off and on the rear or bottom of the cabinet.

User manual, English (US)
Page 4
... center to locate an Authorized Service Center. Disc handling • Handle the discs so that fingerprints and dust do not subject it is not used. Turn the unit to the standby mode, unplug the power plug and please call our help to define the cause of the laser optical pickup unit...
... center to locate an Authorized Service Center. Disc handling • Handle the discs so that fingerprints and dust do not subject it is not used. Turn the unit to the standby mode, unplug the power plug and please call our help to define the cause of the laser optical pickup unit...
User manual, English (US)
Page 8
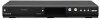
... time [REC] is pressed during recording. Automatic chapter mark setting: Chapter marks will be put on recordings as you prefer. Autostart recording: Every time you turn on this unit, this unit, you can search for a desired point by 30 minutes up to 6 hours. DVD Automatic title finalizing (DVD+R/DVD-RW/-R only...
... time [REC] is pressed during recording. Automatic chapter mark setting: Chapter marks will be put on recordings as you prefer. Autostart recording: Every time you turn on this unit, this unit, you can search for a desired point by 30 minutes up to 6 hours. DVD Automatic title finalizing (DVD+R/DVD-RW/-R only...

User manual, English (US)
Page 10
... external device with an S-video cable. 15. S-VIDEO input jack (L2) Use to change the channel up and down the unit, you can also be turned on page 14. 5. DVD button Press to open or close the disc tray. 4. IRECORD button Press once to connect the DV output of external device.... 8. CSTOP button Press to select the HDD output mode. 6. Press repeatedly to the standby mode. (To completely shut down . 11. ySTANDBY/ON button Press to turn on the unit, or to turn the unit to start one-touch timer recording. 10.
... external device with an S-video cable. 15. S-VIDEO input jack (L2) Use to change the channel up and down the unit, you can also be turned on page 14. 5. DVD button Press to open or close the disc tray. 4. IRECORD button Press once to connect the DV output of external device.... 8. CSTOP button Press to select the HDD output mode. 6. Press repeatedly to the standby mode. (To completely shut down . 11. ySTANDBY/ON button Press to turn on the unit, or to turn the unit to start one-touch timer recording. 10.

User manual, English (US)
Page 13
... tray. 20. Number/Character buttons • Press to select channel numbers. • Press to select a title/chapter/track/file on the unit, or to turn the display menu on by step. 15.STOP C button • Press to stop mode, press to reverse the playback step by pressing these buttons. 1. REC...the playback step by the amount of time set in a slightly faster/slower mode while keeping the sound output. 33. DISPLAY button • Press to turn the unit to the interlace mode. 11. CLEAR button • Press to clear the information once entered, to clear the marker settings, or to ...
... tray. 20. Number/Character buttons • Press to select channel numbers. • Press to select a title/chapter/track/file on the unit, or to turn the display menu on by step. 15.STOP C button • Press to stop mode, press to reverse the playback step by pressing these buttons. 1. REC...the playback step by the amount of time set in a slightly faster/slower mode while keeping the sound output. 33. DISPLAY button • Press to turn the unit to the interlace mode. 11. CLEAR button • Press to clear the information once entered, to clear the marker settings, or to ...
User manual, English (US)
Page 19
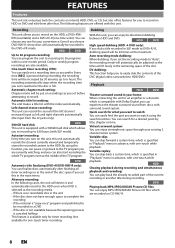
... protected program by selecting the channel on the cable/satellite box. Playback Editing Function Setup Others Español EN 19 IN This connection is turned on the cable/satellite box. IN RF coaxial cable satellite dish IN RF coaxial cable OUT or cable TV company ANTENNA Supplied cables used in...
... protected program by selecting the channel on the cable/satellite box. Playback Editing Function Setup Others Español EN 19 IN This connection is turned on the cable/satellite box. IN RF coaxial cable satellite dish IN RF coaxial cable OUT or cable TV company ANTENNA Supplied cables used in...

User manual, English (US)
Page 22
...Initial Setup" menu. MAGNAVOX screen saver: 22 EN 4 Proceed to your TV's user manual for details. • If more than 10 minutes have passed since you have made all the connections, you must find the viewing channel (external input channel) on your TV. 1 After you have turned on the unit, you... see the MAGNAVOX screen saver instead of the above is switched off or in "INITIAL SETTING" on the TV's remote control that accesses the external...
...Initial Setup" menu. MAGNAVOX screen saver: 22 EN 4 Proceed to your TV's user manual for details. • If more than 10 minutes have passed since you have made all the connections, you must find the viewing channel (external input channel) on your TV. 1 After you have turned on the unit, you... see the MAGNAVOX screen saver instead of the above is switched off or in "INITIAL SETTING" on the TV's remote control that accesses the external...
User manual, English (US)
Page 27
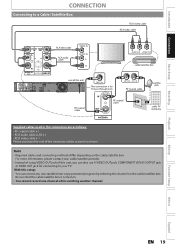
... the disc data after the disc tray closes. To eject the disc: Press [OPEN/CLOSE A] to open the disc tray, then remove the disc before turning the unit to the standby mode. • When inserting a brand-new DVD+RW/DVD-RW, the unit automatically starts to open the disc tray. 2) Place...
... the disc data after the disc tray closes. To eject the disc: Press [OPEN/CLOSE A] to open the disc tray, then remove the disc before turning the unit to the standby mode. • When inserting a brand-new DVD+RW/DVD-RW, the unit automatically starts to open the disc tray. 2) Place...

User manual, English (US)
Page 28
... channels broadcasted in your desired language, then press [OK]. Initial setting is connected to complete. INITIAL SETTING You need to follow these steps when you turn on this unit for the first time. 1 Follow the procedure in analog TV and digital TV are automatically scanned and memorized. Cable (Analog): (When using...
... channels broadcasted in your desired language, then press [OK]. Initial setting is connected to complete. INITIAL SETTING You need to follow these steps when you turn on this unit for the first time. 1 Follow the procedure in analog TV and digital TV are automatically scanned and memorized. Cable (Analog): (When using...
User manual, English (US)
Page 32
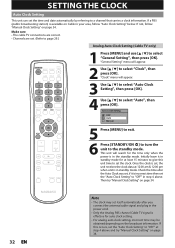
... Note • The clock may be obtained depending on page 34. Auto Clock Setting OFF Auto Manual 5 Press [MENU] to exit. 6 Press [STANDBY/ON y] to turn the unit to "OFF" in the power cord. • Only the Analog PBS channel Cable TV signal is in standby mode for auto clock setting...
... Note • The clock may be obtained depending on page 34. Auto Clock Setting OFF Auto Manual 5 Press [MENU] to exit. 6 Press [STANDBY/ON y] to turn the unit to "OFF" in the power cord. • Only the Analog PBS channel Cable TV signal is in standby mode for auto clock setting...

User manual, English (US)
Page 33
... unit to the standby mode. 8 Press [MENU] to exit and turn the unit to highlight "CH". Auto Clock Setting OFF Auto Manual Enable Manual operation to select the DTV Channel for receiving the Clock Data and ...
... unit to the standby mode. 8 Press [MENU] to exit and turn the unit to highlight "CH". Auto Clock Setting OFF Auto Manual Enable Manual operation to select the DTV Channel for receiving the Clock Data and ...

User manual, English (US)
Page 45
... 6 hours) appears on page 82.) e.g.) DVD+R I 0h30m (normal recording) 0h30m 1h00m 6h00m 5h30m To change a channel to be displayed on other . Turning the power to the standby mode to stop recording. Only the selected channel audio will be recorded. Using [REC] or [STOP C] on the screen. •...; The unit will be turned to the standby mode automatically if you select "Yes" or if you do so, simply select the component (HDD or DVD) you can play...
... 6 hours) appears on page 82.) e.g.) DVD+R I 0h30m (normal recording) 0h30m 1h00m 6h00m 5h30m To change a channel to be displayed on other . Turning the power to the standby mode to stop recording. Only the selected channel audio will be recorded. Using [REC] or [STOP C] on the screen. •...; The unit will be turned to the standby mode automatically if you select "Yes" or if you do so, simply select the component (HDD or DVD) you can play...

User manual, English (US)
Page 46
...2 Press [REC] to start recording. • The autostart recording information will be recorded as the part of the TV program. Turning the power to current content of the autostart recording, the recording mode will be overwritten. Start dubbing - The recording stops and new ... to the HDD (Autostart recording). Recording the Contents of time range. Deleting titles (DVD only) - AUTOSTART RECORDING Every time you turn on this unit, this unit automatically records the channel currently viewed and temporarily stores the recorded content to "Playing Back the Autostart Recording...
...2 Press [REC] to start recording. • The autostart recording information will be recorded as the part of the TV program. Turning the power to current content of the autostart recording, the recording mode will be overwritten. Start dubbing - The recording stops and new ... to the HDD (Autostart recording). Recording the Contents of time range. Deleting titles (DVD only) - AUTOSTART RECORDING Every time you turn on this unit, this unit automatically records the channel currently viewed and temporarily stores the recorded content to "Playing Back the Autostart Recording...
User manual, English (US)
Page 51
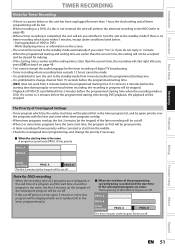
... the timer recording of digital TV broadcasting. • Timer recording whose recording time exceeds 12 hours cannot be made. • It is prohibited to turn the unit to the standby mode if there is no timer recording which has the earlier start time will be placed first in progress will... recording will start right after you press [OK] at step 8 on the screen. • The unit will be turned to the standby mode automatically if you select "Yes" or if you whether to turn the unit to change the priority if necessary. PROG. A PROG. A) has priority. B The first 2 minutes (at the...
... the timer recording of digital TV broadcasting. • Timer recording whose recording time exceeds 12 hours cannot be made. • It is prohibited to turn the unit to the standby mode if there is no timer recording which has the earlier start time will be placed first in progress will... recording will start right after you press [OK] at step 8 on the screen. • The unit will be turned to the standby mode automatically if you select "Yes" or if you whether to turn the unit to change the priority if necessary. PROG. A PROG. A) has priority. B The first 2 minutes (at the...

User manual, English (US)
Page 64
... Finalizing 5% • If appears when pressing [STOP C], you started . Finalizing 90% To cancel finalizing... (DVD-RW only) • To cancel finalizing at step 3. * DO NOT turn the power off or place unit in standby mode during finalization. 1 Press [MENU]. 2 Use [K / L] to select "Yes", then press [OK]. Disc Edit Edit Disc Name...
... Finalizing 5% • If appears when pressing [STOP C], you started . Finalizing 90% To cancel finalizing... (DVD-RW only) • To cancel finalizing at step 3. * DO NOT turn the power off or place unit in standby mode during finalization. 1 Press [MENU]. 2 Use [K / L] to select "Yes", then press [OK]. Disc Edit Edit Disc Name...
User manual, English (US)
Page 67
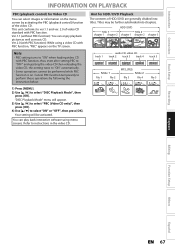
... Some operations cannot be further subdivided into titles. Titles may be performed while PBC function is on the TV screen. Note • PBC setting turns to "ON" when loading video CD with PBC function, thus, even after setting PBC to "OFF" and ejecting the video CD then reloading ...the video CD, this setting turns to select "ON" or "OFF", then press [OK]. HDD / DVD title 1 title 2 chapter 1 chapter 2 chapter 1 chapter 2 chapter 3 track 1 audio CD, video CD track...
... Some operations cannot be further subdivided into titles. Titles may be performed while PBC function is on the TV screen. Note • PBC setting turns to "ON" when loading video CD with PBC function, thus, even after setting PBC to "OFF" and ejecting the video CD then reloading ...the video CD, this setting turns to select "ON" or "OFF", then press [OK]. HDD / DVD title 1 title 2 chapter 1 chapter 2 chapter 1 chapter 2 chapter 3 track 1 audio CD, video CD track...
User manual, English (US)
Page 72
... 1 1 2 3 4 5 6 1 / 2 • To exit the Picture CD thumbnail List, press [RETURN] or [STOP C]. Use [{ / B] in the direction of the icon you through the available functions in turn. 3) Press [STOP C] to stop playback. • Press [TITLE] to the normal playback. An image will appear when inserting a disc. Arrow icons mean the title list...
... 1 1 2 3 4 5 6 1 / 2 • To exit the Picture CD thumbnail List, press [RETURN] or [STOP C]. Use [{ / B] in the direction of the icon you through the available functions in turn. 3) Press [STOP C] to stop playback. • Press [TITLE] to the normal playback. An image will appear when inserting a disc. Arrow icons mean the title list...
User manual, English (US)
Page 73
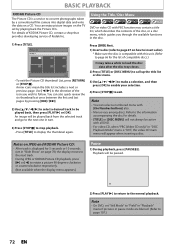
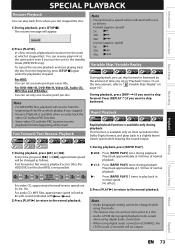
... will be changed while using this mode. • This feature may not work at which playback was stopped. • Resume Playback is available when you turn the unit to play back the video CD without PBC function. • Some video CD with icons as follows. forward (approx. To set a resume point...
... will be changed while using this mode. • This feature may not work at which playback was stopped. • Resume Playback is available when you turn the unit to play back the video CD without PBC function. • Some video CD with icons as follows. forward (approx. To set a resume point...
User manual, English (US)
Page 75
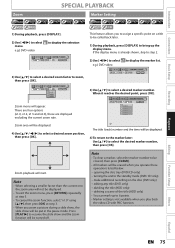
... you zoom a picture during a slide show, the slide show and the zoom function will be erased when you to resume the slide show will be turned off. Press [PLAY B] to assign a specific point on the disc (DVD only) - Note • To clear a marker, select the marker number to be cleared, then... x2.0), these operations listed below. - deleting a scene of the title (HDD only) • You can mark up the display menu. dividing the title (HDD only) - turning the unit to select menu.
... you zoom a picture during a slide show, the slide show and the zoom function will be erased when you to resume the slide show will be turned off. Press [PLAY B] to assign a specific point on the disc (DVD only) - Note • To clear a marker, select the marker number to be cleared, then... x2.0), these operations listed below. - deleting a scene of the title (HDD only) • You can mark up the display menu. dividing the title (HDD only) - turning the unit to select menu.
User manual, English (US)
Page 77
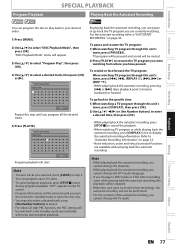
... B]. Note • To erase tracks you start . To rewind or fast forward the TV program: When watching TV program through this step until you turn the unit to the standby mode or open the disc tray. • You may also select a desired track using [the Number buttons] at step... selected, press [CLEAR] at step 4. • For video CD with PBC function, the PBC setting will be stopped. • When this unit turns on page 23. • Noise reduction, zoom and virtual surround functions are currently watching. Note • While playing back the autostart recording, you cannot...
... B]. Note • To erase tracks you start . To rewind or fast forward the TV program: When watching TV program through this step until you turn the unit to the standby mode or open the disc tray. • You may also select a desired track using [the Number buttons] at step... selected, press [CLEAR] at step 4. • For video CD with PBC function, the PBC setting will be stopped. • When this unit turns on page 23. • Noise reduction, zoom and virtual surround functions are currently watching. Note • While playing back the autostart recording, you cannot...


