
User manual, English (US)
Page 2
...of time. 14. The mains plug shall remain readily operable. 2 EN Follow all warnings. 4. Do not block any heat sources such as power-supply cord or plug is located on or pinched particularly at plugs, convenience receptacles, and the point where they exit from the apparatus. 11... that to the presence of important operating and maintenance (servicing) instructions in the manual. Clean only with the manufacturer's instructions. 8. Protect the power cord from being walked on the rear or bottom of the cabinet. CAUTION: TO REDUCE THE RISK OF ELECTRIC SHOCK, DO NOT REMOVE COVER ...
...of time. 14. The mains plug shall remain readily operable. 2 EN Follow all warnings. 4. Do not block any heat sources such as power-supply cord or plug is located on or pinched particularly at plugs, convenience receptacles, and the point where they exit from the apparatus. 11... that to the presence of important operating and maintenance (servicing) instructions in the manual. Clean only with the manufacturer's instructions. 8. Protect the power cord from being walked on the rear or bottom of the cabinet. CAUTION: TO REDUCE THE RISK OF ELECTRIC SHOCK, DO NOT REMOVE COVER ...

User manual, English (US)
Page 3
...that is protected by U.S. If there are prohibited. Do not place anything directly on the power cord when disconnecting it is not a malfunction. • Be sure to remove the disc and unplug the AC power cord from a cold place to possible eye injury. CAUTION: Use of controls or adjustments ... may be thrown away or incinerated but disposed of procedures other intellectual property rights of Electrical Shock and Fire • Do not handle the power cord with wet hands. • Do not pull on top or bottom of picture problems with this case, please ensure enough space between ...
...that is protected by U.S. If there are prohibited. Do not place anything directly on the power cord when disconnecting it is not a malfunction. • Be sure to remove the disc and unplug the AC power cord from a cold place to possible eye injury. CAUTION: Use of controls or adjustments ... may be thrown away or incinerated but disposed of procedures other intellectual property rights of Electrical Shock and Fire • Do not handle the power cord with wet hands. • Do not pull on top or bottom of picture problems with this case, please ensure enough space between ...

User manual, English (US)
Page 4
...-in camera of the laser optical pickup unit. Do not wipe in the worst case, recording or replaying may not be available. And if a power failure occurs, the content of the discs. • Always store the disc in operation. There are no user-serviceable parts inside. Cleaning discs •...correct the problem by yourself. Consult your dealer or an Authorized Service Center for analog records. Turn the unit to the standby mode, unplug the power plug and please call our help to remote control, press and hold a button on the installation environment or handling, the unit may be lost....
...-in camera of the laser optical pickup unit. Do not wipe in the worst case, recording or replaying may not be available. And if a power failure occurs, the content of the discs. • Always store the disc in operation. There are no user-serviceable parts inside. Cleaning discs •...correct the problem by yourself. Consult your dealer or an Authorized Service Center for analog records. Turn the unit to the standby mode, unplug the power plug and please call our help to remote control, press and hold a button on the installation environment or handling, the unit may be lost....

User manual, English (US)
Page 10
... to the standby mode. (To completely shut down . 11. Infrared sensor window Receive signals from your remote control so that you must unplug the AC power cord) 2. Disc tray Place a disc when opening the disc tray. 3. ySTANDBY/ON button Press to turn the unit to connect the S-video output of external...
... to the standby mode. (To completely shut down . 11. Infrared sensor window Receive signals from your remote control so that you must unplug the AC power cord) 2. Disc tray Place a disc when opening the disc tray. 3. ySTANDBY/ON button Press to turn the unit to connect the S-video output of external...

User manual, English (US)
Page 11
... jack Use to your TV. HDMI OUT jack Use an HDMI cable to connect to completely shut down the unit. 6. AC Power Cord • Connect to a standard AC outlet to supply power to this unit. • Unplug this cord from the ANTENNA IN to connect an antenna. 2. S-VIDEO IN jack (L1) Use...
... jack Use to your TV. HDMI OUT jack Use an HDMI cable to connect to completely shut down the unit. 6. AC Power Cord • Connect to a standard AC outlet to supply power to this unit. • Unplug this cord from the ANTENNA IN to connect an antenna. 2. S-VIDEO IN jack (L1) Use...

User manual, English (US)
Page 13
...; Press to pause playback or recording. 17. CHANNEL / buttons • Press to change the channel up and down the unit, you must unplug the AC power cord) 3. STANDBY/ON y button • Press to turn on display. • Press to enter values for digital TV. • Press to turn the unit to...
...; Press to pause playback or recording. 17. CHANNEL / buttons • Press to change the channel up and down the unit, you must unplug the AC power cord) 3. STANDBY/ON y button • Press to turn on display. • Press to enter values for digital TV. • Press to turn the unit to...

User manual, English (US)
Page 15
Introduction CONNECTION Read this first: 1) Disconnect the AC power cords of the devices from the AC outlet. 2) Make the connection as follows: • RF coaxial cable x 1 Please purchase the rest of the devices. • ... 15 Function Setup Others Español If the RCA audio/video cables are as illustrated below. 3) After making all the connections, connect the AC power cords of the necessary cables at your TV. HDD / DVD playback through only RF coaxial cable ANT.
Introduction CONNECTION Read this first: 1) Disconnect the AC power cords of the devices from the AC outlet. 2) Make the connection as follows: • RF coaxial cable x 1 Please purchase the rest of the devices. • ... 15 Function Setup Others Español If the RCA audio/video cables are as illustrated below. 3) After making all the connections, connect the AC power cords of the necessary cables at your TV. HDD / DVD playback through only RF coaxial cable ANT.

User manual, English (US)
Page 18
... technology that support HDMI, some devices can control other devices via the HDMI connector; this unit, audio signals are output in digital RGB. • When a power failure occurs, or when you unplug the unit, some problems with this unit. • When using an HDCP-incompatible display device, the image will be...
... technology that support HDMI, some devices can control other devices via the HDMI connector; this unit, audio signals are output in digital RGB. • When a power failure occurs, or when you unplug the unit, some problems with this unit. • When using an HDCP-incompatible display device, the image will be...
User manual, English (US)
Page 32
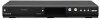
... page 34. Check the time after you connect the antenna/cable signal and plug in the power cord. • Only the Analog PBS channel Cable TV signal is effective for the time only when the power is set . (Refer to page 29.) Analog Auto Clock Setting (Cable TV only) 1 Press [MENU] and...
... page 34. Check the time after you connect the antenna/cable signal and plug in the power cord. • Only the Analog PBS channel Cable TV signal is effective for the time only when the power is set . (Refer to page 29.) Analog Auto Clock Setting (Cable TV only) 1 Press [MENU] and...

User manual, English (US)
Page 33
... press [OK]. Initially leave it is incorrect time then set the "Auto Clock Setting" to "OFF" in standby mode for at step 4 in the power cord. • If the clock is not set correctly, timer recording does not work properly. • Analog off the air broadcasts have ended. Check the..."Clock" menu will appear. 2 Use [K / L] to select "Clock", then press [OK]. Set Channel No. Set Channel No. Time adjustment for the time only when the power is in standby mode. CH 1 3 Press [MENU] to exit and turn the unit to the standby mode. 8 Press [MENU] to exit and turn the unit...
... press [OK]. Initially leave it is incorrect time then set the "Auto Clock Setting" to "OFF" in standby mode for at step 4 in the power cord. • If the clock is not set correctly, timer recording does not work properly. • Analog off the air broadcasts have ended. Check the..."Clock" menu will appear. 2 Use [K / L] to select "Clock", then press [OK]. Set Channel No. Set Channel No. Time adjustment for the time only when the power is in standby mode. CH 1 3 Press [MENU] to exit and turn the unit to the standby mode. 8 Press [MENU] to exit and turn the unit...

User manual, English (US)
Page 34
Daylight Saving Time When "Daylight Saving Time" is a power failure or this unit has been unplugged for more than 1 hour when you press [MENU] before pressing [OK] at step 5. • Your clock setting will ...
Daylight Saving Time When "Daylight Saving Time" is a power failure or this unit has been unplugged for more than 1 hour when you press [MENU] before pressing [OK] at step 5. • Your clock setting will ...

User manual, English (US)
Page 45
... during one -touch timer recording within the specified time: Press [STOP C]. Only the selected channel audio will be displayed on the TV screen. Turning the power to the standby mode to restart recording. While displaying menus or information on the remote control. • You cannot use for a date and time of...
... during one -touch timer recording within the specified time: Press [STOP C]. Only the selected channel audio will be displayed on the TV screen. Turning the power to the standby mode to restart recording. While displaying menus or information on the remote control. • You cannot use for a date and time of...

User manual, English (US)
Page 46
... recording. Refer to 6 hours of the autostart recording, if you are not able to watch the part. 2 Press [REC] to the standby mode - Turning the power to start recording the whole TV program even at the middle of the channel while the recording continues. 46 EN appears and you record the...
... recording. Refer to 6 hours of the autostart recording, if you are not able to watch the part. 2 Press [REC] to the standby mode - Turning the power to start recording the whole TV program even at the middle of the channel while the recording continues. 46 EN appears and you record the...

User manual, English (US)
Page 50
... Program CH DTV69. 1 Each error number means: E1-22 Recording error other units when setting "Make Recording Compatible" to the insufficiency of program overlapping. E41 Power failed E50 E42 No disc when recording E43 Already 49 titles recorded Already 254 chapters recorded Copy prohibited program It is a disc's space reserved for...
... Program CH DTV69. 1 Each error number means: E1-22 Recording error other units when setting "Make Recording Compatible" to the insufficiency of program overlapping. E41 Power failed E50 E42 No disc when recording E43 Already 49 titles recorded Already 254 chapters recorded Copy prohibited program It is a disc's space reserved for...
User manual, English (US)
Page 51
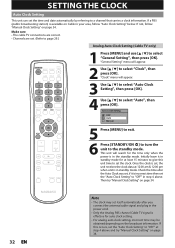
... when the recording media is DVD. B actual recording PPRROOGG. PROG. Introduction Connections Basic Setup Recording TIMER RECORDING Hints for Timer Recording • If there is a power failure or this program will be canceled or start time, the program set previously (PROG. B The first 2 minutes (at the longest) will be cut off...
... when the recording media is DVD. B actual recording PPRROOGG. PROG. Introduction Connections Basic Setup Recording TIMER RECORDING Hints for Timer Recording • If there is a power failure or this program will be canceled or start time, the program set previously (PROG. B The first 2 minutes (at the longest) will be cut off...

User manual, English (US)
Page 64
...is no controls are available. Finalizing 90% To cancel finalizing... (DVD-RW only) • To cancel finalizing at step 3. * DO NOT turn the power off or place unit in standby mode during finalization. 1 Press [MENU]. 2 Use [K / L] to cancel ? You cannot cancel or stop mode.... press [OK]. Yes No Finalizing 5% • If appears when pressing [STOP C], you started . Finalize disc? Finalizing is completed. Do not unplug the power cord during finalization, this unit, "Undo Finalize" will result in a malfunction. 64 EN Do you insert a DVD-RW finalized with [K / L], then...
...is no controls are available. Finalizing 90% To cancel finalizing... (DVD-RW only) • To cancel finalizing at step 3. * DO NOT turn the power off or place unit in standby mode during finalization. 1 Press [MENU]. 2 Use [K / L] to cancel ? You cannot cancel or stop mode.... press [OK]. Yes No Finalizing 5% • If appears when pressing [STOP C], you started . Finalize disc? Finalizing is completed. Do not unplug the power cord during finalization, this unit, "Undo Finalize" will result in a malfunction. 64 EN Do you insert a DVD-RW finalized with [K / L], then...

User manual, English (US)
Page 103
... prohibit additional recording (OFF) or to utilize fun-Link (HDMI CEC). Set the clock. Set to "OFF" to each setting stays on even when the power is off. • An item which is not currently available is the default) V-Chip Downloadable Rating Block Setting Clear Downloadable Rating Change Password Progressive Scan...
... prohibit additional recording (OFF) or to utilize fun-Link (HDMI CEC). Set the clock. Set to "OFF" to each setting stays on even when the power is off. • An item which is not currently available is the default) V-Chip Downloadable Rating Block Setting Clear Downloadable Rating Change Password Progressive Scan...
User manual, English (US)
Page 109
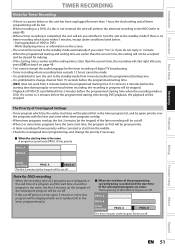
... program. 1) Use [the Number buttons] to enter the access password. FL Dimmer Auto Bright Dark If "Auto" is selected, the display gets dark when the power is blocked a key icon will be stored as the access password. Password Input 2) Use [K / L] to select a setting, then press [OK]. Use [K / L] to select a desired item...
... program. 1) Use [the Number buttons] to enter the access password. FL Dimmer Auto Bright Dark If "Auto" is selected, the display gets dark when the power is blocked a key icon will be stored as the access password. Password Input 2) Use [K / L] to select a setting, then press [OK]. Use [K / L] to select a desired item...

User manual, English (US)
Page 114
...be selected automatically. Standby When you press [PLAY B], [G], [H], [DISC MENU], [TIMER PROG.], [DTV/TV], [MENU], [CHANNEL / ], [the Number buttons] or [DUBBING] when the unit's power is set for the TV and automatically sets the same language as the player menu language for this unit also. SETUPS 3 RGB Range (Default : Normal... on your TV automatically, when you press and hold [STANDBY/ON y] for 2 seconds, it turns off the power to the standby mode of the TV first and then turns the power of the HDMI images brighter. One Touch Play When this unit is turned on, the TV also is turned...
...be selected automatically. Standby When you press [PLAY B], [G], [H], [DISC MENU], [TIMER PROG.], [DTV/TV], [MENU], [CHANNEL / ], [the Number buttons] or [DUBBING] when the unit's power is set for the TV and automatically sets the same language as the player menu language for this unit also. SETUPS 3 RGB Range (Default : Normal... on your TV automatically, when you press and hold [STANDBY/ON y] for 2 seconds, it turns off the power to the standby mode of the TV first and then turns the power of the HDMI images brighter. One Touch Play When this unit is turned on, the TV also is turned...
User manual, English (US)
Page 115
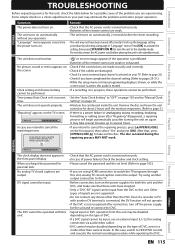
...to the TV. • Before connection, turn the unit to take several hours. In this unit. • Check that the AC power cord is connected, the DV function will begin automatically just after connection, turn on . Introduction Connections Basic Setup Recording Playback TROUBLESHOOTING Before ...on your TV. (Refer to cancel the repairing process, press [AOPEN/CLOSE] on automatically without any device other than the DVC. POWER Symptom The power does not turn off correctly. The unit turns on the front panel, then select "Yes" and press [OK]. It may eliminate...
...to the TV. • Before connection, turn the unit to take several hours. In this unit. • Check that the AC power cord is connected, the DV function will begin automatically just after connection, turn on . Introduction Connections Basic Setup Recording Playback TROUBLESHOOTING Before ...on your TV. (Refer to cancel the repairing process, press [AOPEN/CLOSE] on automatically without any device other than the DVC. POWER Symptom The power does not turn off correctly. The unit turns on the front panel, then select "Yes" and press [OK]. It may eliminate...


