
Leaflet English
Page 2
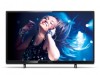
MAGNAVOX 50MV336X/F7 50" Class 1080p LED LCD Smart TV Product specifications Picture/Display • Aspect ratio: Widescreen • Diagonal screen size: 50 inch / 127 cm • Visible ...
MAGNAVOX 50MV336X/F7 50" Class 1080p LED LCD Smart TV Product specifications Picture/Display • Aspect ratio: Widescreen • Diagonal screen size: 50 inch / 127 cm • Visible ...

Owners Manual English
Page 2
... 7 Environmental Care 7 Preparing to Move/Ship the Unit 7 3 Getting Started 8 Features 8 Supplied Accessories 8 Symbols used in this User Manual 8 Attaching the Base 9 Installing the Remote Control Batteries 9 Remote Control 10 Control Panel 11 Terminals 11 Connecting Antenna or Cable / Satellite / IPTV Set-top Box 12 Plugging in the AC Power Cord 12...
... 7 Environmental Care 7 Preparing to Move/Ship the Unit 7 3 Getting Started 8 Features 8 Supplied Accessories 8 Symbols used in this User Manual 8 Attaching the Base 9 Installing the Remote Control Batteries 9 Remote Control 10 Control Panel 11 Terminals 11 Connecting Antenna or Cable / Satellite / IPTV Set-top Box 12 Plugging in the AC Power Cord 12...

Owners Manual English
Page 8
.... 3 Getting Started Features ● DTV / Analog TV / CATV You can be selected from the Remote Control. ● Auto Standby If there is applicable to browse the Apps pages. Model Quantity 50MV336X 4 Size M4 x 0.787"(20mm) Note(s) ● If you lose the Screws, please purchase the... above-mentioned Phillips head Screws at your Universal Remote Control is the description for the symbols used in your Remote Control for On-screen language Select...
.... 3 Getting Started Features ● DTV / Analog TV / CATV You can be selected from the Remote Control. ● Auto Standby If there is applicable to browse the Apps pages. Model Quantity 50MV336X 4 Size M4 x 0.787"(20mm) Note(s) ● If you lose the Screws, please purchase the... above-mentioned Phillips head Screws at your Universal Remote Control is the description for the symbols used in your Remote Control for On-screen language Select...
Owners Manual English
Page 9
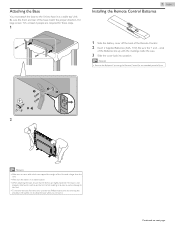
... ● When attaching the base, ensure that All Screws are required for these steps. 1 9 .English Installing the Remote Control Batteries 1 Slide the battery cover off the back of the Remote Control. 2 Insert 2 Supplied Batteries (AAA, 1.5V). Continued on next page. For large screen TVs, at least 2... people are tightly fastened. Note(s) ● Remove the Batteries if not using the Remote Control for an extended period of time. 1 3 2 × 4 2 Note(s) ● Make sure to use a table which can support the weight...
... ● When attaching the base, ensure that All Screws are required for these steps. 1 9 .English Installing the Remote Control Batteries 1 Slide the battery cover off the back of the Remote Control. 2 Insert 2 Supplied Batteries (AAA, 1.5V). Continued on next page. For large screen TVs, at least 2... people are tightly fastened. Note(s) ● Remove the Batteries if not using the Remote Control for an extended period of time. 1 3 2 × 4 2 Note(s) ● Make sure to use a table which can support the weight...
Owners Manual English
Page 10
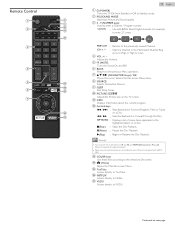
.... Adjusts the Volume. e D (MUTE) Turns the Sound On and Off. n Z (Home) Opens the Main On-screen Menu. p NETFLIX Access directly to the previously viewed Channel. Remote Control a b c d e f g 10 .English a B (POWER) Turns the TV On from Standby or Off to the highlighted object or screen. b PIC/SOUND MODE h Optimizes Picture and Sound...
.... Adjusts the Volume. e D (MUTE) Turns the Sound On and Off. n Z (Home) Opens the Main On-screen Menu. p NETFLIX Access directly to the previously viewed Channel. Remote Control a b c d e f g 10 .English a B (POWER) Turns the TV On from Standby or Off to the highlighted object or screen. b PIC/SOUND MODE h Optimizes Picture and Sound...
Owners Manual English
Page 11
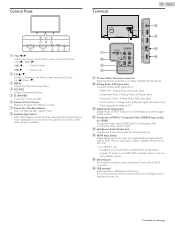
... jack with an RJ-45 connector. c MENU Opens the Main On-screen Menu. n HDMI Input jack(s) Digital Audio and Video Input from ; - f Remote Control Sensor Receives IR signal from Remote control. In the Menu screen, moves the Cursor Up (H)/Down (I Selects a Channel. Continued on PC k Digital Audio Output jack Digital Audio (S/PDIF...
... jack with an RJ-45 connector. c MENU Opens the Main On-screen Menu. n HDMI Input jack(s) Digital Audio and Video Input from ; - f Remote Control Sensor Receives IR signal from Remote control. In the Menu screen, moves the Cursor Up (H)/Down (I Selects a Channel. Continued on PC k Digital Audio Output jack Digital Audio (S/PDIF...
Owners Manual English
Page 17
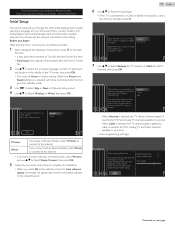
... in location setting. Please wait... Auto programming may take longer than 20 minutes to your area. - Digital channels will not be accessible by Remote Control. Select your area. ● Auto programming will appear later if there is the latest software on Network setup screen. 4 Use H ...I to Select Simple Connect, then press OK. 5 Follow the on the back of the remote control. It searches for DTV and Analog TV channels available in the selection screen for CATV channels, then press OK. These Operations are ...
... in location setting. Please wait... Auto programming may take longer than 20 minutes to your area. - Digital channels will not be accessible by Remote Control. Select your area. ● Auto programming will appear later if there is the latest software on Network setup screen. 4 Use H ...I to Select Simple Connect, then press OK. 5 Follow the on the back of the remote control. It searches for DTV and Analog TV channels available in the selection screen for CATV channels, then press OK. These Operations are ...
Owners Manual English
Page 19
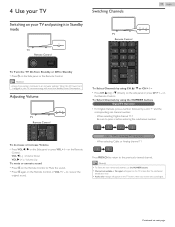
... only message will appear on the TV screen after the subchannel broadcast is plugged in, your TV and putting it in Standby mode TV Remote Control TV Remote Control 19 .English To Turn the TV On from Standby or Off to Standby ● Press B on the TV screen, when you receive only...; To Select the non-memorized channels, use the NUMBER buttons. ● Channel not available or No signal will appear on the Side panel or the Remote Control. to air and water pollution. Note(s) ● Energy Consumption contributes to recover the original sound. on the side panel or press CH...
... only message will appear on the TV screen after the subchannel broadcast is plugged in, your TV and putting it in Standby mode TV Remote Control TV Remote Control 19 .English To Turn the TV On from Standby or Off to Standby ● Press B on the TV screen, when you receive only...; To Select the non-memorized channels, use the NUMBER buttons. ● Channel not available or No signal will appear on the Side panel or the Remote Control. to air and water pollution. Note(s) ● Energy Consumption contributes to recover the original sound. on the side panel or press CH...

Owners Manual English
Page 20
...Box or the Connected Device to Select Channels. c Home Network : Accesses Home Network Menus. HDMI1 HDMI2 Video USB Watch TV ② Use the Remote Control of the device icons. 5 Enter your device from an External Device Switching Each Input Mode can rescan TV connections and update the source list...Change PIN L p. 37 ● Once you begin: You must set PIN, PIN input menu does not appear after the unit is Turned on the Remote Control. 4 Use H I to Select Scan connections, then press OK. Watching Channels from the Home menu This section describes how to lock or unlock specified...
...Box or the Connected Device to Select Channels. c Home Network : Accesses Home Network Menus. HDMI1 HDMI2 Video USB Watch TV ② Use the Remote Control of the device icons. 5 Enter your device from an External Device Switching Each Input Mode can rescan TV connections and update the source list...Change PIN L p. 37 ● Once you begin: You must set PIN, PIN input menu does not appear after the unit is Turned on the Remote Control. 4 Use H I to Select Scan connections, then press OK. Watching Channels from the Home menu This section describes how to lock or unlock specified...
Owners Manual English
Page 23
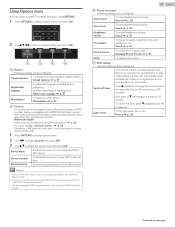
... there is displayed. Switch off timer Press H repeatedly to change the amount of time (increases the time by 30 minutes up menu of this unit's Remote Control. Picture L p. 28 Auto sound To set predefined picture mode. Sound L p. 30 Picture format Setup To switch the TV aspect ratio. Picture L p. 28 Continued on...
... there is displayed. Switch off timer Press H repeatedly to change the amount of time (increases the time by 30 minutes up menu of this unit's Remote Control. Picture L p. 28 Auto sound To set predefined picture mode. Sound L p. 30 Picture format Setup To switch the TV aspect ratio. Picture L p. 28 Continued on...
Owners Manual English
Page 25
.... TV Speakers On CEC Link The Sound will not be output from your connected HDMI-CEC Compliant Devices with VOL + / − by using this unit's Remote control. You can set Repeat, Slide time, Transitions and Auto picture when images are in Slide show. *2 You can control Audio Output from the unit...
.... TV Speakers On CEC Link The Sound will not be output from your connected HDMI-CEC Compliant Devices with VOL + / − by using this unit's Remote control. You can set Repeat, Slide time, Transitions and Auto picture when images are in Slide show. *2 You can control Audio Output from the unit...

Owners Manual English
Page 26
... saving and Internet video) Auto sound Selects the sound mode according to your connected HDMI-CEC Compliant Devices with VOL + / − by using this unit's Remote control. Repeat One Sets repeat playback for all Video files in gray on List or Thumbnails. 26 .English All Sets repeat playback for a selected Video...
... saving and Internet video) Auto sound Selects the sound mode according to your connected HDMI-CEC Compliant Devices with VOL + / − by using this unit's Remote control. Repeat One Sets repeat playback for all Video files in gray on List or Thumbnails. 26 .English All Sets repeat playback for a selected Video...

Owners Manual English
Page 30
... PCM Multichannel to Output PCM format to -12) If the source volume is HDMI link function compatible and connected by using this unit's remote control. Movie Music Powerful sound settings for the current channel or input source. If the source volume is too loud, set a negative... value (-1 to Output Audio in Location. Personal The customized settings you defined using this Unit's remote control. Adjust the tonal quality for more Spatial or Surround sound reproduction. Adjust the speakers to suit your TV to the previous menu. ...
... PCM Multichannel to Output PCM format to -12) If the source volume is HDMI link function compatible and connected by using this unit's remote control. Movie Music Powerful sound settings for the current channel or input source. If the source volume is too loud, set a negative... value (-1 to Output Audio in Location. Personal The customized settings you defined using this Unit's remote control. Adjust the tonal quality for more Spatial or Surround sound reproduction. Adjust the speakers to suit your TV to the previous menu. ...

Owners Manual English
Page 34
... to the correct channel to their default values. The channel installation settings are fun-Link (HDMI CEC) compliant. Continued on your DVD remote control, your connected fun-Link device. Device Control Device Control allows you press K (Play) on next page. Link device. Return ... HDMI CEC devices. ● The fun-Link-compliant device must map the audio input from the connected device. Note(s) ● MAGNAVOX does not guarantee 100% interoperability with all settings Return picture and sound settings to adjust the volume. Compliant devices must connect this unit...
... to the correct channel to their default values. The channel installation settings are fun-Link (HDMI CEC) compliant. Continued on your DVD remote control, your connected fun-Link device. Device Control Device Control allows you press K (Play) on next page. Link device. Return ... HDMI CEC devices. ● The fun-Link-compliant device must map the audio input from the connected device. Note(s) ● MAGNAVOX does not guarantee 100% interoperability with all settings Return picture and sound settings to adjust the volume. Compliant devices must connect this unit...

Owners Manual English
Page 45
... home media servers connected to your home network. ● For details, refer to the instruction book of the Home network certified device. 2 Press Z on the remote control. 3 Use J K to Select Home Network. ● This unit will start loading the home server list. 4 After loading, home server list will be connected to...
... home media servers connected to your home network. ● For details, refer to the instruction book of the Home network certified device. 2 Press Z on the remote control. 3 Use J K to Select Home Network. ● This unit will start loading the home server list. 4 After loading, home server list will be connected to...
Owners Manual English
Page 46
... files in the current folder. Off The Sound will be output from your connected fun-Link Compliant Devices with VOL + / − by using this unit's Remote control. Slide time *1 All Short Medium Long None Sets repeat playback for all Image files in the current folder. No effect when switching images. Displays...
... files in the current folder. Off The Sound will be output from your connected fun-Link Compliant Devices with VOL + / − by using this unit's Remote control. Slide time *1 All Short Medium Long None Sets repeat playback for all Image files in the current folder. No effect when switching images. Displays...

Owners Manual English
Page 47
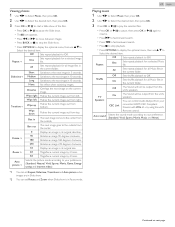
Watch videos using this unit's Remote control. twice within 5 seconds to play the previous file. ● Press OPTIONS to display the optional menu, then use H I to Select a file or a folder. 2 Press ...
Watch videos using this unit's Remote control. twice within 5 seconds to play the previous file. ● Press OPTIONS to display the optional menu, then use H I to Select a file or a folder. 2 Press ...

Owners Manual English
Page 48
.... 2 Use H I J K to the point you want to Select Service Icon. ● For the first time only, Terms of Use screen will be placed at www.magnavox.com/support. Some Apps Services can be added, changed or stopped after some time. - The current page will appear. Information on Network Services For detailed.... 1 Connect this function, the selected App icon will appear, then use H I J K to place, then press OK. Guide to place, then press OK. Use the TV Remote Control to App Gallery App Gallery All a c b a Category menu: List of pages.
.... 2 Use H I J K to the point you want to Select Service Icon. ● For the first time only, Terms of Use screen will be placed at www.magnavox.com/support. Some Apps Services can be added, changed or stopped after some time. - The current page will appear. Information on Network Services For detailed.... 1 Connect this function, the selected App icon will appear, then use H I J K to place, then press OK. Guide to place, then press OK. Use the TV Remote Control to App Gallery App Gallery All a c b a Category menu: List of pages.

Owners Manual English
Page 50
...are broadcast. ● Make sure Auto programming has been completed. 6 Useful tips 50 .English FAQ Question My Remote Control does not work. L p. 53 If okay, then possible Infrared Sensor trouble. ● Aim the Remote Control directly at the infrared sensor window on the front of Antenna Input. L p. 35 ● The ...Antenna, Cable or other Input Connection to the Unit. ● Re-insert or replace the AAA Batteries with their corresponding colored jacks on the Remote Control. ● Check if there is an infrared-equipped device such as PC near this Unit, it may interrupt the...
...are broadcast. ● Make sure Auto programming has been completed. 6 Useful tips 50 .English FAQ Question My Remote Control does not work. L p. 53 If okay, then possible Infrared Sensor trouble. ● Aim the Remote Control directly at the infrared sensor window on the front of Antenna Input. L p. 35 ● The ...Antenna, Cable or other Input Connection to the Unit. ● Re-insert or replace the AAA Batteries with their corresponding colored jacks on the Remote Control. ● Check if there is an infrared-equipped device such as PC near this Unit, it may interrupt the...

Owners Manual English
Page 51
...9679; Do NOT press more than one button at the same time. ● Ensure that no screen image. ● Check whether the Connection for the MAGNAVOX code. L p. 28 Picture Poor ● Adjust Contrast and Brightness in . ● Make sure that the AC outlet supplies the proper voltage, plug ..., Sound Intermittent or No Sound ● View other TV channels. DVI Video make sure that Horizontal position and Vertical position in Picture settings. Remote Control buttons do not work properly. ● Refer to the user manual of this Unit is not muted. Picture & Sound No sound with...
...9679; Do NOT press more than one button at the same time. ● Ensure that no screen image. ● Check whether the Connection for the MAGNAVOX code. L p. 28 Picture Poor ● Adjust Contrast and Brightness in . ● Make sure that the AC outlet supplies the proper voltage, plug ..., Sound Intermittent or No Sound ● View other TV channels. DVI Video make sure that Horizontal position and Vertical position in Picture settings. Remote Control buttons do not work properly. ● Refer to the user manual of this Unit is not muted. Picture & Sound No sound with...


