User Manual
Page 11
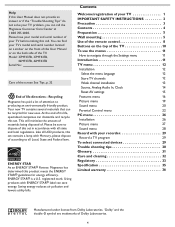
...sticker on the back side of the TV. Recycling Magnavox has paid a lot of life directives - ENERGY STAR® is a U.S. Model: 37MF337B, 37MF437B, 42MF337B, 42MF437B Serial No: Care of the screen See Tips,... TV 1 IMPORTANT SAFETY INSTRUCTIONS 2 Precaution 3 Contents 4 Preparation 5 Wall mounting 5 Use of the remote control 8 Buttons on the top of the TV 10 To use the menus 11 How to navigate.... Like all LCD products, this User Manuel does not provide an answer or if the "Trouble Shooting Tips" do not solve your TV before making this call the Magnavox Customer Care Center...
...sticker on the back side of the TV. Recycling Magnavox has paid a lot of life directives - ENERGY STAR® is a U.S. Model: 37MF337B, 37MF437B, 42MF337B, 42MF437B Serial No: Care of the screen See Tips,... TV 1 IMPORTANT SAFETY INSTRUCTIONS 2 Precaution 3 Contents 4 Preparation 5 Wall mounting 5 Use of the remote control 8 Buttons on the top of the TV 10 To use the menus 11 How to navigate.... Like all LCD products, this User Manuel does not provide an answer or if the "Trouble Shooting Tips" do not solve your TV before making this call the Magnavox Customer Care Center...
User Manual
Page 13
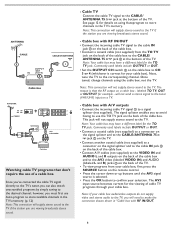
... on the back of the cable box. • Connect a coaxial cable (not supplied) from your cable box, first press the SOURCE button on the remote control. • Press the cursor down or up buttons until the AV3 signal source is that don't require the use the TO TV jack on...
... on the back of the cable box. • Connect a coaxial cable (not supplied) from your cable box, first press the SOURCE button on the remote control. • Press the cursor down or up buttons until the AV3 signal source is that don't require the use the TO TV jack on...
User Manual
Page 14
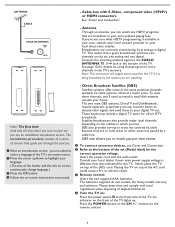
.... If you can watch pay-per-view events. 3 To connect accessory devices, see an installation introduction screen. These boxes may include a digital TV tuner for the TV. Cable box with local regulations when disposing of the AC cord could cause a fire or electric shock.... 5 Remote control: Insert the two supplied AAA batteries. Antenna Through an antenna, you 're not sure what HDTV programming is different than that a given broadcaster will supply stereo sound to proceed. - Connect the ...
.... If you can watch pay-per-view events. 3 To connect accessory devices, see an installation introduction screen. These boxes may include a digital TV tuner for the TV. Cable box with local regulations when disposing of the AC cord could cause a fire or electric shock.... 5 Remote control: Insert the two supplied AAA batteries. Antenna Through an antenna, you 're not sure what HDTV programming is different than that a given broadcaster will supply stereo sound to proceed. - Connect the ...
User Manual
Page 15
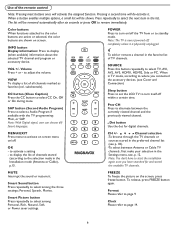
... in the Settings menu, see Cover and Connection) Sleep button Press to set the LCD TV to select CC On, Off or On during mute. SOURCE Press this button repeatedly to...standby mode. POWER Press to turn itself off . VOL +/- Note: You don't have searched for digital channels. FREEZE To freeze the picture on /off completely unless it . CH +/- Format Please refer...to page 14. 8 Clock Please refer to activate on screen menu on screen. Use of the remote control Note: Pressing most buttons once will be shown. When a button enables multiple options, a ...
... in the Settings menu, see Cover and Connection) Sleep button Press to set the LCD TV to select CC On, Off or On during mute. SOURCE Press this button repeatedly to...standby mode. POWER Press to turn itself off . VOL +/- Note: You don't have searched for digital channels. FREEZE To freeze the picture on /off completely unless it . CH +/- Format Please refer...to page 14. 8 Clock Please refer to activate on screen menu on screen. Use of the remote control Note: Pressing most buttons once will be shown. When a button enables multiple options, a ...

User Manual
Page 17
... broken you can still change some of the basic settings with the buttons on the top of the TV Should your remote be used to display the Settings menu without the remote control. buttons and the + CH - Press: •the + VOL -button to adjust volume; •the + CH -buttons to switch the...
... broken you can still change some of the basic settings with the buttons on the top of the TV Should your remote be used to display the Settings menu without the remote control. buttons and the + CH - Press: •the + VOL -button to adjust volume; •the + CH -buttons to switch the...

User Manual
Page 18
... left panel. When the cursor left is also dismissed by pressing one menu level up /down to perform the required action when using on the remote control to go one of the menu you to access and change settings and preferences settings. • Press the MENU button on screen menu. ...highlight moves to the left panel. • Press the cursor left to display the Settings menu. - The content of the right panel is on the remote control to additional items. - Note: Sometimes not all the menu items are hidden. Press the MENU button again to enter the right panel. Please, follow...
... left panel. When the cursor left is also dismissed by pressing one menu level up /down to perform the required action when using on the remote control to go one of the menu you to access and change settings and preferences settings. • Press the MENU button on screen menu. ...highlight moves to the left panel. • Press the cursor left to display the Settings menu. - The content of the right panel is on the remote control to additional items. - Note: Sometimes not all the menu items are hidden. Press the MENU button again to enter the right panel. Please, follow...
User Manual
Page 19
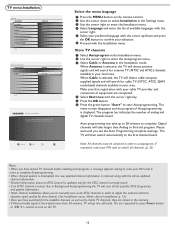
...your cable TV provider and connection of available languages with the cursor right. 5 Select your preferred language with your local area. Digital channels will go into off mode. TV menu-Installation Settings Installation Language Autoprogram Source Clock Weak channel installation Current software info Reset AV...4 Select Start now with the cursor right key. 5 Press the OK button. 6 Press the green button "Start" to turn on the remote control. 2 Use the cursor down and press the OK button to complete Autoprogramming. • When channel update is interrupted, the new updated channel...
...your cable TV provider and connection of available languages with the cursor right. 5 Select your preferred language with your local area. Digital channels will go into off mode. TV menu-Installation Settings Installation Language Autoprogram Source Clock Weak channel installation Current software info Reset AV...4 Select Start now with the cursor right key. 5 Press the OK button. 6 Press the green button "Start" to turn on the remote control. 2 Use the cursor down and press the OK button to complete Autoprogramming. • When channel update is interrupted, the new updated channel...
User Manual
Page 20
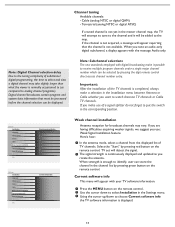
...you want to analog channel programs). Important: After the installation of TV channels. Cable (analog NTSC or digital QAM) - Select the "Start" by pressing the digit remote control direct-access channel number entry. TV set will attempt to tune to the channel and it possible ... in the Installation menu between Antenna or Cable whether you tune an audio-only digital subchannel, a display appears with your TV software information. 1 Press the MENU button on the remote control; Digital channel broadcasts contain program and system data information that the channel is displayed. 13...
...you want to analog channel programs). Important: After the installation of TV channels. Cable (analog NTSC or digital QAM) - Select the "Start" by pressing the digit remote control direct-access channel number entry. TV set will attempt to tune to the channel and it possible ... in the Installation menu between Antenna or Cable whether you tune an audio-only digital subchannel, a display appears with your TV software information. 1 Press the MENU button on the remote control; Digital channel broadcasts contain program and system data information that the channel is displayed. 13...

User Manual
Page 21
... This allows you to use your amplifier or receiver has a matching connector for Digital Audio In, you have connected to confirm. 14 If your TV as a clock. 1 Press the MENU button on the remote control. 2 Use the cursor down to select Installation in the Settings menu. 3 Press the... cursor right to enter the list, and press up /down key to set the time. (hour/ minute/ AM or PM) 4 Press OK button to the external inputs/outputs. 1 Select Source in digital format. AM...
... This allows you to use your amplifier or receiver has a matching connector for Digital Audio In, you have connected to confirm. 14 If your TV as a clock. 1 Press the MENU button on the remote control. 2 Use the cursor down to select Installation in the Settings menu. 3 Press the... cursor right to enter the list, and press up /down key to set the time. (hour/ minute/ AM or PM) 4 Press OK button to the external inputs/outputs. 1 Select Source in digital format. AM...
User Manual
Page 26
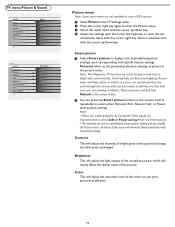
... the picture menu. Contrast This will find that Natural is the correct choice. 2 You can press the Smart picture button on the remote control repeatedly to find the one that you modify the Picture menu, all values of picture in a predefined Smart picture setting.... Smart picture 1 Select Smart picture to display a list of bright parts in the picture but keep the dark parts unchanged. Note: This Magnavox TV has been set at the factory to the personal preference settings of the menu will overwrite those previously made in bright store environments, which...
... the picture menu. Contrast This will find that Natural is the correct choice. 2 You can press the Smart picture button on the remote control repeatedly to find the one that you modify the Picture menu, all values of picture in a predefined Smart picture setting.... Smart picture 1 Select Smart picture to display a list of bright parts in the picture but keep the dark parts unchanged. Note: This Magnavox TV has been set at the factory to the personal preference settings of the menu will overwrite those previously made in bright store environments, which...

User Manual
Page 27
...bar scale is entered. Noise Reduction Reduce picture noise. Picture format This menu item performs the same as the FORMAT button on the remote control. Smart sound Select Smart sound to display a list of predefined sound settings, each corresponding with the cursor left/...Settings Picture Sound Features Parental Control Installation Exit Info Settings Sound Smart sound Sound mode Alternate audio Digital audio language AVL Info Sound Smart sound Sound mode Alternate audio Digital audio language AVL Smart sound 3 Personal Speech Movies Sharpness This will adjust the sharpness of ...
...bar scale is entered. Noise Reduction Reduce picture noise. Picture format This menu item performs the same as the FORMAT button on the remote control. Smart sound Select Smart sound to display a list of predefined sound settings, each corresponding with the cursor left/...Settings Picture Sound Features Parental Control Installation Exit Info Settings Sound Smart sound Sound mode Alternate audio Digital audio language AVL Info Sound Smart sound Sound mode Alternate audio Digital audio language AVL Smart sound 3 Personal Speech Movies Sharpness This will adjust the sharpness of ...
User Manual
Page 33
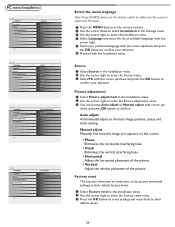
... adjust Info Settings Installation Language Source Picture adjustment Factory reset Factory reset Start now Info Select the menu language Note: Press SOURCE button on the remote control to make sure the source is selected in PC mode. 1 Press the MENU button on the screen. • Phase Eliminates the horizontal interfering lines... and clock setting. Auto adjust Automatically adjust to their default values. 26 Manual adjust Manually fine tune the image as it appears on the remote control. 2 Use the cursor down and press the OK button to confirm.
... adjust Info Settings Installation Language Source Picture adjustment Factory reset Factory reset Start now Info Select the menu language Note: Press SOURCE button on the remote control to make sure the source is selected in PC mode. 1 Press the MENU button on the screen. • Phase Eliminates the horizontal interfering lines... and clock setting. Auto adjust Automatically adjust to their default values. 26 Manual adjust Manually fine tune the image as it appears on the remote control. 2 Use the cursor down and press the OK button to confirm.
User Manual
Page 37
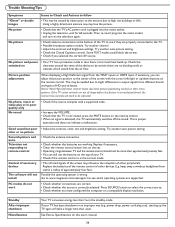
...are properly connected to the TV. • Possible broadcast station trouble. If your TV. • Check if the remote control is in the correct mode. • The infrared signals of the screen may influence the reception of approximately four... signal from the YPbPr inputs or HDMI input, if necessary, you can still use the buttons on the remote control. Good sound but poor color or no picture Snowish picture and noise Television not responding to slight differences... the top of the device to be adjusted. Go to www.magnavox.com/usasupport to high rise buildings or hills.
...are properly connected to the TV. • Possible broadcast station trouble. If your TV. • Check if the remote control is in the correct mode. • The infrared signals of the screen may influence the reception of approximately four... signal from the YPbPr inputs or HDMI input, if necessary, you can still use the buttons on the remote control. Good sound but poor color or no picture Snowish picture and noise Television not responding to slight differences... the top of the device to be adjusted. Go to www.magnavox.com/usasupport to high rise buildings or hills.


