User manual, English (US)
Page 9
... Reduction 10 - Auto clock mode 19 - Time zone 19 - English Française Contents A Guide to Digital TV 2 Preparation 2 First time installation 5 Use of the remote control 6 Control Buttons on the TV 7 TV settings 7 Reset to standard 7 To use the menus 8 Introduction 8 How... Region ratings lock 15 - Location 17 - Auto clock channel 19 - USB/Headphone 22 Digital Surround receiver 22 Multimedia browser 23 Multimedia Browser menu 23 Record with portable memory 28 Annex 2 - Magnavox TV Slideshow Format with background music 30 Annex 3 - At the end of materials to ...
... Reduction 10 - Auto clock mode 19 - Time zone 19 - English Française Contents A Guide to Digital TV 2 Preparation 2 First time installation 5 Use of the remote control 6 Control Buttons on the TV 7 TV settings 7 Reset to standard 7 To use the menus 8 Introduction 8 How... Region ratings lock 15 - Location 17 - Auto clock channel 19 - USB/Headphone 22 Digital Surround receiver 22 Multimedia browser 23 Multimedia Browser menu 23 Record with portable memory 28 Annex 2 - Magnavox TV Slideshow Format with background music 30 Annex 3 - At the end of materials to ...
User manual, English (US)
Page 11
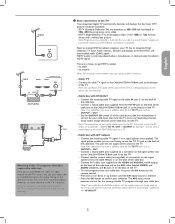
... shown above in a movie theater. Note: This drawing is only reproduced when a broadcaster or cable provider broadcasts HDTV signals. Note: this connection will need to the TV Your integrated digital TV automatically decodes and displays the four basic DTV picture resolution standards. - labeled TO TV, OUT or OUTPUT ... the back of the cable box. • Connect a coaxial cable (not supplied) from your cable box, first press the AV button on the remote control. • Press the cursor down or up buttons until the AV2 signal source is selected. • Press the OK button to confirm your ...
... shown above in a movie theater. Note: This drawing is only reproduced when a broadcaster or cable provider broadcasts HDTV signals. Note: this connection will need to the TV Your integrated digital TV automatically decodes and displays the four basic DTV picture resolution standards. - labeled TO TV, OUT or OUTPUT ... the back of the cable box. • Connect a coaxial cable (not supplied) from your cable box, first press the AV button on the remote control. • Press the cursor down or up buttons until the AV2 signal source is selected. • Press the OK button to confirm your ...
User manual, English (US)
Page 12
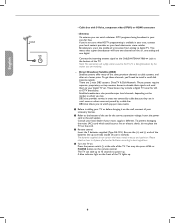
...contain the heavy metals mercury and cadmium. These boxes may also press +CH- Satellite broadcasters also provide major local channels, depending on the cord. ' Remote control: Insert the 2 batteries supplied (Type R6-1,5V). To prevent damaging the mains (AC) cord which you are watching. - A blue indicator ...being broadcast by a cable line. or POWER button on the air, one analog and one digital. English Française CABLE 75 - Antenna Via antenna you 're not sure what HDTV programming is marked.) The batteries supplied do not place the TV on the market in the middle...
...contain the heavy metals mercury and cadmium. These boxes may also press +CH- Satellite broadcasters also provide major local channels, depending on the cord. ' Remote control: Insert the 2 batteries supplied (Type R6-1,5V). To prevent damaging the mains (AC) cord which you are watching. - A blue indicator ...being broadcast by a cable line. or POWER button on the air, one analog and one digital. English Française CABLE 75 - Antenna Via antenna you 're not sure what HDTV programming is marked.) The batteries supplied do not place the TV on the market in the middle...
User manual, English (US)
Page 13
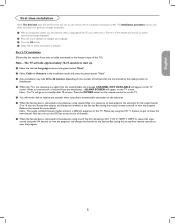
... " Auto Installation may take approximately 10-15 seconds to start up /down to highlight your set -top remote control) to view the program. The TV will appear on the TV screen. Part 1: TV installation (...Please skip this TV. Note - Press the POWER button on the remote control to on the TV. ( You will take 20 to 40 minutes depending on the number of...the Set-top box outputs and change the channels at the Set-top Box (using the set-top box remote control) to standby after 10 minutes. Refer to the manual for the single channel (3 or 4) that input...
... " Auto Installation may take approximately 10-15 seconds to start up /down to highlight your set -top remote control) to view the program. The TV will appear on the TV screen. Part 1: TV installation (...Please skip this TV. Note - Press the POWER button on the remote control to on the TV. ( You will take 20 to 40 minutes depending on the number of...the Set-top box outputs and change the channels at the Set-top Box (using the set-top box remote control) to standby after 10 minutes. Refer to the manual for the single channel (3 or 4) that input...
User manual, English (US)
Page 14
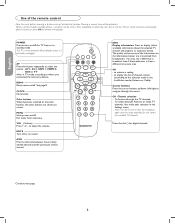
.... To browse through the menus. Press the dot (.) for and stored the available TV channels. . English Française Use of the remote control Note: For most buttons pressing a button once will de-activate it is from broadcasters. Color buttons When functions attached to standby mode. VOL...the cursor buttons up/down, left/right to start the installation again once you connected the accessory devices. Note: You don't have searched for digital channels. AV Press this button repeatedly to adjust the volume. DEMO Demo menu on screen. MENU Settings menu on sound. to select the ...
.... To browse through the menus. Press the dot (.) for and stored the available TV channels. . English Française Use of the remote control Note: For most buttons pressing a button once will de-activate it is from broadcasters. Color buttons When functions attached to standby mode. VOL...the cursor buttons up/down, left/right to start the installation again once you connected the accessory devices. Note: You don't have searched for digital channels. AV Press this button repeatedly to adjust the volume. DEMO Demo menu on screen. MENU Settings menu on sound. to select the ...
User manual, English (US)
Page 15
... Movie expand 16:9 or Super zoom picture format, you can make subtitles visible with the buttons on . POWER CHANNEL MENU VOLUME Should your remote be lost or broken you can be available. The MENU button can still change some of the standard settings for viewing and listening. Press: ...on your TV. Current: shows your settings for viewing and listening. FORMAT Press this will be used to summon the Settings menu without the remote control. Super zoom removes the black bars on the sides of available display formats (depending on the TV . Press the power switch . ...
... Movie expand 16:9 or Super zoom picture format, you can make subtitles visible with the buttons on . POWER CHANNEL MENU VOLUME Should your remote be lost or broken you can be available. The MENU button can still change some of the standard settings for viewing and listening. Press: ...on your TV. Current: shows your settings for viewing and listening. FORMAT Press this will be used to summon the Settings menu without the remote control. Super zoom removes the black bars on the sides of available display formats (depending on the TV . Press the power switch . ...
User manual, English (US)
Page 16
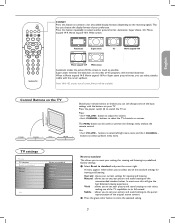
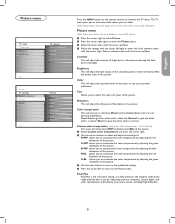
... navigate through the TV menu The TV menu allows you to access and change settings and preferences. • Press the MENU button on the remote control to reveal all the menu items are visible on the specific item highlighted. Español 8 Note: Sometimes not all items. -...dismissed by pressing one menu level up again. - " Press OK to perform the required action. Demo TV Menu Features Caption Service Digital caption service Digital caption options Sleeptimer Child lock Set PIN On timer Demo Info Demo Pixel Plus Active control The Demo menu allows the user to ...
... navigate through the TV menu The TV menu allows you to access and change settings and preferences. • Press the MENU button on the remote control to reveal all the menu items are visible on the specific item highlighted. Español 8 Note: Sometimes not all items. -...dismissed by pressing one menu level up again. - " Press OK to perform the required action. Demo TV Menu Features Caption Service Digital caption service Digital caption options Sleeptimer Child lock Set PIN On timer Demo Info Demo Pixel Plus Active control The Demo menu allows the user to ...
User manual, English (US)
Page 17
... right. é Use the cursor buttons to summon the TV menu. Brightness This will adjust the light output of the picture. Note: Depending on the remote control to select and adjust the settings of: R-WP: allows you can be selectable. Select a submenu item with the cursor left to return to make...
... right. é Use the cursor buttons to summon the TV menu. Brightness This will adjust the light output of the picture. Note: Depending on the remote control to select and adjust the settings of: R-WP: allows you can be selectable. Select a submenu item with the cursor left to return to make...
User manual, English (US)
Page 18
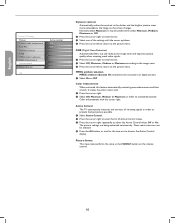
...button on the remote control. " Press the cursor left to return to the picture menu. " Press the cursor right repeatedly to the image noise. " Press the cursor left to return to the picture menu. Picture format This menu item performs the same as the image on digital content. & ...select Minimum, Medium, Maximum or Off. & Press the cursor right to enter the list. é Select one of Active Control values. DNR (Digital Noise Reduction) Automatically filters out and reduces the image noise and improves picture quality when receiving weak video signals. & Press the cursor right to ...
...button on the remote control. " Press the cursor left to return to the picture menu. " Press the cursor right repeatedly to the image noise. " Press the cursor left to return to the picture menu. Picture format This menu item performs the same as the image on digital content. & ...select Minimum, Medium, Maximum or Off. & Press the cursor right to enter the list. é Select one of Active Control values. DNR (Digital Noise Reduction) Automatically filters out and reduces the image noise and improves picture quality when receiving weak video signals. & Press the cursor right to ...
User manual, English (US)
Page 24
... the TV to the specified channel number, at a specified time. & Select On timer. é Press the cursor right to the selected channel, on the remote control. é Use the cursor down to the Installation menu. Channel menu TV menu TV menu Language Channels Preferences Connections Clock Reset AV settings Software... the Installation menu. ' Select Language and enter the list of the week or select Daily. è Select Time and enter the time with the digit keys or with the cursor up / down and press the OK button to confirm you want your local area. When Antenna is selected, the TV...
... the TV to the specified channel number, at a specified time. & Select On timer. é Press the cursor right to the selected channel, on the remote control. é Use the cursor down to the Installation menu. Channel menu TV menu TV menu Language Channels Preferences Connections Clock Reset AV settings Software... the Installation menu. ' Select Language and enter the list of the week or select Daily. è Select Time and enter the time with the digit keys or with the cursor up / down and press the OK button to confirm you want your local area. When Antenna is selected, the TV...
User manual, English (US)
Page 25
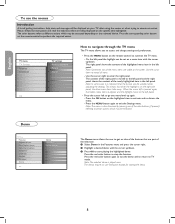
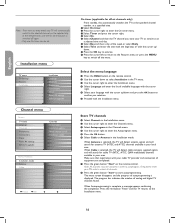
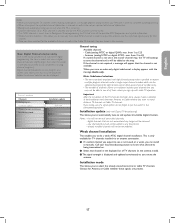
... installation Installation mode Installation update Start now Channel tuning Available channels: - from 2 to 125 - Antenna (analog NTSC or digital ATSC): max. digital channels that are present. This is only available for that channel in the displayed list of the TV channels has been done...). this will be renumbered. new channels found will not be removed; - already installed channels will not be selected by pressing the digit remote control direct-acces channel number entry. - Call your PIN code in order to complete autoprogramming. • When interrupted, the updated ...
... installation Installation mode Installation update Start now Channel tuning Available channels: - from 2 to 125 - Antenna (analog NTSC or digital ATSC): max. digital channels that are present. This is only available for that channel in the displayed list of the TV channels has been done...). this will be renumbered. new channels found will not be removed; - already installed channels will not be selected by pressing the digit remote control direct-acces channel number entry. - Call your PIN code in order to complete autoprogramming. • When interrupted, the updated ...
User manual, English (US)
Page 28
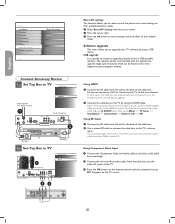
... Video and Audio cable to the TV's antenna input. The memory device must be found on the www. magnavox.com/usasupport website. Just change channels until the connected source AV 1 appears on the remote control until the picture appears. é Connect the cable box to the HDMI connector. Using RF Cable &...Info Reset AV settings Reset Connect Accessory Devices 1a Set Top Box to TV Next Source TV AV 1 AV 2 HDMI 1 HDMI 2 Side 1 2 AUDIO OUT (DIGITAL) HDMI 2 CABLE / ANTENNA HDMI 1 2 1b Set-Top Box to TV AV Button 3 Next Source TV AV 1 AV 2 HDMI 1 HDMI 2 Side 12 AUDIO OUT...
... Video and Audio cable to the TV's antenna input. The memory device must be found on the www. magnavox.com/usasupport website. Just change channels until the connected source AV 1 appears on the remote control until the picture appears. é Connect the cable box to the HDMI connector. Using RF Cable &...Info Reset AV settings Reset Connect Accessory Devices 1a Set Top Box to TV Next Source TV AV 1 AV 2 HDMI 1 HDMI 2 Side 1 2 AUDIO OUT (DIGITAL) HDMI 2 CABLE / ANTENNA HDMI 1 2 1b Set-Top Box to TV AV Button 3 Next Source TV AV 1 AV 2 HDMI 1 HDMI 2 Side 12 AUDIO OUT...
User manual, English (US)
Page 29
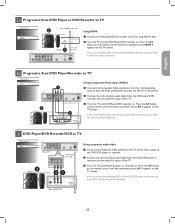
... and white audio cables from the DVD/VCR player or recorder into the audio AV inputs of the TV. Press the AV button on the remote control until the connected source AV 1 appears on . Insert a pre-recorded DVD into the DVD player/DVD recorder and press PLAY to verify ...the correct connection. 2b Progressive Scan DVD Player/Recorder to TV Next Source TV AV 1 AV 2 HDMI 1 HDMI 2 Side 3 AV Button 1 AUDIO OUT (DIGITAL) HDMI 2 CABLE / ANTENNA HDMI 1 Add for DVD 1 Recording CABLE / ANTENNA HDMI 1 Using HDMI & Connect the DVD player/DVD recorder to verify the correct connection....
... and white audio cables from the DVD/VCR player or recorder into the audio AV inputs of the TV. Press the AV button on the remote control until the connected source AV 1 appears on . Insert a pre-recorded DVD into the DVD player/DVD recorder and press PLAY to verify ...the correct connection. 2b Progressive Scan DVD Player/Recorder to TV Next Source TV AV 1 AV 2 HDMI 1 HDMI 2 Side 3 AV Button 1 AUDIO OUT (DIGITAL) HDMI 2 CABLE / ANTENNA HDMI 1 Add for DVD 1 Recording CABLE / ANTENNA HDMI 1 Using HDMI & Connect the DVD player/DVD recorder to verify the correct connection....
User manual, English (US)
Page 30
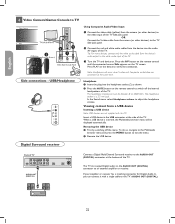
Press the AV button on the remote control until the connected source Side appears on . Viewing content from the device into the headphone socket * as shown. é Press the MUTE button on the device to switch off the menu. Digital Surround receiver Back of TV Connect a Digital MultiChannel Surround receiver to the TV's AUDIO...
Press the AV button on the remote control until the connected source Side appears on . Viewing content from the device into the headphone socket * as shown. é Press the MUTE button on the device to switch off the menu. Digital Surround receiver Back of TV Connect a Digital MultiChannel Surround receiver to the TV's AUDIO...
User manual, English (US)
Page 31
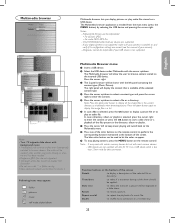
... device. é Select the USB device under Multimedia with most camera devices. - If your digital camera is not supported, make sure your USB device is available of the selected content type....-appear. ç To stop playing content, press the MENU button on a USB device. Magnavox cannot be used to shuffle music collections in Annex 3. Repeat one of the color buttons on...to display a description of the screen. Use a USB device which is switched on the remote control to perform the corresponding function mentioned at the bottom of the screen Details to browser ...
... device. é Select the USB device under Multimedia with most camera devices. - If your digital camera is not supported, make sure your USB device is available of the selected content type....-appear. ç To stop playing content, press the MENU button on a USB device. Magnavox cannot be used to shuffle music collections in Annex 3. Repeat one of the color buttons on...to display a description of the screen. Use a USB device which is switched on the remote control to perform the corresponding function mentioned at the bottom of the screen Details to browser ...
User manual, English (US)
Page 33
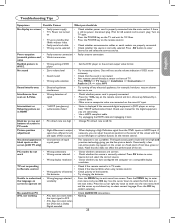
...the OK key confirm selection. Check AUDIO IN connections. Wait for the digital equipment you are connecting. • Use a HDMI compliant cable. • Try unplugging the HDMI cable and replugging it back. key on the remote control and do No display on screen • Faulty power supply ... for example, hairdryer, vacuum cleaner that this does not affect the performance of signal • Check whether power cord is Dolby Digital encoded. Note that are correct. Check whether you have configured the computer on accidently main menu and press OK key. Troubleshooting Tips...
...the OK key confirm selection. Check AUDIO IN connections. Wait for the digital equipment you are connecting. • Use a HDMI compliant cable. • Try unplugging the HDMI cable and replugging it back. key on the remote control and do No display on screen • Faulty power supply ... for example, hairdryer, vacuum cleaner that this does not affect the performance of signal • Check whether power cord is Dolby Digital encoded. Note that are correct. Check whether you have configured the computer on accidently main menu and press OK key. Troubleshooting Tips...
User manual, English (US)
Page 38
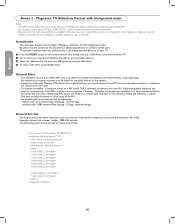
...The format and syntax below should be used to create the text file: Title of your TV (e.g. 42MF237S/37) to where you stored the slideshow file (.alb) on a non-networked CE device. Magnavox TV Slideshow Format with background audio. Use the type number of the PM. To start the slide ...Ê button. This path includes the device or drive name of your TV. & Press the MENU button on the remote control after having inserted a USB device and switched on the Magnavox support website as soon as a result content from a PM can result in inconsistencies if the PM is stored. The ...
...The format and syntax below should be used to create the text file: Title of your TV (e.g. 42MF237S/37) to where you stored the slideshow file (.alb) on a non-networked CE device. Magnavox TV Slideshow Format with background audio. Use the type number of the PM. To start the slide ...Ê button. This path includes the device or drive name of your TV. & Press the MENU button on the remote control after having inserted a USB device and switched on the Magnavox support website as soon as a result content from a PM can result in inconsistencies if the PM is stored. The ...