User Manual
Page 1
24-Inch Built-In Wall Oven User's Manual Model MCSWOE24S PLEASE READ THIS MANUAL CAREFULLY BEFORE USING YOUR WALL OVEN AND KEEP IT FOR FUTURE REFERENCE. 1
24-Inch Built-In Wall Oven User's Manual Model MCSWOE24S PLEASE READ THIS MANUAL CAREFULLY BEFORE USING YOUR WALL OVEN AND KEEP IT FOR FUTURE REFERENCE. 1
User Manual
Page 5
... vapors, flammables or nonfood products in this appliance. It is specifically designed for its intended purpose as described in or near the oven. These precautions will damage the appliance and could result in the event of burns, electric shock, fire and injury to people. ...If you the location of the appliance, unless specifically recommended in risk of the appliance, especially the oven bottom. including those in the following . • Smother flames with baking soda. • Have an appropriate fire extinguisher available, nearby, ...
... vapors, flammables or nonfood products in this appliance. It is specifically designed for its intended purpose as described in or near the oven. These precautions will damage the appliance and could result in the event of burns, electric shock, fire and injury to people. ...If you the location of the appliance, unless specifically recommended in risk of the appliance, especially the oven bottom. including those in the following . • Smother flames with baking soda. • Have an appropriate fire extinguisher available, nearby, ...
User Manual
Page 6
...let potholder contact the heating elements. • ALWAYS use a towel or other flammable materials contact heating elements or interior surfaces of an oven become hot enough to the side, open doors unattended. • DO NOT heat or warm unopened food containers. Keep doors shut unless ...NOT touch, or let clothing, potholders, or other bulky cloth. • Secure all loose garments before beginning. Interior surfaces of oven until they are oven vent openings, surfaces near the unit. Standing to cause burns. DO NOT let potholder touch hot heating elements. Moist or damp ...
...let potholder contact the heating elements. • ALWAYS use a towel or other flammable materials contact heating elements or interior surfaces of an oven become hot enough to the side, open doors unattended. • DO NOT heat or warm unopened food containers. Keep doors shut unless ...NOT touch, or let clothing, potholders, or other bulky cloth. • Secure all loose garments before beginning. Interior surfaces of oven until they are oven vent openings, surfaces near the unit. Standing to cause burns. DO NOT let potholder touch hot heating elements. Moist or damp ...
User Manual
Page 8
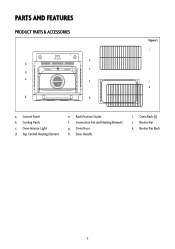
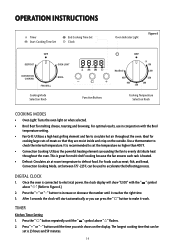
Convection Fan and Heating Element g. Oven Interior Light d. Top Central Heating Element e. Oven Rack (2) j. Broiler Pan Rack 8 Control Panel b. Oven Door h. Cooling Vents c. Door Handle i. Broiler Pan k. PARTS AND FEATURES PRODUCT PARTS & ACCESSORIES a b c d e f g h Figure 1 i j k a. Rack Position Guide f.
Convection Fan and Heating Element g. Oven Interior Light d. Top Central Heating Element e. Oven Rack (2) j. Broiler Pan Rack 8 Control Panel b. Oven Door h. Cooling Vents c. Door Handle i. Broiler Pan k. PARTS AND FEATURES PRODUCT PARTS & ACCESSORIES a b c d e f g h Figure 1 i j k a. Rack Position Guide f.
User Manual
Page 10
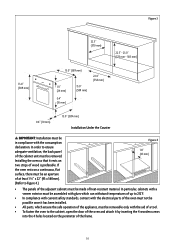
... ventilation, the back panel of the cabinet unit must be removable only with the aid of a tool. • To fasten the oven to the cabinet, open the door of the oven and attach it by inserting the 4 wooden screws into the 4 holes located on the perimeter of the frame. 10 Installing the... temperatures of up to Figure 4.) Figure 4 1.8" (45 mm) • The panels of the adjacent cabinets must be in compliance with the electrical parts of the oven must not be possible once it rests on a continuous, flat surface, there must be an aperture of at least 1 ¾" x 22" (45 x 560mm). (Refer to...
... ventilation, the back panel of the cabinet unit must be removable only with the aid of a tool. • To fasten the oven to the cabinet, open the door of the oven and attach it by inserting the 4 wooden screws into the 4 holes located on the perimeter of the frame. 10 Installing the... temperatures of up to Figure 4.) Figure 4 1.8" (45 mm) • The panels of the adjacent cabinets must be in compliance with the electrical parts of the oven must not be possible once it rests on a continuous, flat surface, there must be an aperture of at least 1 ¾" x 22" (45 x 560mm). (Refer to...
User Manual
Page 11
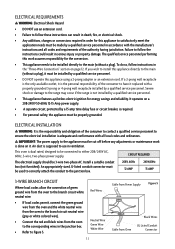
... the branch circuit neutral wire (gray or white colored wire). • Connect the red and black wires from Oven Connector Failure to either 208/240V AC, 60Hz, 3-wire, two-phase power supply. If a 2-prong wall receptacle is the only available outlet, it is dual ... the main (without a plug), it . Neutral Wire Green Wire White Wire 11 Cable from Power Supply Figure 5 Black Wires UL Listed Conduit Cable from the oven to the corresponding wires in the junction box. • Refer to use an extension cord. • Failure to follow these instructions can result in death...
... the branch circuit neutral wire (gray or white colored wire). • Connect the red and black wires from Oven Connector Failure to either 208/240V AC, 60Hz, 3-wire, two-phase power supply. If a 2-prong wall receptacle is the only available outlet, it is dual ... the main (without a plug), it . Neutral Wire Green Wire White Wire 11 Cable from Power Supply Figure 5 Black Wires UL Listed Conduit Cable from the oven to the corresponding wires in the junction box. • Refer to use an extension cord. • Failure to follow these instructions can result in death...
User Manual
Page 12
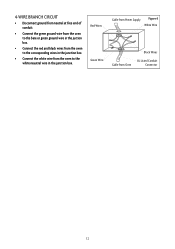
Red Wires Green Wire Cable from Power Supply Figure 6 White Wire Black Wires UL Listed Conduit Cable from the oven to the corresponding wires in the junction box. • Connect the white wire from Oven Connector 12 4-WIRE BRANCH CIRCUIT • Disconnect ground from neutral at free end of conduit. • Connect the green ground wire from the oven to the bare or green ground wire in the juction box. • Connect the red and black wires from the oven to the white neautral wire in the junction box.
Red Wires Green Wire Cable from Power Supply Figure 6 White Wire Black Wires UL Listed Conduit Cable from the oven to the corresponding wires in the junction box. • Connect the white wire from Oven Connector 12 4-WIRE BRANCH CIRCUIT • Disconnect ground from neutral at free end of conduit. • Connect the green ground wire from the oven to the bare or green ground wire in the juction box. • Connect the red and black wires from the oven to the white neautral wire in the junction box.
User Manual
Page 13
... this initial use is due to the evaporation of substances used to prevent any sauce and/or grease from dripping onto the bottom of the oven only when grilling food. • For all other types of cooking, NEVER use your cookware (dishes, aluminum foil, etc.) on the bottom ...assisted models in a single appliance. BEFORE USE This multi-function oven combines the advantages of traditional convection ovens with the oven door shut. IMPORTANT: The first time you to the highest setting and leave the oven on the bottom of the oven when it is installed. It is an extremely versatile appliance ...
... this initial use is due to the evaporation of substances used to prevent any sauce and/or grease from dripping onto the bottom of the oven only when grilling food. • For all other types of cooking, NEVER use your cookware (dishes, aluminum foil, etc.) on the bottom ...assisted models in a single appliance. BEFORE USE This multi-function oven combines the advantages of traditional convection ovens with the oven door shut. IMPORTANT: The first time you to the highest setting and leave the oven on the bottom of the oven when it is installed. It is an extremely versatile appliance ...
User Manual
Page 14
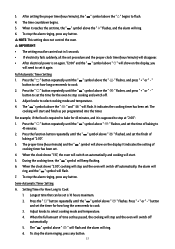
...set the temperature no higher than 400°F. • Convection Cooking: Utilizes the powerful heating element surrounding the fan to evenly distribute heat throughout the oven. " button to increase or decrease the number until it work. " button until the " " symbol above " ". (Refer to Figure 6.)... " " button repeatedly until the time you can be used to accelerate the Defrosting process. TIMER Kitchen Timer Setting 1. Once the oven is connected to electrical power, the clock display will start automatically or you wish shows on the display. After 5 seconds the clock...
...set the temperature no higher than 400°F. • Convection Cooking: Utilizes the powerful heating element surrounding the fan to evenly distribute heat throughout the oven. " button to increase or decrease the number until it work. " button until the " " symbol above " ". (Refer to Figure 6.)... " " button repeatedly until the time you can be used to accelerate the Defrosting process. TIMER Kitchen Timer Setting 1. Once the oven is connected to electrical power, the clock display will start automatically or you wish shows on the display. After 5 seconds the clock...
User Manual
Page 15
..., the " " symbol above the " " flashes, and press " + " or " - For example, if the food is required to bake for how long the oven needs to stop the alarm ringing, press any button. Press the " " button repeatedly until the " " symbol above " " flashed, and set has passed, the cooking... will disappear. • After electrical power is 10 hours maximum. 2. To stop and the oven will stop the alarm ringing, press any button. 15 It indicates the setting of baking at "2:00": 1. When the clock shows "2:00", cooking ...
..., the " " symbol above the " " flashes, and press " + " or " - For example, if the food is required to bake for how long the oven needs to stop the alarm ringing, press any button. Press the " " button repeatedly until the " " symbol above " " flashed, and set has passed, the cooking... will disappear. • After electrical power is 10 hours maximum. 2. To stop and the oven will stop the alarm ringing, press any button. 15 It indicates the setting of baking at "2:00": 1. When the clock shows "2:00", cooking ...
User Manual
Page 16
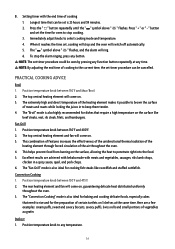
...press any temperature. 16 The rear heating element and fan will ring. 6. " button and set , cooking will stop and the oven will come on 3 shelves at any function button repeatedly at the same time. When it possible to brown the surface of the ...°F. 2. Longest time that require a high temperature on . 3. This helps prevent food from burning on , guaranteeing delicate heat distributed uniformly throughout the oven. 3. B. The "Fan Grill" mode is also highly recommended for cooking fish steaks like beef steaks, veal, rib steak, filets, and hamburgers. Press...
...press any temperature. 16 The rear heating element and fan will ring. 6. " button and set , cooking will stop and the oven will come on 3 shelves at any function button repeatedly at the same time. When it possible to brown the surface of the ...°F. 2. Longest time that require a high temperature on . 3. This helps prevent food from burning on , guaranteeing delicate heat distributed uniformly throughout the oven. 3. B. The "Fan Grill" mode is also highly recommended for cooking fish steaks like beef steaks, veal, rib steak, filets, and hamburgers. Press...

User Manual
Page 17
...is on, a normal flow of meat, fish and bread, it is possible to cool down the exterior of food which comes on until the oven cools down sufficiently. 17 This is recommended for delicate types of the appliance, this model is hot. Cooling Ventilation In order to accelerate the ...process using the fan, the defrosting time is done, the fan stays on automatically when the oven is equipped with a cooling fan, which do not require heat, such as ice cream cakes, cream or custard desserts, and fruitcakes. 4. 2. In case ...
...is on, a normal flow of meat, fish and bread, it is possible to cool down the exterior of food which comes on until the oven cools down sufficiently. 17 This is recommended for delicate types of the appliance, this model is hot. Cooling Ventilation In order to accelerate the ...process using the fan, the defrosting time is done, the fan stays on automatically when the oven is equipped with a cooling fan, which do not require heat, such as ice cream cakes, cream or custard desserts, and fruitcakes. 4. 2. In case ...
User Manual
Page 18
... a liquid detergent directly onto the soil. Only use kitchen cleaners that are particularly tough to remove, use a special product for oven cleaning, following cleaning instructions before cleaning or doing any of the following the instructions provided on the packet. • NEVER use ...could compromise the cooking and even damage the enamel. 18 If damaged, contact the vendor. NOTE: ALWAYS follow label instructions on panel. Oven Interior • This appliance DOES NOT have a self-cleaning feature. • Use an appropriate cleaning product designed specifically to cool....
... a liquid detergent directly onto the soil. Only use kitchen cleaners that are particularly tough to remove, use a special product for oven cleaning, following cleaning instructions before cleaning or doing any of the following the instructions provided on the packet. • NEVER use ...could compromise the cooking and even damage the enamel. 18 If damaged, contact the vendor. NOTE: ALWAYS follow label instructions on panel. Oven Interior • This appliance DOES NOT have a self-cleaning feature. • Use an appropriate cleaning product designed specifically to cool....
User Manual
Page 19
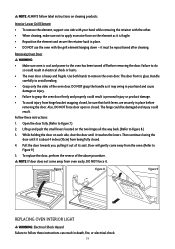
... is glass. Handle carefully to apply excessive force on the two hinges all the way back. (Refer to grasp the oven door firmly and properly could result is personal injury or product damage. • To avoid injury from being fully closed . Also, DO NOT force door ... each side, shut the door until it must be damaged and injury could be repositioned after cleaning. NOTE: If door does not come away from oven easily, DO NOT force it out of the above procedure. The hinge could result. While holding the door on cleaning products.
... is glass. Handle carefully to apply excessive force on the two hinges all the way back. (Refer to grasp the oven door firmly and properly could result is personal injury or product damage. • To avoid injury from being fully closed . Also, DO NOT force door ... each side, shut the door until it must be damaged and injury could be repositioned after cleaning. NOTE: If door does not come away from oven easily, DO NOT force it out of the above procedure. The hinge could result. While holding the door on cleaning products.
User Manual
Page 20
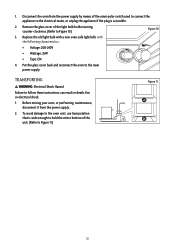
...240V • Wattage: 25W • Type: E14 4. To avoid damage to the oven vent, use transpotation that is accessible. 2. 1. TRANSPORTING WARNING: Electrical Shock Hazard Failure to the main power supply. Disconnect the oven from the power supply. 2. Remove the glass cover of the unit. (Refer to Figure... 10.) Figure 10 3. Put the glass cover back and reconnect the oven to follow these instructions can result in death, fire, or electrical shock. 1. Before moving your oven, or performing maintenance, disconnect it from the power supply by means of the omni-...
...240V • Wattage: 25W • Type: E14 4. To avoid damage to the oven vent, use transpotation that is accessible. 2. 1. TRANSPORTING WARNING: Electrical Shock Hazard Failure to the main power supply. Disconnect the oven from the power supply. 2. Remove the glass cover of the unit. (Refer to Figure... 10.) Figure 10 3. Put the glass cover back and reconnect the oven to follow these instructions can result in death, fire, or electrical shock. 1. Before moving your oven, or performing maintenance, disconnect it from the power supply by means of the omni-...
User Manual
Page 21
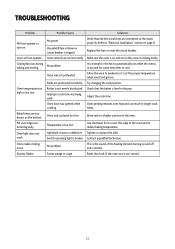
...on and off and is normal. No problem It is the sound of the crust and/or reduce baking temperature. Oven door was in the pan. Oven rack is tripped. If the oven was opened while cooking. TROUBLESHOOTING Problem Possible Causes Solutions Will not operate or turn on the bottom. No power ... in use, reset it is at the proper temperature when your food goes in use and for the fan to preheat so it . 21 Oven was being used. Check that the electrical wires are too brown on . Display flashes. Refer to a higher position in longer cook times...
...on and off and is normal. No problem It is the sound of the crust and/or reduce baking temperature. Oven door was in the pan. Oven rack is tripped. If the oven was opened while cooking. TROUBLESHOOTING Problem Possible Causes Solutions Will not operate or turn on the bottom. No power ... in use, reset it is at the proper temperature when your food goes in use and for the fan to preheat so it . 21 Oven was being used. Check that the electrical wires are too brown on . Display flashes. Refer to a higher position in longer cook times...
User Manual
Page 22
LIMITED WARRANTY MC Appliance Corporation warrants each new Wall Oven to be free from defects in material and workmanship, and agrees to remedy any such defect or to furnish a new part(s), at the company's option, ... implied warranties� This warranty gives you specific legal rights, and you may also have other rights which vary from state to state� Model MCSWOE24S Parts One Year Labor One Year Type of Service Carry In For Service or Assistance please call 888-775-0202 or visit us on the...
LIMITED WARRANTY MC Appliance Corporation warrants each new Wall Oven to be free from defects in material and workmanship, and agrees to remedy any such defect or to furnish a new part(s), at the company's option, ... implied warranties� This warranty gives you specific legal rights, and you may also have other rights which vary from state to state� Model MCSWOE24S Parts One Year Labor One Year Type of Service Carry In For Service or Assistance please call 888-775-0202 or visit us on the...
