
User Manual
Page 1
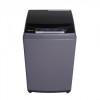
1.6 & 2.0 Cu. Ft. Portable Washer User's Manual Model MCSTCW16W4 / MCSTCW16S4 / MCSTCW20W4 / MCSTCW20S4 PLEASE READ THIS MANUAL CAREFULLY BEFORE USING YOUR WASHER AND KEEP IT FOR FUTURE REFERENCE. 1
1.6 & 2.0 Cu. Ft. Portable Washer User's Manual Model MCSTCW16W4 / MCSTCW16S4 / MCSTCW20W4 / MCSTCW20S4 PLEASE READ THIS MANUAL CAREFULLY BEFORE USING YOUR WASHER AND KEEP IT FOR FUTURE REFERENCE. 1
User Manual
Page 2
...; Registering your product will allow us to contact you regarding a safety notification or product update� 2� Registering your product will allow for more efficient warranty service processing when warranty service is required� 3� Registering your product could act as your proof of purchase in the event of insurance loss� Once again, thank you for purchasing this Magic Chef product� 2
...; Registering your product will allow us to contact you regarding a safety notification or product update� 2� Registering your product will allow for more efficient warranty service processing when warranty service is required� 3� Registering your product could act as your proof of purchase in the event of insurance loss� Once again, thank you for purchasing this Magic Chef product� 2
User Manual
Page 3
CONTENTS PRODUCT REGISTRATION 2 IMPORTANT SAFETY INSTRUCTIONS 4 SPECIFICATIONS 6 PARTS AND FEATURES 7 INSTALLATION INSTRUCTIONS 8 OPERATING INSTRUCTIONS 11 WASH CYCLE GUIDE 14 CARE AND MAINTENANCE 15 TROUBLESHOOTING 16 LIMITED WARRANTY 20 3
CONTENTS PRODUCT REGISTRATION 2 IMPORTANT SAFETY INSTRUCTIONS 4 SPECIFICATIONS 6 PARTS AND FEATURES 7 INSTALLATION INSTRUCTIONS 8 OPERATING INSTRUCTIONS 11 WASH CYCLE GUIDE 14 CARE AND MAINTENANCE 15 TROUBLESHOOTING 16 LIMITED WARRANTY 20 3
User Manual
Page 4
... instructions before loading laundry. Read all packaging materials away from service or discarded, remove the lid of time, such as in or on the ratings label. 4 DO NOT wash articles of child entrapment. Be sure to follow the precautions listed below: NOTE: Specifications may be handed over along with or modify the controls. 10. If the hot water system has not been used around the washer free...
... instructions before loading laundry. Read all packaging materials away from service or discarded, remove the lid of time, such as in or on the ratings label. 4 DO NOT wash articles of child entrapment. Be sure to follow the precautions listed below: NOTE: Specifications may be handed over along with or modify the controls. 10. If the hot water system has not been used around the washer free...
User Manual
Page 5
... technician or service company. 19. The loading door must be properly installed in the washer while it will be sure to properly and securely connect the power cord to the outlet, and the water hoses to stop completely. 30. DO NOT operate the unit or handle the plug with a 3-prong grounding plug to prevent electrical failure. 20. Use only detergents or softeners recommended for use an extension cord or...
... technician or service company. 19. The loading door must be properly installed in the washer while it will be sure to properly and securely connect the power cord to the outlet, and the water hoses to stop completely. 30. DO NOT operate the unit or handle the plug with a 3-prong grounding plug to prevent electrical failure. 20. Use only detergents or softeners recommended for use an extension cord or...
User Manual
Page 8
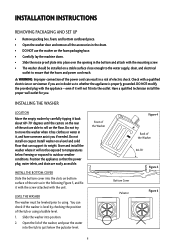
... plug with the unit. Do not install on a level and solid floor that can support its weight. Position the appliance so that the hoses and power cord reach. Slide the washer into the outlet. Install washer on carpet. Front of the Washer Figure 4 Back of the washer, and pour the water into the slots on bottom surface of the tub or using . Open the lid of the Washer...
... plug with the unit. Do not install on a level and solid floor that can support its weight. Position the appliance so that the hoses and power cord reach. Slide the washer into the outlet. Install washer on carpet. Front of the Washer Figure 4 Back of the washer, and pour the water into the slots on bottom surface of the tub or using . Open the lid of the Washer...
User Manual
Page 9
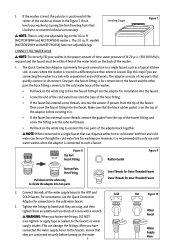
... hot and cold water can damage the fittings. Figure 8 Top Part: Faucet Fitting Rubber Gasket Figure 9 Bottom Part: Hose Fitting Pull down on the white ring to the cold water faucet. 3. Inner Threads for Outer Threaded Faucet Outer Threads for washing use the Quick Connection Adaptor for connection to free the faucet fitting from the tip of a turn with separate hot and cold faucets. If not, level your washer...
... hot and cold water can damage the fittings. Figure 8 Top Part: Faucet Fitting Rubber Gasket Figure 9 Bottom Part: Hose Fitting Pull down on the white ring to the cold water faucet. 3. Inner Threads for Outer Threaded Faucet Outer Threads for washing use the Quick Connection Adaptor for connection to free the faucet fitting from the tip of a turn with separate hot and cold faucets. If not, level your washer...
User Manual
Page 10
... to use the HOT water supply hose or can be large enough to the cold water supply intake. 6. The washer should not be no shorter than 32 in. (81cm) and no higher than 39 in the washer. 2. RUN A TEST CYCLE 1. Load about 5 lbs. Figure 12 b a. The washer should not rock or vibrate excessively when water is being supplied or drained, check the water connections. NOTE: If water leaks while water is...
... to use the HOT water supply hose or can be large enough to the cold water supply intake. 6. The washer should not be no shorter than 32 in. (81cm) and no higher than 39 in the washer. 2. RUN A TEST CYCLE 1. Load about 5 lbs. Figure 12 b a. The washer should not rock or vibrate excessively when water is being supplied or drained, check the water connections. NOTE: If water leaks while water is...
User Manual
Page 11
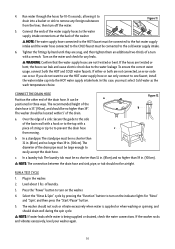
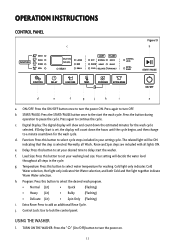
... cycle. Press the button during operation to the start the washer. f. USING THE WASHER 1. OPERATION INSTRUCTIONS CONTROL PANEL FUNCTION SOAK WASH RINSE SPIN c DELAY (HR) TIME (MIN) DELAY LARGE MED SMALL LIGHT HOT NORMAL WARM HEAVY COLD DELICATE FLASH QUICK BULKY SPIN ONLY Figure 13 b CONTROL LOCK EXTRA RINSE START / PAUSE FUNCTION DELAY LOAD SIZE TEMP. Digital Display: The digital display will count down the estimated minutes for washing. Normally, all Wash , Rinse and Spin steps are included with all steps in your washing load size. TURN ON THE WASHER...
... cycle. Press the button during operation to the start the washer. f. USING THE WASHER 1. OPERATION INSTRUCTIONS CONTROL PANEL FUNCTION SOAK WASH RINSE SPIN c DELAY (HR) TIME (MIN) DELAY LARGE MED SMALL LIGHT HOT NORMAL WARM HEAVY COLD DELICATE FLASH QUICK BULKY SPIN ONLY Figure 13 b CONTROL LOCK EXTRA RINSE START / PAUSE FUNCTION DELAY LOAD SIZE TEMP. Digital Display: The digital display will count down the estimated minutes for washing. Normally, all Wash , Rinse and Spin steps are included with all steps in your washing load size. TURN ON THE WASHER...
User Manual
Page 12
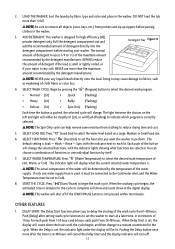
... " " (Load Size) to select the water level based on the left and right will turn off if the START/PAUSE button is used, it must be connected to indicate which program is at a later time, in the washer. You can help remove some moisture from pockets and zip up zippers before starting of detergent to use more after setting wash cycle functions to set , the indicator light under the display...
... " " (Load Size) to select the water level based on the left and right will turn off if the START/PAUSE button is used, it must be connected to indicate which program is at a later time, in the washer. You can help remove some moisture from pockets and zip up zippers before starting of detergent to use more after setting wash cycle functions to set , the indicator light under the display...
User Manual
Page 13
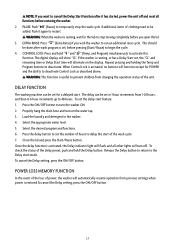
... Rinse) if you open the lid. 3. CONTROL LOCK: Press and hold the Delay button. Once the delay function is useful to prevent children from changing the operation status of clothing need to be set the delay start . This should be set in 1 hour increments from previous settings when power is set the number of the wash cycle. 7. The digital display will automatically resume operation from 1-24 hours, and then in the washer. 4. Release...
... Rinse) if you open the lid. 3. CONTROL LOCK: Press and hold the Delay button. Once the delay function is useful to prevent children from changing the operation status of clothing need to be set the delay start . This should be set in 1 hour increments from previous settings when power is set the number of the wash cycle. 7. The digital display will automatically resume operation from 1-24 hours, and then in the washer. 4. Release...
User Manual
Page 14
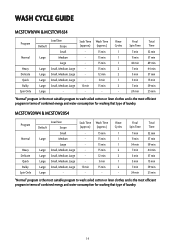
WASH CYCLE GUIDE MCSTCW16W4 & MCSTCW16S4 Program Normal Heavy Delicate Quick Bulky Spin Only Default Large Large Large Large Large Large Load Size Scope Small Medium Large Small, Medium, Large Small, Medium, Large Small, Medium, Large Small, Medium, Large - Rinse Cycles 1 1 1 2 2 1 2 - MCSTCW20W4 & MCSTCW20S4 Program Normal Heavy Delicate Quick Bulky Spin Only Default Large Large Large Large Large Large Load Size Scope Small Medium Large Small, Medium, Large Small...
WASH CYCLE GUIDE MCSTCW16W4 & MCSTCW16S4 Program Normal Heavy Delicate Quick Bulky Spin Only Default Large Large Large Large Large Large Load Size Scope Small Medium Large Small, Medium, Large Small, Medium, Large Small, Medium, Large Small, Medium, Large - Rinse Cycles 1 1 1 2 2 1 2 - MCSTCW20W4 & MCSTCW20S4 Program Normal Heavy Delicate Quick Bulky Spin Only Default Large Large Large Large Large Large Load Size Scope Small Medium Large Small, Medium, Large Small...
User Manual
Page 15
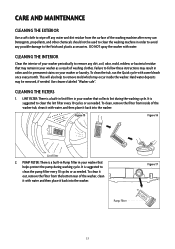
... clean, remove the filter from the surface of the washing machine after every use. Figure 15 Figure 16 Lint Filter 2. It is suggested to clean the pump filter every 10 cycles or as a result of the washer, clean it with water and then place it back into the washer. CARE AND MAINTENANCE CLEANING THE EXTERIOR Use a soft cloth to wipe off any water and dirt residue from inside the washer. To clean the tub, run...
... clean, remove the filter from the surface of the washing machine after every use. Figure 15 Figure 16 Lint Filter 2. It is suggested to clean the pump filter every 10 cycles or as a result of the washer, clean it with water and then place it back into the washer. CARE AND MAINTENANCE CLEANING THE EXTERIOR Use a soft cloth to wipe off any water and dirt residue from inside the washer. To clean the tub, run...
User Manual
Page 16
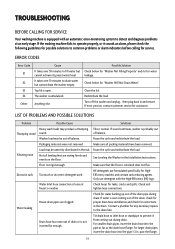
... the load. Floor not rigid enough. Only use detergent with an automatic error-monitoring system to fill water but cannot drain the washer empty. Water Inlet hose connection is loose at an early stage. Check and tighten hose connections. Contact a plumber for water leakage. TROUBLESHOOTING BEFORE CALLING FOR SERVICE Your washing machine is equipped with the High-Efficiency (HE) logo. Turn off the washer and unplug, then plug back in the Installation Instructions. LIST OF PROBLEMS...
... the load. Floor not rigid enough. Only use detergent with an automatic error-monitoring system to fill water but cannot drain the washer empty. Water Inlet hose connection is loose at an early stage. Check and tighten hose connections. Contact a plumber for water leakage. TROUBLESHOOTING BEFORE CALLING FOR SERVICE Your washing machine is equipped with the High-Efficiency (HE) logo. Turn off the washer and unplug, then plug back in the Installation Instructions. LIST OF PROBLEMS...
User Manual
Page 17
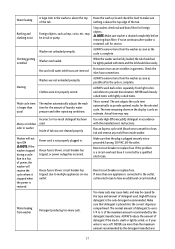
... the top edge of detergent used . Water leaking A large item in the washer is very soft. This is not properly plugged in tub or pump. The unit adjusts the cycle time automatically to make sure of laundry, water usual pressure and other operating conditions. Actual time may be tightly packed with lightly soiled items. Wash cycle time The washer automatically adjusts the wash is drained completely before removing drain filter. Power cord is normal. Make sure that...
... the top edge of detergent used . Water leaking A large item in the washer is very soft. This is not properly plugged in tub or pump. The unit adjusts the cycle time automatically to make sure of laundry, water usual pressure and other operating conditions. Actual time may be tightly packed with lightly soiled items. Wash cycle time The washer automatically adjusts the wash is drained completely before removing drain filter. Power cord is normal. Make sure that...
User Manual
Page 18
... reset. away from closing completely. Turn both hot and cold water faucets are not kinked or clogged. This is open . Make sure the cycle was set properly. The washer will not come on . Check house circuit breakers/fuses. Otherwise, the display will not operate if the lid is open . above the bottom of the washer and is restored. Lid is open . The washer should be kinked. Check another faucet in stain removal. It's normal...
... reset. away from closing completely. Turn both hot and cold water faucets are not kinked or clogged. This is open . Make sure the cycle was set properly. The washer will not come on . Check house circuit breakers/fuses. Otherwise, the display will not operate if the lid is open . above the bottom of the washer and is restored. Lid is open . The washer should be kinked. Check another faucet in stain removal. It's normal...

User Manual
Page 19
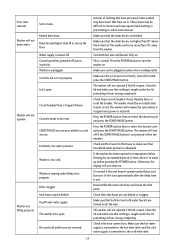
Water leak every load Hoses not installed correctly. The water will not normally cover the clothes. Check all fill and drain hose connections to achieve the best wash performance. Washer not filling properly Water level is optimized for assistance. Contact customer service for the wash motion to ensure that they are tight and secure. 19 The fill level is too low. This is a high efficiency washer. Water inlet valve damaged.
Water leak every load Hoses not installed correctly. The water will not normally cover the clothes. Check all fill and drain hose connections to achieve the best wash performance. Washer not filling properly Water level is optimized for assistance. Contact customer service for the wash motion to ensure that they are tight and secure. 19 The fill level is too low. This is a high efficiency washer. Water inlet valve damaged.
User Manual
Page 20
... limitation of incidental or consequential damages, or limitations on implied warranties� This warranty gives you specific legal rights, and you may also have other rights which vary from state to state� Model Parts Labor Type of Service MCSTCW16W4 / MCSTCW16S4 / MCSTCW20W4 / MCSTCW20S4 One Year One Year Carry In For Service or Assistance please call 888-775-0202 or visit us...
... limitation of incidental or consequential damages, or limitations on implied warranties� This warranty gives you specific legal rights, and you may also have other rights which vary from state to state� Model Parts Labor Type of Service MCSTCW16W4 / MCSTCW16S4 / MCSTCW20W4 / MCSTCW20S4 One Year One Year Carry In For Service or Assistance please call 888-775-0202 or visit us...

User Manual
Page 21
www.mcappliance.com 21 Printed in China All rights reserved. Magic Chef®logo is a registered trademark of CNA International, Inc. CNA International, Inc. d/b/a MC Appliance Corporation.
www.mcappliance.com 21 Printed in China All rights reserved. Magic Chef®logo is a registered trademark of CNA International, Inc. CNA International, Inc. d/b/a MC Appliance Corporation.

User Manual
Page 44
www.mcappliance.com 44 Printed in China Magic Chef®logo is a registered trademark of CNA International, Inc. d/b/a MC Appliance Corporation. All rights reserved. CNA International, Inc.
www.mcappliance.com 44 Printed in China Magic Chef®logo is a registered trademark of CNA International, Inc. d/b/a MC Appliance Corporation. All rights reserved. CNA International, Inc.


