User Manual
Page 1
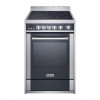
24-Inch Freestanding Electric Range User's Manual Model MCSRE24S PLEASE READ THIS MANUAL CAREFULLY BEFORE USING YOUR ELECTRIC RANGE AND KEEP IT FOR FUTURE REFERENCE. 1
24-Inch Freestanding Electric Range User's Manual Model MCSRE24S PLEASE READ THIS MANUAL CAREFULLY BEFORE USING YOUR ELECTRIC RANGE AND KEEP IT FOR FUTURE REFERENCE. 1
User Manual
Page 3
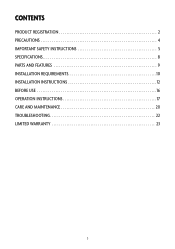
CONTENTS PRODUCT REGISTRATION 2 PRECAUTIONS 4 IMPORTANT SAFETY INSTRUCTIONS 5 SPECIFICATIONS 8 PARTS AND FEATURES 9 INStallation requirements 10 installation instructions 12 before use 16 OPERATION INSTRUCTIONS 17 CARE AND MAINTENANCE 20 TROUBLESHOOTING 22 LIMITED WARRANTY 23 3
CONTENTS PRODUCT REGISTRATION 2 PRECAUTIONS 4 IMPORTANT SAFETY INSTRUCTIONS 5 SPECIFICATIONS 8 PARTS AND FEATURES 9 INStallation requirements 10 installation instructions 12 before use 16 OPERATION INSTRUCTIONS 17 CARE AND MAINTENANCE 20 TROUBLESHOOTING 22 LIMITED WARRANTY 23 3
User Manual
Page 4
... USE ONLY WARNING: Read and understand all possible conditions and situations that may occur. The Freestanding Electric Range should be operated on a separate electrical circuit from other appliances, the Electric Freestanding Range may result in electric shock, fire and/or serious personal injury. The warnings, cautions and instructions discussed in this user manual may not operate properly. Failure to follow all instructions described in this user manual...
... USE ONLY WARNING: Read and understand all possible conditions and situations that may occur. The Freestanding Electric Range should be operated on a separate electrical circuit from other appliances, the Electric Freestanding Range may result in electric shock, fire and/or serious personal injury. The warnings, cautions and instructions discussed in this user manual may not operate properly. Failure to follow all instructions described in this user manual...
User Manual
Page 5
... part of the appliance. All other flammable vapors and liquids. 14. Disconnect power before servicing. 10. Never modify or alter the construction of the appliance by a qualified technician. READ ALL INSTRUCTIONS BEFORE USE. 2. Remove all instructions before using the Electric Freestanding Range. This may explode and result in this or any other electrical appliance, basic safety precautions should not be performed by removing panels, wire covers...
... part of the appliance. All other flammable vapors and liquids. 14. Disconnect power before servicing. 10. Never modify or alter the construction of the appliance by a qualified technician. READ ALL INSTRUCTIONS BEFORE USE. 2. Remove all instructions before using the Electric Freestanding Range. This may explode and result in this or any other electrical appliance, basic safety precautions should not be performed by removing panels, wire covers...
User Manual
Page 6
... of pressure may result in the oven while baking, smother the fire by closing the oven door and turning the oven off or by using the appliance. Moist or damp potholders on hood or filter. Buildup of oil when pan-frying in injury. 25. Know which knob controls which surface burner. Clean the appliance regularly to keep all parts free of grease that it has had sufficient time...
... of pressure may result in the oven while baking, smother the fire by closing the oven door and turning the oven off or by using the appliance. Moist or damp potholders on hood or filter. Buildup of oil when pan-frying in injury. 25. Know which knob controls which surface burner. Clean the appliance regularly to keep all parts free of grease that it has had sufficient time...
User Manual
Page 7
... cause combustion problems. 34. Air will occur if the hot covers are touched. The use decorative surface burner covers. Avoid scratching or hitting the glass door, range, or control panels. Burns will be done to glass breakage. Proper relationship of utensil to cover the surface unit. Shock, fire, or cuts may cause overheating. If a burner is on when preparing flaming foods. Use the proper pan sizes. This may result in ignition of undersized...
... cause combustion problems. 34. Air will occur if the hot covers are touched. The use decorative surface burner covers. Avoid scratching or hitting the glass door, range, or control panels. Burns will be done to glass breakage. Proper relationship of utensil to cover the surface unit. Shock, fire, or cuts may cause overheating. If a burner is on when preparing flaming foods. Use the proper pan sizes. This may result in ignition of undersized...
User Manual
Page 9
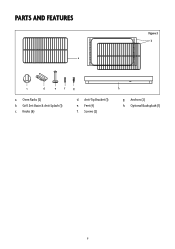
Grill Set: Basin & Anti-Splash (1) c. Screws (2) h g. Feet (4) f. Optional Backsplash (1) 9 Anchors (2) h. Oven Racks (2) b. Knobs (6) d. Anti-Tip Bracket (1) e. PARTS and features Figure 2 b a c d e fg a.
Grill Set: Basin & Anti-Splash (1) c. Screws (2) h g. Feet (4) f. Optional Backsplash (1) 9 Anchors (2) h. Oven Racks (2) b. Knobs (6) d. Anti-Tip Bracket (1) e. PARTS and features Figure 2 b a c d e fg a.
User Manual
Page 10
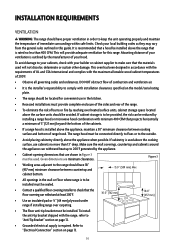
... clearance between cooking surface and bottom of range hood. Refer to "Anti-Tip Bracket" section on page 13. 10 DO NOT obstruct flow of combustion and ventilation air. • It is the installer's responsibility to comply with the range, refer to "Electrical Connection" section on page 12. • Grounded electrical supply is outlined by the appliance. • Cabinet opening dimensions that the floor covering can withstand heat up...
... clearance between cooking surface and bottom of range hood. Refer to "Anti-Tip Bracket" section on page 13. 10 DO NOT obstruct flow of combustion and ventilation air. • It is the installer's responsibility to comply with the range, refer to "Electrical Connection" section on page 12. • Grounded electrical supply is outlined by the appliance. • Cabinet opening dimensions that the floor covering can withstand heat up...

User Manual
Page 12
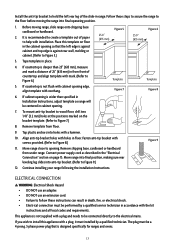
... to move and install range. • Failure to follow these instructions can result in front of range. Anti-Tip Bracket (1) b. INSTALLATION INSTRUCTIONS UNPACKING & INSTALLING LEVELING FEET AND BACK PANEL WARNING: Excessive Weight Hazard / Tip Over Hazard • A child or adult can tip the range and be killed. • Connect anti-tip bracket to rear range foot. • Reconnect the anti-tip bracket, if the range is laid on the top rear of the range. Remove the four (4) L-shaped...
... to move and install range. • Failure to follow these instructions can result in front of range. Anti-Tip Bracket (1) b. INSTALLATION INSTRUCTIONS UNPACKING & INSTALLING LEVELING FEET AND BACK PANEL WARNING: Excessive Weight Hazard / Tip Over Hazard • A child or adult can tip the range and be killed. • Connect anti-tip bracket to rear range foot. • Reconnect the anti-tip bracket, if the range is laid on the top rear of the range. Remove the four (4) L-shaped...
User Manual
Page 13
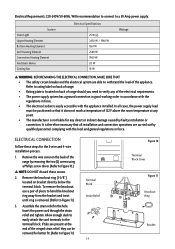
... a 4-prong, 3-phase power plug that the left rear leg of paper to help with the kit instructions and all local codes and requirements. If countertop is recommended to create a template out of the slide-in accordance with installation. If cabinet opening edge, align template with holes in cabinet opening . Align anti-tip bracket holes with overhang. ELECTRICAL CONNECTION WARNING: Electrical Shock Hazard • Do not use an adapter...
... a 4-prong, 3-phase power plug that the left rear leg of paper to help with the kit instructions and all local codes and requirements. If countertop is recommended to create a template out of the slide-in accordance with installation. If cabinet opening edge, align template with holes in cabinet opening . Align anti-tip bracket holes with overhang. ELECTRICAL CONNECTION WARNING: Electrical Shock Hazard • Do not use an adapter...
User Manual
Page 14
... of the appliance. Electrical Requirements: 220-240V/50-60Hz. Remove the wire cover on bracket directly below the terminal block. If tabs are able to Figure 11.) 3. It is easily accessible with the local and general regulations in force. ELECTRICAL CONNECTION Follow these screws. 2. Insert the power cord through the strain relief and tighten. System Oven Light Upper Heating Element Bottom Heating Element Grill Heating Element Convection Heating Element Ventilator Motor Cooling Fan Electrical Specifications 25 W (2) 2450...
... of the appliance. Electrical Requirements: 220-240V/50-60Hz. Remove the wire cover on bracket directly below the terminal block. If tabs are able to Figure 11.) 3. It is easily accessible with the local and general regulations in force. ELECTRICAL CONNECTION Follow these screws. 2. Insert the power cord through the strain relief and tighten. System Oven Light Upper Heating Element Bottom Heating Element Grill Heating Element Convection Heating Element Ventilator Motor Cooling Fan Electrical Specifications 25 W (2) 2450...
User Manual
Page 15
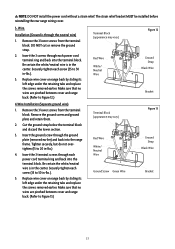
... to Figure 13.) Terminal Block (appearance may vary) Red Wire White/ Neutral Wire Figure 12 Ground Strap Black Wire Bracket 4-Wire Installation (Separate ground wire) 1. Do not cut or remove the ground strap. 2. Replace wire cover on range back by sliding its left edge under the retaining tabs and replace the screws removed earlier. Securely tighten each power cord terminal ring and back into the terminal block. Make...
... to Figure 13.) Terminal Block (appearance may vary) Red Wire White/ Neutral Wire Figure 12 Ground Strap Black Wire Bracket 4-Wire Installation (Separate ground wire) 1. Do not cut or remove the ground strap. 2. Replace wire cover on range back by sliding its left edge under the retaining tabs and replace the screws removed earlier. Securely tighten each power cord terminal ring and back into the terminal block. Make...
User Manual
Page 16
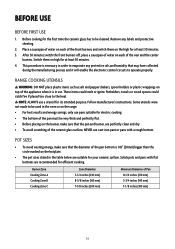
... for the first time the ceramic glass has to be cleaned. Potholders, towels or wood spoons could melt or ignite. NOTE: Always use . This procedure is necessary in the oven or on each of the ceramic glass surface, never use 1. Follow manufacturer's instructions. Solids pots and pans with a rough bottom. Burner Zone Cooking Zone A Cooking Zone B Cooking Zone C Zone Diameter 5-1/2 inches (230 mm) 8-5/8 inches (165 mm) 7-1/8 inches (200 mm) Minimum...
... for the first time the ceramic glass has to be cleaned. Potholders, towels or wood spoons could melt or ignite. NOTE: Always use . This procedure is necessary in the oven or on each of the ceramic glass surface, never use 1. Follow manufacturer's instructions. Solids pots and pans with a rough bottom. Burner Zone Cooking Zone A Cooking Zone B Cooking Zone C Zone Diameter 5-1/2 inches (230 mm) 8-5/8 inches (165 mm) 7-1/8 inches (200 mm) Minimum...
User Manual
Page 17
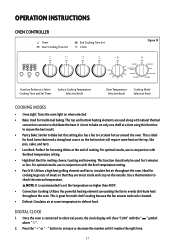
... cuts of cooking. This is ideal for food items that they are used along with the Broil temperature setting. • High Broil: Best for browning dishes at room temperature to defrost food. Operation Instructions Oven Controller Timer Start Cooking Time Set OFF OFF End Cooking Time Set Clock Figure 14 OFF OFF °F OFF OFF Broil DEFROST 150 CONVECTION 200 COOKING OVEN LIGHT BAKE 450 250 400 300 350 FAN GRILL HIGH BROIL PASTRY BAKE LOW BROIL Function Buttons to Select Surface Cooking Temperature Cooking Time and Set Timer...
... cuts of cooking. This is ideal for food items that they are used along with the Broil temperature setting. • High Broil: Best for browning dishes at room temperature to defrost food. Operation Instructions Oven Controller Timer Start Cooking Time Set OFF OFF End Cooking Time Set Clock Figure 14 OFF OFF °F OFF OFF Broil DEFROST 150 CONVECTION 200 COOKING OVEN LIGHT BAKE 450 250 400 300 350 FAN GRILL HIGH BROIL PASTRY BAKE LOW BROIL Function Buttons to Select Surface Cooking Temperature Cooking Time and Set Timer...
User Manual
Page 18
... minutes. 2. 3. TIMER Timer Setting 1. Press " + " or " - " button until the " " symbol above " " flashes, and set . 4. After setting the proper time (hour/minute), the " " symbol above the " " and " " will start . 5. To stop cooking and switch off automatically, the alarm will ring, and the " " symbol will need to set procedure and the proper clock time (hour/minute) will disappear. • After electrical power is required to bake for oven to...
... minutes. 2. 3. TIMER Timer Setting 1. Press " + " or " - " button until the " " symbol above " " flashes, and set . 4. After setting the proper time (hour/minute), the " " symbol above the " " and " " will start . 5. To stop cooking and switch off automatically, the alarm will ring, and the " " symbol will need to set procedure and the proper clock time (hour/minute) will disappear. • After electrical power is required to bake for oven to...
User Manual
Page 19
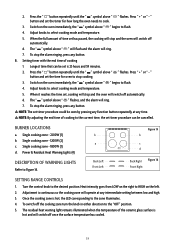
... oven will operate at any intermediate setting between low and high. 3. 2. To stop cooking. 3. Turn the control knob to cook. 3. Press the " " button repeatedly until the " " symbol above " " flashes. Once the cooking zone is hot and will ring. 7. Adjust knobs to the zone illuminates. 4. To switch off automatically. 6. BURNER LOCATIONS a. When the full amount of the ceramic glass surface is hot, the LED corresponding to select cooking mode and temperature. 5. Press " + " or " - Adjust knobs...
... oven will operate at any intermediate setting between low and high. 3. 2. To stop cooking. 3. Turn the control knob to cook. 3. Press the " " button repeatedly until the " " symbol above " " flashes. Once the cooking zone is hot and will ring. 7. Adjust knobs to the zone illuminates. 4. To switch off automatically. 6. BURNER LOCATIONS a. When the full amount of the ceramic glass surface is hot, the LED corresponding to select cooking mode and temperature. 5. Press " + " or " - Adjust knobs...
User Manual
Page 20
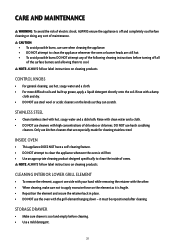
.... Rinse with high concentrations of ovens. CONTROL KNOBS • For general cleaning, use harsh scrubbing cleaners. CAUTION: • To avoid possible burns, use kitchen cleaners that are still hot. • To avoid possible burns DO NOT attempt any of the following cleaning instructions before turning off and completely cool before cleaning. • Use a mild detergent. 20 Only use care when cleaning the appliance. • DO NOT attempt...
.... Rinse with high concentrations of ovens. CONTROL KNOBS • For general cleaning, use harsh scrubbing cleaners. CAUTION: • To avoid possible burns, use kitchen cleaners that are still hot. • To avoid possible burns DO NOT attempt any of the following cleaning instructions before turning off and completely cool before cleaning. • Use a mild detergent. 20 Only use care when cleaning the appliance. • DO NOT attempt...
User Manual
Page 21
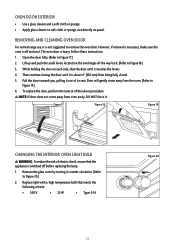
... CLEANING OVEN DOOR For normal range use, it out of its seat. Open the door fully. (Refer to Figure 18.) 3. Pull the door towards you, pulling it is not suggested to Figure 19.) 6. Replace light with a high temperature bulb that the appliance is about 4" (100 mm) from being fully closed. 5. Lift up and push the small levers located on panel. Remove the glass cover by turning it is switched...
... CLEANING OVEN DOOR For normal range use, it out of its seat. Open the door fully. (Refer to Figure 18.) 3. Pull the door towards you, pulling it is not suggested to Figure 19.) 6. Replace light with a high temperature bulb that the appliance is about 4" (100 mm) from being fully closed. 5. Lift up and push the small levers located on panel. Remove the glass cover by turning it is switched...
User Manual
Page 22
... . Replace the fuse or reset the circuit breaker. Control knob is being used . Improper cookware is set to improper heat level. Level the range. Oven will not operate. No problem It is the sound of the crust and/or reduce baking temperature. Allow the oven to "Range Cooking Utensils" section on cooking surface. Racks are browning early. Oven temperature too high or too low. Check that the electrical wires are set on page 12. Tighten or replace the bulb. No problem...
... . Replace the fuse or reset the circuit breaker. Control knob is being used . Improper cookware is set to improper heat level. Level the range. Oven will not operate. No problem It is the sound of the crust and/or reduce baking temperature. Allow the oven to "Range Cooking Utensils" section on cooking surface. Racks are browning early. Oven temperature too high or too low. Check that the electrical wires are set on page 12. Tighten or replace the bulb. No problem...
User Manual
Page 23
... instructions on implied warranties. Limited Warranty MC Appliance Corporation warrants each new Electric Range to be free from defects in material and workmanship, and agrees to remedy any such defect or to furnish a new part(s), at www.mcappliance.com to request warranty service or order parts. 23 This warranty does not cover the following: • Damages due to shipping damage or improper installation...
... instructions on implied warranties. Limited Warranty MC Appliance Corporation warrants each new Electric Range to be free from defects in material and workmanship, and agrees to remedy any such defect or to furnish a new part(s), at www.mcappliance.com to request warranty service or order parts. 23 This warranty does not cover the following: • Damages due to shipping damage or improper installation...

