User Manual
Page 1
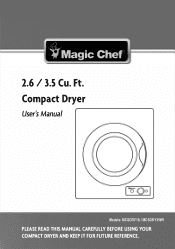
c:) fl Magic Chef 2.6 / 3.5 Cu. Ft. Compact Dryer User's Manual Models: MCSDRY1S / MCSDRY35W1 PLEASE READ THIS MANUAL CAREFULLY BEFORE USING YOUR COMPACT DRYER AND KEEP IT FOR FUTURE REFERENCE.
c:) fl Magic Chef 2.6 / 3.5 Cu. Ft. Compact Dryer User's Manual Models: MCSDRY1S / MCSDRY35W1 PLEASE READ THIS MANUAL CAREFULLY BEFORE USING YOUR COMPACT DRYER AND KEEP IT FOR FUTURE REFERENCE.

User Manual
Page 2
... for purchasing a Magic Chef®product. 2 Registering your product could act as your proof of purchase in the event of registering your product include the following: l. Once again, thank you regardinga safetynotification or product update. 2. Registering your new product is required. 3. The benefits of insurance loss. Registeringyourproduct will allow us tocontact you for purchasing a MagicChef®product. The first...
... for purchasing a Magic Chef®product. 2 Registering your product could act as your proof of purchase in the event of registering your product include the following: l. Once again, thank you regardinga safetynotification or product update. 2. Registering your new product is required. 3. The benefits of insurance loss. Registeringyourproduct will allow us tocontact you for purchasing a MagicChef®product. The first...

User Manual
Page 3
CONTENTS PRODUCT REGISTRATION 2 PRECAUTIONS 4 IMPORTANT SAFETY INSTRUCTIONS 5 SPECIFICATIONS 7 PARTS AND FEATURES 8 INSTALLATION 9 OPERATION 12 CARE AND MAINTENANCE 17 TROUBLESHOOTING 19 WARRANTY 20 3
CONTENTS PRODUCT REGISTRATION 2 PRECAUTIONS 4 IMPORTANT SAFETY INSTRUCTIONS 5 SPECIFICATIONS 7 PARTS AND FEATURES 8 INSTALLATION 9 OPERATION 12 CARE AND MAINTENANCE 17 TROUBLESHOOTING 19 WARRANTY 20 3
User Manual
Page 4
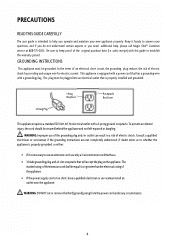
... guide to keep proof of electric shock. Be sure to establish the warranty period. Keep it isnecessary to help you need additional help, please call Magic Chef® Customer service at 888-775-0202. To prevent accidental injury, the cord should be grounded. and a 3-slot receptacle that has a • 3-bladegroundingplug. PRECAUTIONS READ THIS GUIDE CAREFULLY The user guide is properly installed and grounded. 3-Prong Plug...
... guide to keep proof of electric shock. Be sure to establish the warranty period. Keep it isnecessary to help you need additional help, please call Magic Chef® Customer service at 888-775-0202. To prevent accidental injury, the cord should be grounded. and a 3-slot receptacle that has a • 3-bladegroundingplug. PRECAUTIONS READ THIS GUIDE CAREFULLY The user guide is properly installed and grounded. 3-Prong Plug...
User Manual
Page 5
... type of child entrapment and suffocation; DO NOT immerse the power cord or plug in accordance with flammable fluids. IMPORTANT SAFETY INSTRUCTIONS This manual contains Safety Instructions, Installation and Operating Instructions, and Troubleshooting Tips� Please carefully read the troubleshooting section� WARNING: When using your hand in the spin basket during operation. DO NOT place the dryer in steamy rooms or where the dryer is specifically designed to operate...
... type of child entrapment and suffocation; DO NOT immerse the power cord or plug in accordance with flammable fluids. IMPORTANT SAFETY INSTRUCTIONS This manual contains Safety Instructions, Installation and Operating Instructions, and Troubleshooting Tips� Please carefully read the troubleshooting section� WARNING: When using your hand in the spin basket during operation. DO NOT place the dryer in steamy rooms or where the dryer is specifically designed to operate...
User Manual
Page 6
... installed. DO NOT operate the unit or handle the plug with wet hands. 20. DO NOT operate this dryer unless all packaging materials away from the power source. 21. READ AND FOLLOW THIS SAFETY INFORMATION CAREFULLY SAVE THESE INSTRUCTIONS 6 DO NOT unplug your appliance by pulling on its power cord. 17. Allow unit to cool down completely before servicing, changing accessories or cleaning...
... installed. DO NOT operate the unit or handle the plug with wet hands. 20. DO NOT operate this dryer unless all packaging materials away from the power source. 21. READ AND FOLLOW THIS SAFETY INFORMATION CAREFULLY SAVE THESE INSTRUCTIONS 6 DO NOT unplug your appliance by pulling on its power cord. 17. Allow unit to cool down completely before servicing, changing accessories or cleaning...
User Manual
Page 7
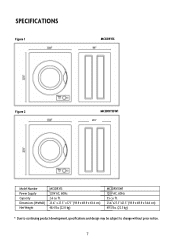
ft. 23.6" x 27.5" x 17.1" (59.9 x 69.9 x 43.4 cm) 48.4 lbs (22.0 kg) MCSDRY35W1 120V AC, 60Hz 3.5 cu. ft. 23.6" X 27.5" X 17.l" (W X H X D) 48.4 lbs. ft. 23.6"x27.5"x21.5" (59.9 x 69.9 x 54.6 cm) 49.5 lbs. (22.5 kg) • Due to continuing product development, specifications and design may be subject to change without prior notice. 7 MCSDRY1S Figure 2 MCSDRY35W1 21.5" Model Number Power Supply Capacity Dimensions (WxHxD) Net Weight MCSDRY1S 120V AC, 60Hz 2.6 cu. SPECIFICATIONS Figure 1 Power Supply Capacity Unit Dimensions Net Weight 120V AC, 60Hz 2.6 cu.
ft. 23.6" x 27.5" x 17.1" (59.9 x 69.9 x 43.4 cm) 48.4 lbs (22.0 kg) MCSDRY35W1 120V AC, 60Hz 3.5 cu. ft. 23.6" X 27.5" X 17.l" (W X H X D) 48.4 lbs. ft. 23.6"x27.5"x21.5" (59.9 x 69.9 x 54.6 cm) 49.5 lbs. (22.5 kg) • Due to continuing product development, specifications and design may be subject to change without prior notice. 7 MCSDRY1S Figure 2 MCSDRY35W1 21.5" Model Number Power Supply Capacity Dimensions (WxHxD) Net Weight MCSDRY1S 120V AC, 60Hz 2.6 cu. SPECIFICATIONS Figure 1 Power Supply Capacity Unit Dimensions Net Weight 120V AC, 60Hz 2.6 cu.
User Manual
Page 8
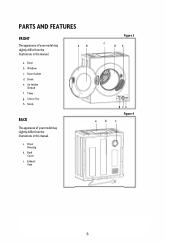
Air Intake Shroud f. a b g fh Figure 4 a. Dryer Housing b. Door Gasket d. Timer g. Back Cover c. Drum e. Mode BACK The apperance of your model may slightly differ from the illustrations in this manual. Exhaust Vent 8 Sensor Dry h. PARTS AND FEATURES FRONT The appearance of your model may slightly differ from the illustrations in this manual. a b Figure 3 d e a. Door b. Window c.
Air Intake Shroud f. a b g fh Figure 4 a. Dryer Housing b. Door Gasket d. Timer g. Back Cover c. Drum e. Mode BACK The apperance of your model may slightly differ from the illustrations in this manual. Exhaust Vent 8 Sensor Dry h. PARTS AND FEATURES FRONT The appearance of your model may slightly differ from the illustrations in this manual. a b Figure 3 d e a. Door b. Window c.
User Manual
Page 9
... kit. 4. c) Use of the dryer. 7. The room temperature should be vented outdoors. (Ventilation Kit not included.) 6. INSTALLATION LOCATION 1. Install the dryer on its power cord. Installthe dryer away from direct sunlight; Keep the dryer away from the power cord. These things can be pulled on bychildren or tripped over a longer cord. b) A short power-supply cord is not recommended. d) Plug the dryer into a properly installed receptacle box that you are blocked during operation, the dryer...
... kit. 4. c) Use of the dryer. 7. The room temperature should be vented outdoors. (Ventilation Kit not included.) 6. INSTALLATION LOCATION 1. Install the dryer on its power cord. Installthe dryer away from direct sunlight; Keep the dryer away from the power cord. These things can be pulled on bychildren or tripped over a longer cord. b) A short power-supply cord is not recommended. d) Plug the dryer into a properly installed receptacle box that you are blocked during operation, the dryer...

User Manual
Page 10
... using the existing wooden studs, the preferred method of installation is using the wooden slats to install on an uneven or weak surface, noise or vibrations will be installing the mounting hooks. • This dryer is not designed to sit on top of a front loading washer, allow sufficient spacing to complete the following procedure with a bag containing the user guide and four (4) leveling...
... using the existing wooden studs, the preferred method of installation is using the wooden slats to install on an uneven or weak surface, noise or vibrations will be installing the mounting hooks. • This dryer is not designed to sit on top of a front loading washer, allow sufficient spacing to complete the following procedure with a bag containing the user guide and four (4) leveling...

User Manual
Page 11
Using the (4) 1" Phillips head screws included, affix the moonting hooks to the wooden slats as shown in the diagram to the right Figure 7 l" Phillips HeadScrews Install the exhaust pipe as shown in the figure to the right. With the assistance of the dryer and turning...Sectionl Figure 8 Install the lower wall spacers (included) using the (4) ½" long Phillips flat head screws (included� These spaces are in place, slowly lower the dryer in a tilted position on the dryer as put the appliance in place and check all installation points for efficient operation. Exhaust Connector...
Using the (4) 1" Phillips head screws included, affix the moonting hooks to the wooden slats as shown in the diagram to the right Figure 7 l" Phillips HeadScrews Install the exhaust pipe as shown in the figure to the right. With the assistance of the dryer and turning...Sectionl Figure 8 Install the lower wall spacers (included) using the (4) ½" long Phillips flat head screws (included� These spaces are in place, slowly lower the dryer in a tilted position on the dryer as put the appliance in place and check all installation points for efficient operation. Exhaust Connector...
User Manual
Page 12
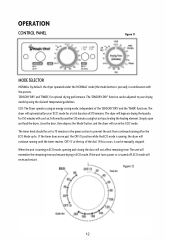
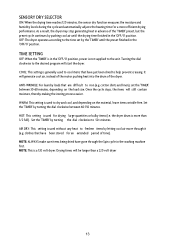
.... Simply open and load the dryer, close the door, then depress the 'Mode' button, and the dryer will reset and restart. The unit will remember the remaining time and resume drying in ECO mode, opening and closing the door will continue running after the ECO Mode cycle. When the unit is running in ECO mode. Figure 12 12 If this occurs, it can be manually stopped. OPERATION � -CONTROL PANEL JilMagic Chef 0. Wrinkle...
.... Simply open and load the dryer, close the door, then depress the 'Mode' button, and the dryer will reset and restart. The unit will remember the remaining time and resume drying in ECO mode, opening and closing the door will continue running after the ECO Mode cycle. When the unit is running in ECO mode. Figure 12 12 If this occurs, it can be manually stopped. OPERATION � -CONTROL PANEL JilMagic Chef 0. Wrinkle...
User Manual
Page 13
... easier. Once the cycle stops, the items will generate cool air, instead of the motor pushing heat into the drum of the dryer. As a result, the dryer may stop generating heat in the 'OFF/0' position. ANTI-WRINKLE: For laundry loads that have just been dried to dry and cool, and depending on the load size. HOT: This setting is used for drying large quantities...
... easier. Once the cycle stops, the items will generate cool air, instead of the motor pushing heat into the drum of the dryer. As a result, the dryer may stop generating heat in the 'OFF/0' position. ANTI-WRINKLE: For laundry loads that have just been dried to dry and cool, and depending on the load size. HOT: This setting is used for drying large quantities...

User Manual
Page 14
... heavy, bulky items. Delicate clothes, especially those with fiberglass materials. 4. Garments that should be closed or turned insideout to prevent tangling. Under certain circumstances, some rubber materials, when heated, can produce fire by the manufacturer of the fabric softener or related products. 14 NOTE: Before drying, check all permanent care labels carefully. DRYING TIME REFERENCE Drying Capacity 3 Lbs. (1.4 kgs.) 5 Lbs. (2.3 kgs...
... heavy, bulky items. Delicate clothes, especially those with fiberglass materials. 4. Garments that should be closed or turned insideout to prevent tangling. Under certain circumstances, some rubber materials, when heated, can produce fire by the manufacturer of the fabric softener or related products. 14 NOTE: Before drying, check all permanent care labels carefully. DRYING TIME REFERENCE Drying Capacity 3 Lbs. (1.4 kgs.) 5 Lbs. (2.3 kgs...
User Manual
Page 15
... remove the laundry load from the manufacturer that may permanently set too long. FABRIC CARE For optimum results, load the dryer with static electricity. This is only one item to adequately dry the garment. Synthetic materials can also become charged with cloths of similar fabric, weight and construction. SINGLE ITEMS: Use the timed drying mode when there is because the moisture sensor in washing. OVERDRYING GARMENTS: When using...
... remove the laundry load from the manufacturer that may permanently set too long. FABRIC CARE For optimum results, load the dryer with static electricity. This is only one item to adequately dry the garment. Synthetic materials can also become charged with cloths of similar fabric, weight and construction. SINGLE ITEMS: Use the timed drying mode when there is because the moisture sensor in washing. OVERDRYING GARMENTS: When using...

User Manual
Page 16
...; � 01 0 Definition Resistant material Delicate fabric May be washed at 200"F/95°C May be washed at 140"F/60"C May be washed at 105"F/40"C May be washed at 85"F/30"C Item may be hand washed Dry clean only Can be bleached in cold water Do not bleach Can be ironed at 392°F/200°C max...lighter fuel, pure alcohol or Rll3 only Dry clean with aviation fue� pure alcohol or Rll3 only Do not dry clean Dry flat Can be hung to dry Dry on clothes hanger Tumble dry, normal heat Tumble dry, reduced heat Do not tumble dry 16 FABRIC CARE CHART FabricCare Symbol tJ D @re!] '@J'W ...
...; � 01 0 Definition Resistant material Delicate fabric May be washed at 200"F/95°C May be washed at 140"F/60"C May be washed at 105"F/40"C May be washed at 85"F/30"C Item may be hand washed Dry clean only Can be bleached in cold water Do not bleach Can be ironed at 392°F/200°C max...lighter fuel, pure alcohol or Rll3 only Dry clean with aviation fue� pure alcohol or Rll3 only Do not dry clean Dry flat Can be hung to dry Dry on clothes hanger Tumble dry, normal heat Tumble dry, reduced heat Do not tumble dry 16 FABRIC CARE CHART FabricCare Symbol tJ D @re!] '@J'W ...
User Manual
Page 17
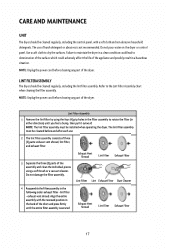
... back of the dryer. The lint filter assembly must be cleaned before cleaning any part of the drum and press firmly until you feel a bump, then pull it outward NOTE: The lint filter assembly must be installed when operating the dryer. exhaust filter - Align the entire assembly with a soft cloth and non-abrasive household detergents. Lint Filter Assembly Remove the lint filter by using a soft brush or...
... back of the dryer. The lint filter assembly must be cleaned before cleaning any part of the drum and press firmly until you feel a bump, then pull it outward NOTE: The lint filter assembly must be installed when operating the dryer. exhaust filter - Align the entire assembly with a soft cloth and non-abrasive household detergents. Lint Filter Assembly Remove the lint filter by using a soft brush or...
User Manual
Page 18
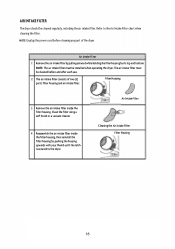
NOTE: The air intake filter must be installed when operating the dryer. Cleaning the Air Intake Filter Filter Housing 18 Clean the filter using a soft brush or a vacuum cleaner. 4 Reassemble the air intake filter inside the filter housing. NOTE: Unplug the power cord before and after each use. 2 The air intake filter consists of the dryer. Filter Housing !) Air Intake Filter Remove the air intake filter inside the filter housing, then reinstall the...
NOTE: The air intake filter must be installed when operating the dryer. Cleaning the Air Intake Filter Filter Housing 18 Clean the filter using a soft brush or a vacuum cleaner. 4 Reassemble the air intake filter inside the filter housing. NOTE: Unplug the power cord before and after each use. 2 The air intake filter consists of the dryer. Filter Housing !) Air Intake Filter Remove the air intake filter inside the filter housing, then reinstall the...

User Manual
Page 19
... or bulked together. • The dryer is not located in a properly ventilated area. • Make sure your house. • The door is not closed . • Verify the presets used for 'TIMER', 'MODE', and 'SENSOR DRY'. • Clean the filter. • Reduce the laundry load in . • The circuit breaker tripped or a fuse blew. Check for a blown circuit fuse or tripped main circuit breaker...
... or bulked together. • The dryer is not located in a properly ventilated area. • Make sure your house. • The door is not closed . • Verify the presets used for 'TIMER', 'MODE', and 'SENSOR DRY'. • Clean the filter. • Reduce the laundry load in . • The circuit breaker tripped or a fuse blew. Check for a blown circuit fuse or tripped main circuit breaker...
User Manual
Page 20
... to request warranty service or order parts. 20 This warranty gives you specific rights, and you may also have other rights which very from the date of purchaserat A copy of the dated sales receipt/invoice is required to receive warranty service, replacement or refundrat This warranty covers appliances in use of the product or improper installation • Replacement or resetting of house fuses or circuit...
... to request warranty service or order parts. 20 This warranty gives you specific rights, and you may also have other rights which very from the date of purchaserat A copy of the dated sales receipt/invoice is required to receive warranty service, replacement or refundrat This warranty covers appliances in use of the product or improper installation • Replacement or resetting of house fuses or circuit...


