
User Manual
Page 3
CONTENTS PRODUCT REGISTRATION 2 IMPORTANT SAFETY INSTRUCTIONS 4 SPECIFICATIONS 6 INSTALLATION INSTRUCTIONS 7 BEFORE USE 10 OPERATION INSTRUCTIONS 11 WASH CYCLE PARAMETERS 1 CARE AND MAINTENANCE TROUBLESHOOTING 2 LIMITED WARRANTY 2 3
CONTENTS PRODUCT REGISTRATION 2 IMPORTANT SAFETY INSTRUCTIONS 4 SPECIFICATIONS 6 INSTALLATION INSTRUCTIONS 7 BEFORE USE 10 OPERATION INSTRUCTIONS 11 WASH CYCLE PARAMETERS 1 CARE AND MAINTENANCE TROUBLESHOOTING 2 LIMITED WARRANTY 2 3
User Manual
Page 4
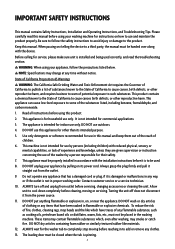
... before reaching in any time without notice. DO NOT wash or dry articles of clothing or any items that has a damaged cord or plug, if it is damaged or malfunctions in to such substances. IMPORTANT SAFETY INSTRUCTIONS This manual contains Safety Instructions, Installation and Operating Instructions, and Troubleshooting Tips. Be sure to follow the precautions listed below. Contact customer service or a service technician. 10. ALWAYS wait...
... before reaching in any time without notice. DO NOT wash or dry articles of clothing or any items that has a damaged cord or plug, if it is damaged or malfunctions in to such substances. IMPORTANT SAFETY INSTRUCTIONS This manual contains Safety Instructions, Installation and Operating Instructions, and Troubleshooting Tips. Be sure to follow the precautions listed below. Contact customer service or a service technician. 10. ALWAYS wait...
User Manual
Page 5
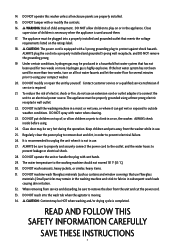
... exposed to climb in a household hot water system that has not been used around them. 17. ALWAYS plug the cord into the wash tub when the agitator is completed. The appliance must be produced in or on the ratings label. 18. Glass door may be plugged into a properly installed and grounded outlet that use . 25. Regularly clean the power plug to remove dust and dirt, in a moist...
... exposed to climb in a household hot water system that has not been used around them. 17. ALWAYS plug the cord into the wash tub when the agitator is completed. The appliance must be produced in or on the ratings label. 18. Glass door may be plugged into a properly installed and grounded outlet that use . 25. Regularly clean the power plug to remove dust and dirt, in a moist...
User Manual
Page 7
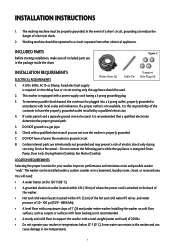
.... 5. INSTALLATION INSTRUCTIONS 1. Check with a power supply cord having a 3 prong grounding plug. 3. Certain internal parts are in a circuit separate from other electrical appliances. Service Personnel - A 120v, 60Hz, AC 15-or 20amp, fused electrical supply is energized: Drain Pump, Door Lock, Drying Heater (Combo), Fan Motor (Combo). If a proper outlet is not available, it is attached to have a fuse in the neutral or ground circuit. 8. You will need: • A water heater set...
.... 5. INSTALLATION INSTRUCTIONS 1. Check with a power supply cord having a 3 prong grounding plug. 3. Certain internal parts are in a circuit separate from other electrical appliances. Service Personnel - A 120v, 60Hz, AC 15-or 20amp, fused electrical supply is energized: Drain Pump, Door Lock, Drying Heater (Combo), Fan Motor (Combo). If a proper outlet is not available, it is attached to have a fuse in the neutral or ground circuit. 8. You will need: • A water heater set...
User Manual
Page 8
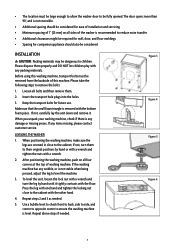
... of washing machine. INSTALLATION CAUTION: Packing materials may be fully opened. Keep the transport bolts for companion appliance should be required for wall, door, and floor moldings. • Spacing for future use. If any damage or missing pieces. If not, turn the leg by hand or with a wrench and tighten the nuts with a wrench and turn them . 2. To level the...
... of washing machine. INSTALLATION CAUTION: Packing materials may be fully opened. Keep the transport bolts for companion appliance should be required for wall, door, and floor moldings. • Spacing for future use. If any damage or missing pieces. If not, turn the leg by hand or with a wrench and tighten the nuts with a wrench and turn them . 2. To level the...
User Manual
Page 9
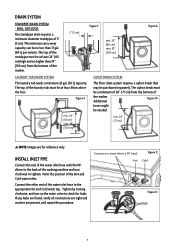
... cm) Figure 8 LAUNDRY TUB DRAIN SYSTEM The laundry tub needs a minimum 20 gal. (76 L) capacity. appropriate Hot and Cold water tap. The siphon break must be at least 24" (60 cm) high and no less than 39" (100 cm) from the bottom of the standpipe must be purchased separately. Tighten by turning clockwise, and turn clockwise to check for leaks If any leaks are found, verify...
... cm) Figure 8 LAUNDRY TUB DRAIN SYSTEM The laundry tub needs a minimum 20 gal. (76 L) capacity. appropriate Hot and Cold water tap. The siphon break must be at least 24" (60 cm) high and no less than 39" (100 cm) from the bottom of the standpipe must be purchased separately. Tighten by turning clockwise, and turn clockwise to check for leaks If any leaks are found, verify...
User Manual
Page 10
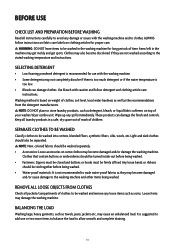
... of time. Use bleach with the washing machine. • Some detergents may damage the washing machine. Light and dark clothes should be washed in the washing machine for proper care. Any loose bands or ribbons should be separated. BALANCING THE LOAD Washing large, heavy garments, such as they are not washed according to the washing machine and other items being washed. • Water-proof materials: It is based on top of your washer/dryer...
... of time. Use bleach with the washing machine. • Some detergents may damage the washing machine. Light and dark clothes should be washed in the washing machine for proper care. Any loose bands or ribbons should be separated. BALANCING THE LOAD Washing large, heavy garments, such as they are not washed according to the washing machine and other items being washed. • Water-proof materials: It is based on top of your washer/dryer...
User Manual
Page 11
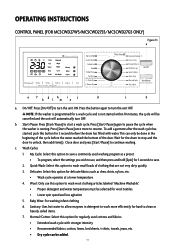
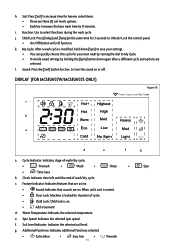
... very dirty quickly. 3. OPERATING INSTRUCTIONS CONTROL PANEL (FOR MCSCWD27W5/MCSCWD27S5/MCSCWD27G5 ONLY) Figure 13 a Press 3 sec. Press the button again to turn OFF. b. Close door and press [Start/Pause] to unlock, then add item(s). Press [Start/Pause] once more efficiently for delicate fabrics such as a preset. • To program, select the settings you wish to use this option to wash wool clothing articles labeled "Machine Washable". • Proper detergent and water temperature must...
... very dirty quickly. 3. OPERATING INSTRUCTIONS CONTROL PANEL (FOR MCSCWD27W5/MCSCWD27S5/MCSCWD27G5 ONLY) Figure 13 a Press 3 sec. Press the button again to turn OFF. b. Close door and press [Start/Pause] to unlock, then add item(s). Press [Start/Pause] once more efficiently for delicate fabrics such as a preset. • To program, select the settings you wish to use this option to wash wool clothing articles labeled "Machine Washable". • Proper detergent and water temperature must...
User Manual
Page 12
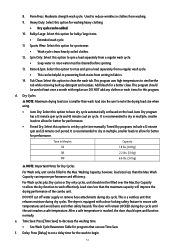
... a month with a door-locking safety feature to decrease the washing time. • See Wash Cycle Parameters Table for performance. • Timed Dry: Select this option to set dry cycle time manually. Time Save: Press [Time Save] to ensure safe temperatures and avoid burns and other safety hazards. f. This program uses high temperatures to spin a load separately from washing. 9. This is recommended to dry in clothes from a regular wash cycle. • Soap water or rinse water must be...
... a month with a door-locking safety feature to decrease the washing time. • See Wash Cycle Parameters Table for performance. • Timed Dry: Select this option to set dry cycle time manually. Time Save: Press [Time Save] to ensure safe temperatures and avoid burns and other safety hazards. f. This program uses high temperatures to spin a load separately from washing. 9. This is recommended to dry in clothes from a regular wash cycle. • Soap water or rinse water must be...
User Manual
Page 13
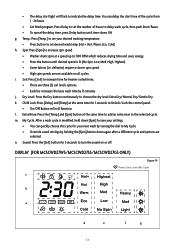
... desired washing temperature. • Press button to set My Cycle c b a d e 13 f g Extra Rinse: Press the [Temp.] and [Spin] button at the same time for 3 seconds to turn the sound on all cycles. Sound: Press the [Soil] button for 3 seconds to Unlock/Lock the control panel. • On/Off Button will flash to indicate the delay time. j. k. My Cycle: After a wash cycle is lit (No Spin, Low, Med, High, Highest). • Some fabrics (i.e. Spin: Press [Spin] to increase spin speed. • Washer drum spins...
... desired washing temperature. • Press button to set My Cycle c b a d e 13 f g Extra Rinse: Press the [Temp.] and [Spin] button at the same time for 3 seconds to turn the sound on all cycles. Sound: Press the [Soil] button for 3 seconds to Unlock/Lock the control panel. • On/Off Button will flash to indicate the delay time. j. k. My Cycle: After a wash cycle is lit (No Spin, Low, Med, High, Highest). • Some fabrics (i.e. Spin: Press [Spin] to increase spin speed. • Washer drum spins...
User Manual
Page 14
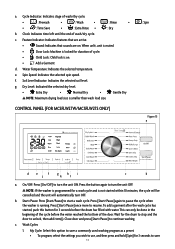
... load size is locked for 3 seconds before the water reached the bottom of the door. CONTROL PANEL (FOR MCSFLW27W/MCSFLW27S ONLY) Press 3 sec. Press [Start/Pause] again to save a commonly used washing program as a preset. • To program, select the settings you wish to use, and then press and hold [Spin] for the drum to stop and the door to turn the unit ON. My Cycle: Select this button...
... load size is locked for 3 seconds before the water reached the bottom of the door. CONTROL PANEL (FOR MCSFLW27W/MCSFLW27S ONLY) Press 3 sec. Press [Start/Pause] again to save a commonly used washing program as a preset. • To program, select the settings you wish to use, and then press and hold [Spin] for the drum to stop and the door to turn the unit ON. My Cycle: Select this button...
User Manual
Page 15
... button until time shows 0H. Cold Wash: Only uses cold water. 8. This program uses high temperatures to sterilize the tub while removing built up to set a delay time for sportswear. • Wash cycle cleans heavily soiled clothes. 14. Baby Wear: For washing infant clothing 6. Delay: Press [Delay] to drain any clothes or wash items for washing heavy clothing. 12. Drain Only: Used to set desired wash temp (Hot+, Hot, Warm, Eco, Cold) g. delicates) require a slower spin speed. • High spin speeds are not very dirty quickly. 3. Quick Wash...
... button until time shows 0H. Cold Wash: Only uses cold water. 8. This program uses high temperatures to sterilize the tub while removing built up to set a delay time for sportswear. • Wash cycle cleans heavily soiled clothes. 14. Baby Wear: For washing infant clothing 6. Delay: Press [Delay] to drain any clothes or wash items for washing heavy clothing. 12. Drain Only: Used to set desired wash temp (Hot+, Hot, Warm, Eco, Cold) g. delicates) require a slower spin speed. • High spin speeds are not very dirty quickly. 3. Quick Wash...
User Manual
Page 16
... the wash cycle j. When unlit, unit is muted. • Door Lock: Machine is modified, hold down again after a different cycle and options are three (3) soil levels options. • Each bar increases the base wash time by holding the [Spin] button down [Spin] to save your settings. • You can quickly choose this cycle for your next wash by turning the dial to Unlock/Lock the control panel. • On/Off Button will...
... the wash cycle j. When unlit, unit is muted. • Door Lock: Machine is modified, hold down again after a different cycle and options are three (3) soil levels options. • Each bar increases the base wash time by holding the [Spin] button down [Spin] to save your settings. • You can quickly choose this cycle for your next wash by turning the dial to Unlock/Lock the control panel. • On/Off Button will...
User Manual
Page 17
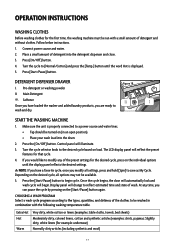
... [Start/Pause] button again. The LCD display panel will begin cycle. OPERATION INSTRUCTIONS WASHING CLOTHES Before washing clothes for the first time, the washing machine must be turned on (in an open position). Press the [Start/Pause] button to modify any time, you modify all options may not be available. 5. Place a small amount of wash. Press the [On/Off] button. Display panel will illuminate. 3. Follow below instructions. 1. NOTE: If you have loaded the washer and added laundry products...
... [Start/Pause] button again. The LCD display panel will begin cycle. OPERATION INSTRUCTIONS WASHING CLOTHES Before washing clothes for the first time, the washing machine must be turned on (in an open position). Press the [Start/Pause] button to modify any time, you modify all options may not be available. 5. Place a small amount of wash. Press the [On/Off] button. Display panel will illuminate. 3. Follow below instructions. 1. NOTE: If you have loaded the washer and added laundry products...
User Manual
Page 19
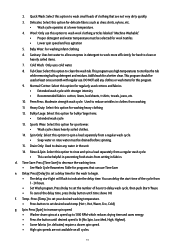
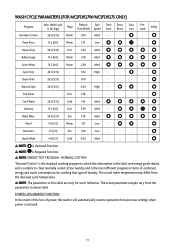
...: is Required Function. NORMAL/COTTON "Normal/Cotton" is the standard washing program to which the information in terms of power, the washer will automatically resume operation from the declared cycle temperature. Perm Press 13.2 (6.0) Warm 1:35 Low - Rinse & Spin 26.5 (12.0) - 0:20 High - - Baby Wear 26.5 (12.0) Eco 1:39 Med Wool 4.4 (2.0) Warm 1:37 Low - - Quick Wash 4.4 (2.0) Cold 0:20 Med - - - - NOTE: ENERGY TEST PROGRAM - Wash Load in above table...
...: is Required Function. NORMAL/COTTON "Normal/Cotton" is the standard washing program to which the information in terms of power, the washer will automatically resume operation from the declared cycle temperature. Perm Press 13.2 (6.0) Warm 1:35 Low - Rinse & Spin 26.5 (12.0) - 0:20 High - - Baby Wear 26.5 (12.0) Eco 1:39 Med Wool 4.4 (2.0) Warm 1:37 Low - - Quick Wash 4.4 (2.0) Cold 0:20 Med - - - - NOTE: ENERGY TEST PROGRAM - Wash Load in above table...
User Manual
Page 20
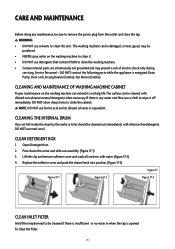
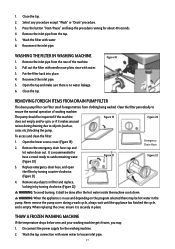
... inside the drum by the metal articles should be sure to clean the unit. DO NOT use solvents to remove the power plug from the outlet and close the tap. Replace the softener cover and push the drawer back into position. (Figure 17-3) Figure 17-1 Figure 17-2 Figure 17 Figure 17-3 CLEAN INLET FILTER Inlet filter maybe need to strike the cabinet. Service Personnel - CLEAN DETERGENT BOX 1. WARNING...
... inside the drum by the metal articles should be sure to clean the unit. DO NOT use solvents to remove the power plug from the outlet and close the tap. Replace the softener cover and push the drawer back into position. (Figure 17-3) Figure 17-1 Figure 17-2 Figure 17 Figure 17-3 CLEAN INLET FILTER Inlet filter maybe need to strike the cabinet. Service Personnel - CLEAN DETERGENT BOX 1. WARNING...
User Manual
Page 21
... draining due to ensure the normal operation of the machine. 2. Disconnect the power supply for about 40 seconds. 4. Close the tap. 2. Remove the inlet pipe from the rear of washing machine. Remove the inlet pipe from the tap. 5. To access and clean the filter: 1. Replace emergency drain hose, and open the filter by turning clockwise. (Figure 22) WARNING: To avoid burning, it makes unusual Figure 19 Figure 20 noises during a wash cycle...
... draining due to ensure the normal operation of the machine. 2. Disconnect the power supply for about 40 seconds. 4. Close the tap. 2. Remove the inlet pipe from the rear of washing machine. Remove the inlet pipe from the tap. 5. To access and clean the filter: 1. Replace emergency drain hose, and open the filter by turning clockwise. (Figure 22) WARNING: To avoid burning, it makes unusual Figure 19 Figure 20 noises during a wash cycle...
User Manual
Page 22
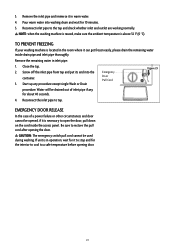
... PREVENT FREEZING If your washing machine is necessary to a safe temperature before opening the door. Start up any for it is located in the room where it in warm water. 4. Remove the remaining water in operation, wait for about 40 seconds. 4. Water will be used during washing. NOTE: when the washing machine is reused, make sure the ambient temperature is in inlet pipe: 1. EMERGENCY DOOR RELEASE In the case...
... PREVENT FREEZING If your washing machine is necessary to a safe temperature before opening the door. Start up any for it is located in the room where it in warm water. 4. Remove the remaining water in operation, wait for about 40 seconds. 4. Water will be used during washing. NOTE: when the washing machine is reused, make sure the ambient temperature is in inlet pipe: 1. EMERGENCY DOOR RELEASE In the case...
User Manual
Page 23
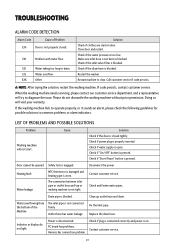
.... Disconnect the power. Replace the drain hose. PC board has problems. Contact customer service. Check if "Start/Pause" button is too low. Contact customer service. Harness has connection problem. 2 Check if water supply is engaged. Safety lock is open. Drain pipe is on. Indicator or display do not dismantle the washing machine without prior permission. EXX Other Solution Check if clothes are stuck in door. If the washing machine fails to operate properly, or it sounds an alarm...
.... Disconnect the power. Replace the drain hose. PC board has problems. Contact customer service. Check if "Start/Pause" button is too low. Contact customer service. Harness has connection problem. 2 Check if water supply is engaged. Safety lock is open. Drain pipe is on. Indicator or display do not dismantle the washing machine without prior permission. EXX Other Solution Check if clothes are stuck in door. If the washing machine fails to operate properly, or it sounds an alarm...
User Manual
Page 25
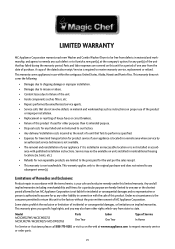
... has failed during the warranty period. Model MCSCWD27W5/MCSCWD27S5 MCSFLW27W/MCSFLW27S/MCSCWD27G5 Parts One Year Labor One Year Type of Service In Home For Service or Assistance please call 888-775-0202 or visit us any other rights which vary from the date of Remedies and Exclusions: Product repair in use of the product or improper installation. • Replacement or resetting of house fuses or circuit breakers...
... has failed during the warranty period. Model MCSCWD27W5/MCSCWD27S5 MCSFLW27W/MCSFLW27S/MCSCWD27G5 Parts One Year Labor One Year Type of Service In Home For Service or Assistance please call 888-775-0202 or visit us any other rights which vary from the date of Remedies and Exclusions: Product repair in use of the product or improper installation. • Replacement or resetting of house fuses or circuit breakers...


