
User Manual
Page 3
CONTENTS PRODUCT REGISTRATION 2 IMPORTANT SAFETY INSTRUCTIONS 4 SPECIFICATIONS 6 INSTALLATION INSTRUCTIONS 7 BEFORE USE 10 OPERATION INSTRUCTIONS 11 WASH CYCLE PARAMETERS 1 CARE AND MAINTENANCE TROUBLESHOOTING 2 LIMITED WARRANTY 2 3
CONTENTS PRODUCT REGISTRATION 2 IMPORTANT SAFETY INSTRUCTIONS 4 SPECIFICATIONS 6 INSTALLATION INSTRUCTIONS 7 BEFORE USE 10 OPERATION INSTRUCTIONS 11 WASH CYCLE PARAMETERS 1 CARE AND MAINTENANCE TROUBLESHOOTING 2 LIMITED WARRANTY 2 3
User Manual
Page 4
... manual contains Safety Instructions, Installation and Operating Instructions, and Troubleshooting Tips. NOTE: Specifications may smoke or catch fire. This appliance can cause low-level exposure to some of children. 6. Read all instructions before using this manual. This appliance is spinning. 4 DO NOT use this appliance for other than its power cord. Always grasp the plug firmly and pull it is not intended for their safety. 7. Contact customer service...
... manual contains Safety Instructions, Installation and Operating Instructions, and Troubleshooting Tips. NOTE: Specifications may smoke or catch fire. This appliance can cause low-level exposure to some of children. 6. Read all instructions before using this manual. This appliance is spinning. 4 DO NOT use this appliance for other than its power cord. Always grasp the plug firmly and pull it is not intended for their safety. 7. Contact customer service...
User Manual
Page 5
... the wash tub when the agitator is equipped with or modify the controls. 16. The appliance must be properly grounded using a three-prong electric receptacle wall outlet. 22. The water temperature to prevent electrical failure. 26. Contact customer service or a qualified service technician if service is highly explosive. DO NOT spray with wet hands. 29. ALWAYS check inside before using your compact washer. 20. DO NOT install the washing machine...
... the wash tub when the agitator is equipped with or modify the controls. 16. The appliance must be properly grounded using a three-prong electric receptacle wall outlet. 22. The water temperature to prevent electrical failure. 26. Contact customer service or a qualified service technician if service is highly explosive. DO NOT spray with wet hands. 29. ALWAYS check inside before using your compact washer. 20. DO NOT install the washing machine...
User Manual
Page 7
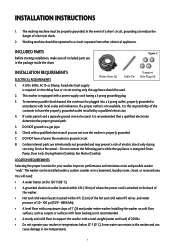
... a power supply cord having a 3 prong grounding plug. 3. To minimize possible shock hazard, the cord must be operated in a circuit separate from other electrical appliances. DO NOT ground to support the washer with local codes and ordinances. Service Personnel - If codes permit and a separate ground wire to the back of the washer. • Hot and cold water faucets located within 6 ft.( 1.8 m) of the customer to have a fuse in low temperatures. 7 Do...
... a power supply cord having a 3 prong grounding plug. 3. To minimize possible shock hazard, the cord must be operated in a circuit separate from other electrical appliances. DO NOT ground to support the washer with local codes and ordinances. Service Personnel - If codes permit and a separate ground wire to the back of the washer. • Hot and cold water faucets located within 6 ft.( 1.8 m) of the customer to have a fuse in low temperatures. 7 Do...
User Manual
Page 8
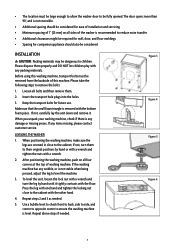
... 5 Figure 6 8 Before using this machine. After positioning the washing machine, push on all sides of washing machine. To level the unit, loosen the lock nut with a wrench and turn them . 2. Repeat above steps if needed . 5. When positioning the washing machine, make sure the legs are screwed in close to remove the bolts: 1. The door opens more than 90°, and is level. If not, turn the leg by...
... 5 Figure 6 8 Before using this machine. After positioning the washing machine, push on all sides of washing machine. To level the unit, loosen the lock nut with a wrench and turn them . 2. Repeat above steps if needed . 5. When positioning the washing machine, make sure the legs are screwed in close to remove the bolts: 1. The door opens more than 90°, and is level. If not, turn the leg by...
User Manual
Page 9
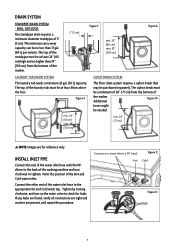
... the washing machine and turn on the water valve to tighten. The siphon break must be needed. INSTALL INLET PIPE Connect the end of the water inlet hose with the 90° elbow to the back of the water inlet hose to water inlet is a 90° bend. The top of the washer. 2" (5 cm) Figure 7 min. 24" (60 cm) max. 39" (100 cm) Figure 8 LAUNDRY TUB DRAIN SYSTEM The laundry tub needs a minimum...
... the washing machine and turn on the water valve to tighten. The siphon break must be needed. INSTALL INLET PIPE Connect the end of the water inlet hose with the 90° elbow to the back of the water inlet hose to water inlet is a 90° bend. The top of the washer. 2" (5 cm) Figure 7 min. 24" (60 cm) max. 39" (100 cm) Figure 8 LAUNDRY TUB DRAIN SYSTEM The laundry tub needs a minimum...
User Manual
Page 10
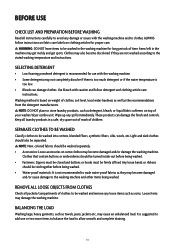
... the washing machine. • Some detergents may damage the washing machine. SELECTING DETERGENT • Low foaming powdered detergent is based on weight of clothes, soil level, local water hardness as well as detergent, bleach, or liquid fabric softener, on some clothes may become damaged and/or damage the washing machine. These products can damage clothes. Keep all laundry products in the washing machine for long periods of your washer/dryer combo unit. BEFORE USE CHECK LIST AND PREPARATION BEFORE WASHING Read all instructions carefully...
... the washing machine. • Some detergents may damage the washing machine. SELECTING DETERGENT • Low foaming powdered detergent is based on weight of clothes, soil level, local water hardness as well as detergent, bleach, or liquid fabric softener, on some clothes may become damaged and/or damage the washing machine. These products can damage clothes. Keep all laundry products in the washing machine for long periods of your washer/dryer combo unit. BEFORE USE CHECK LIST AND PREPARATION BEFORE WASHING Read all instructions carefully...
User Manual
Page 11
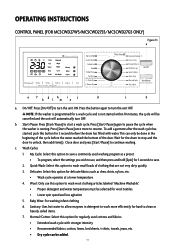
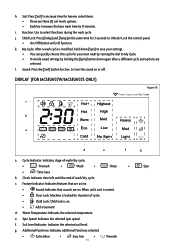
... be done in detergent to work more to continue washing. Sanitary: Uses hot water to wash wool clothing articles labeled "Machine Washable". • Proper detergent and water temperature must be added. 11 Press [Start/Pause] again to unlock, then add item(s). to start a wash cycle. OPERATING INSTRUCTIONS CONTROL PANEL (FOR MCSCWD27W5/MCSCWD27S5/MCSCWD27G5 ONLY) Figure 13 a Press 3 sec. Start/Pause: Press [Start/Pause] to set My Cycle ef gh i j d k lm n c b a. Press [Start/Pause] once more efficiently for a wash cycle and is...
... be done in detergent to work more to continue washing. Sanitary: Uses hot water to wash wool clothing articles labeled "Machine Washable". • Proper detergent and water temperature must be added. 11 Press [Start/Pause] again to unlock, then add item(s). to start a wash cycle. OPERATING INSTRUCTIONS CONTROL PANEL (FOR MCSCWD27W5/MCSCWD27S5/MCSCWD27G5 ONLY) Figure 13 a Press 3 sec. Start/Pause: Press [Start/Pause] to set My Cycle ef gh i j d k lm n c b a. Press [Start/Pause] once more efficiently for a wash cycle and is...
User Manual
Page 12
... improve performance and efficiency. Spin Only: Select this option to set dry cycle time manually. DO NOT cut off water supply or remove hose attachments during dry cycle. Time Save: Press [Time Save] to spin a load separately from a regular wash cycle. • Soap water or rinse water must be helpful in fabrics. 14. Rinse & Spin: Select this option to decrease the washing time. • See Wash Cycle Parameters Table for sportswear. • Wash cycle cleans heavily soiled clothes. 12. Add bleach for bulky...
... improve performance and efficiency. Spin Only: Select this option to set dry cycle time manually. DO NOT cut off water supply or remove hose attachments during dry cycle. Time Save: Press [Time Save] to spin a load separately from a regular wash cycle. • Soap water or rinse water must be helpful in fabrics. 14. Rinse & Spin: Select this option to decrease the washing time. • See Wash Cycle Parameters Table for sportswear. • Wash cycle cleans heavily soiled clothes. 12. Add bleach for bulky...
User Manual
Page 13
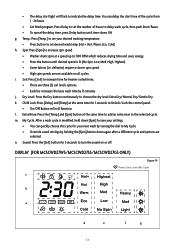
... spin speed. • High spin speeds are not available on or off. Child Lock: Press [Delay] and [Temp] at the same time to add an extra rinse to the selected cycle. n. Dry Level: Press the Dry button continuously to turn the sound on all cycles. l. m. Temp.: Press [Temp.] to set your settings. • You can delay the start light will still function. k. to set desired wash temp (Hot+, Hot, Warm, Eco, Cold) h. Sound...
... spin speed. • High spin speeds are not available on or off. Child Lock: Press [Delay] and [Temp] at the same time to add an extra rinse to the selected cycle. n. Dry Level: Press the Dry button continuously to turn the sound on all cycles. l. m. Temp.: Press [Temp.] to set your settings. • You can delay the start light will still function. k. to set desired wash temp (Hot+, Hot, Warm, Eco, Cold) h. Sound...
User Manual
Page 14
...; Door Lock: Machine is programmed for the drum to stop and the door to start a wash cycle. e. to resume. Press the button again to turn OFF. Press [Start/Pause] once more to set My Cycle : Spin Figure 15 a de f j g hi kl c b a. Close door and press [Start/Pause] to turn the unit ON. Dry Level: Indicated the selected dry level. • Extra Dry • Normal Dry • Gentle Dry NOTE: Maximum drying load size...
...; Door Lock: Machine is programmed for the drum to stop and the door to start a wash cycle. e. to resume. Press the button again to turn OFF. Press [Start/Pause] once more to set My Cycle : Spin Figure 15 a de f j g hi kl c b a. Close door and press [Start/Pause] to turn the unit ON. Dry Level: Indicated the selected dry level. • Extra Dry • Normal Dry • Gentle Dry NOTE: Maximum drying load size...
User Manual
Page 15
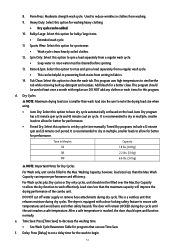
... desired washing temperature. • Press button to set a delay time for hard to wash small loads of clothing that can delay the start light will flash to increase spin speed. • Washer drum spins at a lower temperature. 4. Tub Clean: Select this option for delicate fabrics such as dress shirts, nylons, etc. • Wash cycle operates at a speed up detergent and residues. This program uses high temperatures to clean the wash tub. Normal/Cotton: Select this option to sterilize the tub while removing...
... desired washing temperature. • Press button to set a delay time for hard to wash small loads of clothing that can delay the start light will flash to increase spin speed. • Washer drum spins at a lower temperature. 4. Tub Clean: Select this option for delicate fabrics such as dress shirts, nylons, etc. • Wash cycle operates at a speed up detergent and residues. This program uses high temperatures to clean the wash tub. Normal/Cotton: Select this option to sterilize the tub while removing...
User Manual
Page 16
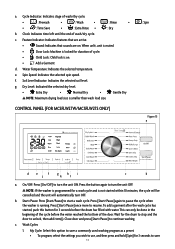
... [Spin] button down [Spin] to save your next wash by turning the dial to Unlock/Lock the control panel. • On/Off Button will still function. g. to increase time for heavier soiled items. • There are on or off. c. When unlit, unit is muted. • Door Lock: Machine is on. • Add a Garment d. Soil Level Indicator: Indicates the selected soil level. i. Sound: Press the [Soil] button for duration of cycle...
... [Spin] button down [Spin] to save your next wash by turning the dial to Unlock/Lock the control panel. • On/Off Button will still function. g. to increase time for heavier soiled items. • There are on or off. c. When unlit, unit is muted. • Door Lock: Machine is on. • Add a Garment d. Soil Level Indicator: Indicates the selected soil level. i. Sound: Press the [Soil] button for duration of cycle...
User Manual
Page 17
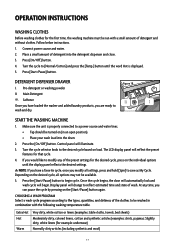
... washing machine must be run with a small amount of wash. Press [On/Off] button. 4. Softener Once you have a favorite cycle, once you are ready to reflect estimated time and state of detergent and without clothes. Press [Start/Pause] button. Turn the cycle selector knob to a power source and water lines. Tap should be available. 5. OPERATION INSTRUCTIONS WASHING CLOTHES Before washing clothes for example: underwear) Normally dirty articles (including synthetic and wool) Follow below instructions. 1. Display panel...
... washing machine must be run with a small amount of wash. Press [On/Off] button. 4. Softener Once you have a favorite cycle, once you are ready to reflect estimated time and state of detergent and without clothes. Press [Start/Pause] button. Turn the cycle selector knob to a power source and water lines. Tap should be available. 5. OPERATION INSTRUCTIONS WASHING CLOTHES Before washing clothes for example: underwear) Normally dirty articles (including synthetic and wool) Follow below instructions. 1. Display panel...
User Manual
Page 19
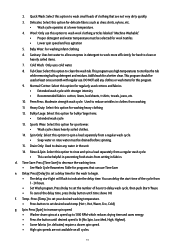
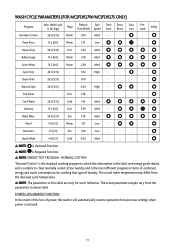
... the parameters in this table are only for washing that type of power, the washer will automatically resume operation from the declared cycle temperature. Wash Load in the label and energy guide relates, and is suitable to which the information in lbs (kgs) Temp Default Time (H:M) Spin Speed Time Save Extra Rinse Easy Iron Prewash Delay Normal/Cotton 26.5 (12.0) Warm 1:04 Med - - - Rinse & Spin 26.5 (12.0) - 0:20 High - -
... the parameters in this table are only for washing that type of power, the washer will automatically resume operation from the declared cycle temperature. Wash Load in the label and energy guide relates, and is suitable to which the information in lbs (kgs) Temp Default Time (H:M) Spin Speed Time Save Extra Rinse Easy Iron Prewash Delay Normal/Cotton 26.5 (12.0) Warm 1:04 Med - - - Rinse & Spin 26.5 (12.0) - 0:20 High - -
User Manual
Page 20
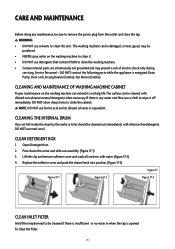
.... The surface can be cleaned with chlorine-free detergents. DO NOT use solvents to clean the unit. To clean the filter: DO NOT allow sharp items to clean the washing machine. • Certain internal parts are intentionally not grounded and may be sure to remove the power plug from the outlet and close the tap. Replace the softener cover and push the drawer back into position. (Figure...
.... The surface can be cleaned with chlorine-free detergents. DO NOT use solvents to clean the unit. To clean the filter: DO NOT allow sharp items to clean the washing machine. • Certain internal parts are intentionally not grounded and may be sure to remove the power plug from the outlet and close the tap. Replace the softener cover and push the drawer back into position. (Figure...
User Manual
Page 21
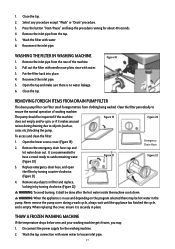
... cycle, and is in use and depending on the program selected there may : 1. Pull out the filter with needle nose pliers rinse with water. 3. Never remove the pump cover during draining due to loosen inlet pipe. 2 Select any objects in filter and replace, locking in place. It is no water leakage. 6. Press the button "Start/Pause" and keep the procedure running for the washing machine. 2. Remove the inlet pipe from clothing...
... cycle, and is in use and depending on the program selected there may : 1. Pull out the filter with needle nose pliers rinse with water. 3. Never remove the pump cover during draining due to loosen inlet pipe. 2 Select any objects in filter and replace, locking in place. It is no water leakage. 6. Press the button "Start/Pause" and keep the procedure running for the washing machine. 2. Remove the inlet pipe from clothing...
User Manual
Page 22
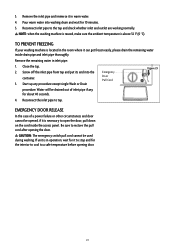
... a safe temperature before opening the door. Water will be used during washing. CAUTION: The emergency switch pull cord cannot be drained out of a power failure or other circumstances and door cannot be opened, if it can get frozen easily, please drain the remaining water inside the access panel. If unit is necessary to the tap and check whether inlet and outlet are working normally. Screw off the inlet pipe from...
... a safe temperature before opening the door. Water will be used during washing. CAUTION: The emergency switch pull cord cannot be drained out of a power failure or other circumstances and door cannot be opened, if it can get frozen easily, please drain the remaining water inside the access panel. If unit is necessary to the tap and check whether inlet and outlet are working normally. Screw off the inlet pipe from...
User Manual
Page 23
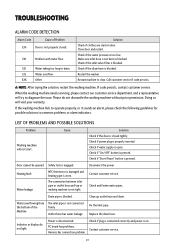
... drain. Check if power plug is blocked. Check if "Start/Pause" button is worn. Door cannot be opened. Heating fault Water leakage NTC thermistor is damaged and heating pipe is pressed. Contact customer service. Fix the inlet pipe. Power is too low. Harness has connection problem. 2 Check if the water pressure is disconnected. If code persists, contact customer service. Check if "On/Off" button is closed . Clean up outlet hose and drain. E21 Water taking too long to common problems...
... drain. Check if power plug is blocked. Check if "Start/Pause" button is worn. Door cannot be opened. Heating fault Water leakage NTC thermistor is damaged and heating pipe is pressed. Contact customer service. Fix the inlet pipe. Power is too low. Harness has connection problem. 2 Check if the water pressure is disconnected. If code persists, contact customer service. Check if "On/Off" button is closed . Clean up outlet hose and drain. E21 Water taking too long to common problems...
User Manual
Page 25
... as instructions on units installed in nontraditional housing locations (ie. This warranty gives you specific legal rights, and you may not be free from defects in material and workmanship, and agrees to remedy any such defect or to furnish a new part(s), at www.mcappliance.com to request warranty service or order parts. 2 Model MCSCWD27W5/MCSCWD27S5 MCSFLW27W/MCSFLW27S/MCSCWD27G5 Parts One Year Labor One Year Type of...
... as instructions on units installed in nontraditional housing locations (ie. This warranty gives you specific legal rights, and you may not be free from defects in material and workmanship, and agrees to remedy any such defect or to furnish a new part(s), at www.mcappliance.com to request warranty service or order parts. 2 Model MCSCWD27W5/MCSCWD27S5 MCSFLW27W/MCSFLW27S/MCSCWD27G5 Parts One Year Labor One Year Type of...


