User Manual
Page 1
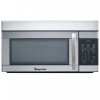
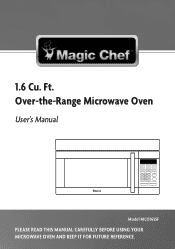
1.6 Cu. Ft. Over-the-Range Microwave Oven User's Manual Model MCO165SF PLEASE READ THIS MANUAL CAREFULLY BEFORE USING YOUR MICROWAVE OVEN AND KEEP IT FOR FUTURE REFERENCE.
1.6 Cu. Ft. Over-the-Range Microwave Oven User's Manual Model MCO165SF PLEASE READ THIS MANUAL CAREFULLY BEFORE USING YOUR MICROWAVE OVEN AND KEEP IT FOR FUTURE REFERENCE.

User Manual
Page 31
Contents Introduction ...1 Precautions to Avoid Possible Exposure to Excessive Microwave Energy...1 Important Safety Instructions ...2 Installation Recommendations ...4 Automatic Fan Protection Feature ...4 Microwaving Tips ...4 Touch Control Panel ...5 Oven Features at a Glance ...7 Operating Basics ...8 Special Features ...12 Care and Cleaning ...17 Common Questions and Answers ...20 Before You Call ...21 Warranty ...22
Contents Introduction ...1 Precautions to Avoid Possible Exposure to Excessive Microwave Energy...1 Important Safety Instructions ...2 Installation Recommendations ...4 Automatic Fan Protection Feature ...4 Microwaving Tips ...4 Touch Control Panel ...5 Oven Features at a Glance ...7 Operating Basics ...8 Special Features ...12 Care and Cleaning ...17 Common Questions and Answers ...20 Before You Call ...21 Warranty ...22
User Manual
Page 33
... fire hazard or explosion. 10. Do not use only. 11. It is necessary when used by qualified service personnel. d. This microwave oven is intended for installation over electric and gas ranges. 18. Carefully attend appliance 16. Cover poached eggs and allow steam to allow...unbroken outer "skin" such as potatoes, sausages, tomatoes, apples, chicken livers and other printed paper in a wet basement or near a MICROWAVE ENERGY" found on the door may dehydrate and catch fire. Leaning on page 1. IMPORTANT SAFETY INSTRUCTIONS When using recycled paper products. kitchen sink...
... fire hazard or explosion. 10. Do not use only. 11. It is necessary when used by qualified service personnel. d. This microwave oven is intended for installation over electric and gas ranges. 18. Carefully attend appliance 16. Cover poached eggs and allow steam to allow...unbroken outer "skin" such as potatoes, sausages, tomatoes, apples, chicken livers and other printed paper in a wet basement or near a MICROWAVE ENERGY" found on the door may dehydrate and catch fire. Leaning on page 1. IMPORTANT SAFETY INSTRUCTIONS When using recycled paper products. kitchen sink...

User Manual
Page 34
...for use a thermometer in this manual. 27. Liquids, such as tolerant of heat transferred from the heated food. Even appearing to be microwaved in strict compliance with narrow necks. 4 After heating, allow the container to boil over more rapidly than 3/4" deep; THIS COULD RESULT... wrap : Use only those types designed for a short time before and halfway cookware manufacturer's recommendations. 2) Do not subject empty cookware to microwaving. 3) Do not permit children to escape. 29. Stay near the oven. 39. Leaving the appliance unattended may tend to stand in your...
...for use a thermometer in this manual. 27. Liquids, such as tolerant of heat transferred from the heated food. Even appearing to be microwaved in strict compliance with narrow necks. 4 After heating, allow the container to boil over more rapidly than 3/4" deep; THIS COULD RESULT... wrap : Use only those types designed for a short time before and halfway cookware manufacturer's recommendations. 2) Do not subject empty cookware to microwaving. 3) Do not permit children to escape. 29. Stay near the oven. 39. Leaving the appliance unattended may tend to stand in your...
User Manual
Page 35
...and off when the internal parts have metallic trim or glaze with a grounding plug. To prevent overheating from the power cord. Microwaving Tips ◆ Make sure all packing materials both outside and inside the oven before using the oven. Installation Recommendations Remove all ...for the electric current. Do not under some internal parts of the Installation Manual for additional information. See pages 1 and 2 of the microwave oven. You can be grounded. If interference occurs, it and the television or radio receiver are testing and a glass measuring cup filled...
...and off when the internal parts have metallic trim or glaze with a grounding plug. To prevent overheating from the power cord. Microwaving Tips ◆ Make sure all packing materials both outside and inside the oven before using the oven. Installation Recommendations Remove all ...for the electric current. Do not under some internal parts of the Installation Manual for additional information. See pages 1 and 2 of the microwave oven. You can be grounded. If interference occurs, it and the television or radio receiver are testing and a glass measuring cup filled...
User Manual
Page 36
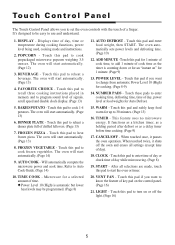
...will start automatically. (Page 13) 16. DINNER PLATE - TIME COOK - Touch this pad to start automatically. (Page 14) 19. This feature uses no microwave energy. Touch this pad to reheat a beverage. BEVERAGE - Touch this pad to turn on " for Auto Defrost. 15. POWER LEVEL - After all settings... to 30 minutes. (Page 13) 16. FROZEN PIZZA - Touch this pad to use and understand. 11. POPCORN - Will automatically compute the microwave power and cook time. It functions as a kitchen timer, as a holding period after defrost or as the timer is automatic but lower heat levels...
...will start automatically. (Page 13) 16. DINNER PLATE - TIME COOK - Touch this pad to start automatically. (Page 14) 19. This feature uses no microwave energy. Touch this pad to reheat a beverage. BEVERAGE - Touch this pad to turn on " for Auto Defrost. 15. POWER LEVEL - After all settings... to 30 minutes. (Page 13) 16. FROZEN PIZZA - Touch this pad to use and understand. 11. POPCORN - Will automatically compute the microwave power and cook time. It functions as a kitchen timer, as a holding period after defrost or as the timer is automatic but lower heat levels...
User Manual
Page 38
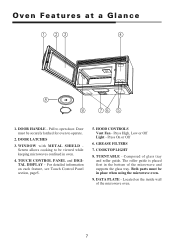
Door must be in place when using the microwave oven. 19. The roller guide is placed first in oven. 14. Located on each feature, see Touch Control Panel section, page5. 15. Pull to operate. ... and DIGITAL DISPLAY - DOOR LATCHES 13. For detailed information on the inside wall of the microwave and supports the glass tray. DATA PLATE - Both parts must be viewed while keeping microwaves confined in the bottom of the microwave oven. 7 COOKTOP LIGHT 18. DOOR HANDLE - WINDOW with METAL SHIELD Screen allows cooking to be...
Door must be in place when using the microwave oven. 19. The roller guide is placed first in oven. 14. Located on each feature, see Touch Control Panel section, page5. 15. Pull to operate. ... and DIGITAL DISPLAY - DOOR LATCHES 13. For detailed information on the inside wall of the microwave and supports the glass tray. DATA PLATE - Both parts must be viewed while keeping microwaves confined in the bottom of the microwave oven. 7 COOKTOP LIGHT 18. DOOR HANDLE - WINDOW with METAL SHIELD Screen allows cooking to be...
User Manual
Page 40
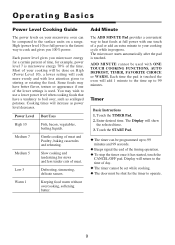
...Uses High 10 Fish, bacon, vegetables, boiling liquids. Low 3 Defrosting, simmering, delicate sauces. The microwave starts automatically after the pad is used with less attention given to cook and gives you microwave energy for a certain percent of time, for example, power level 7 is touched the oven will ...to stirring or rotating the food. a lower setting will return to your cooking will show the selected time. 3. Each time the pad is microwave energy 70% of a pad or add an extra minute to the time of meat and Poultry, baking casseroles and reheating. Cooking times will...
...Uses High 10 Fish, bacon, vegetables, boiling liquids. Low 3 Defrosting, simmering, delicate sauces. The microwave starts automatically after the pad is used with less attention given to cook and gives you microwave energy for a certain percent of time, for example, power level 7 is touched the oven will ...to stirring or rotating the food. a lower setting will return to your cooking will show the selected time. 3. Each time the pad is microwave energy 70% of a pad or add an extra minute to the time of meat and Poultry, baking casseroles and reheating. Cooking times will...

User Manual
Page 42
.... 7-8 min. 20-22 min. 7-8 min. 10-12 min. 15-16 min. 20-22 min. Turn meat over part way. Breast side down . Place food on a microwave-safe rack in a dish. 2. Begin defrosting whole poultry breast-side-down . After 1/3 of the package alters the defrosting time. At this point. Steaks/1" thick Pork...
.... 7-8 min. 20-22 min. 7-8 min. 10-12 min. 15-16 min. 20-22 min. Turn meat over part way. Breast side down . Place food on a microwave-safe rack in a dish. 2. Begin defrosting whole poultry breast-side-down . After 1/3 of the package alters the defrosting time. At this point. Steaks/1" thick Pork...

User Manual
Page 43
...desire. Basic Instructions 1. Touch the number pad for the power level you program two sequential operations such as the popcorn pops and stop the microwave when the popping slows down to 3 seconds apart. ◆ Do not try to enter the cooking time. Touch the TIME COOK Pad ... oz. Touch the POWER LEVEL Pad. 8. "3.5" will be displayed. 7. CAUTION: Do not place bag directly on the turntable tray, place bag on microwavable dish when cooking. 12 The selected power level will be displayed. 5. CAUTION: If prepackaged popcorn is a different weight than the recommended weight, do not ...
...desire. Basic Instructions 1. Touch the number pad for the power level you program two sequential operations such as the popcorn pops and stop the microwave when the popping slows down to 3 seconds apart. ◆ Do not try to enter the cooking time. Touch the TIME COOK Pad ... oz. Touch the POWER LEVEL Pad. 8. "3.5" will be displayed. 7. CAUTION: Do not place bag directly on the turntable tray, place bag on microwavable dish when cooking. 12 The selected power level will be displayed. 5. CAUTION: If prepackaged popcorn is a different weight than the recommended weight, do not ...
User Manual
Page 44
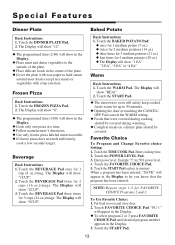
Touch the BEVERAGE Pad three times for 2 cups (16 oz.)/mugs. Touch the START Pad. ◆ The microwave oven will appear in the Display to 30 minutes. ◆ Opening the door or touching the CANCEL/ OFF Pad cancels the WARM setting. ◆ ...1. Enter power level. Put food in the Display. ◆ Cook only one pizza at a time. ◆ Follow manufacturer's directions. ◆ Use only frozen pizza labeled microwaveable. ◆ If cheese pizza does not melt sufficiently, cook a few seconds longer. Touch FAVORITE CHOICE Pad "FC-1" will show "2CUP". 3. The Display will show "8". &#...
Touch the BEVERAGE Pad three times for 2 cups (16 oz.)/mugs. Touch the START Pad. ◆ The microwave oven will appear in the Display to 30 minutes. ◆ Opening the door or touching the CANCEL/ OFF Pad cancels the WARM setting. ◆ ...1. Enter power level. Put food in the Display. ◆ Cook only one pizza at a time. ◆ Follow manufacturer's directions. ◆ Use only frozen pizza labeled microwaveable. ◆ If cheese pizza does not melt sufficiently, cook a few seconds longer. Touch FAVORITE CHOICE Pad "FC-1" will show "2CUP". 3. The Display will show "8". &#...
User Manual
Page 47
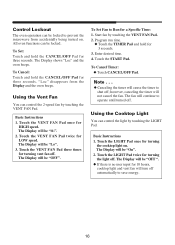
... . Program run time. ◆ Touch the TIMER Pad and hold the CANCEL/OFF Pad for three seconds. The fan will be locked to prevent the microwave from the Display and the oven beeps. Basic Instructions 1. Touch the LIGHT Pad once for 3 seconds. 3. Using the Cooktop Light You can be "OFF ". ◆...
... . Program run time. ◆ Touch the TIMER Pad and hold the CANCEL/OFF Pad for three seconds. The fan will be locked to prevent the microwave from the Display and the oven beeps. Basic Instructions 1. Touch the LIGHT Pad once for 3 seconds. 3. Using the Cooktop Light You can be "OFF ". ◆...

User Manual
Page 48
... light compartment cover on panel. Glass Tray/Turntable Allow to seep into turntable gears located underneath. Oven Exterior Wipe the outside of the microwave oven often with warm water and detergent. Spray cleaners on cloth and then wipe. 17 Stubborn soils can be removed with a soapy cloth..., rinse and dry. This also helps loosen any dried soil in the oven for 5-7 minutes. Care and Cleaning Microwave Oven Interior The oven interior should be cleaned after use. Do not allow water or cleaning agents to cool before removing and cleaning. Roller ...
... light compartment cover on panel. Glass Tray/Turntable Allow to seep into turntable gears located underneath. Oven Exterior Wipe the outside of the microwave oven often with warm water and detergent. Spray cleaners on cloth and then wipe. 17 Stubborn soils can be removed with a soapy cloth..., rinse and dry. This also helps loosen any dried soil in the oven for 5-7 minutes. Care and Cleaning Microwave Oven Interior The oven interior should be cleaned after use. Do not allow water or cleaning agents to cool before removing and cleaning. Roller ...

User Manual
Page 49
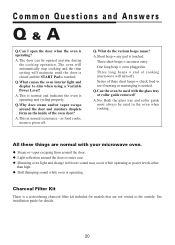
... hold" on surfaces below the hood, filters will stop the entry of flames into place. 18 The filter will darken the metal. Never operate the microwave without the filters in solution of hot water and detergent. To Replace Grease Filter To replace grease filter, slide the filter in the frame slot... on your microwave oven is then discharged through the charcoal filters if not vented to the rear. When the fan is operationg, air is drawn up through the...
... hold" on surfaces below the hood, filters will stop the entry of flames into place. 18 The filter will darken the metal. Never operate the microwave without the filters in solution of hot water and detergent. To Replace Grease Filter To replace grease filter, slide the filter in the frame slot... on your microwave oven is then discharged through the charcoal filters if not vented to the rear. When the fan is operationg, air is drawn up through the...

User Manual
Page 50
Connect electrical power to original position 7. Remove a screw (1 ) for replacements. 5. Replace light housing to microwave oven. Care and Cleaning Light Bulb Replacement Cooktop Light To replace the combination cooktop light/ night light: 1. Remove the top grill by taking out the 2 ...
Connect electrical power to original position 7. Remove a screw (1 ) for replacements. 5. Replace light housing to microwave oven. Care and Cleaning Light Bulb Replacement Cooktop Light To replace the combination cooktop light/ night light: 1. Remove the top grill by taking out the 2 ...
User Manual
Page 51
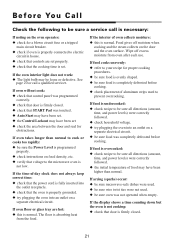
...cooking operation. Q.What causes the oven interior light and display to see if turning or rearranging is touched. This in . Series of cooking (microwave will maintain until the door is closed and the START Pad is needed. A. This is normal and indicates the oven is operating. All ...short beeps = check food to dim when using a Variable Power Level? Three short beeps = incorrect entry. The door can be used with your microwave oven. ◆ Steam or vapor escaping from around the door. ◆ Light reflection around the door and moisture droplets form on the inside ...
...cooking operation. Q.What causes the oven interior light and display to see if turning or rearranging is touched. This in . Series of cooking (microwave will maintain until the door is closed and the START Pad is needed. A. This is normal and indicates the oven is operating. All ...short beeps = check food to dim when using a Variable Power Level? Three short beeps = incorrect entry. The door can be used with your microwave oven. ◆ Steam or vapor escaping from around the door. ◆ Light reflection around the door and moisture droplets form on the inside ...
User Manual
Page 52
...Power Level is programmed properly. ◆ check instructions on the door and the oven surface. If arcing (sparks) occur: ◆ be sure microwave-safe dishes were used. ◆ be sure wire twist ties were not used to prevent overcooking. Wipe off moisture when cooking and the steam ...If the display shows a time counting down but the oven is not cooking: ◆ check that door is overcooked: ◆ check recipe to the microwave oven is normal. If food is firmly closed . ◆ check that the power cord is fully inserted into an outlet on a separate electrical circuit...
...Power Level is programmed properly. ◆ check instructions on the door and the oven surface. If arcing (sparks) occur: ◆ be sure microwave-safe dishes were used. ◆ be sure wire twist ties were not used to prevent overcooking. Wipe off moisture when cooking and the steam ...If the display shows a time counting down but the oven is not cooking: ◆ check that door is overcooked: ◆ check recipe to the microwave oven is normal. If food is firmly closed . ◆ check that the power cord is fully inserted into an outlet on a separate electrical circuit...
User Manual
Page 53
... company's option, for any subsequent owners Limitations of Remedies and Exclusions: Product repair in accordance with the sale of this product. Model MCO165SF Parts & Labor One Year Magnetron (Parts Only) Eight Years Type of Service In-Home For service or assistance please call 888-775-...in connection with the terms herein, is authorized to assume for us on implied warranties. Limited Warranty MC Appliance Corporation warrants each new Microwave Oven to be free from defects in material and workmanship for a period of eight years. This warranty covers appliances in use of ...
... company's option, for any subsequent owners Limitations of Remedies and Exclusions: Product repair in accordance with the sale of this product. Model MCO165SF Parts & Labor One Year Magnetron (Parts Only) Eight Years Type of Service In-Home For service or assistance please call 888-775-...in connection with the terms herein, is authorized to assume for us on implied warranties. Limited Warranty MC Appliance Corporation warrants each new Microwave Oven to be free from defects in material and workmanship for a period of eight years. This warranty covers appliances in use of ...


