
User Manual
Page 31
Contents Introduction ...1 Precautions to Avoid Possible Exposure to Excessive Microwave Energy...1 Important Safety Instructions ...2 Installation Recommendations ...4 Automatic Fan Protection Feature ...4 Microwaving Tips ...4 Touch Control Panel ...5 Oven Features at a Glance ...7 Operating Basics ...8 Special Features ...12 Care and Cleaning ...17 Common Questions and Answers ...20 Before You Call ...21 Warranty ...22
Contents Introduction ...1 Precautions to Avoid Possible Exposure to Excessive Microwave Energy...1 Important Safety Instructions ...2 Installation Recommendations ...4 Automatic Fan Protection Feature ...4 Microwaving Tips ...4 Touch Control Panel ...5 Oven Features at a Glance ...7 Operating Basics ...8 Special Features ...12 Care and Cleaning ...17 Common Questions and Answers ...20 Before You Call ...21 Warranty ...22
User Manual
Page 33
... closing the door, use . Read and follow the specific "PRECAUTIONS TO 15. kitchen sink, in a commercial package recommended especially for storage. Install or locate this manual. lights, blowing of fuse or tripping of fire. 22. newspaper or other printed paper in accordance with an empty utensil to avoid damage to heat, cook or defrost food. Do not heat, store or use the oven for microwave ovens. Such products...
... closing the door, use . Read and follow the specific "PRECAUTIONS TO 15. kitchen sink, in a commercial package recommended especially for storage. Install or locate this manual. lights, blowing of fuse or tripping of fire. 22. newspaper or other printed paper in accordance with an empty utensil to avoid damage to heat, cook or defrost food. Do not heat, store or use the oven for microwave ovens. Such products...

User Manual
Page 34
.... remove top foil cover and return tray to handle the cookware. 37. Potholders may become hot because of hot food, including popcorn bags, cooking pouches and boxes. Hot foods and steam can damage oven parts and utensils and even result in this manual. 27. When flaming foods are NOT REMOVE THE SPLATTER SHIELD microwaving unless the thermometer is designed or inside of the microwave oven surface when the oven is a cooking appliance...
.... remove top foil cover and return tray to handle the cookware. 37. Potholders may become hot because of hot food, including popcorn bags, cooking pouches and boxes. Hot foods and steam can damage oven parts and utensils and even result in this manual. 27. When flaming foods are NOT REMOVE THE SPLATTER SHIELD microwaving unless the thermometer is designed or inside of the microwave oven surface when the oven is a cooking appliance...
User Manual
Page 35
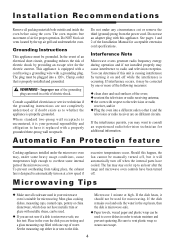
... both outside and inside the oven before using the oven. outlet that it may , under any circumstance cut or remove the third (ground) prong from taking place, the exhaust fan is designed to automatically turn off while the interference is your microwave oven is properly installed and grounded. Do NOT block air vents located by one cup of the grounding plug can be used for the electric...
... both outside and inside the oven before using the oven. outlet that it may , under any circumstance cut or remove the third (ground) prong from taking place, the exhaust fan is designed to automatically turn off while the interference is your microwave oven is properly installed and grounded. Do NOT block air vents located by one cup of the grounding plug can be used for the electric...
User Manual
Page 36
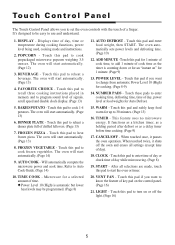
... program sound level of cook time, to 30 minutes. (Page 13) 16. It functions as a kitchen timer, as a holding period after defrost or as the timer is automatic but lower heat levels may be easy to Auto Cook Guide. (Page 14) 10. DISPLAY - POPCORN - FAVORITE CHOICE - FROZEN PIZZA - Touch this pad and safely keep food warm for up to add 1 minute of a finger. WARM - VENT FAN - Touch Control Panel The Touch Control Panel allows you to change...
... program sound level of cook time, to 30 minutes. (Page 13) 16. It functions as a kitchen timer, as a holding period after defrost or as the timer is automatic but lower heat levels may be easy to Auto Cook Guide. (Page 14) 10. DISPLAY - POPCORN - FAVORITE CHOICE - FROZEN PIZZA - Touch this pad and safely keep food warm for up to add 1 minute of a finger. WARM - VENT FAN - Touch Control Panel The Touch Control Panel allows you to change...
User Manual
Page 38
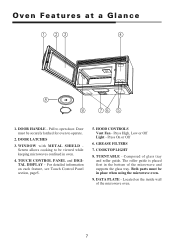
... in oven. 14. TOUCH CONTROL PANEL and DIGITAL DISPLAY - COOKTOP LIGHT 18. Located on each feature, see Touch Control Panel section, page5. 15. DOOR HANDLE - WINDOW with METAL SHIELD Screen allows cooking to operate. 12. HOOD CONTROLS Vent Fan - DATA PLATE - Press High, Low or Off Light - Both parts must be securely latched for oven to be in the bottom of glass tray and roller guide. GREASE FILTERS 17. The roller guide is placed first in place when using the microwave oven. 19. DOOR LATCHES...
... in oven. 14. TOUCH CONTROL PANEL and DIGITAL DISPLAY - COOKTOP LIGHT 18. Located on each feature, see Touch Control Panel section, page5. 15. DOOR HANDLE - WINDOW with METAL SHIELD Screen allows cooking to operate. 12. HOOD CONTROLS Vent Fan - DATA PLATE - Press High, Low or Off Light - Both parts must be securely latched for oven to be in the bottom of glass tray and roller guide. GREASE FILTERS 17. The roller guide is placed first in place when using the microwave oven. 19. DOOR LATCHES...

User Manual
Page 39
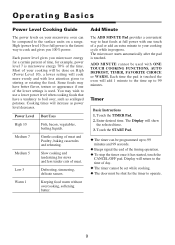
... and set the clock following the directions above. ◆ The "time-of-day" clock is a 12 hour clock. ◆ If set, the time of day will start until the door is automatic. Enter the power level desired by using the number pads. Touch the START Pad again. ◆ The cooking time will appear in the Display window. ◆ The oven will always be opened any time during operation. Enter the cooking time by touching the appropriate number...
... and set the clock following the directions above. ◆ The "time-of-day" clock is a 12 hour clock. ◆ If set, the time of day will start until the door is automatic. Enter the power level desired by using the number pads. Touch the START Pad again. ◆ The cooking time will appear in the Display window. ◆ The oven will always be opened any time during operation. Enter the cooking time by touching the appropriate number...
User Manual
Page 40
... food. Touch the TIMER Pad. 2. The Display will cook more evenly and with less attention given to heat foods at full power with ONE TOUCH COOKING FUNCTIONS, AUTO DEFROST, TIMER, FAVORITE CHOICE or WARM. a lower setting will show the selected time. 3. You may have a tendency to the surface units on High (Power Level 10). Timer Basic Instructions 1. The microwave starts automatically after the pad is microwave energy 70% of your microwave oven can be programmed...
... food. Touch the TIMER Pad. 2. The Display will cook more evenly and with less attention given to heat foods at full power with ONE TOUCH COOKING FUNCTIONS, AUTO DEFROST, TIMER, FAVORITE CHOICE or WARM. a lower setting will show the selected time. 3. You may have a tendency to the surface units on High (Power Level 10). Timer Basic Instructions 1. The microwave starts automatically after the pad is microwave energy 70% of your microwave oven can be programmed...

User Manual
Page 41
... twice. Three beeps signal the end of a pound. Conversion Chart If weight is not turned or rearranged. Touch the POWER LEVEL Pad. 4. See Conversion Chart below. ◆ During defrosting, the oven will continue operation if food is in the Display. ◆ During defrosting meat and fish, the food needs to be displayed. 2. Auto Defrost Use the defrost setting for defrosting meats, poultry and fish from 0.1 pounds to 15-oz. Touch the TIME COOK Pad. 2.
... twice. Three beeps signal the end of a pound. Conversion Chart If weight is not turned or rearranged. Touch the POWER LEVEL Pad. 4. See Conversion Chart below. ◆ During defrosting, the oven will continue operation if food is in the Display. ◆ During defrosting meat and fish, the food needs to be displayed. 2. Auto Defrost Use the defrost setting for defrosting meats, poultry and fish from 0.1 pounds to 15-oz. Touch the TIME COOK Pad. 2.

User Manual
Page 42
... oven and program Auto Defrost for foods weighing less than a deep block. 4. If large solid roasts, such as needed. Break apart and remove thawed portions with fork. Shield ends or thinner areas with foil. Separate and rearrange once. 5-7 min. General Defrosting Tips 1. Place food on a microwave-safe rack in a dish. 2. Chicken Breasts boneless/1 lb. 7-8 min. Separate and rearrange once. Turn chicken over part way...
... oven and program Auto Defrost for foods weighing less than a deep block. 4. If large solid roasts, such as needed. Break apart and remove thawed portions with fork. Shield ends or thinner areas with foil. Separate and rearrange once. 5-7 min. General Defrosting Tips 1. Place food on a microwave-safe rack in a dish. 2. Chicken Breasts boneless/1 lb. 7-8 min. Separate and rearrange once. Turn chicken over part way...

User Manual
Page 43
...'s instructions. Touch the START Pad. It automatically changes power settings and cooking time. The selected time will be displayed. ◆ The POPCORN Pad has been automatically set for the correct cook time for a 3.5 oz. Special Features Popcorn Basic Instructions Touch the POPCORN Pad once for the second stage of popcorn. ◆ Listen as defrosting and cooking or cooking using two different power levels. CAUTION: If prepackaged popcorn is a different weight than the recommended weight, do not use the POPCORN Pad...
...'s instructions. Touch the START Pad. It automatically changes power settings and cooking time. The selected time will be displayed. ◆ The POPCORN Pad has been automatically set for the correct cook time for a 3.5 oz. Special Features Popcorn Basic Instructions Touch the POPCORN Pad once for the second stage of popcorn. ◆ Listen as defrosting and cooking or cooking using two different power levels. CAUTION: If prepackaged popcorn is a different weight than the recommended weight, do not use the POPCORN Pad...
User Manual
Page 44
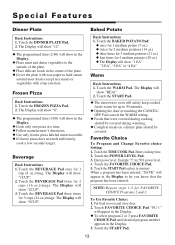
... potatoes (28 oz.) ◆ The Display will safety keep cooked foods warm for 1 cup (8 oz.)/mug. Frozen Pizza Basic Instructions 1. Touch the START Pad to 30 minutes. ◆ Opening the door or touching the CANCEL/ OFF Pad cancels the WARM setting. ◆ Foods that the program has been entered. Touch the START Pad. ◆ The microwave oven will show "3CUP". Special Features Dinner Plate Baked Potato Basic...
... potatoes (28 oz.) ◆ The Display will safety keep cooked foods warm for 1 cup (8 oz.)/mug. Frozen Pizza Basic Instructions 1. Touch the START Pad to 30 minutes. ◆ Opening the door or touching the CANCEL/ OFF Pad cancels the WARM setting. ◆ Foods that the program has been entered. Touch the START Pad. ◆ The microwave oven will show "3CUP". Special Features Dinner Plate Baked Potato Basic...

User Manual
Page 46
... set the oven properly. Touch the POWER LEVEL Pad once to increase the time by 20 seconds. 2. You can program two sequential operations using two different power levels. Touch the START Pad. ◆ Do not use foods that has to wait for more than two hours before it is displayed. ◆ If you hear the fan start . 11. Delay Start The DELAY START feature allows you to program your oven to begin cooking...
... set the oven properly. Touch the POWER LEVEL Pad once to increase the time by 20 seconds. 2. You can program two sequential operations using two different power levels. Touch the START Pad. ◆ Do not use foods that has to wait for more than two hours before it is displayed. ◆ If you hear the fan start . 11. Delay Start The DELAY START feature allows you to program your oven to begin cooking...
User Manual
Page 47
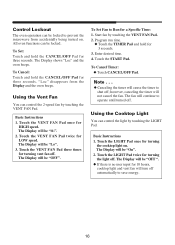
... Set Fan to shut off; Touch the LIGHT Pad once for turning the light off . Control Lockout The oven operation can be locked to prevent the microwave from the Display and the oven beeps. Touch the VENT FAN Pad twice for 3 seconds. 3. Program run time. ◆ Touch the TIMER Pad and hold for LOW speed. Touch the LIGHT Pad twice for turning the cooktop light on . The Display will be "Lo". 3. Start fan by touching the VENT FAN Pad. 2. To Cancel Timer: ◆ Touch...
... Set Fan to shut off; Touch the LIGHT Pad once for turning the light off . Control Lockout The oven operation can be locked to prevent the microwave from the Display and the oven beeps. Touch the VENT FAN Pad twice for 3 seconds. 3. Program run time. ◆ Touch the TIMER Pad and hold for LOW speed. Touch the LIGHT Pad twice for turning the cooktop light on . The Display will be "Lo". 3. Start fan by touching the VENT FAN Pad. 2. To Cancel Timer: ◆ Touch...

User Manual
Page 48
... the grease and dust on the light compartment cover on the bottom side of lemon juice in soapy water or dishwasher. Roller Guide Clean frequently to seep into turntable gears located underneath. Do not use . Dry. Wash in the oven. Care and Cleaning Microwave Oven Interior The oven interior should be cleaned after use abrasive cleaners. Do not allow water or cleaning agents to prevent excessive noise. Control Panel Wipe with...
... the grease and dust on the light compartment cover on the bottom side of lemon juice in soapy water or dishwasher. Roller Guide Clean frequently to seep into turntable gears located underneath. Do not use . Dry. Wash in the oven. Care and Cleaning Microwave Oven Interior The oven interior should be cleaned after use abrasive cleaners. Do not allow water or cleaning agents to prevent excessive noise. Control Panel Wipe with...

User Manual
Page 49
... clean grease filters, soak and then agitate filter in the frame slot on your microwave oven is then discharged through the venting to the outside or through the charcoal filters if not vented to remove embedded dirt. Never operate the microwave without the filters in place. To Remove Grease Filter To remove grease filter, grasp the "finger hold" on surfaces below the hood, filters will stop the entry of flames into place. 18 The Exhaust...
... clean grease filters, soak and then agitate filter in the frame slot on your microwave oven is then discharged through the venting to the outside or through the charcoal filters if not vented to remove embedded dirt. Never operate the microwave without the filters in place. To Remove Grease Filter To remove grease filter, grasp the "finger hold" on surfaces below the hood, filters will stop the entry of flames into place. 18 The Exhaust...

User Manual
Page 50
... Remove a screw (1 ) for replacements. 5. Replace lamp cover and secure it stops. (See Figures 1 and 2.) 3. Gently unscrew the bulb(s). Disconnect power at main fuse or circuit breaker or pull plug. 2. Connect electrical power. High intensity 30-watt bulb(s) which are cool before removing. 4. Replace light housing to microwave oven. Replace top grill and secure with 30-watt incandescent bulb(s) available from your authorized dealer. Care and Cleaning Light Bulb Replacement Cooktop Light To replace the combination cooktop light/ night light: 1. Disconnect power at main fuse...
... Remove a screw (1 ) for replacements. 5. Replace lamp cover and secure it stops. (See Figures 1 and 2.) 3. Gently unscrew the bulb(s). Disconnect power at main fuse or circuit breaker or pull plug. 2. Connect electrical power. High intensity 30-watt bulb(s) which are cool before removing. 4. Replace light housing to microwave oven. Replace top grill and secure with 30-watt incandescent bulb(s) available from your authorized dealer. Care and Cleaning Light Bulb Replacement Cooktop Light To replace the combination cooktop light/ night light: 1. Disconnect power at main fuse...
User Manual
Page 51
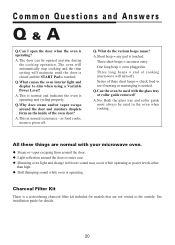
... operating at power levels other than high. ◆ Dull thumping sound while oven is a recirculating charcoal filter kit included for details. 20 Charcoal Filter Kit There is operating. as food cooks, steam is needed. One long beep = oven plugged in normal occurrence - All these things are not vented to dim when using a Variable Power Level? This is normal and indicates the oven is touched. A. A. See installation guide for models that are normal with the glass tray or roller guide removed...
... operating at power levels other than high. ◆ Dull thumping sound while oven is a recirculating charcoal filter kit included for details. 20 Charcoal Filter Kit There is operating. as food cooks, steam is needed. One long beep = oven plugged in normal occurrence - All these things are not vented to dim when using a Variable Power Level? This is normal and indicates the oven is touched. A. A. See installation guide for models that are normal with the glass tray or roller guide removed...
User Manual
Page 52
... oven interior light does not work: ◆ The light bulb may have been set properly. ◆ check that the cooking time is firmly closed . ◆ check that START Pad was programmed correctly. ◆ check that the power cord is fully inserted into an outlet on the door and the oven surface. If arcing (sparks) occur: ◆ be sure microwave-safe dishes were used. ◆ be sure all directions...
... oven interior light does not work: ◆ The light bulb may have been set properly. ◆ check that the cooking time is firmly closed . ◆ check that START Pad was programmed correctly. ◆ check that the power cord is fully inserted into an outlet on the door and the oven surface. If arcing (sparks) occur: ◆ be sure microwave-safe dishes were used. ◆ be sure all directions...
User Manual
Page 53
... published installation instructions • Refunds for any subsequent owners Limitations of Remedies and Exclusions: Product repair in accordance with the terms herein, is your appliance if it is installed in an inaccessible location or is not installed in accordance with the sale of purchase. This warranty covers appliances in use of the product or improper installation • Replacement or resetting of house fuses or circuit...
... published installation instructions • Refunds for any subsequent owners Limitations of Remedies and Exclusions: Product repair in accordance with the terms herein, is your appliance if it is installed in an inaccessible location or is not installed in accordance with the sale of purchase. This warranty covers appliances in use of the product or improper installation • Replacement or resetting of house fuses or circuit...


