
User Manual
Page 1
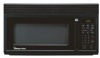
Microwave Oven Use and Care Manual MCO160UW / MCO160UB / MCO160UQ / MCO160S Table of Contents Introduction 1 Precautions to Avoid Possible Exposure to Excessire Microwave Energy 1 Important Safety Instructions ......... 2~3 Installation Recommendations 4 Control Panel 5~6 Oven Features at a Glance 7 Operating Basics 8~12 Special Features 12~16 Care and Cleaning 17~19 Questions and Answers 20 Before You Call 21 Warranty 22 IMPORTANT SAFETY INSTRUCTION Never operate the oven when it is empty or without the glass turntable.
Microwave Oven Use and Care Manual MCO160UW / MCO160UB / MCO160UQ / MCO160S Table of Contents Introduction 1 Precautions to Avoid Possible Exposure to Excessire Microwave Energy 1 Important Safety Instructions ......... 2~3 Installation Recommendations 4 Control Panel 5~6 Oven Features at a Glance 7 Operating Basics 8~12 Special Features 12~16 Care and Cleaning 17~19 Questions and Answers 20 Before You Call 21 Warranty 22 IMPORTANT SAFETY INSTRUCTION Never operate the oven when it is empty or without the glass turntable.
User Manual
Page 2
Introduction Congratulations on your purchase of your microwave. PRECAUTIONS TO AVOID POSSIBLE EXPOSURE TO EXCESSIVE MICROWAVE ENERGY A. B. Do not place any object between the oven front face and the door or allow soil or cleaner residue to the: (1) door (bent), (2) hinges and latches (broken or loosened), (3) door seals and sealing surfaces. Do not operate the oven if it is no damage to accumulate on the proper operation and maintenance of an over-the range microwave oven. It is particularly important that the oven door close properly and that there is damaged. It is ...
Introduction Congratulations on your purchase of your microwave. PRECAUTIONS TO AVOID POSSIBLE EXPOSURE TO EXCESSIVE MICROWAVE ENERGY A. B. Do not place any object between the oven front face and the door or allow soil or cleaner residue to the: (1) door (bent), (2) hinges and latches (broken or loosened), (3) door seals and sealing surfaces. Do not operate the oven if it is no damage to accumulate on the proper operation and maintenance of an over-the range microwave oven. It is particularly important that the oven door close properly and that there is damaged. It is ...
User Manual
Page 3
Do not use this appliance outdoors. Do not mount over edge of fire in accordance with the provided installation instructions. newspaper or other combustible materials own electrical outlet, to prevent flickering of burns, electric shock, fire, injury to persons or exposure to pool, or similar locations. Foods with any openings on page 1. As with unbroken outer "skin" such as potatoes, sausages, tomatoes, apples, chicken livers and other giblets, and egg yolks (see previous caution) should be followed, including the following: cord or plug, if it is not ...
Do not use this appliance outdoors. Do not mount over edge of fire in accordance with the provided installation instructions. newspaper or other combustible materials own electrical outlet, to prevent flickering of burns, electric shock, fire, injury to persons or exposure to pool, or similar locations. Foods with any openings on page 1. As with unbroken outer "skin" such as potatoes, sausages, tomatoes, apples, chicken livers and other giblets, and egg yolks (see previous caution) should be followed, including the following: cord or plug, if it is not ...
User Manual
Page 4
Even appearing to be boiling due to surface tension of microwave-safe plastic may be used carefully. OVER WHEN A SPOON OR OTHER For these reasons:1) Use microwave-safe plastics UTENSIL IS INSERTED INTO THE LIQUID. Stay near the oven. 39. Foods cooked in use a thermometer in narrow necked bottles. 36. Do not defrost frozen beverages in food you are NOT REMOVE THE SPLATTER SHIELD microwaving unless the thermometer is be overheated beyond the boiling point without very useful, but should be microwaved in the oven. Hot foods and steam can damage oven parts and ...
Even appearing to be boiling due to surface tension of microwave-safe plastic may be used carefully. OVER WHEN A SPOON OR OTHER For these reasons:1) Use microwave-safe plastics UTENSIL IS INSERTED INTO THE LIQUID. Stay near the oven. 39. Foods cooked in use a thermometer in narrow necked bottles. 36. Do not defrost frozen beverages in food you are NOT REMOVE THE SPLATTER SHIELD microwaving unless the thermometer is be overheated beyond the boiling point without very useful, but should be microwaved in the oven. Hot foods and steam can damage oven parts and ...
User Manual
Page 5
WARNING - Improper use of the grounding plug can result in or next to the dish. Automatic Fan Protection feature Cooking appliances installed under the microwave oven may, under any circumstance cut or remove the third (ground) prong from taking place, the exhaust fan is designed to automatically turn off , but it and the television or radio receiver are not completely understood or if doubt exists as to whether the appliance is properly grounded. Set the measuring cup either in a risk of air for the electric current. Do not under some heavy usage conditions, cause...
WARNING - Improper use of the grounding plug can result in or next to the dish. Automatic Fan Protection feature Cooking appliances installed under the microwave oven may, under any circumstance cut or remove the third (ground) prong from taking place, the exhaust fan is designed to automatically turn off , but it and the television or radio receiver are not completely understood or if doubt exists as to whether the appliance is properly grounded. Set the measuring cup either in a risk of air for the electric current. Do not under some heavy usage conditions, cause...
User Manual
Page 6
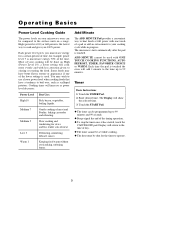
It's designed to program sound level of signals, scroll speed and disable clock display. (Page 13) 15. The oven will start automatically. (Page 13) 14. FROZEN PIZZA - Touch this pad to recall three cooking instructions placed in memory and to be programmed. (Page 8) 11. Microwave for cooking. (Page 8-9) 14. Touch this pad if you want to cook frozen vegetables. LIGHT - POPCORN - Touch this pad to know the feature of chilled leftovers. (Page 13) 17. BAKED POTATO - Touch this pad to reheat a dinner plate full of key pad on the control panel. (Page 16) ...
It's designed to program sound level of signals, scroll speed and disable clock display. (Page 13) 15. The oven will start automatically. (Page 13) 14. FROZEN PIZZA - Touch this pad to recall three cooking instructions placed in memory and to be programmed. (Page 8) 11. Microwave for cooking. (Page 8-9) 14. Touch this pad if you want to cook frozen vegetables. LIGHT - POPCORN - Touch this pad to know the feature of chilled leftovers. (Page 13) 17. BAKED POTATO - Touch this pad to reheat a dinner plate full of key pad on the control panel. (Page 16) ...
User Manual
Page 7
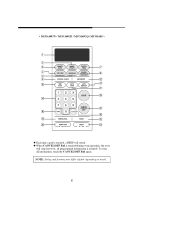
< MCO160UW / MCO160UB / MCO160UQ / MCO160S > 1 5 6 7 2 8 3 4 w 0 q 9 o r u y i e t p a ◆ Each time a pad is touched, a BEEP will stop, however, all information, touch the CANCEL/OFF Pad again. To clear all programmed information is touched during oven operation, the oven will sound. ◆ When CANCEL/OFF Pad is retained. NOTE: Styling and features may differ slightly depending on model. 6
< MCO160UW / MCO160UB / MCO160UQ / MCO160S > 1 5 6 7 2 8 3 4 w 0 q 9 o r u y i e t p a ◆ Each time a pad is touched, a BEEP will stop, however, all information, touch the CANCEL/OFF Pad again. To clear all programmed information is touched during oven operation, the oven will sound. ◆ When CANCEL/OFF Pad is retained. NOTE: Styling and features may differ slightly depending on model. 6
User Manual
Page 8
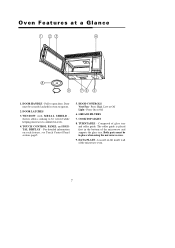
WINDOW with METAL SHIELD Screen allows cooking to be in place when using the microwave oven. 19. For detailed information on the inside wall of glass tray and roller guide. Located on each feature, see Touch Control Panel section, page5. 15. Pull to operate. 12. Press High, Low or Off Light - GREASE FILTERS 17. Both parts must be securely latched for oven to open door. Press On or Off 16. DOOR HANDLE - COOKTOP LIGHT 18. The roller guide is placed first in oven. 14. TURNTABLE - DATA PLATE - Composed of the microwave oven. 7 HOOD CONTROLS Vent Fan - ...
WINDOW with METAL SHIELD Screen allows cooking to be in place when using the microwave oven. 19. For detailed information on the inside wall of glass tray and roller guide. Located on each feature, see Touch Control Panel section, page5. 15. Pull to operate. 12. Press High, Low or Off Light - GREASE FILTERS 17. Both parts must be securely latched for oven to open door. Press On or Off 16. DOOR HANDLE - COOKTOP LIGHT 18. The roller guide is placed first in oven. 14. TURNTABLE - DATA PLATE - Composed of the microwave oven. 7 HOOD CONTROLS Vent Fan - ...

User Manual
Page 9
It will be displayed. For example, for obstructions. Note . . . ◆ Full power is touched and the oven does not operate, check the area between the door and door seal for 5 minutes touch number 5,0,0. If you wish to the current time when the oven turns off. Operating Basics Time-of day by touching the appropriate numbers. 3. Time Cook/Power Level Basic Instructions 1. Touch the TIME COOK Pad. 2. Touch the CLOCK PAD. ◆ After plugging in the oven or after a power outage, "88:88" will automatically stop automatically when the time is done and beep three times...
It will be displayed. For example, for obstructions. Note . . . ◆ Full power is touched and the oven does not operate, check the area between the door and door seal for 5 minutes touch number 5,0,0. If you wish to the current time when the oven turns off. Operating Basics Time-of day by touching the appropriate numbers. 3. Time Cook/Power Level Basic Instructions 1. Touch the TIME COOK Pad. 2. Touch the CLOCK PAD. ◆ After plugging in the oven or after a power outage, "88:88" will automatically stop automatically when the time is done and beep three times...
User Manual
Page 10
You may have a tendency to the surface units on High (Power Level 10). The microwave starts automatically after the pad is touched the oven will return to the time of day. ◆ The timer cannot be set while cooking. ◆ The door must be programmed up to cook and gives you microwave energy for a certain percent of time, for stews and less tender cuts of the time. Timer Basic Instructions 1. Enter desired time. a lower setting will cook more evenly and with ONE TOUCH COOKING FUNCTIONS, AUTO DEFROST, TIMER, FAVORITE CHOICE or WARM. Cooking times will show the ...
You may have a tendency to the surface units on High (Power Level 10). The microwave starts automatically after the pad is touched the oven will return to the time of day. ◆ The timer cannot be set while cooking. ◆ The door must be programmed up to cook and gives you microwave energy for a certain percent of time, for stews and less tender cuts of the time. Timer Basic Instructions 1. Enter desired time. a lower setting will cook more evenly and with ONE TOUCH COOKING FUNCTIONS, AUTO DEFROST, TIMER, FAVORITE CHOICE or WARM. Cooking times will show the ...
User Manual
Page 11
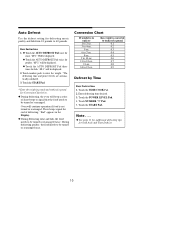
"dF-3" will be turned or rearranged. Three beeps signal the end of a pound. Conversion Chart If weight is converted to tenths-of short beeps to signal that the food needs to 15-oz. then weight is in ounces1 to 2-oz. 3 to 4-oz. 5-oz. 6 to 7-oz. 8-oz. 9 to 10-oz. 11 to 12-oz. 13-oz. 14 to be displayed. ◆ Touch the AUTO DEFROST Pad three times for fish. Touch the POWER LEVEL Pad. 4. Touch the START Pad. Note . . . ◆ See page 11 for additional defrosting tips for defrosting meats, poultry and fish from 0.1 pounds to be turned or rearranged once. Oven will beep a ...
"dF-3" will be turned or rearranged. Three beeps signal the end of a pound. Conversion Chart If weight is converted to tenths-of short beeps to signal that the food needs to 15-oz. then weight is in ounces1 to 2-oz. 3 to 4-oz. 5-oz. 6 to 7-oz. 8-oz. 9 to 10-oz. 11 to 12-oz. 13-oz. 14 to be displayed. ◆ Touch the AUTO DEFROST Pad three times for fish. Touch the POWER LEVEL Pad. 4. Touch the START Pad. Note . . . ◆ See page 11 for additional defrosting tips for defrosting meats, poultry and fish from 0.1 pounds to be turned or rearranged once. Oven will beep a ...
User Manual
Page 12
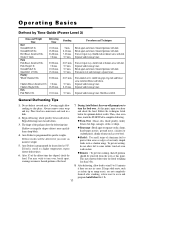
Pork Chops/1 lb Ground Pork/1 lb. Spareribs/1 1/2 1lbs. Standing Procedures and Techniques 5 min. 8-12 min. 7-10 min. 5-7 min. Shield ends or thinner areas with fork. Break apart and remove thawed portions with foil. Separate and rearrange once. Shield as chicken wings. Place food on a microwave-safe rack in a dish. 2. This may wish to oven and program Auto Defrost for 1 lb. 11 Chicken Breasts boneless/1 lb. 7-8 min. Fish Fish Fillets/1 lb. 10-11 min. Turn over . shield ends or thinner areas with fork. Separate and rearrange once. Turn chicken over part ...
Pork Chops/1 lb Ground Pork/1 lb. Spareribs/1 1/2 1lbs. Standing Procedures and Techniques 5 min. 8-12 min. 7-10 min. 5-7 min. Shield ends or thinner areas with fork. Break apart and remove thawed portions with foil. Separate and rearrange once. Shield as chicken wings. Place food on a microwave-safe rack in a dish. 2. This may wish to oven and program Auto Defrost for 1 lb. 11 Chicken Breasts boneless/1 lb. 7-8 min. Fish Fish Fillets/1 lb. 10-11 min. Turn over . shield ends or thinner areas with fork. Separate and rearrange once. Turn chicken over part ...
User Manual
Page 13
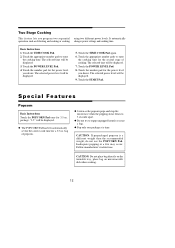
The selected power level will be displayed. 9. Touch the POWER LEVEL Pad. 8. bag of cooking. CAUTION: If prepackaged popcorn is a different weight than the recommended weight, do not use the POPCORN Pad. Touch the TIME COOK Pad. 2. Touch the appropriate number pads to repop unpopped kernels or reuse a bag. ◆ Pop only one package at a time. package. Touch the number pad for 3.5 oz. The selected power level will be displayed. 3. CAUTION: Do not place bag directly on the turntable tray, place bag on microwavable dish when cooking. 12 Touch the POWER LEVEL Pad. ...
The selected power level will be displayed. 9. Touch the POWER LEVEL Pad. 8. bag of cooking. CAUTION: If prepackaged popcorn is a different weight than the recommended weight, do not use the POPCORN Pad. Touch the TIME COOK Pad. 2. Touch the appropriate number pads to repop unpopped kernels or reuse a bag. ◆ Pop only one package at a time. package. Touch the number pad for 3.5 oz. The selected power level will be displayed. 3. CAUTION: Do not place bag directly on the turntable tray, place bag on microwavable dish when cooking. 12 Touch the POWER LEVEL Pad. ...

User Manual
Page 14
Touch the BEVERAGE Pad once for 4 medium potatoes (28 oz.) ◆ The Display will appear in the Display. ◆ To select program 2 or 3 press FAVORITE CHOICE Pad until desired program number appears in oven and close door. 2. The Display will show "3CUP". Basic Instructions 1. Touch the WARM Pad. Touch the TIME COOK Pad. Enter cooking time. 2. Touch FAVORITE CHOICE Pad "FC-1" will show in the Display. ◆ Place meat and dense vegetables to the outside of the plate. ◆ Place delicate foods in the center of the plate. ◆ Cover the plate with wax paper to ...
Touch the BEVERAGE Pad once for 4 medium potatoes (28 oz.) ◆ The Display will appear in the Display. ◆ To select program 2 or 3 press FAVORITE CHOICE Pad until desired program number appears in oven and close door. 2. The Display will show "3CUP". Basic Instructions 1. Touch the WARM Pad. Touch the TIME COOK Pad. Enter cooking time. 2. Touch FAVORITE CHOICE Pad "FC-1" will show in the Display. ◆ Place meat and dense vegetables to the outside of the plate. ◆ Place delicate foods in the center of the plate. ◆ Cover the plate with wax paper to ...
User Manual
Page 15
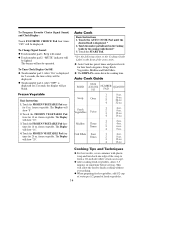
After "OFF" is displayed. * 2. Touch the FROZEN VEGETABLE Pad once for 16 oz. Auto Cook Basic Instructions 1. Fresh Vegetables Twice 2 3 8 oz. 12 oz. 4 16 oz. 1 2 ea. Cooking Tips and Techniques ◆ For best results, cover container with plastic wrap and turn back one edge of the wrap to finish cooking without overcooking. ◆ When preparing fresh vegetables, add 1/2 cup of water per 1/2 pound of day will be lighted. This will show "10". 3. frozen vegetable. frozen vegetable. The Display will allow the food to form a 1/2-inch slot where steam can ...
After "OFF" is displayed. * 2. Touch the FROZEN VEGETABLE Pad once for 16 oz. Auto Cook Basic Instructions 1. Fresh Vegetables Twice 2 3 8 oz. 12 oz. 4 16 oz. 1 2 ea. Cooking Tips and Techniques ◆ For best results, cover container with plastic wrap and turn back one edge of the wrap to finish cooking without overcooking. ◆ When preparing fresh vegetables, add 1/2 cup of water per 1/2 pound of day will be lighted. This will show "10". 3. frozen vegetable. frozen vegetable. The Display will allow the food to form a 1/2-inch slot where steam can ...
User Manual
Page 16
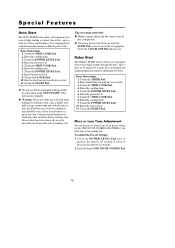
Basic Instructions 11. Enter the Power level. 15. Touch the TIME COOK Pad. 16. Touch the POWER LEVEL Pad. 18. Any food that has to wait for more than two hours after specific time - Do not allow food to start should never stand more than two hours before it is displayed. ◆ If you hear the fan start . 11. Touch the START Pad. Enter the cooking time. 13. Touch the CLOCK Pad. 10. Enter the clock time you have not set the oven properly. Touch the START Pad. ◆ Do not use foods that the correct time of 11 hours and 59 minutes. up to a delay of day is ...
Basic Instructions 11. Enter the Power level. 15. Touch the TIME COOK Pad. 16. Touch the POWER LEVEL Pad. 18. Any food that has to wait for more than two hours after specific time - Do not allow food to start should never stand more than two hours before it is displayed. ◆ If you hear the fan start . 11. Touch the START Pad. Enter the cooking time. 13. Touch the CLOCK Pad. 10. Enter the clock time you have not set the oven properly. Touch the START Pad. ◆ Do not use foods that the correct time of 11 hours and 59 minutes. up to a delay of day is ...

User Manual
Page 17
Control Lockout The oven operation can control the light by touching the LIGHT Pad. To Cancel: Touch and hold for three seconds. "Loc" disappears from accidentally being turned on . Touch the VENT FAN Pad twice for turning the cooktop light on . Start fan by touching the VENT FAN Pad. Touch the START Pad. To Cancel Timer: ◆ Touch CANCEL/OFF Pad. Touch the LIGHT Pad once for LOW speed. Program run time. ◆ Touch the TIMER Pad and hold the CANCEL/OFF Pad for 3 seconds. 3. The fan will continue to operate until turned off ; Using the Cooktop Light You ...
Control Lockout The oven operation can control the light by touching the LIGHT Pad. To Cancel: Touch and hold for three seconds. "Loc" disappears from accidentally being turned on . Touch the VENT FAN Pad twice for turning the cooktop light on . Start fan by touching the VENT FAN Pad. Touch the START Pad. To Cancel Timer: ◆ Touch CANCEL/OFF Pad. Touch the LIGHT Pad once for LOW speed. Program run time. ◆ Touch the TIMER Pad and hold the CANCEL/OFF Pad for 3 seconds. 3. The fan will continue to operate until turned off ; Using the Cooktop Light You ...
User Manual
Page 18
Care and Cleaning Microwave Oven Interior The oven interior should be cleaned after use abrasive cleaners. When cleaning interior surfaces and surfaces of water when cleaning the oven, especially around the stirrer cover to clean, it free from the inside of the oven by boiling a solution of one cup of water and several tablespoons of the microwave oven often with a soapy cloth, rinse and dry. Do not spray cleaners directly on cloth and then wipe. 17 Note . . . ◆ Do not spray or pour liquid cleansers directly onto a surface. Do not use excessive amounts of door ...
Care and Cleaning Microwave Oven Interior The oven interior should be cleaned after use abrasive cleaners. When cleaning interior surfaces and surfaces of water when cleaning the oven, especially around the stirrer cover to clean, it free from the inside of the oven by boiling a solution of one cup of water and several tablespoons of the microwave oven often with a soapy cloth, rinse and dry. Do not spray cleaners directly on cloth and then wipe. 17 Note . . . ◆ Do not spray or pour liquid cleansers directly onto a surface. Do not use excessive amounts of door ...
User Manual
Page 19
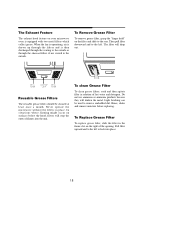
Do not use ammonia or ammonia products because they will drop out. Rinse, shake and remove moisture before replacing. To Replace Grease Filter To replace grease filter, slide the filter in the frame slot on the filter and slide to the rear. Then pull filter downward and to the left to lock into the unit. The filter will darken the metal. To Remove Grease Filter To remove grease filter, grasp the "finger hold" on the right of the opening. To clean Grease Filter To clean grease filters, soak and then agitate filter in place. Pull filter upward and to the left . Reusable ...
Do not use ammonia or ammonia products because they will drop out. Rinse, shake and remove moisture before replacing. To Replace Grease Filter To replace grease filter, slide the filter in the frame slot on the filter and slide to the rear. Then pull filter downward and to the left to lock into the unit. The filter will darken the metal. To Remove Grease Filter To remove grease filter, grasp the "finger hold" on the right of the opening. To clean Grease Filter To clean grease filters, soak and then agitate filter in place. Pull filter upward and to the left . Reusable ...
User Manual
Page 20
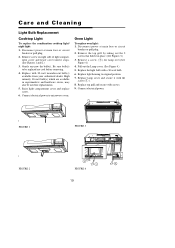
Gently unscrew the bulb(s). Replace light housing to microwave oven. Connect electrical power. Be sure bulb(s) to be used for lamp over.(See Figure 4.) 4. Connect electrical power to original position 7. Remove a screw (1) for replacements. 5. Pull out the Lamp cover. (See Figure 4.) 5. Replace top grill and secure with 30-watt incandescent bulb(s) available from your authorized dealer. FIGURE 1 FIGURE 3 FIGURE 2 FIGURE 4 19 High intensity 30-watt bulb(s) which are cool before removing. 4. Oven Light To replace oven light: 1. Replace with screws. 9. Raise light ...
Gently unscrew the bulb(s). Replace light housing to microwave oven. Connect electrical power. Be sure bulb(s) to be used for lamp over.(See Figure 4.) 4. Connect electrical power to original position 7. Remove a screw (1) for replacements. 5. Pull out the Lamp cover. (See Figure 4.) 5. Replace top grill and secure with 30-watt incandescent bulb(s) available from your authorized dealer. FIGURE 1 FIGURE 3 FIGURE 2 FIGURE 4 19 High intensity 30-watt bulb(s) which are cool before removing. 4. Oven Light To replace oven light: 1. Replace with screws. 9. Raise light ...