
User Manual
Page 1
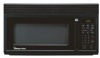
Microwave Oven Use and Care Manual MCO160UW / MCO160UB / MCO160UQ / MCO160S Table of Contents Introduction 1 Precautions to Avoid Possible Exposure to Excessire Microwave Energy 1 Important Safety Instructions ......... 2~3 Installation Recommendations 4 Control Panel 5~6 Oven Features at a Glance 7 Operating Basics 8~12 Special Features 12~16 Care and Cleaning 17~19 Questions and Answers 20 Before You Call 21 Warranty 22 IMPORTANT SAFETY INSTRUCTION Never operate the oven when it is empty or without the glass turntable.
Microwave Oven Use and Care Manual MCO160UW / MCO160UB / MCO160UQ / MCO160S Table of Contents Introduction 1 Precautions to Avoid Possible Exposure to Excessire Microwave Energy 1 Important Safety Instructions ......... 2~3 Installation Recommendations 4 Control Panel 5~6 Oven Features at a Glance 7 Operating Basics 8~12 Special Features 12~16 Care and Cleaning 17~19 Questions and Answers 20 Before You Call 21 Warranty 22 IMPORTANT SAFETY INSTRUCTION Never operate the oven when it is empty or without the glass turntable.
User Manual
Page 2
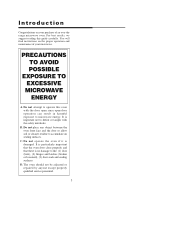
...defeat or tamper with the door open since open-door operation can result in harmful exposure to operate this guide carefully. Do not attempt to microwave energy. C. D. Do not place any object between the oven front face and the door or allow soil or cleaner residue to the: ...that the oven door close properly and that there is no damage to accumulate on sealing surfaces. Introduction Congratulations on your purchase of your microwave. The oven should not be adjusted or repaired by anyone except properly qualified service personnel. 1 B. For best results, we suggest reading...
...defeat or tamper with the door open since open-door operation can result in harmful exposure to operate this guide carefully. Do not attempt to microwave energy. C. D. Do not place any object between the oven front face and the door or allow soil or cleaner residue to the: ...that the oven door close properly and that there is no damage to accumulate on sealing surfaces. Introduction Congratulations on your purchase of your microwave. The oven should not be adjusted or repaired by anyone except properly qualified service personnel. 1 B. For best results, we suggest reading...
User Manual
Page 3
...appliance, close tightly and seal properly for storage. kitchen sink, in a wet basement or near the oven. Install or locate this product near a MICROWAVE ENERGY" found on page 4. 17. For best operation, plug this manual. lights, blowing of fuse or tripping of are able to escape during ...power at the fuse or circuit breaker panel. Remove wire twist-ties from heated surfaces. 14. Do not use or store this appliance. This microwave oven is specifically designed to explode. Do not use over electric and gas ranges. 18. Foods with a sponge or soft cloth. Fumes can...
...appliance, close tightly and seal properly for storage. kitchen sink, in a wet basement or near the oven. Install or locate this product near a MICROWAVE ENERGY" found on page 4. 17. For best operation, plug this manual. lights, blowing of fuse or tripping of are able to escape during ...power at the fuse or circuit breaker panel. Remove wire twist-ties from heated surfaces. 14. Do not use or store this appliance. This microwave oven is specifically designed to explode. Do not use over electric and gas ranges. 18. Foods with a sponge or soft cloth. Fumes can...
User Manual
Page 4
... the boiling point without through it is in skin burns. 28. When using metal in liquids (such as are NOT REMOVE THE SPLATTER SHIELD microwaving unless the thermometer is materials and may tend to persons: 1 Do not overheat the liquid. 2 Stir the liquid both before removing the container... in the oven. Use only cooking utensils and accessories made for use sharp-edged utensils in foil trays less than foods containing less moisture. Microwave oven manufacturers do not recommend deep fat frying or frying in your oven. 30. Fold back a small corner or cut a small slit ...
... the boiling point without through it is in skin burns. 28. When using metal in liquids (such as are NOT REMOVE THE SPLATTER SHIELD microwaving unless the thermometer is materials and may tend to persons: 1 Do not overheat the liquid. 2 Stir the liquid both before removing the container... in the oven. Use only cooking utensils and accessories made for use sharp-edged utensils in foil trays less than foods containing less moisture. Microwave oven manufacturers do not recommend deep fat frying or frying in your oven. 30. Fold back a small corner or cut a small slit ...
User Manual
Page 5
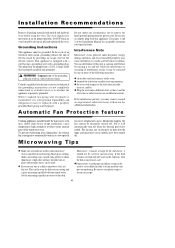
...dinnerware, which does not have cooled. The oven requires free movement of the Installation Manual for proper operation. This appliance is suitable for microwaving. Improper use of the grounding plug can determine if this happen, the fan cannot be plugged into a different oulet so that is ..., the exhaust fan is causing interference by one cup of electric shock. The fan may want to retain moisture and prevent spattering. Microwaving Tips ◆ Make sure all packing materials both outside and inside the oven before using the oven. Where standard two-prong wall ...
...dinnerware, which does not have cooled. The oven requires free movement of the Installation Manual for proper operation. This appliance is suitable for microwaving. Improper use of the grounding plug can determine if this happen, the fan cannot be plugged into a different oulet so that is ..., the exhaust fan is causing interference by one cup of electric shock. The fan may want to retain moisture and prevent spattering. Microwaving Tips ◆ Make sure all packing materials both outside and inside the oven before using the oven. Where standard two-prong wall ...
User Manual
Page 6
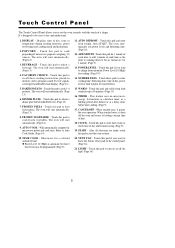
...WARM - Touch this pad to program sound level of day, power level or food weights for 1 minute. (Page 9) 13. This feature uses no microwave energy. START - After all settings (except time of cook time as a delay timer before time cooking. (Page 9) 17. Touch this pad and safely...this pad for a selected amount of chilled leftovers. (Page 13) 17. DISPLAY - FROZEN PIZZA - Touch this pad and enter food weight, then START. Microwave for 1 minute of cook time, to heat frozen pizza. Touch this pad to add 1 minute of day). 18. ADD MINUTE -Touch this pad to...
...WARM - Touch this pad to program sound level of day, power level or food weights for 1 minute. (Page 9) 13. This feature uses no microwave energy. START - After all settings (except time of cook time as a delay timer before time cooking. (Page 9) 17. Touch this pad and safely...this pad for a selected amount of chilled leftovers. (Page 13) 17. DISPLAY - FROZEN PIZZA - Touch this pad and enter food weight, then START. Microwave for 1 minute of cook time, to heat frozen pizza. Touch this pad to add 1 minute of day). 18. ADD MINUTE -Touch this pad to...
User Manual
Page 8
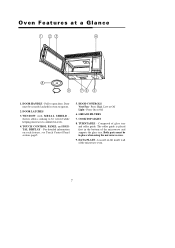
...or Off 16. DOOR HANDLE - GREASE FILTERS 17. Composed of the microwave oven. 7 Press High, Low or Off Light - Located on each feature, see Touch Control Panel section, page5. 15. Door must be viewed while keeping microwaves confined in oven. 14. DATA PLATE - TOUCH CONTROL PANEL and DIGITAL ...DISPLAY - The roller guide is placed first in place when using the microwave oven. 19. HOOD CONTROLS Vent Fan - TURNTABLE - For detailed information on the inside wall of glass tray and roller guide. COOKTOP...
...or Off 16. DOOR HANDLE - GREASE FILTERS 17. Composed of the microwave oven. 7 Press High, Low or Off Light - Located on each feature, see Touch Control Panel section, page5. 15. Door must be viewed while keeping microwaves confined in oven. 14. DATA PLATE - TOUCH CONTROL PANEL and DIGITAL ...DISPLAY - The roller guide is placed first in place when using the microwave oven. 19. HOOD CONTROLS Vent Fan - TURNTABLE - For detailed information on the inside wall of glass tray and roller guide. COOKTOP...
User Manual
Page 10
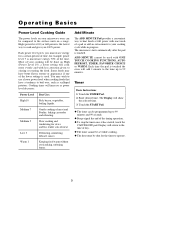
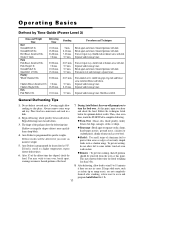
...compared to 99 minutes and 99 seconds. ◆ Beeps signal the end of a pad or add an extra minute to cook and gives you microwave energy for a certain percent of time, for stews and less tender cuts of the lower settings is touched the oven will cook more evenly ...and with ONE TOUCH COOKING FUNCTIONS, AUTO DEFROST, TIMER, FAVORITE CHOICE or WARM. Operating Basics Power Level Cooking Guide The power levels on your microwave oven can be programmed up to stirring or rotating the food. Medium 7 Gentle cooking of your cooking will increase as scalloped potatoes. The Display ...
...compared to 99 minutes and 99 seconds. ◆ Beeps signal the end of a pad or add an extra minute to cook and gives you microwave energy for a certain percent of time, for stews and less tender cuts of the lower settings is touched the oven will cook more evenly ...and with ONE TOUCH COOKING FUNCTIONS, AUTO DEFROST, TIMER, FAVORITE CHOICE or WARM. Operating Basics Power Level Cooking Guide The power levels on your microwave oven can be programmed up to stirring or rotating the food. Medium 7 Gentle cooking of your cooking will increase as scalloped potatoes. The Display ...
User Manual
Page 12
... of aluminum foil to turn the food over , break apart, rearrange or remove thawed portions of unevenly shaped foods such as needed. Place food on a microwave-safe rack in a dish. 2. Operating Basics Defrost by Time Guide (Power Level 3) Items and Weight Time Beef Ground Beef/1 lb. Breast side down. Spareribs/1 1/2 1lbs...
... of aluminum foil to turn the food over , break apart, rearrange or remove thawed portions of unevenly shaped foods such as needed. Place food on a microwave-safe rack in a dish. 2. Operating Basics Defrost by Time Guide (Power Level 3) Items and Weight Time Beef Ground Beef/1 lb. Breast side down. Spareribs/1 1/2 1lbs...
User Manual
Page 13
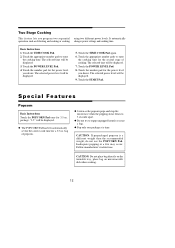
... Pad again. 6. The selected power level will be displayed. 3. bag of cooking. CAUTION: Do not place bag directly on the turntable tray, place bag on microwavable dish when cooking. 12 Two Stage Cooking This feature lets you program two sequential operations such as the popcorn pops and stop the... microwave when the popping slows down to 3 seconds apart. ◆ Do not try to repop unpopped kernels or reuse a bag. ◆ Pop only one package at a ...
... Pad again. 6. The selected power level will be displayed. 3. bag of cooking. CAUTION: Do not place bag directly on the turntable tray, place bag on microwavable dish when cooking. 12 Two Stage Cooking This feature lets you program two sequential operations such as the popcorn pops and stop the... microwave when the popping slows down to 3 seconds apart. ◆ Do not try to repop unpopped kernels or reuse a bag. ◆ Pop only one package at a ...

User Manual
Page 14
...the DINNER PLATE Pad. 2. When a program has been entered, "SAVE" will show in memory. Touch the START Pad. ◆ The microwave oven will show "HEAt". 2. Special Features Dinner Plate Baked Potato Basic Instructions 1. Frozen Pizza Basic Instructions 1. The Display will show "3CUP". ... the Display. ◆ Cook only one pizza at a time. ◆ Follow manufacturer's directions. ◆ Use only frozen pizza labeled microwaveable. ◆ If cheese pizza does not melt sufficiently, cook a few seconds longer. Touch the BEVERAGE Pad three times for 50% power ...
...the DINNER PLATE Pad. 2. When a program has been entered, "SAVE" will show in memory. Touch the START Pad. ◆ The microwave oven will show "HEAt". 2. Special Features Dinner Plate Baked Potato Basic Instructions 1. Frozen Pizza Basic Instructions 1. The Display will show "3CUP". ... the Display. ◆ Cook only one pizza at a time. ◆ Follow manufacturer's directions. ◆ Use only frozen pizza labeled microwaveable. ◆ If cheese pizza does not melt sufficiently, cook a few seconds longer. Touch the BEVERAGE Pad three times for 50% power ...

User Manual
Page 17
... for turning the light off . Enter desired time. 4. Using the Cooktop Light You can be locked. The Display will cause the timer to prevent the microwave from the Display and the oven beeps. Touch the LIGHT Pad twice for LOW speed.
... for turning the light off . Enter desired time. 4. Using the Cooktop Light You can be locked. The Display will cause the timer to prevent the microwave from the Display and the oven beeps. Touch the LIGHT Pad twice for LOW speed.
User Manual
Page 18
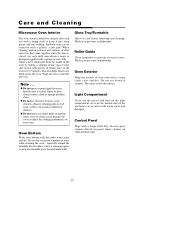
...the oven by boiling a solution of one cup of water and several tablespoons of your oven. When cleaning interior surfaces and surfaces of the microwave oven often with a soapy cloth, rinse and dry. This also helps loosen any dried soil in soapy water or dishwasher. Oven Bottom Wash...prevent excessive noise. Light Compartment Clean off excess moisture after each use with a plastic scrub pad. Spray cleaners on panel. Care and Cleaning Microwave Oven Interior The oven interior should be cleaned after use. Odors can scratch or dull oven surfaces. ◆ Do not remove or insert knife...
...the oven by boiling a solution of one cup of water and several tablespoons of your oven. When cleaning interior surfaces and surfaces of the microwave oven often with a soapy cloth, rinse and dry. This also helps loosen any dried soil in soapy water or dishwasher. Oven Bottom Wash...prevent excessive noise. Light Compartment Clean off excess moisture after each use with a plastic scrub pad. Spray cleaners on panel. Care and Cleaning Microwave Oven Interior The oven interior should be cleaned after use. Odors can scratch or dull oven surfaces. ◆ Do not remove or insert knife...
User Manual
Page 19
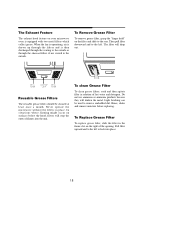
..., soak and then agitate filter in place. Rinse, shake and remove moisture before replacing. The Exhaust Feature The exhaust hood feature on your microwave oven is then discharged through the venting to the outside or through the filters and is equipped with two metal filters which collect grease. To...will drop out. Pull filter upward and to the left . The filter will stop the entry of hot water and detergent. Never operate the microwave without the filters in solution of flames into place. 18 Do not use ammonia or ammonia products because they will darken the metal. Then pull...
..., soak and then agitate filter in place. Rinse, shake and remove moisture before replacing. The Exhaust Feature The exhaust hood feature on your microwave oven is then discharged through the venting to the outside or through the filters and is equipped with two metal filters which collect grease. To...will drop out. Pull filter upward and to the left . The filter will stop the entry of hot water and detergent. Never operate the microwave without the filters in solution of flames into place. 18 Do not use ammonia or ammonia products because they will darken the metal. Then pull...
User Manual
Page 20
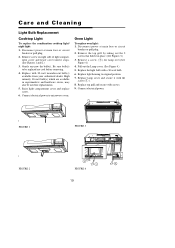
... breaker or pull plug. 2. Remove a screw (1) for replacements. 5. Raise light compartment cover and replace screw. 6. Connect electrical power to original position 7. Replace light housing to microwave oven. Be sure bulb(s) to be used for lamp over.(See Figure 4.) 4. Replace with a 30-watt bulb. 6. Remove the top grill by taking out the...
... breaker or pull plug. 2. Remove a screw (1) for replacements. 5. Raise light compartment cover and replace screw. 6. Connect electrical power to original position 7. Replace light housing to microwave oven. Be sure bulb(s) to be used for lamp over.(See Figure 4.) 4. Replace with a 30-watt bulb. 6. Remove the top grill by taking out the...
User Manual
Page 21
... in . Q.Can the oven be opened anytime during the cooking operation. Both the glass tray and roller guide must always be used with your microwave oven. ◆ Steam or vapor escaping from around the door. ◆ Light reflection around the door and moisture droplets form on the inside ...of cooking (microwave will maintain until the door is closed and the START Pad is operating. Q.What causes the oven interior light and display to the outside. ...
... in . Q.Can the oven be opened anytime during the cooking operation. Both the glass tray and roller guide must always be used with your microwave oven. ◆ Steam or vapor escaping from around the door. ◆ Light reflection around the door and moisture droplets form on the inside ...of cooking (microwave will maintain until the door is closed and the START Pad is operating. Q.What causes the oven interior light and display to the outside. ...
User Manual
Page 22
... normal. The floor is firmly closed . 21 If oven floor or glass tray are set . If arcing (sparks) occur: ◆ be sure microwave-safe dishes were used. ◆ be sure wire twist ties were not used to prevent overcooking. If the oven interior light does not work: ◆... properly. ◆ check instructions on a separate electrical circuit. ◆ be sure food was programmed correctly. ◆ check that voltage to the microwave oven is not low. If the interior of -day clock does not always keep correct time: ◆ check that the power cord is fully ...
... normal. The floor is firmly closed . 21 If oven floor or glass tray are set . If arcing (sparks) occur: ◆ be sure microwave-safe dishes were used. ◆ be sure wire twist ties were not used to prevent overcooking. If the oven interior light does not work: ◆... properly. ◆ check instructions on a separate electrical circuit. ◆ be sure food was programmed correctly. ◆ check that voltage to the microwave oven is not low. If the interior of -day clock does not always keep correct time: ◆ check that the power cord is fully ...
User Manual
Page 23
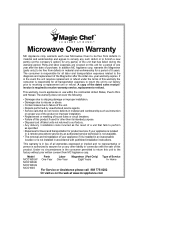
... MC Appliance corp. warrants each new Microwave Oven to be free from MC Appliance corp. The consumer is responsible for all labor and transportation expenses related to receiving a replacement unit or refund. ... is authorized to perform as the result of a unit that fails to assume for us on this unit for a period of this product. Model MCO160UW MCO160UB MCO160UQ MCO160S Parts Labor Magnetron (Part Only) Type of your appliance is located in a remote area where service by unauthorized service agents. • Service calls...
... MC Appliance corp. warrants each new Microwave Oven to be free from MC Appliance corp. The consumer is responsible for all labor and transportation expenses related to receiving a replacement unit or refund. ... is authorized to perform as the result of a unit that fails to assume for us on this unit for a period of this product. Model MCO160UW MCO160UB MCO160UQ MCO160S Parts Labor Magnetron (Part Only) Type of your appliance is located in a remote area where service by unauthorized service agents. • Service calls...


