User Manual
Page 1
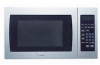
Microwave Oven MCM990ST Instruction Manual Before operating this oven, please read these instructions completely. 0.9 cu. ft.
Microwave Oven MCM990ST Instruction Manual Before operating this oven, please read these instructions completely. 0.9 cu. ft.
User Manual
Page 2
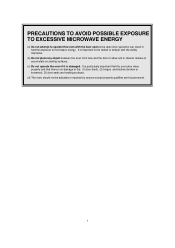
... important not to defeat or tamper with the door open since open-door operation can result in harmful exposure to microwave energy. It is damaged. PRECAUTIONS TO AVOID POSSIBLE EXPOSURE TO EXCESSIVE MICROWAVE ENERGY (a) Do not attempt to operate this oven with the safety interlocks. (b) Do not place any object between the...
... important not to defeat or tamper with the door open since open-door operation can result in harmful exposure to microwave energy. It is damaged. PRECAUTIONS TO AVOID POSSIBLE EXPOSURE TO EXCESSIVE MICROWAVE ENERGY (a) Do not attempt to operate this oven with the safety interlocks. (b) Do not place any object between the...
User Manual
Page 3
... RADIO FREQUENCY INTERFERENCE STATEMENT...4 z GROUNDING INSTRUCTIONS...4 z INSTALLATION...5 z SPECIFICATIONS...6 z PARTS AND FEATURES ...7 TURNTABLE...7 z MICROWAVE OVEN CONTROL...7 DISPLAY...7 POWER LEVEL...8 CLOCK SETTING...8 KITCHEN TIMER...8 MICROWAVE COOK...8 FAST STARTING...8 DEFROSTING BY WT FUNCTION...9 TIME DEFROST FUNCTION...9 POPCORN...9 POTATO...10 PIZZA...10 BEVERAGE...10 SOUP.........12 COOKING END REMINDING FUNCTION...12 OTHER SPECIFICATIONS...12 z CARE OF YOUR MICROWAVE OVEN...13 z BEFORE YOU CALL FOR SERVICE...14 z CARE AND CLEANING...14 z QUESTIONS AND ANSWERS...15 z ...
... RADIO FREQUENCY INTERFERENCE STATEMENT...4 z GROUNDING INSTRUCTIONS...4 z INSTALLATION...5 z SPECIFICATIONS...6 z PARTS AND FEATURES ...7 TURNTABLE...7 z MICROWAVE OVEN CONTROL...7 DISPLAY...7 POWER LEVEL...8 CLOCK SETTING...8 KITCHEN TIMER...8 MICROWAVE COOK...8 FAST STARTING...8 DEFROSTING BY WT FUNCTION...9 TIME DEFROST FUNCTION...9 POPCORN...9 POTATO...10 PIZZA...10 BEVERAGE...10 SOUP.........12 COOKING END REMINDING FUNCTION...12 OTHER SPECIFICATIONS...12 z CARE OF YOUR MICROWAVE OVEN...13 z BEFORE YOU CALL FOR SERVICE...14 z CARE AND CLEANING...14 z QUESTIONS AND ANSWERS...15 z ...
User Manual
Page 4
...or laboratory use. 17. When cleaning surfaces of the safety interlock switches thereby rendering them inoperable. 19. b) Remove wire twist-ties from the microwave oven is not working properly, or if it has been damaged or dropped. 19. d) Do not use . Liquids, such as described in ... qualified service personnel. Wipe the oven interior with narrow necks. Do not operate the oven without appearing to be boiling due to excessive microwave energy: 11. This appliance must be grounded. Do not operate this manual. Keep cord away from such corrosive chemicals may overheat, smoke...
...or laboratory use. 17. When cleaning surfaces of the safety interlock switches thereby rendering them inoperable. 19. b) Remove wire twist-ties from the microwave oven is not working properly, or if it has been damaged or dropped. 19. d) Do not use . Liquids, such as described in ... qualified service personnel. Wipe the oven interior with narrow necks. Do not operate the oven without appearing to be boiling due to excessive microwave energy: 11. This appliance must be grounded. Do not operate this manual. Keep cord away from such corrosive chemicals may overheat, smoke...

User Manual
Page 5
... electric current. WARNING: Do not cut or remove the third (ground) prong from the receiver. • Plug the microwave oven into an outlet that microwave oven and receiver are not completely understood, or if doubt exists as to radio and television reception. FEDERAL COMMUNICATIONS COMMISSION RADIO... This equipment generates and uses ISM frequency energy and if not installed and used properly, that is in a residential installation. If this microwave oven. WARNING: Improper use of the grounding can be plugged into a different outlet so that is the responsibility of the user to ...
... electric current. WARNING: Do not cut or remove the third (ground) prong from the receiver. • Plug the microwave oven into an outlet that microwave oven and receiver are not completely understood, or if doubt exists as to radio and television reception. FEDERAL COMMUNICATIONS COMMISSION RADIO... This equipment generates and uses ISM frequency energy and if not installed and used properly, that is in a residential installation. If this microwave oven. WARNING: Improper use of the grounding can be plugged into a different outlet so that is the responsibility of the user to ...
User Manual
Page 6
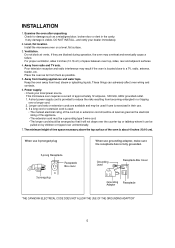
... type 3-wire cord. • The longer cord should be at least as great as possible. 5. Away from becoming entangled in the cavity. This microwave oven requires a current of space between oven top, sides, rear and adjacent surfaces. 4. The minimum height of free space necessary above the top surface... about 4 inches (10.16 cm). These things can be arranged so that it can adversely affect oven wiring and contacts. 6. Install the microwave oven on by children or tripped over the counter top or tabletop where it will not drape over unintentionally. 7. If they are available and...
... type 3-wire cord. • The longer cord should be at least as great as possible. 5. Away from becoming entangled in the cavity. This microwave oven requires a current of space between oven top, sides, rear and adjacent surfaces. 4. The minimum height of free space necessary above the top surface... about 4 inches (10.16 cm). These things can be arranged so that it can adversely affect oven wiring and contacts. 6. Install the microwave oven on by children or tripped over the counter top or tabletop where it will not drape over unintentionally. 7. If they are available and...
User Manual
Page 7
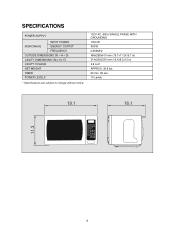
SPECIFICATIONS POWER SUPPLY INPUT POWER MICROWAVE ENERGY OUTPUT FREQUENCY OUTSIDE DIMENSIONS (W H D) CAVITY DIMENSIONS (W H D) CAVITY VOLUME NET WEIGHT TIMER POWER LEVELS * Specifications are subject to change without notice. 120V AC, 60Hz SINGLE ...
SPECIFICATIONS POWER SUPPLY INPUT POWER MICROWAVE ENERGY OUTPUT FREQUENCY OUTSIDE DIMENSIONS (W H D) CAVITY DIMENSIONS (W H D) CAVITY VOLUME NET WEIGHT TIMER POWER LEVELS * Specifications are subject to change without notice. 120V AC, 60Hz SINGLE ...
User Manual
Page 8
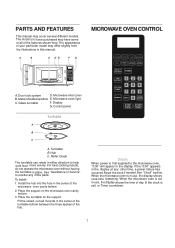
... A B C A. To Install: 1. Fit the raised, curved mounds in the center of the turntable bottom between the three spokes of the microwave oven cavity bottom 2. If the "0:00" appears in the display at any of your particular model may cover several different models. See "Assistance ...or Service" to reorder any other time, a power failure has occurred.Reset the clock if needed.See "Clock" section. When the microwave oven is not in use , the display shows cook time remaining. Glass turntable F. Display G. Hub C. Display When power is set) or Timer countdown...
... A B C A. To Install: 1. Fit the raised, curved mounds in the center of the turntable bottom between the three spokes of the microwave oven cavity bottom 2. If the "0:00" appears in the display at any of your particular model may cover several different models. See "Assistance ...or Service" to reorder any other time, a power failure has occurred.Reset the clock if needed.See "Clock" section. When the microwave oven is not in use , the display shows cook time remaining. Glass turntable F. Display G. Hub C. Display When power is set) or Timer countdown...
User Manual
Page 9
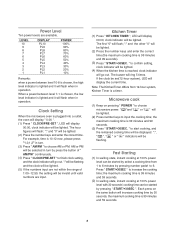
... be lighted. (2) Press the number keys and enter the correct time.(the maximum cooking time is lighted and it will be started by 30 seconds. Microwave cook (1) Keep on the same button will display the current time. LEVEL 10 9 8 7 6 5 4 3 2 1 DISPLAY PL10 PL9 PL8 PL7 PL6 PL5 ...and the remained cooking time will be displayed or " " indicators will flash; Clock Setting When the microwave oven is 10:12 now, please press "1,0,1,2" in turn by pressing number pads1 to choose microwave power. The buzzer will flash; The first "0" will be lighted. (2) Press the number keys and ...
... be lighted. (2) Press the number keys and enter the correct time.(the maximum cooking time is lighted and it will be started by 30 seconds. Microwave cook (1) Keep on the same button will display the current time. LEVEL 10 9 8 7 6 5 4 3 2 1 DISPLAY PL10 PL9 PL8 PL7 PL6 PL5 ...and the remained cooking time will be displayed or " " indicators will flash; Clock Setting When the microwave oven is 10:12 now, please press "1,0,1,2" in turn by pressing number pads1 to choose microwave power. The buzzer will flash; The first "0" will be lighted. (2) Press the number keys and ...
User Manual
Page 10
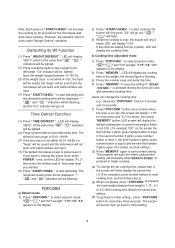
... screen will not work until valid numbers are input. (4) The default microwave power is over, the buzzer will ring 5 times, LED will be sound and the microwave will firstly display the saved time ( 3:15 for the microwave and Auto menu cooking. " to start defrosting and the remained cooking ... for twice), then press "MEMORY" button, LED screen will display the default cooking time of the power level you want to be sound and the microwave will go out, " ", " " will flash. 3) When the cooking is power level 3. when at the same time " ", " " indicators will cook with amended...
... screen will not work until valid numbers are input. (4) The default microwave power is over, the buzzer will ring 5 times, LED will be sound and the microwave will firstly display the saved time ( 3:15 for the microwave and Auto menu cooking. " to start defrosting and the remained cooking ... for twice), then press "MEMORY" button, LED screen will display the default cooking time of the power level you want to be sound and the microwave will go out, " ", " " will flash. 3) When the cooking is power level 3. when at the same time " ", " " indicators will cook with amended...
User Manual
Page 12
... back to choose memory 1-5 procedure. to save and operate the setting. b. Be careful! If not, continue to cook the food with 80% microwave power for 5 minutes + 60% microwave power for 3minutes and 20 seconds. Press " START/ +30 SEC." ,to run the saved procedure, in the display, " ", " " ... is not cut off, the procedure will display 1,2,3...5. (2) If the procedure has been set the procedure. Press "MEMORY" to choose 100% microwave power; screen displays "2", then press "START/+30SEC." The LED will be selected in the display. The steps are same as follows: a. ...
... back to choose memory 1-5 procedure. to save and operate the setting. b. Be careful! If not, continue to cook the food with 80% microwave power for 5 minutes + 60% microwave power for 3minutes and 20 seconds. Press " START/ +30 SEC." ,to run the saved procedure, in the display, " ", " " ... is not cut off, the procedure will display 1,2,3...5. (2) If the procedure has been set the procedure. Press "MEMORY" to choose 100% microwave power; screen displays "2", then press "START/+30SEC." The LED will be selected in the display. The steps are same as follows: a. ...
User Manual
Page 13
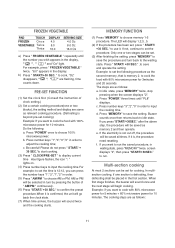
...the cooking is finished. Lock disabling: In locked state, press " STOP/CLEAR " for three seconds. (2) In the microwave cooking state, press " POWER " to inquire microwave power level, and the current microwave power will be displayed. OTHER SPECIFICATIONS (1) In standby state , if the set the cooking time; (5) Press "START... setting. (3) In working or pause state, LED displays surplus cooking time. 12 (1) Press "POWER" eight times to choose 80% microwave,now "PL8" is displayed; (2) Press number keys "5","0","0" to set the cooking time; (3) Press "POWER" six times to choose 60...
...the cooking is finished. Lock disabling: In locked state, press " STOP/CLEAR " for three seconds. (2) In the microwave cooking state, press " POWER " to inquire microwave power level, and the current microwave power will be displayed. OTHER SPECIFICATIONS (1) In standby state , if the set the cooking time; (5) Press "START... setting. (3) In working or pause state, LED displays surplus cooking time. 12 (1) Press "POWER" eight times to choose 80% microwave,now "PL8" is displayed; (2) Press number keys "5","0","0" to set the cooking time; (3) Press "POWER" six times to choose 60...
User Manual
Page 14
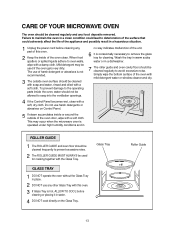
... adhere to seep into the ventilation openings. 4 If the Control Panel becomes wet, clean with a soft cloth. Mild detergent may occur when the microwave oven is hot, ALLOW TO COOL before cleaning or placing it in a hazardous situation. 1 Unplug the power cord before cleaning any food deposits removed... The roller guide and oven cavity floor should be cleaned with soap and water, rinsed and dried with a soft, dry cloth. CARE OF YOUR MICROWAVE OVEN The oven should be used for cleaning. The use harsh detergents or abrasives on the Glass Tray. To prevent damage to remove the glass...
... adhere to seep into the ventilation openings. 4 If the Control Panel becomes wet, clean with a soft cloth. Mild detergent may occur when the microwave oven is hot, ALLOW TO COOL before cleaning or placing it in a hazardous situation. 1 Unplug the power cord before cleaning any food deposits removed... The roller guide and oven cavity floor should be cleaned with soap and water, rinsed and dried with a soft, dry cloth. CARE OF YOUR MICROWAVE OVEN The oven should be used for cleaning. The use harsh detergents or abrasives on the Glass Tray. To prevent damage to remove the glass...
User Manual
Page 16
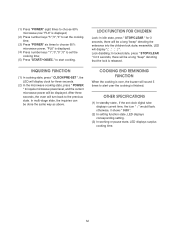
... dish? * A : No. the most common problem in the oven. Never run it empty. * Q : Can I operate my microwave oven without the turntable or turn over the turntable, you 've followed directions exactly ; The turntable rotates clockwise or counterclockwise, depending on the ...time for the turntable to continue, even after the cooking operation has been completed? * A : Standing time is very important. Pop packaged microwave popcorn following manufacture's guidelines. How do I get poor cooking results. Cooking guide times and heat settings are made to allow the cooking ...
... dish? * A : No. the most common problem in the oven. Never run it empty. * Q : Can I operate my microwave oven without the turntable or turn over the turntable, you 've followed directions exactly ; The turntable rotates clockwise or counterclockwise, depending on the ...time for the turntable to continue, even after the cooking operation has been completed? * A : Standing time is very important. Pop packaged microwave popcorn following manufacture's guidelines. How do I get poor cooking results. Cooking guide times and heat settings are made to allow the cooking ...
User Manual
Page 17
...to dry clothes, newspapers or other materials in a paper bag unless it can explode. or if hinges are damaged; Food Never use your microwave oven. Always use abrasive powders or pads. Do not heat eggs in buring the popcorn or risk of food with low moisture carefully. To...into the beverages and stir before cooking to consume. Remember, the Popcorn bag and tray can be done. ARCING If you should put packaged Microwave Popcorn bags directly on sealing surfaces. Do not hit or strike the control panel with safety interlocks. Potatoes, apples, egg yolks and sausages ...
...to dry clothes, newspapers or other materials in a paper bag unless it can explode. or if hinges are damaged; Food Never use your microwave oven. Always use abrasive powders or pads. Do not heat eggs in buring the popcorn or risk of food with low moisture carefully. To...into the beverages and stir before cooking to consume. Remember, the Popcorn bag and tray can be done. ARCING If you should put packaged Microwave Popcorn bags directly on sealing surfaces. Do not hit or strike the control panel with safety interlocks. Potatoes, apples, egg yolks and sausages ...
User Manual
Page 18
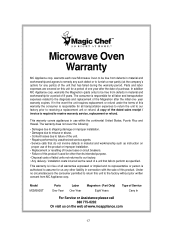
...terms of the unit. • Repairs performed by unauthorized service agents. • Service calls that has failed during the warranty period. Microwave Oven Warranty MC Appliance corp. year warranty expires. This warranty covers appliances in lieu of all labor and transportation expenses related to receiving ...one year after the date of 8 years. The consumer is the consumer permitted to receive warranty service, replacement or refund. Model MCM990ST Parts One-Year Labor One-Year Magnetron (Part Only) Eight Years Type of Service Carry In For Service or Assistance please call...
...terms of the unit. • Repairs performed by unauthorized service agents. • Service calls that has failed during the warranty period. Microwave Oven Warranty MC Appliance corp. year warranty expires. This warranty covers appliances in lieu of all labor and transportation expenses related to receiving ...one year after the date of 8 years. The consumer is the consumer permitted to receive warranty service, replacement or refund. Model MCM990ST Parts One-Year Labor One-Year Magnetron (Part Only) Eight Years Type of Service Carry In For Service or Assistance please call...


