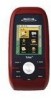
Triton User Manual Addendum - English, French, Spanish
Page 1
... to the Triton, press ENTER again and select "Stop & Save Track". Triton User Manual Addendum This addendum applies to Triton GPS receivers that have a software version that you can pause and then resume recording your track. Pressing ENTER on any navigational screen. In this software update you can now access the Main Menu on any navigational screen press ENTER. On the contextual menu, select "Start New Track". When you are done. This will record your track, following your current track (or a saved track or route) and...
... to the Triton, press ENTER again and select "Stop & Save Track". Triton User Manual Addendum This addendum applies to Triton GPS receivers that have a software version that you can pause and then resume recording your track. Pressing ENTER on any navigational screen. In this software update you can now access the Main Menu on any navigational screen press ENTER. On the contextual menu, select "Start New Track". When you are done. This will record your track, following your current track (or a saved track or route) and...
Triton User Manual Addendum - English, French, Spanish
Page 2
Provide the information for the datum. Select View > Settings > Navigation. On the MAP DATUM drop-down menu, select User Grid. Set Custom Position. Set the coordinates or select the position from a point on the map. But in a Multileg Route. Select "Go to Next" or "Go to Previous" to set through the navigation screens to the Satellite Status screen. To set a User Map Datum, press MENU from any navigational screen. When done, the Navigation screen will be displayed with User Grid set as the map datum. With the point defined, select "Enable Custom Position". For example,...
Provide the information for the datum. Select View > Settings > Navigation. On the MAP DATUM drop-down menu, select User Grid. Set Custom Position. Set the coordinates or select the position from a point on the map. But in a Multileg Route. Select "Go to Next" or "Go to Previous" to set through the navigation screens to the Satellite Status screen. To set a User Map Datum, press MENU from any navigational screen. When done, the Navigation screen will be displayed with User Grid set as the map datum. With the point defined, select "Enable Custom Position". For example,...
Manual - English
Page 2
... your selected destination. Never rely solely on the Magellan Triton while driving. USE CARE The Global Positioning System (GPS) is an excellent navigation aid, but does not replace the need for the accuracy and maintenance of Defence civil GPS user policy and the Federal Radionavigation Plan. Accuracy can also be followed to prevent accidents that can be injured. USE PROPER ACCESSORIES Use only Magellan cables and...
... your selected destination. Never rely solely on the Magellan Triton while driving. USE CARE The Global Positioning System (GPS) is an excellent navigation aid, but does not replace the need for the accuracy and maintenance of Defence civil GPS user policy and the Federal Radionavigation Plan. Accuracy can also be followed to prevent accidents that can be injured. USE PROPER ACCESSORIES Use only Magellan cables and...

Manual - English
Page 5
...4 Turning the Triton off 4 Setting the display backlight intensity 4 Setting the Time Zone 4 Changing Languages 5 Sleep Mode (Backlight Timer 5 Waking up the Triton from Sleep Mode 5 Setting the Backlight Timer 5 Automatic Power Off 6 Setting the Power Off Timer interval 6 Menus ...6 Accessing the Main Menu 6 Navigation Screens 7 Accessing the Map Screen Contextual Menu 7 Accessing the Speedometer Contextual Menu 7 Data Fields ...8 Customizing the Data Field for the Map Screen 8 Customizing the Data Field for the Large Data, Compass or Satellite Status Screen .. 8 Selecting Maps...
...4 Turning the Triton off 4 Setting the display backlight intensity 4 Setting the Time Zone 4 Changing Languages 5 Sleep Mode (Backlight Timer 5 Waking up the Triton from Sleep Mode 5 Setting the Backlight Timer 5 Automatic Power Off 6 Setting the Power Off Timer interval 6 Menus ...6 Accessing the Main Menu 6 Navigation Screens 7 Accessing the Map Screen Contextual Menu 7 Accessing the Speedometer Contextual Menu 7 Data Fields ...8 Customizing the Data Field for the Map Screen 8 Customizing the Data Field for the Large Data, Compass or Satellite Status Screen .. 8 Selecting Maps...
Manual - English
Page 6
... Map Screen Data Fields 20 Saving Your Current Position as a Waypoint 20 Saving a Position as a Waypoint using Pan 20 Displaying Best Fishing and Hunting Times 21 Displaying Solar and Lunar Rise and Set Times 21 Creating a Go To Route from the Map Screen 22 Viewing Waypoint Details from the Map Screen 22 Creating a Backtrack Route 23 Changing Map Options 23 Changing Map Units of Measure 24 Changing Map Units of Measure 25 Using the Keyboard ...26 Date Entry ...29 Text Size Limitations 29 Page Selection ...29 Profiles ...30 Activating a Profile 30 Editing a Profile 30 Information...
... Map Screen Data Fields 20 Saving Your Current Position as a Waypoint 20 Saving a Position as a Waypoint using Pan 20 Displaying Best Fishing and Hunting Times 21 Displaying Solar and Lunar Rise and Set Times 21 Creating a Go To Route from the Map Screen 22 Viewing Waypoint Details from the Map Screen 22 Creating a Backtrack Route 23 Changing Map Options 23 Changing Map Units of Measure 24 Changing Map Units of Measure 25 Using the Keyboard ...26 Date Entry ...29 Text Size Limitations 29 Page Selection ...29 Profiles ...30 Activating a Profile 30 Editing a Profile 30 Information...
Manual - English
Page 7
... the Map Screen 34 Creating a Custom Waypoint Using the Triton Menu 35 Viewing Waypoints 35 Viewing a Saved Waypoint 35 Editing Waypoints 36 Editing a Saved Waypoint 36 Deleting a Saved Waypoint 36 Deleting a Saved Waypoint (Alternate Method 36 Deleting All Saved Waypoints 37 Duplicating a Saved Waypoint 37 Settings ...38 Customizing Navigation Settings 38 Setting Volume and Brightness 38 View Memory Usage 38 Clearing Memory 39 Restoring Factory Settings 39 Setting Connectivity 39 Getting Software Version Information 40 Viewing Copyright Information 40 Personalizing Magellan...
... the Map Screen 34 Creating a Custom Waypoint Using the Triton Menu 35 Viewing Waypoints 35 Viewing a Saved Waypoint 35 Editing Waypoints 36 Editing a Saved Waypoint 36 Deleting a Saved Waypoint 36 Deleting a Saved Waypoint (Alternate Method 36 Deleting All Saved Waypoints 37 Duplicating a Saved Waypoint 37 Settings ...38 Customizing Navigation Settings 38 Setting Volume and Brightness 38 View Memory Usage 38 Clearing Memory 39 Restoring Factory Settings 39 Setting Connectivity 39 Getting Software Version Information 40 Viewing Copyright Information 40 Personalizing Magellan...
Manual - English
Page 9
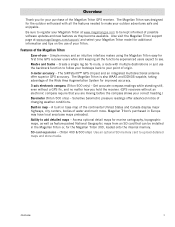
... be kept informed of possible software updates and new features as feature-packed National Geographic maps from an SD card that you for first time GPS receiver users while still keeping all the features needed to be installed in base map of the continental United States and Canada display major highways, city centers, bodies of changing weather conditions. Overview 1 Simple menus and an intuitive interface makes using the Magellan Triton easy...
... be kept informed of possible software updates and new features as feature-packed National Geographic maps from an SD card that you for first time GPS receiver users while still keeping all the features needed to be installed in base map of the continental United States and Canada display major highways, city centers, bodies of changing weather conditions. Overview 1 Simple menus and an intuitive interface makes using the Magellan Triton easy...
Manual - English
Page 13
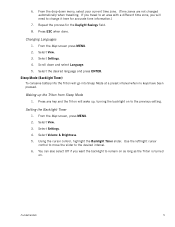
... screen, press MENU. 2. 6. Repeat the process for accurate time information.) 7. Changing Languages 1. Select Settings. 4. Select Volume & Brightness. 5. You can also select Off if you will need to change it here for the Daylight Savings field. 8. Sleep Mode (Backlight Timer) To conserve battery life the Triton will wake up the Triton from Sleep Mode 1. Select View. 3. From the Map screen press MENU. 2. Waking up , turning the backlight on . From the drop-down and select Language. 5. Select Settings. 4. Select the desired language and press ENTER. Press any key...
... screen, press MENU. 2. 6. Repeat the process for accurate time information.) 7. Changing Languages 1. Select Settings. 4. Select Volume & Brightness. 5. You can also select Off if you will need to change it here for the Daylight Savings field. 8. Sleep Mode (Backlight Timer) To conserve battery life the Triton will wake up the Triton from Sleep Mode 1. Select View. 3. From the Map screen press MENU. 2. Waking up , turning the backlight on . From the drop-down and select Language. 5. Select Settings. 4. Select the desired language and press ENTER. Press any key...
Manual - English
Page 14
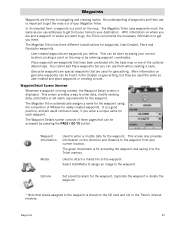
... Magellan Triton. Use the Waypoint option to create a waypoint from the list. (A Trail is a saved track.) The Geocache option allows you have saved previously. Go To, Create and View. Waypoint, Place, Trail, Geocache, Route, and Trips. The Place option is done through the Main Menu. The Route option displays routes that can be saved by entering the coordinates for a Go To route. The Trips option will turn off with no keys have been pressed. From the Map screen, press MENU. 2. Select View...
... Magellan Triton. Use the Waypoint option to create a waypoint from the list. (A Trail is a saved track.) The Geocache option allows you have saved previously. Go To, Create and View. Waypoint, Place, Trail, Geocache, Route, and Trips. The Place option is done through the Main Menu. The Route option displays routes that can be saved by entering the coordinates for a Go To route. The Trips option will turn off with no keys have been pressed. From the Map screen, press MENU. 2. Select View...
Manual - English
Page 15
... waypoints that could have options menus that you can: Reset Odometer, Reset Trip Odometer, Reset Speed. 2. Other functions of this manual. Navigation Screens The Triton has eight navigation screens and a Satellite Status screen that can be discussed in detail in the Magellan Triton. Fundamentals 7 Accessing the Map Screen Contextual Menu 1. The Profiles option is used to close the menu. Use Settings to your present position, by entering the coordinates of the Magellan Triton for your current location and go to additional functions. While viewing...
... waypoints that could have options menus that you can: Reset Odometer, Reset Trip Odometer, Reset Speed. 2. Other functions of this manual. Navigation Screens The Triton has eight navigation screens and a Satellite Status screen that can be discussed in detail in the Magellan Triton. Fundamentals 7 Accessing the Map Screen Contextual Menu 1. The Profiles option is used to close the menu. Use Settings to your present position, by entering the coordinates of the Magellan Triton for your current location and go to additional functions. While viewing...
Manual - English
Page 20
... set the number of arrival (ETA), accuracy, velocity made good (VMG), odometer, and current trip odometer. Select Customize Fields. 3. Press ENTER. 7. The Triton will be needed during normal use the cursor control to select the Navigation screen you want to the end of the route, current time, date, destination, XTE, elevation, current speed, average speed, maximum speed, distance made good (DMG), estimated time of data fields displayed on or off. 6. Select ENTER. 5. Press ESC when done. (Note: you . While viewing a screen that would be displayed...
... set the number of arrival (ETA), accuracy, velocity made good (VMG), odometer, and current trip odometer. Select Customize Fields. 3. Press ENTER. 7. The Triton will be needed during normal use the cursor control to select the Navigation screen you want to the end of the route, current time, date, destination, XTE, elevation, current speed, average speed, maximum speed, distance made good (DMG), estimated time of data fields displayed on or off. 6. Select ENTER. 5. Press ESC when done. (Note: you . While viewing a screen that would be displayed...
Manual - English
Page 21
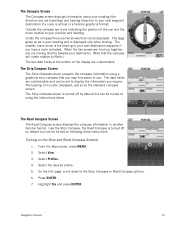
... Compass or Speedometer screen, press MENU. The header bar shows battery level, time of the various menu options will be discussed in the Map Screen chapter. 1. Navigation Screens 13 A visual indication of your movements (track) is displayed on the map as solid green lines. Also, if you have a route activated, it appears as the distance and bearing to indicate north from the Map screen by accessing the contextual menu and selecting Reset... . Current Location Screen The Current Location screen contains information...
... Compass or Speedometer screen, press MENU. The header bar shows battery level, time of the various menu options will be discussed in the Map Screen chapter. 1. Navigation Screens 13 A visual indication of your movements (track) is displayed on the map as solid green lines. Also, if you have a route activated, it appears as the distance and bearing to indicate north from the Map screen by accessing the contextual menu and selecting Reset... . Current Location Screen The Current Location screen contains information...
Manual - English
Page 23
... Map screen, press MENU. 2. Select Profiles. 4. Press ENTER. 7. The bearing icon is active) in another familiar format. Turning on the standard compass screen. The Strip Compass Screen The Strip Compass screen presents the compass information using the instructions below. The Road Compass Screen The Road Compass screen displays the compass information in a familiar graphical format. On the Info page, scroll down to your next waypoint destination if a route is also displayed, just as on the Strip and Road Compass Screens 1. Outside the compass are icons...
... Map screen, press MENU. 2. Select Profiles. 4. Press ENTER. 7. The bearing icon is active) in another familiar format. Turning on the standard compass screen. The Strip Compass Screen The Strip Compass screen presents the compass information using the instructions below. The Road Compass Screen The Road Compass screen displays the compass information in a familiar graphical format. On the Info page, scroll down to your next waypoint destination if a route is also displayed, just as on the Strip and Road Compass Screens 1. Outside the compass are icons...
Manual - English
Page 27
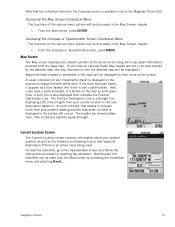
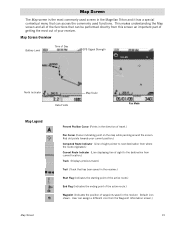
User can assign a different icon from current location.) Track (Displays previous travel .) Pan Cursor (Cursor indicating point on the map while panning around the screen. Red dot points towards your receiver. Default icon shown. Map Screen Overview Battery Level Time of Day GPS Signal Strength North Indicator Data Fields Map Scale Pan Mode Map Legend Present Position Cursor (Points in the receiver. This makes understanding the Map screen and all of the functions that can access the commonly used screen in the Magellan Triton and it...
User can assign a different icon from current location.) Track (Displays previous travel .) Pan Cursor (Cursor indicating point on the map while panning around the screen. Red dot points towards your receiver. Default icon shown. Map Screen Overview Battery Level Time of Day GPS Signal Strength North Indicator Data Fields Map Scale Pan Mode Map Legend Present Position Cursor (Points in the receiver. This makes understanding the Map screen and all of the functions that can access the commonly used screen in the Magellan Triton and it...
Manual - English
Page 28
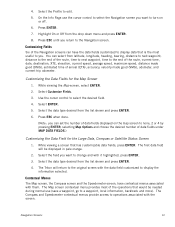
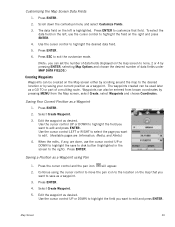
... Coordinates. Select Create Waypoint. 3. Map Screen 20 The data field on the map that field. Press ESC to exit the customize mode. (Note: you can set the number of data fields displayed on the map screen to none, 2 or 4 by pressing ENTER, selecting Map Options and choose the desired number of a multileg route. Press the cursor control and the pan icon will appear. 2. Use the cursor control UP or DOWN to highlight the field you want to edit...
... Coordinates. Select Create Waypoint. 3. Map Screen 20 The data field on the map that field. Press ESC to exit the customize mode. (Note: you can set the number of data fields displayed on the map screen to none, 2 or 4 by pressing ENTER, selecting Map Options and choose the desired number of a multileg route. Press the cursor control and the pan icon will appear. 2. Use the cursor control UP or DOWN to highlight the field you want to edit...
Manual - English
Page 40
... of your current location. With information on the direction and distance to your current location, picking a point on the map or by pressing the PAGE / GO TO button. This screen provides a way to enter data, modify existing data, add media or set alarm requirements for accepting the waypoint and saving it to enter or modify data for waypoints; Waypoint Information Media Used to the Triton memory. Select Add Media to assign an image to navigating and creating routes. User-Created, Place and Geocache waypoints. This can...
... of your current location. With information on the direction and distance to your current location, picking a point on the map or by pressing the PAGE / GO TO button. This screen provides a way to enter data, modify existing data, add media or set alarm requirements for accepting the waypoint and saving it to enter or modify data for waypoints; Waypoint Information Media Used to the Triton memory. Select Add Media to assign an image to navigating and creating routes. User-Created, Place and Geocache waypoints. This can...

Manual - English
Page 42
Select the icon to turn the proximity alarm on or off . 10. Select Point on the Map Using the Triton Menu 1. Edit the waypoint information as needed . 9. Select the Media page to add media or the Options page to save the waypoint. Select Create Waypoint. 3. Use the keyboard to enter the latitude for the cursor position. 8. Select OK when done. 8. Optional: Select the elevation field (ELEVATION) and enter the elevation for the waypoint. Use the arrow keypad to move the pan cursor to...
Select the icon to turn the proximity alarm on or off . 10. Select Point on the Map Using the Triton Menu 1. Edit the waypoint information as needed . 9. Select the Media page to add media or the Options page to save the waypoint. Select Create Waypoint. 3. Use the keyboard to enter the latitude for the cursor position. 8. Select OK when done. 8. Optional: Select the elevation field (ELEVATION) and enter the elevation for the waypoint. Use the arrow keypad to move the pan cursor to...

Manual - English
Page 43
... Triton Menu 1. Select Create. 3. The Waypoint Details screen is displayed on or off. 13. Use the keyboard to save the waypoint. Select the Viewing Waypoints icon to enter the longitude for the waypoint. Change the order that the waypoints are displayed, if needed . 12. Select the waypoint you want to the list of waypoints and press MENU. 6. Pressing ENTER to create a Go To route to the waypoint or ESC to return to view from the contextual menu. 7. Select the latitude field...
... Triton Menu 1. Select Create. 3. The Waypoint Details screen is displayed on or off. 13. Use the keyboard to save the waypoint. Select the Viewing Waypoints icon to enter the longitude for the waypoint. Change the order that the waypoints are displayed, if needed . 12. Select the waypoint you want to the list of waypoints and press MENU. 6. Pressing ENTER to create a Go To route to the waypoint or ESC to return to view from the contextual menu. 7. Select the latitude field...
Manual - English
Page 50
... Difficulty (1 through 5 with 5 being the most difficult), Terrain (1 though 5 with GPS users. They post these geocache waypoints into your Magellan Triton either by creating a geocache waypoint or by saving the geocache file from Current Location, Point on geocaching web sites that you would probably select Current Location or Coordinates.) 5. You then enter these locations on Map or Coordinates. (If you are entering waypoint information manually, you can transfer.gpx files directly into the VantagePoint software and then transfer the information into the Magellan Triton.
... Difficulty (1 through 5 with 5 being the most difficult), Terrain (1 though 5 with GPS users. They post these geocache waypoints into your Magellan Triton either by creating a geocache waypoint or by saving the geocache file from Current Location, Point on geocaching web sites that you would probably select Current Location or Coordinates.) 5. You then enter these locations on Map or Coordinates. (If you are entering waypoint information manually, you can transfer.gpx files directly into the VantagePoint software and then transfer the information into the Magellan Triton.
Manual - English
Page 55
... newly created route is shown with the default name (RouteXXX). Press ENTER. Select Add Point. 7. Confirm the deletion. (This does not remove the waypoint from the Triton's memory, only from the list of saved user-created waypoints and press ENTER. Select the method for determining the starting waypoint as explained in the list. 6. To change the name, select the button with the Information page displayed. Select the method for determining the next destination in memory. Select Save Route. 12. Current Location: The Waypoint...
... newly created route is shown with the default name (RouteXXX). Press ENTER. Select Add Point. 7. Confirm the deletion. (This does not remove the waypoint from the Triton's memory, only from the list of saved user-created waypoints and press ENTER. Select the method for determining the starting waypoint as explained in the list. 6. To change the name, select the button with the Information page displayed. Select the method for determining the next destination in memory. Select Save Route. 12. Current Location: The Waypoint...


