

Manual - English
Page 2
... type of vehicle power cable will result in malfunction and/or damage to the receiver. • For safety reasons, the battery in your Magellan RoadMate will stop charging when the ambient temperature is less than 32°F (0°C)... or more than 113°F (45°C). • It will take approximately 6 hours of the following: legal restrictions (such as an accessory for issues related to your responsibility to replace the battery. When using the windshield mount or other mounting...
... type of vehicle power cable will result in malfunction and/or damage to the receiver. • For safety reasons, the battery in your Magellan RoadMate will stop charging when the ambient temperature is less than 32°F (0°C)... or more than 113°F (45°C). • It will take approximately 6 hours of the following: legal restrictions (such as an accessory for issues related to your responsibility to replace the battery. When using the windshield mount or other mounting...
Manual - English
Page 5
... Notes on Entering Data 12 Table of Contents Magellan RoadMate 1400 ...1 Magellan RoadMate 1400 2 Installation Instructions ...3 Selecting the Location 3 Items Needed ...3 Cleaning the Area 4 Applying the Adhesive Disk 4 Attach the Cradle to the Swivel Mount 4 Secure the Swivel Mount to the Windshield or Adhesive Disk 4 Attaching the Magellan RoadMate to the Cradle 5 Adjust the Mount for Optimum Viewing 5 Connecting Power 5 Connecting Traffic...
... Notes on Entering Data 12 Table of Contents Magellan RoadMate 1400 ...1 Magellan RoadMate 1400 2 Installation Instructions ...3 Selecting the Location 3 Items Needed ...3 Cleaning the Area 4 Applying the Adhesive Disk 4 Attach the Cradle to the Swivel Mount 4 Secure the Swivel Mount to the Windshield or Adhesive Disk 4 Attaching the Magellan RoadMate to the Cradle 5 Adjust the Mount for Optimum Viewing 5 Connecting Power 5 Connecting Traffic...
Manual - English
Page 11
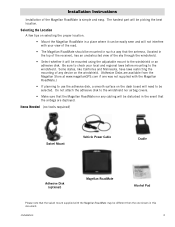
... sure to check your view of the road. • The Magellan RoadMate should be mounted in such a way that the antenna, (located in the top of the receiver), has an unobstructed view of the Magellan RoadMate is simple and easy. Selecting the Location A few tips on the windshield. (Adhesive Disks are deployed. Installation 3 Installation Instructions Installation of...
... sure to check your view of the road. • The Magellan RoadMate should be mounted in such a way that the antenna, (located in the top of the receiver), has an unobstructed view of the Magellan RoadMate is simple and easy. Selecting the Location A few tips on the windshield. (Adhesive Disks are deployed. Installation 3 Installation Instructions Installation of...
Manual - English
Page 12
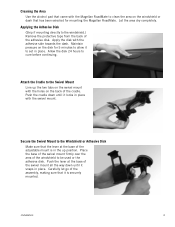
...disk. Installation 4 Maintain pressure on the windshield or dash that has been selected for 5 minutes to allow it snaps in place. Attach the Cradle to clean the area on the disk for mounting the Magellan RoadMate. Place the base of the swivel mount firmly over the area of the adhesive disk... the back of the windshield to set in place. Carefully let go of the assembly, making sure that it locks in the up the two tabs on the back of the adjustable mount is securely mounted. Apply the disk with the Magellan RoadMate to the Swivel Mount Line up position. Push...
...disk. Installation 4 Maintain pressure on the windshield or dash that has been selected for 5 minutes to allow it snaps in place. Attach the Cradle to clean the area on the disk for mounting the Magellan RoadMate. Place the base of the swivel mount firmly over the area of the adhesive disk... the back of the windshield to set in place. Carefully let go of the assembly, making sure that it locks in the up the two tabs on the back of the adjustable mount is securely mounted. Apply the disk with the Magellan RoadMate to the Swivel Mount Line up position. Push...