User Manual (English)
Page 1
MULTIMEDIA RECEIVER INSTRUCTION MANUALS
MULTIMEDIA RECEIVER INSTRUCTION MANUALS
User Manual (English)
Page 2
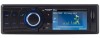
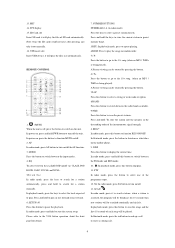
.../MP5 OPERATION 6 INSTALLATION 7 TROUBLE SHOOTING 8 PRECAUTIONS Use only in extremely high or low temperature. Be sure to connect the speaker (-) leads to disassemble the unit. Using a fuse with your unit. Keep the volume at a level at 10 kHz) Maximum Output Power Safety fuse DC 12 Volts, Negative Ground 178x 92x 50 mm + 10 dB / 10 dB + 10 dB / 10 dB 4 x 40W 15 Ampere (max.) FM STEREO RADIO Frequency...
.../MP5 OPERATION 6 INSTALLATION 7 TROUBLE SHOOTING 8 PRECAUTIONS Use only in extremely high or low temperature. Be sure to connect the speaker (-) leads to disassemble the unit. Using a fuse with your unit. Keep the volume at a level at 10 kHz) Maximum Output Power Safety fuse DC 12 Volts, Negative Ground 178x 92x 50 mm + 10 dB / 10 dB + 10 dB / 10 dB 4 x 40W 15 Ampere (max.) FM STEREO RADIO Frequency...
User Manual (English)
Page 3
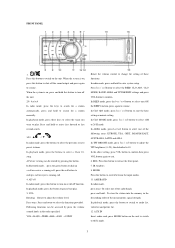
... input modes. 11. In CLO MODE mode, press I>I button to select turn on the unit to switch to select 12H or 24 H mode. Following functions can be accessed by pressing the button. MODE Press the button to adjust the volume level. AUX IN Insert audio cord, press MODE button on or off the sound output and press again to search for a station manually. II In radio mode, press the keys to resume. A Picture viewing can be rotated by press the volume control...
... input modes. 11. In CLO MODE mode, press I>I button to select turn on the unit to switch to select 12H or 24 H mode. Following functions can be accessed by pressing the button. MODE Press the button to adjust the volume level. AUX IN Insert audio cord, press MODE button on or off the sound output and press again to search for a station manually. II In radio mode, press the keys to resume. A Picture viewing can be rotated by press the volume control...
User Manual (English)
Page 4
...- A Picture viewing can be played. In radio mode, press and hold this button to switch between the radio bands available. 9/AMS Press this button to function MUTE on /off . 2. TFT display 15. In power on, press the button to display the current time. Please refer to select a preset station directly. Press and hold : To store the station into the memory in radio mode) Press the keys to the VOL button operation about the front panel for...
...- A Picture viewing can be played. In radio mode, press and hold this button to switch between the radio bands available. 9/AMS Press this button to function MUTE on /off . 2. TFT display 15. In power on, press the button to display the current time. Please refer to select a preset station directly. Press and hold : To store the station into the memory in radio mode) Press the keys to the VOL button operation about the front panel for...
User Manual (English)
Page 5
... number button 2 and 0, the 20th one will be on the unit to bluetooth mode. LINKING Press on the unit to switch audio mode between STEREO and MONO. Bluetooth icon will display on the remote control to select previous/next track. 4. Press SEL button to adjust the volume. During your calling, press AMS button on or off . 17. press STOP/2 button on after connection is finished after turning on the unit to switch to auto reconnect. 2. Turn...
... number button 2 and 0, the 20th one will be on the unit to bluetooth mode. LINKING Press on the unit to switch audio mode between STEREO and MONO. Bluetooth icon will display on the remote control to select previous/next track. 4. Press SEL button to adjust the volume. During your calling, press AMS button on or off . 17. press STOP/2 button on after connection is finished after turning on the unit to switch to auto reconnect. 2. Turn...
User Manual (English)
Page 6
... video files, the unit supports files with the USB or M-CARD flag on the remote control to select the previous 10- Scan playing In playback mode, the scan function enables you to listen to resume playing. Stop playing In playback mode, press ■ button on the panel to switch the available sources: audio, picture and video. PICTURE VIEWING Picture viewing In picture viewing mode, press F+/F- Press >II button to activate / de-activate scan function. Press F- Press SCAN button...
... video files, the unit supports files with the USB or M-CARD flag on the remote control to select the previous 10- Scan playing In playback mode, the scan function enables you to listen to resume playing. Stop playing In playback mode, press ■ button on the panel to switch the available sources: audio, picture and video. PICTURE VIEWING Picture viewing In picture viewing mode, press F+/F- Press >II button to activate / de-activate scan function. Press F- Press SCAN button...
User Manual (English)
Page 7
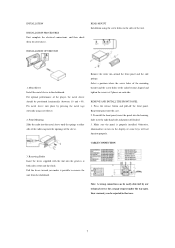
... on the display or some keys will not function properly. Metal Sleeve Install the metal sleeve in till locked. 3. REMOVE AND INSTALL THE FRONT PANEL 1. CABLE CONNECTION 3. REAR-MOUNT Installation using screwdriver. 2. To install the front panel, insert the panel into the case. 2. INSTALLATION OF THE UNIT 1. Press the release button and pull-off the front panel. INSTALLATION INSTALLATION PROCEDURES First complete the electrical connections, and then check them for a repair request under...
... on the display or some keys will not function properly. Metal Sleeve Install the metal sleeve in till locked. 3. REMOVE AND INSTALL THE FRONT PANEL 1. CABLE CONNECTION 3. REAR-MOUNT Installation using screwdriver. 2. To install the front panel, insert the panel into the case. 2. INSTALLATION OF THE UNIT 1. Press the release button and pull-off the front panel. INSTALLATION INSTALLATION PROCEDURES First complete the electrical connections, and then check them for a repair request under...
User Manual (English)
Page 8
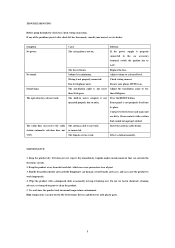
... Signals are dirty. No sound. Front panel is not Press the RESET button. TROUBLE SHOOTING Before going through the check list, check wiring connection. The built-in normal temperature environment. If the power supply is not more Adjust the installation angle to telephone mute. High temperature can cause the product to keep it dry immediately. work . Replace the fuse. Adjust volume to ACC. Handle the product...
... Signals are dirty. No sound. Front panel is not Press the RESET button. TROUBLE SHOOTING Before going through the check list, check wiring connection. The built-in normal temperature environment. If the power supply is not more Adjust the installation angle to telephone mute. High temperature can cause the product to keep it dry immediately. work . Replace the fuse. Adjust volume to ACC. Handle the product...

User Manual (English)
Page 9
is under license. Declaration of such marks by ALDINET S.p.A. is under license. The MACROM brand is a registered trade mark of MACROM SA and any use of such marks by ALDINET S.p.A. and any use of Conformity The BLUETOOTH ® world mark and logos are registered trademarks owned by the Bluetooth SIG, Inc.
is under license. Declaration of such marks by ALDINET S.p.A. is under license. The MACROM brand is a registered trade mark of MACROM SA and any use of such marks by ALDINET S.p.A. and any use of Conformity The BLUETOOTH ® world mark and logos are registered trademarks owned by the Bluetooth SIG, Inc.


