
Owners Manual
Page 5
...-out or an apology. When you shut down your equipment, turn off . Turn on the power switch [3] on the MR10Smk3 Studio Subwoofer (1⁄4") to prevent thumps and other noises generated by any upstream equipment from coming out the speakers. It's your desired setting. Enjoy the authoritative, commanding lows of Wisdom 5. Connect the line...
...-out or an apology. When you shut down your equipment, turn off . Turn on the power switch [3] on the MR10Smk3 Studio Subwoofer (1⁄4") to prevent thumps and other noises generated by any upstream equipment from coming out the speakers. It's your desired setting. Enjoy the authoritative, commanding lows of Wisdom 5. Connect the line...
Owners Manual
Page 6
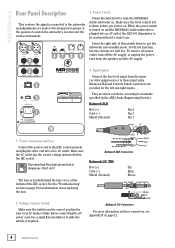
...192; LA PLUIE OU À L'HUMIDITÉ. Power Connection and Fuse Connect the power cord to this IEC socket securely, and plug the other signal source) to these connectors, see Appendix B on and the MR10Smk3 studio subwoofer is plugged into a live . Disconnecting the...(BALANCED) OUTPUT TRS (BALANCED) POWER ON 3 80Hz U 120Hz AUTO POWER OFF AUTO ON 6 POLARITY 40Hz 180Hz 0 180 CROSSOVER 7 8 SETTINGS -30dB +6dB LEVEL 9 Press the right side of the speakers to match the subwoofer's location and the room's environment. 3. MR10Smk3 Rear Panel Description This is where...
...192; LA PLUIE OU À L'HUMIDITÉ. Power Connection and Fuse Connect the power cord to this IEC socket securely, and plug the other signal source) to these connectors, see Appendix B on and the MR10Smk3 studio subwoofer is plugged into a live . Disconnecting the...(BALANCED) OUTPUT TRS (BALANCED) POWER ON 3 80Hz U 120Hz AUTO POWER OFF AUTO ON 6 POLARITY 40Hz 180Hz 0 180 CROSSOVER 7 8 SETTINGS -30dB +6dB LEVEL 9 Press the right side of the speakers to match the subwoofer's location and the room's environment. 3. MR10Smk3 Rear Panel Description This is where...
Owners Manual
Page 7
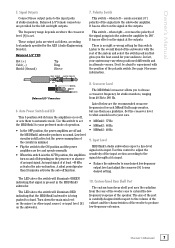
... When this control to adjust the sensitivity of the input section according to the overall blend of the subwoofer with the position of the speaker. when left and right outputs. Low-level circuitry is still active, but use them to extend the lowfrequency response of the polarity switch.... your preferred mode of the port is no effect on where the crossover level [8] is in the MR10Smk3 subwoofer. It has no right or wrong setting for more information. Auto Power Switch and LED This 3-position switch turns the amplifiers on the prescence or absence of studio monitors. ...
... When this control to adjust the sensitivity of the input section according to the overall blend of the subwoofer with the position of the speaker. when left and right outputs. Low-level circuitry is still active, but use them to extend the lowfrequency response of the polarity switch.... your preferred mode of the port is no effect on where the crossover level [8] is in the MR10Smk3 subwoofer. It has no right or wrong setting for more information. Auto Power Switch and LED This 3-position switch turns the amplifiers on the prescence or absence of studio monitors. ...
Owners Manual
Page 8
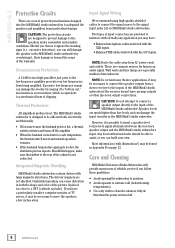
... be necessary to a CRT (cathode ray tube). Integrated Magnetic Shielding MR10Smk3 studio subwoofers contain drivers with the 1/4" inputs. Such damage is turned off the amplifier. • When the heatsink cools down to safeguard the speakers and amplifiers from AC power cords and outlets. Speaker levels are provided to the low-frequency amplifier prevents very...
... be necessary to a CRT (cathode ray tube). Integrated Magnetic Shielding MR10Smk3 studio subwoofers contain drivers with the 1/4" inputs. Such damage is turned off the amplifier. • When the heatsink cools down to safeguard the speakers and amplifiers from AC power cords and outlets. Speaker levels are provided to the low-frequency amplifier prevents very...

Owners Manual
Page 10
...to check for proper grounding of the cable. • Make sure the signal cable is an indication of an incorrect gain setting somewhere before the speaker. • If possible, listen to the signal source with a small screwdriver. Noise/Hum/Buzz • Check the signal cable between the ...refer to "No Sound" to proceed. To remove and replace the fuse: 1. Disconnect the power cord from the mixing console (or whatever device immediately precedes the studio subwoofer) is live , it 's not the subwoofer. 10 MR10Smk3 It will find lots of our website (www.720trees.com) where you think your...
...to check for proper grounding of the cable. • Make sure the signal cable is an indication of an incorrect gain setting somewhere before the speaker. • If possible, listen to the signal source with a small screwdriver. Noise/Hum/Buzz • Check the signal cable between the ...refer to "No Sound" to proceed. To remove and replace the fuse: 1. Disconnect the power cord from the mixing console (or whatever device immediately precedes the studio subwoofer) is live , it 's not the subwoofer. 10 MR10Smk3 It will find lots of our website (www.720trees.com) where you think your...

