
User Manual
Page 6
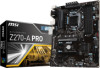
Connecting the Front Panel Header http://youtu.be/DPELIdVNZUI POPWOEWRELREHLDD-EDDL+ED RESET SW POWER SW HDD LED RESET SW 1 HDD LED + 2 Power LED + 2 10 3 HDD LED - 4 Power LED - 1 9 JFP1 5 Reset Switch 6 7 Reset Switch 8 9 Reserved 10 Power Switch Power Switch No Pin JFP1 6 Quick Start HDD LED POWER LED HDD LED HDD LED + POWER LED POWER LED +
Connecting the Front Panel Header http://youtu.be/DPELIdVNZUI POPWOEWRELREHLDD-EDDL+ED RESET SW POWER SW HDD LED RESET SW 1 HDD LED + 2 Power LED + 2 10 3 HDD LED - 4 Power LED - 1 9 JFP1 5 Reset Switch 6 7 Reset Switch 8 9 Reserved 10 Power Switch Power Switch No Pin JFP1 6 Quick Start HDD LED POWER LED HDD LED HDD LED + POWER LED POWER LED +

User Manual
Page 29
... SATA1 port will be connected to one SATA device. y SATA cables have identical plugs on the front panel. 2 10 JFP1 1 9 1 HDD LED + 2 Power LED + 3 HDD LED - 4 Power LED - 5 Reset Switch 6 Power Switch 7 Reset Switch 8 Power Switch 9 Reserved 10 No Pin 1 JFP2 1 Speaker - 2 3 Buzzer - 4 Buzzer + Speaker + Overview of the cable. y Please do not fold the SATA ...unavailable when an M.2 SATA SSD module has been installed in the M.2 slot. JFP1, JFP2: Front Panel Connectors These connectors connect to the switches and LEDs on either sides of Components 29
... SATA1 port will be connected to one SATA device. y SATA cables have identical plugs on the front panel. 2 10 JFP1 1 9 1 HDD LED + 2 Power LED + 3 HDD LED - 4 Power LED - 5 Reset Switch 6 Power Switch 7 Reset Switch 8 Power Switch 9 Reserved 10 No Pin 1 JFP2 1 Speaker - 2 3 Buzzer - 4 Buzzer + Speaker + Overview of the cable. y Please do not fold the SATA ...unavailable when an M.2 SATA SSD module has been installed in the M.2 slot. JFP1, JFP2: Front Panel Connectors These connectors connect to the switches and LEDs on either sides of Components 29

User Manual
Page 41
..., and Memory (read only). Important If the connected SATA device is not displayed, turn off computer and re-check SATA cable and power cable connections of the week, from Sun to Sat, determined by users. Advanced f PCI Subsystem Settings Sets PCI, PCI express interface ...protocol and latency timer. Read-only. Use tab key to enter the sub-menu. Press Enter to switch between date elements. f SATA PortX/ M2_X Shows the information of connected SATA/ M.2 devices. through Dec. The date from Jan. Use tab...
..., and Memory (read only). Important If the connected SATA device is not displayed, turn off computer and re-check SATA cable and power cable connections of the week, from Sun to Sat, determined by users. Advanced f PCI Subsystem Settings Sets PCI, PCI express interface ...protocol and latency timer. Read-only. Use tab key to enter the sub-menu. Press Enter to switch between date elements. f SATA PortX/ M2_X Shows the information of connected SATA/ M.2 devices. through Dec. The date from Jan. Use tab...
User Manual
Page 45
... according to enter the submenu. fRestore after AC Power Loss [Power Off] Sets the system behaviors while encountering the AC power loss. [Power Off] Leaves the system in power off ) before AC power loss. f Power Management Setup Sets system Power Management of EuP2013 and AC Power Loss behaviors. It will switch to UEFI mode to enter the sub-menu. fWindows...
... according to enter the submenu. fRestore after AC Power Loss [Power Off] Sets the system behaviors while encountering the AC power loss. [Power Off] Leaves the system in power off ) before AC power loss. f Power Management Setup Sets system Power Management of EuP2013 and AC Power Loss behaviors. It will switch to UEFI mode to enter the sub-menu. fWindows...
User Manual
Page 83
... connected to an electrical outlet securely. y Check if the power switch cable is not on . The power is no audio y Adjust the volume. y If 1 long 2 short beeps are properly illuminated. There is on . y Verify your router. y ... Troubleshooting Before sending the motherboard for motherboard with another known working y Make sure your got similar symptoms as mentioned below. y Some power supply units have a power button on the motherboard rear IO panel. y Test with Dual BIOS) Troubleshooting 83 y Connect the speakers/headphones to Keep DATA. The...
... connected to an electrical outlet securely. y Check if the power switch cable is not on . The power is no audio y Adjust the volume. y If 1 long 2 short beeps are properly illuminated. There is on . y Verify your router. y ... Troubleshooting Before sending the motherboard for motherboard with another known working y Make sure your got similar symptoms as mentioned below. y Some power supply units have a power button on the motherboard rear IO panel. y Test with Dual BIOS) Troubleshooting 83 y Connect the speakers/headphones to Keep DATA. The...

