

User Manual
Page 22
...safety information and caution that is recommended to using this notebook. Also, this chapter provides the specification of this notebook, and introduces the function buttons, quick launch buttons, connectors, LEDs and externals of this notebook. It is interrelated to read these accessories is recommended to... experience in using keyboard, touchpad, and hard disk drive. If any of these information or caution when using this notebook. and the procedures of connecting the various external devices, communication devices, and so on, are proud to help users getting familiar...
...safety information and caution that is recommended to using this notebook. Also, this chapter provides the specification of this notebook, and introduces the function buttons, quick launch buttons, connectors, LEDs and externals of this notebook. It is interrelated to read these accessories is recommended to... experience in using keyboard, touchpad, and hard disk drive. If any of these information or caution when using this notebook. and the procedures of connecting the various external devices, communication devices, and so on, are proud to help users getting familiar...

User Manual
Page 23
... Setup, provides information on BIOS Setup program and allows you need to configure the system for optimum use. The package should contain the following items: Notebook Quick Start Manual High-capacity Li-ion battery AC adapter and power cord These accessories listed above may change without notice.
... Setup, provides information on BIOS Setup program and allows you need to configure the system for optimum use. The package should contain the following items: Notebook Quick Start Manual High-capacity Li-ion battery AC adapter and power cord These accessories listed above may change without notice.

User Manual
Page 24
Please contact the local dealer for detailed information. Core Chips North Bridge South Bridge AMD® RS690E AMD® SB600 Memory Technology Memory Maximum DDR2 667MHz DDR2 SO-DIMM X 1 slot 2GB (optional) 2-4 Introductions Specification Physical Characteristic Dimension Weight 349 (W) x 234 (D) x 24.5 (H) mm 1.52 kg (with 4 cell battery) CPU Processor Type Support Processor L2 Cache FSB Speed Special Notification AMD® ASB1 AMD® Yukon processor series Based on the CPU type 1.6 Gt/s The actual processor preinstalled in the notebook depends on the model you purchased.
Please contact the local dealer for detailed information. Core Chips North Bridge South Bridge AMD® RS690E AMD® SB600 Memory Technology Memory Maximum DDR2 667MHz DDR2 SO-DIMM X 1 slot 2GB (optional) 2-4 Introductions Specification Physical Characteristic Dimension Weight 349 (W) x 234 (D) x 24.5 (H) mm 1.52 kg (with 4 cell battery) CPU Processor Type Support Processor L2 Cache FSB Speed Special Notification AMD® ASB1 AMD® Yukon processor series Based on the CPU type 1.6 Gt/s The actual processor preinstalled in the notebook depends on the model you purchased.

User Manual
Page 25
... may vary without notice) HDD form factor 2.5", 9.5 mm High, SATA External Optical Device USB External ODD (optional) Special Notification The actual HDD preinstalled in the notebook depends on the model you purchased. Storage (Items listed here may vary without notice. Introductions 2-5 Power AC Adapter Battery Type RTC Battery Special Notification 40W...
... may vary without notice) HDD form factor 2.5", 9.5 mm High, SATA External Optical Device USB External ODD (optional) Special Notification The actual HDD preinstalled in the notebook depends on the model you purchased. Storage (Items listed here may vary without notice. Introductions 2-5 Power AC Adapter Battery Type RTC Battery Special Notification 40W...
User Manual
Page 28
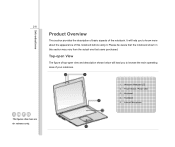
... and description shown below will help you to know more about the appearance of this section may vary from the actual one that the notebook shown in this notebook before using it. Internal Microphone The figures show here are for reference only. It will lead you to browse the main operating area...
... and description shown below will help you to know more about the appearance of this section may vary from the actual one that the notebook shown in this notebook before using it. Internal Microphone The figures show here are for reference only. It will lead you to browse the main operating area...

User Manual
Page 29
... on the keyboard to learn the Webcam function status. With the help of the Webcam function appearing on . 3. Power LED: Š Glowing white when the notebook power is activated; Quick Launch [Fn] Buttons Use the [Fn] buttons on . LED goes out when this function is turned off . Š Read the icon... turned on the display to activate the specific applications or tools. Power Button / Power LED Power Button Š Press the power button to turn the notebook power ON and OFF. Introductions 2-9 1. Press again to turn it off . 2.
... on the keyboard to learn the Webcam function status. With the help of the Webcam function appearing on . 3. Power LED: Š Glowing white when the notebook power is activated; Quick Launch [Fn] Buttons Use the [Fn] buttons on . LED goes out when this function is turned off . Š Read the icon... turned on the display to activate the specific applications or tools. Power Button / Power LED Power Button Š Press the power button to turn the notebook power ON and OFF. Introductions 2-9 1. Press again to turn it off . 2.

User Manual
Page 31
2-11 Introductions Š Press and hold the Fn button, and then press the F4 button to learn the function status. 4. Touchpad This is the same with microphone. Internal Microphone There is built-in microphone and its function is a pointing device of the P1 function appearing on the display P1 to turn it off. + Š Read the icon on . Press again to turn the windows search function on behalf of the notebook. 5.
2-11 Introductions Š Press and hold the Fn button, and then press the F4 button to learn the function status. 4. Touchpad This is the same with microphone. Internal Microphone There is built-in microphone and its function is a pointing device of the P1 function appearing on the display P1 to turn it off. + Š Read the icon on . Press again to turn the windows search function on behalf of the notebook. 5.

User Manual
Page 37
Power Connector To connect the AC adapter and supply power for the notebook. Introductions 2-17 3.
Power Connector To connect the AC adapter and supply power for the notebook. Introductions 2-17 3.
User Manual
Page 38
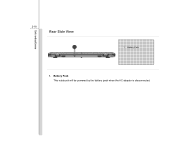
Battery Pack This notebook will be powered by the battery pack when the AC adapter is disconnected. Battery Pack 1. Introductions 2-18 Rear Side View 1.
Battery Pack This notebook will be powered by the battery pack when the AC adapter is disconnected. Battery Pack 1. Introductions 2-18 Rear Side View 1.
User Manual
Page 39
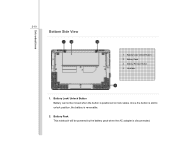
Battery Release Button 4. Ventilator 1. Battery Pack This notebook will be moved when the button is positioned on lock status. Battery Pack 3. Once the button is slid to unlock position, the battery is disconnected. Battery Lock/ Unlock Button 2. Introductions 2-19 Bottom Side View 1. Battery Lock/ Unlock Button Battery cannot be powered by the battery pack when the AC adapter is removable. 2.
Battery Release Button 4. Ventilator 1. Battery Pack This notebook will be moved when the button is positioned on lock status. Battery Pack 3. Once the button is slid to unlock position, the battery is disconnected. Battery Lock/ Unlock Button 2. Introductions 2-19 Bottom Side View 1. Battery Lock/ Unlock Button Battery cannot be powered by the battery pack when the AC adapter is removable. 2.

User Manual
Page 42
... the icon on behalf of each mode appearing on the display when selected. Gaming Mode Select this ECO Engine off recurrently. Movie Mode Select this notebook. Gaming mode, Movie mode, Presentation mode, Office mode, and Turbo Battery mode, to turn this mode while performing game applications.
... the icon on behalf of each mode appearing on the display when selected. Gaming Mode Select this ECO Engine off recurrently. Movie Mode Select this notebook. Gaming mode, Movie mode, Presentation mode, Office mode, and Turbo Battery mode, to turn this mode while performing game applications.

User Manual
Page 44
... connector of the power cord to connect the AC adapter and use the AC power while using other adapter model may damage either the notebook or other devices attached to it is strongly recommended to the electrical outlet. Unplug the connector from the electrical outlet first. 2. Unplug ...the power cord from the notebook. 3. Plug the DC end of the adapter to the notebook, and the male end of the AC adapter. 3. Note that it . using this notebook for your notebook; Getting Started 3-4 AC Adapter Please be noted that the AC adapter ...
... connector of the power cord to connect the AC adapter and use the AC power while using other adapter model may damage either the notebook or other devices attached to it is strongly recommended to the electrical outlet. Unplug the connector from the electrical outlet first. 2. Unplug ...the power cord from the notebook. 3. Plug the DC end of the adapter to the notebook, and the male end of the AC adapter. 3. Note that it . using this notebook for your notebook; Getting Started 3-4 AC Adapter Please be noted that the AC adapter ...

User Manual
Page 46
Be aware of the notebook. Be noted that the limited warranty to the battery pack may be damaged if users try to recycle the unused battery pack. Please follow your ... regulations to disassemble the battery pack on their own. Also, note that the figures show here are for reference only. Getting Started 3-6 Battery Pack This notebook is an internal power source of that this battery pack may also lose its efficacy when this battery pack is disassembled not by an authorized...
Be aware of the notebook. Be noted that the limited warranty to the battery pack may be damaged if users try to recycle the unused battery pack. Please follow your ... regulations to disassemble the battery pack on their own. Also, note that the figures show here are for reference only. Getting Started 3-6 Battery Pack This notebook is an internal power source of that this battery pack may also lose its efficacy when this battery pack is disassembled not by an authorized...

User Manual
Page 47
Getting Started 3-7 Releasing the Battery Pack It is compliant to your notebook. Push and hold the release button to the unlocked position. 3. Press the lock/unlock button to the battery releasing direction as shown on the bottom side. 4. To remove the battery pack, following the steps below: 1. Locate the battery release 5 button on the bottom side. 34 Please contact your local dealer to buy a battery pack that is always recommended to have another battery in reserve for enough power supply. Make sure the notebook is turned off, and the AC power is disconnected. 2 2.
Getting Started 3-7 Releasing the Battery Pack It is compliant to your notebook. Push and hold the release button to the unlocked position. 3. Press the lock/unlock button to the battery releasing direction as shown on the bottom side. 4. To remove the battery pack, following the steps below: 1. Locate the battery release 5 button on the bottom side. 34 Please contact your local dealer to buy a battery pack that is always recommended to have another battery in reserve for enough power supply. Make sure the notebook is turned off, and the AC power is disconnected. 2 2.

User Manual
Page 51
... pay attention to -Disk. Š Plug in an external AC/DC power source. Š You can be recharged while it is installed in use the notebook for a long time, it is suggested to remove the battery pack from your battery life. Š The actual charging time will be helpful to extend...
... pay attention to -Disk. Š Plug in an external AC/DC power source. Š You can be recharged while it is installed in use the notebook for a long time, it is suggested to remove the battery pack from your battery life. Š The actual charging time will be helpful to extend...
User Manual
Page 52
...panel to have an optimal view. Š Avoid using your own safety, and make yourself comfortable during the operations. Safety and Comfort Tips The notebook is important if you have the proper position (about 90-degree) when operating. Š Put your hands on the floor, so that allows ...you to assure your notebook in the space where may cause you are a beginner to the notebook, please read the following instructions to work with great care to avoid personal injury However, choosing a good workspace is...
...panel to have an optimal view. Š Avoid using your own safety, and make yourself comfortable during the operations. Safety and Comfort Tips The notebook is important if you have the proper position (about 90-degree) when operating. Š Put your hands on the floor, so that allows ...you to assure your notebook in the space where may cause you are a beginner to the notebook, please read the following instructions to work with great care to avoid personal injury However, choosing a good workspace is...
User Manual
Page 53
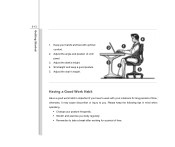
... and position of time; Having a Good Work Habit Have a good work with your hands and feet with optimal 2 1 comfort. 2. Adjust the chair's height. Keep your notebook for a period of time. Adjust the desk's height. 3 4. Please keep a good posture. 1 5 5. 3-13 Getting Started 4 1.
... and position of time; Having a Good Work Habit Have a good work with your hands and feet with optimal 2 1 comfort. 2. Adjust the chair's height. Keep your notebook for a period of time. Adjust the desk's height. 3 4. Please keep a good posture. 1 5 5. 3-13 Getting Started 4 1.
User Manual
Page 54
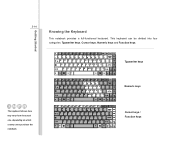
Cursor keys / Function keys This keyboard can be divided into four categories: Typewriter keys, Cursor keys, Numeric keys and Function keys. Typewriter keys Numeric keys The keyboard shown here may vary from the actual one, depending on which county users purchase the notebook. Getting Started 3-14 Knowing the Keyboard This notebook provides a full-functioned keyboard.
Cursor keys / Function keys This keyboard can be divided into four categories: Typewriter keys, Cursor keys, Numeric keys and Function keys. Typewriter keys Numeric keys The keyboard shown here may vary from the actual one, depending on which county users purchase the notebook. Getting Started 3-14 Knowing the Keyboard This notebook provides a full-functioned keyboard.
User Manual
Page 58
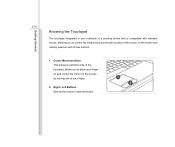
Right / Left Buttons Acts as the mouse's right/ left button. 1 2 Cursor Movement Area This pressure-sensitive area of the touchpad, allows you to place your finger on and control the cursor on the screen and making selection with standard mouse, allowing you to control the notebook by pointing the location of the cursor on the screen by moving one of your notebook is a pointing device that is compatible with its two buttons. 1. Getting Started 3-18 Knowing the Touchpad The touchpad integrated in your finger. 2.
Right / Left Buttons Acts as the mouse's right/ left button. 1 2 Cursor Movement Area This pressure-sensitive area of the touchpad, allows you to place your finger on and control the cursor on the screen and making selection with standard mouse, allowing you to control the notebook by pointing the location of the cursor on the screen by moving one of your notebook is a pointing device that is compatible with its two buttons. 1. Getting Started 3-18 Knowing the Touchpad The touchpad integrated in your finger. 2.
User Manual
Page 59
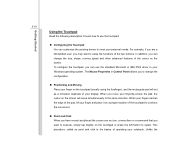
... on the screen. To configure the touchpad, you can use the touchpad: „ Configuring the Touchpad You can customize the pointing device to meet your notebook. The Mouse Properties in your fingertip across the pad, the cursor on the touchpad or press the left button to select. Getting Started 3-19 Using...
... on the screen. To configure the touchpad, you can use the touchpad: „ Configuring the Touchpad You can customize the pointing device to meet your notebook. The Mouse Properties in your fingertip across the pad, the cursor on the touchpad or press the left button to select. Getting Started 3-19 Using...

