

User Guide
Page 2
... FAQ, technical guide, BIOS updates, driver updates and other intellectual property rights. W indows® 2000/ XP/ VISTA are the properties of their respective owners. Revision History Revision V1.0 Revision History First Release Date February 2009 Technical Support If a problem arises with your system and no guarantee is prohibited. Reverse engineering or disassembly is given as to make changes without notice. func=service Contact our technical staff...
... FAQ, technical guide, BIOS updates, driver updates and other intellectual property rights. W indows® 2000/ XP/ VISTA are the properties of their respective owners. Revision History Revision V1.0 Revision History First Release Date February 2009 Technical Support If a problem arises with your system and no guarantee is prohibited. Reverse engineering or disassembly is given as to make changes without notice. func=service Contact our technical staff...

User Guide
Page 3
...: 1. For every changes in power cord's usage, please use an approved power cord with the same or equivalent type recommended by service personnel: The power cord or plug is damaged. Do not disable the protective earth pin from humidity. 4. For better environmental protection, waste batteries should be connected to moisture. The optical storage devices are for future reference. 3. Do not touch the lens inside the drive.
...: 1. For every changes in power cord's usage, please use an approved power cord with the same or equivalent type recommended by service personnel: The power cord or plug is damaged. Do not disable the protective earth pin from humidity. 4. For better environmental protection, waste batteries should be connected to moisture. The optical storage devices are for future reference. 3. Do not touch the lens inside the drive.
User Guide
Page 4
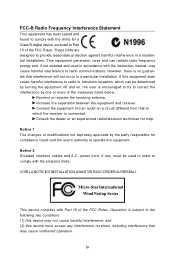
..., if not installed and used in a particular installation. This equipment generates, uses and can be used in a residential installation. iv Notice 1 The changes or modifications not expressly approved by turning the equipment off and on a circuit different from that interference will not occur in order to comply with the emission limits. Micro-Star International Wind Nettop Series This device complies with Part 15 of...
..., if not installed and used in a particular installation. This equipment generates, uses and can be used in a residential installation. iv Notice 1 The changes or modifications not expressly approved by turning the equipment off and on a circuit different from that interference will not occur in order to comply with the emission limits. Micro-Star International Wind Nettop Series This device complies with Part 15 of...

User Guide
Page 8
CONTENTS Copyright Notice ii Trademarks ii U.S. Patent Numbers ii Revision History ii Technical Support ii Safety Instructions iii FCC-B Radio Frequency Interference Statement iv WEEE (Waste Electrical and Electronic Equipment) Statement....v Chapter 1 Getting Started 1-1 Front Panel 1-2 Back Panel 1-5 Packing Contents 1-7 Chapter 2 Realtek ALC888 Audio 2-1 Software Configuration 2-2 Hardware Setup 2-16 Chapter 3 Windows Installation/ Recovery Guide 3-1 Installation Guide 3-2 Recovery Guide 3-9 viii
CONTENTS Copyright Notice ii Trademarks ii U.S. Patent Numbers ii Revision History ii Technical Support ii Safety Instructions iii FCC-B Radio Frequency Interference Statement iv WEEE (Waste Electrical and Electronic Equipment) Statement....v Chapter 1 Getting Started 1-1 Front Panel 1-2 Back Panel 1-5 Packing Contents 1-7 Chapter 2 Realtek ALC888 Audio 2-1 Software Configuration 2-2 Hardware Setup 2-16 Chapter 3 Windows Installation/ Recovery Guide 3-1 Installation Guide 3-2 Recovery Guide 3-9 viii
User Guide
Page 9
W ith the fantastic appearance and ultra-small form factor, it can easily be set anywhere. The feature packed platform also gives you an exciting PC experience. 1-1 It is your best slim PC choice. Getting Started Chapter 1 Getting Started Congratulations for purchasing the Wind Nettop Series (MS-6645).
W ith the fantastic appearance and ultra-small form factor, it can easily be set anywhere. The feature packed platform also gives you an exciting PC experience. 1-1 It is your best slim PC choice. Getting Started Chapter 1 Getting Started Congratulations for purchasing the Wind Nettop Series (MS-6645).
User Guide
Page 12
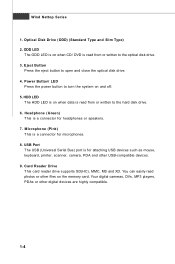
Optical Disk Drive (ODD) (Standard Type and Slim Type) 2. HDD LED The HDD LED is on when data is for attaching USB devices such as mouse, keyboard, printer, scanner, camera, PDA and other digital devices are highly compatible. 1-4 Card Reader Drive This card reader drive supports SD(HC), MMC, MS and XD. USB Port The USB (Universal Serial Bus) port is read photos or other files on the memory card. Power Button/ LED Press the power button to open and close the optical disk drive. 4. Your digital cameras...
Optical Disk Drive (ODD) (Standard Type and Slim Type) 2. HDD LED The HDD LED is on when data is for attaching USB devices such as mouse, keyboard, printer, scanner, camera, PDA and other digital devices are highly compatible. 1-4 Card Reader Drive This card reader drive supports SD(HC), MMC, MS and XD. USB Port The USB (Universal Serial Bus) port is read photos or other files on the memory card. Power Button/ LED Press the power button to open and close the optical disk drive. 4. Your digital cameras...

User Guide
Page 13
... your monitor manual for monitor. 3. You can connect a network cable to connect a LCD monitor. DVI-D Port (Optional) The DVI-D (Digital Visual Interface) connector allows you to it. 1-5 USB Port The USB (Universal Serial Bus) port is provided for more information.) 2. To connect an LCD monitor, simply plug your monitor cable into the DVI-D connector, and make sure that the other USB-compatible devices. 4. It provides a high-speed digital interconnection between the computer and its display device. Back Panel Getting Started 1. LAN...
... your monitor manual for monitor. 3. You can connect a network cable to connect a LCD monitor. DVI-D Port (Optional) The DVI-D (Digital Visual Interface) connector allows you to it. 1-5 USB Port The USB (Universal Serial Bus) port is provided for more information.) 2. To connect an LCD monitor, simply plug your monitor cable into the DVI-D connector, and make sure that the other USB-compatible devices. 4. It provides a high-speed digital interconnection between the computer and its display device. Back Panel Getting Started 1. LAN...

User Guide
Page 14
.... RS-Out (Black) Rear-Surround Out in 4/ 5.1/ 7.1 channel mode. Line-Out (Green) Line-Out, is selected. 5. Orange On 1000 Mbit/ sec data rate is used for external CD player, tapeplayer or other audio devices. Mic (Pink) Mic, is communicating with another computer on the LAN. The computer is used for safety reason. * It is not established. Wind Nettop Series Activity Indicator Link...
.... RS-Out (Black) Rear-Surround Out in 4/ 5.1/ 7.1 channel mode. Line-Out (Green) Line-Out, is selected. 5. Orange On 1000 Mbit/ sec data rate is used for external CD player, tapeplayer or other audio devices. Mic (Pink) Mic, is communicating with another computer on the LAN. The computer is used for safety reason. * It is not established. Wind Nettop Series Activity Indicator Link...
User Guide
Page 15
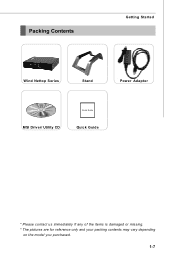
Packing Contents Getting Started Wind Nettop Series Stand Power Adapter MSI Driver/ Utility CD Quick Guide Quick Guide * Please contact us immediately if any of the items is damaged or missing. * The pictures are for reference only and your packing contents may vary depending on the model you purchased. 1-7
Packing Contents Getting Started Wind Nettop Series Stand Power Adapter MSI Driver/ Utility CD Quick Guide Quick Guide * Please contact us immediately if any of the items is damaged or missing. * The pictures are for reference only and your packing contents may vary depending on the model you purchased. 1-7
User Guide
Page 18
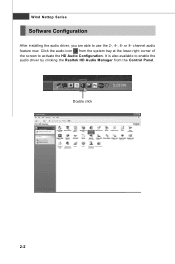
Click the audio icon from the Control Panel. or 8- It is also available to enable the audio driver by clicking the Realtek HD Audio M anager from the system tray at the lower-right corner of the screen to use the 2-, 4-, 6- Double click 2-2 Wind Nettop Series Software Configuration After installing the audio driver, you are able to activate the HD Audio Configuration. channel audio feature now.
Click the audio icon from the Control Panel. or 8- It is also available to enable the audio driver by clicking the Realtek HD Audio M anager from the system tray at the lower-right corner of the screen to use the 2-, 4-, 6- Double click 2-2 Wind Nettop Series Software Configuration After installing the audio driver, you are able to activate the HD Audio Configuration. channel audio feature now.

User Guide
Page 19
... HD Audio Sound Manager also provides five popular settings "Stone Corridor", "Bathroom", "Sewer pipe", "Arena" and "Audio Corridor" for you to remove a preset EQ setting. You may also load an equalizer setting or make an new equalizer setting to save as an new one by using the "Load EQ Setting" and "Save Preset" button, click "Reset EQ Setting" button to use the default value, or click "Delete EQ Setting" button to choose...
... HD Audio Sound Manager also provides five popular settings "Stone Corridor", "Bathroom", "Sewer pipe", "Arena" and "Audio Corridor" for you to remove a preset EQ setting. You may also load an equalizer setting or make an new equalizer setting to save as an new one by using the "Load EQ Setting" and "Save Preset" button, click "Reset EQ Setting" button to use the default value, or click "Delete EQ Setting" button to choose...
User Guide
Page 20
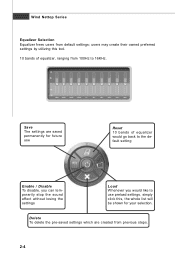
... preferred settings by utilizing this , the whole list will be shown for future use Reset 10 bands of equalizer would go back to the default setting Enable / Disable To disable, you can temporarily stop the sound effect without losing the settings Load W henever you would like to use preload settings, simply click this tool. 10 bands of equalizer, ranging from default settings; Wind Nettop Series Equalizer Selection Equalizer frees users from...
... preferred settings by utilizing this , the whole list will be shown for future use Reset 10 bands of equalizer would go back to the default setting Enable / Disable To disable, you can temporarily stop the sound effect without losing the settings Load W henever you would like to use preload settings, simply click this tool. 10 bands of equalizer, ranging from default settings; Wind Nettop Series Equalizer Selection Equalizer frees users from...

User Guide
Page 21
... enjoyment. [How to Use It] Other than the buttons "Pop" "Live" "Club" & "Rock" shown on the page, to pull down the arrow in "Others", you will find more optimized settings available to you. By leveraging our long experience at audio field, Realtek HD Audio Sound Manager provides you might have. Remove the human voice Raise the key Lower the...
... enjoyment. [How to Use It] Other than the buttons "Pop" "Live" "Club" & "Rock" shown on the page, to pull down the arrow in "Others", you will find more optimized settings available to you. By leveraging our long experience at audio field, Realtek HD Audio Sound Manager provides you might have. Remove the human voice Raise the key Lower the...
User Guide
Page 22
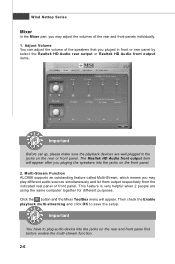
... Before set up, please make sure the playback devices are using the same computer together for different purposes. Important You have to save the setup. Adjust Volume You can adjust the volume of the rear and front panels individually. 1. This feature is very helpful when 2 people are well plugged in the jacks on the rear or front panel. Wind Nettop Series Mixer In...
... Before set up, please make sure the playback devices are using the same computer together for different purposes. Important You have to save the setup. Adjust Volume You can adjust the volume of the rear and front panels individually. 1. This feature is very helpful when 2 people are well plugged in the jacks on the rear or front panel. Wind Nettop Series Mixer In...
User Guide
Page 24
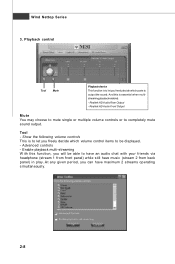
... multistreamingplayback enabled. - And this function, you freely decide which ports to output the sound. Realtek HD Audio Front Output Mute You may choose to mute single or multiple volume controls or to have an audio chat with your friends via headphone (stream 1 from front panel) while still have maximum 2 streams operating simultaneously. 2-8 Wind Nettop Series 3. Tool - Show the following volume controls This...
... multistreamingplayback enabled. - And this function, you freely decide which ports to output the sound. Realtek HD Audio Front Output Mute You may choose to mute single or multiple volume controls or to have an audio chat with your friends via headphone (stream 1 from front panel) while still have maximum 2 streams operating simultaneously. 2-8 Wind Nettop Series 3. Tool - Show the following volume controls This...

User Guide
Page 26
..., Realtek HD Audio Manager will guide you will pop up for 7.1-Speaker Output Speaker Configuration: 1. You can easily configure your device. - a. Dialogue "connected device" will be able to find the icon beside the jack changed to plug the device into the correct jack, you to the one that is same as your multi-channel audio function and speakers. If the device is being plugged into the correct...
..., Realtek HD Audio Manager will guide you will pop up for 7.1-Speaker Output Speaker Configuration: 1. You can easily configure your device. - a. Dialogue "connected device" will be able to find the icon beside the jack changed to plug the device into the correct jack, you to the one that is same as your multi-channel audio function and speakers. If the device is being plugged into the correct...

User Guide
Page 27
Mute rear panel output when front headphone plugged in . 2-11 If so, please check this item checked, the dialog "Connected device" would automatically pop up when device plugged in . Enable auto popup dialogue, when device has been plugged in Once this item to access connector settings. Realtek ALC888 Audio Disable front panel jack detection (option) Find no function on your system are so-called AC'97 jacks. Please check if front jacks on front panel jacks? Connector Settings Click to disable front panel jack detection.
Mute rear panel output when front headphone plugged in . 2-11 If so, please check this item checked, the dialog "Connected device" would automatically pop up when device plugged in . Enable auto popup dialogue, when device has been plugged in Once this item to access connector settings. Realtek ALC888 Audio Disable front panel jack detection (option) Find no function on your system are so-called AC'97 jacks. Please check if front jacks on front panel jacks? Connector Settings Click to disable front panel jack detection.
User Guide
Page 28
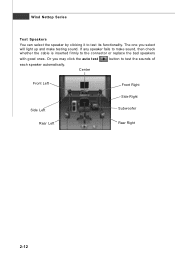
Center Front Left Side Left Rear Left Front Right Side Right Sub woof er Rear Right 2-12 Wind Nettop Series Test Speakers You can select the speaker by clicking it to make testing sound. The one you may click the auto test button to the connector or replace the bad speakers with good ones. Or you select will light up and make sound, then check whether the cable is inserted firmly to test the sounds of each speaker automatically. If any speaker fails to test its functionality.
Center Front Left Side Left Rear Left Front Right Side Right Sub woof er Rear Right 2-12 Wind Nettop Series Test Speakers You can select the speaker by clicking it to make testing sound. The one you may click the auto test button to the connector or replace the bad speakers with good ones. Or you select will light up and make sound, then check whether the cable is inserted firmly to test the sounds of each speaker automatically. If any speaker fails to test its functionality.
User Guide
Page 32
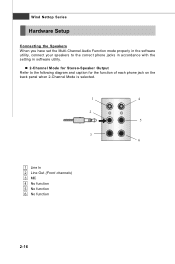
Wind Nettop Series Hardware Setup Connecting the Speakers W hen you have set the Multi-Channel Audio Function mode properly in the software utility, connect your speakers to the following diagram and caption for the function of each phone jack on the back panel when 2-Channel Mode is selected. 1 4 2 5 3 6 1 Line In 2 Line Out (Front channels) 3 MIC 4 No function 5 No function 6 No function 2-16 n 2-Channel Mode for Stereo-Speaker Output Refer to the correct phone jacks in accordance with the setting in software utility.
Wind Nettop Series Hardware Setup Connecting the Speakers W hen you have set the Multi-Channel Audio Function mode properly in the software utility, connect your speakers to the following diagram and caption for the function of each phone jack on the back panel when 2-Channel Mode is selected. 1 4 2 5 3 6 1 Line In 2 Line Out (Front channels) 3 MIC 4 No function 5 No function 6 No function 2-16 n 2-Channel Mode for Stereo-Speaker Output Refer to the correct phone jacks in accordance with the setting in software utility.

User Guide
Page 34
Wind Nettop Series n 6-Channel Mode for 6-Speaker Output 1 4 2 5 3 6 6-Channel Analog Audio Output 1 Line In 2 Line Out (Front channels) 3 MIC 4 Line Out (Rear channels) 5 Line Out (Center and Subwoofer channel) 6 No function 2-18
Wind Nettop Series n 6-Channel Mode for 6-Speaker Output 1 4 2 5 3 6 6-Channel Analog Audio Output 1 Line In 2 Line Out (Front channels) 3 MIC 4 Line Out (Rear channels) 5 Line Out (Center and Subwoofer channel) 6 No function 2-18


