User Guide
Page 2
..., the NVIDIA logo, DualNet, and nForce are registered trademarks or trademarks of NVIDIA Corporation in the United States and/or other information: http://www.msi.com.tw/program/service/faq/ faq/esc_faq_list.php Contact our technical staff at: http://support.msi.com.tw/ ii PS/2 and OS... obtained from the user's manual, please contact your place of purchase or local distributor. Alternatively, please try the following help resources for P6N SLI Platinum Date January 2007 Technical Support If a problem arises with your system and no guarantee is given as to make changes without notice. ...
..., the NVIDIA logo, DualNet, and nForce are registered trademarks or trademarks of NVIDIA Corporation in the United States and/or other information: http://www.msi.com.tw/program/service/faq/ faq/esc_faq_list.php Contact our technical staff at: http://support.msi.com.tw/ ii PS/2 and OS... obtained from the user's manual, please contact your place of purchase or local distributor. Alternatively, please try the following help resources for P6N SLI Platinum Date January 2007 Technical Support If a problem arises with your system and no guarantee is given as to make changes without notice. ...

User Guide
Page 10
The P6N SLI Platinum Series mainboards are based on nVidia® nForce 650i SLI chipsets for choosing the P6N SLI Platinum Series (MS-7350 v1.X) ATX mainboard. Designed to fit the advanced Intel® Core 2 Extreme, Core 2 Quad, Core 2 Duo, Pentium XE and Pentium D processor, the P6N SLI Platinum Series deliver a high performance and professional desktop platform solution. 1-1 Getting Started Chapter 1 Getting Started Thank you for optimal system efficiency.
The P6N SLI Platinum Series mainboards are based on nVidia® nForce 650i SLI chipsets for choosing the P6N SLI Platinum Series (MS-7350 v1.X) ATX mainboard. Designed to fit the advanced Intel® Core 2 Extreme, Core 2 Quad, Core 2 Duo, Pentium XE and Pentium D processor, the P6N SLI Platinum Series deliver a high performance and professional desktop platform solution. 1-1 Getting Started Chapter 1 Getting Started Thank you for optimal system efficiency.

User Guide
Page 11
... Realtek® RTL8211BL IEEE 1394 - ph p) LAN - Supports Intel® SpeedStep Technology (EIST) (For the latest information about CPU, please visit http://www.msi. Supports Ultra DMA 66/100/133 mode and PIO, Bus Master operation m ode - Supports Intel® EIST Technology - t w / p r ogr a...on compatible components, please visit http:/ / w w w .ms i . Supports Intel® Hyper-Threading (HT) Technology - c om. North Bridge: nVidia® nForce 650i SLI (C55) - tw / p r og r a m/ p r od u c t s /ma i n b oa r d/ mb d / pr o_mbd_ t rp _l is ready for new ...
... Realtek® RTL8211BL IEEE 1394 - ph p) LAN - Supports Intel® SpeedStep Technology (EIST) (For the latest information about CPU, please visit http://www.msi. Supports Ultra DMA 66/100/133 mode and PIO, Bus Master operation m ode - Supports Intel® EIST Technology - t w / p r ogr a...on compatible components, please visit http:/ / w w w .ms i . Supports Intel® Hyper-Threading (HT) Technology - c om. North Bridge: nVidia® nForce 650i SLI (C55) - tw / p r og r a m/ p r od u c t s /ma i n b oa r d/ mb d / pr o_mbd_ t rp _l is ready for new ...

User Guide
Page 13
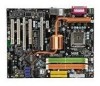
MS-7350 Mainboard Mainboard Layout Top : mouse Bottom: keyboard CP UFA N1 ATX1 DIMM1 DIMM3 DIMM2 DIMM4 IDE2 IDE1 SATA1 SATA2 SATA3 SATA4 USB ports T: LAN B: USB ports T: Li ne- Out B:Mic T: RS -Out M:CS-Out B:Optical S/PDIF Out LAN Chip I/O Chip JPW1 Nv idi a Nforce 650I SLI PCI_E1 SYSFAN1 PCI_E2 PCI1 JCI1 PCI_E4 PCI_E3 SYSFAN3 Nvidia Nforce 430I BATT + SW1 Co dec PCI2 PCI3 1394 Ch ip JFP1 JUSB2 JFP2 JCD1 JAU D1 SPDO1 JCOM1 SYSFAN2 J1394_1 JD B1 FDD 1 JUSB1 P6N SLI Platinum Series (MS-7350 v1.X) ATX Mainboard 1-4 In M:L ine-
MS-7350 Mainboard Mainboard Layout Top : mouse Bottom: keyboard CP UFA N1 ATX1 DIMM1 DIMM3 DIMM2 DIMM4 IDE2 IDE1 SATA1 SATA2 SATA3 SATA4 USB ports T: LAN B: USB ports T: Li ne- Out B:Mic T: RS -Out M:CS-Out B:Optical S/PDIF Out LAN Chip I/O Chip JPW1 Nv idi a Nforce 650I SLI PCI_E1 SYSFAN1 PCI_E2 PCI1 JCI1 PCI_E4 PCI_E3 SYSFAN3 Nvidia Nforce 430I BATT + SW1 Co dec PCI2 PCI3 1394 Ch ip JFP1 JUSB2 JFP2 JCD1 JAU D1 SPDO1 JCOM1 SYSFAN2 J1394_1 JD B1 FDD 1 JUSB1 P6N SLI Platinum Series (MS-7350 v1.X) ATX Mainboard 1-4 In M:L ine-

User Guide
Page 25
... the power connectors (shown in figure 2 & figure 3) before the 1st installation or during system upgrade p r oc ed ur e. Hardware Setup Important Notification about Power Issue NForce chipset is plugged while installing modules. Due to several pins are very sensitive to ESD, so this kind of memory-replacement actions might cause system...
... the power connectors (shown in figure 2 & figure 3) before the 1st installation or during system upgrade p r oc ed ur e. Hardware Setup Important Notification about Power Issue NForce chipset is plugged while installing modules. Due to several pins are very sensitive to ESD, so this kind of memory-replacement actions might cause system...
User Guide
Page 94
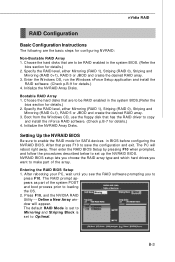
... until you see the RAID software prompting you want to make part of the system POST and boot process prior to copy and install the nForce RAID software. (Check p.B-7 for SATA devices in BIOS before configuring the NVRAID BIOS. B-3 Initialize the NVRAID Array Disks. Choose the hard ...in the system BIOS. (Refer the bios section for details.) 2. Entering the RAID BIOS Setup 1. Enter the W indows OS, run the W indows nForce Setup application and install the RAID software. (Check p.B-9 for configuring NVRAID: Non-Bootable RAID Array 1. Define a New Array window will reboot right away.
... until you see the RAID software prompting you want to make part of the system POST and boot process prior to copy and install the nForce RAID software. (Check p.B-7 for SATA devices in BIOS before configuring the NVRAID BIOS. B-3 Initialize the NVRAID Array Disks. Choose the hard ...in the system BIOS. (Refer the bios section for details.) 2. Entering the RAID BIOS Setup 1. Enter the W indows OS, run the W indows nForce Setup application and install the RAID software. (Check p.B-9 for configuring NVRAID: Non-Bootable RAID Array 1. Define a New Array window will reboot right away.

User Guide
Page 98
... disk. 4. Copy all the contents in the :\\nVidia \System \C55+MCP51 \RAID to appear. 3. The follow the instruction below : Important Please follow - Insert the MSI CD into the CD-ROM drive. 2. Specify the NVIDIA drivers: (1) Insert the floppy that has the RAID driver, press S, then press Enter. nVidia RAID Installing...controller is done. (2) Select "NVIDIA RAID CLASS DRIVER" and then press Enter. (3) Press S again at the Specify Devices screen, then press Enter. (4) Select "NVIDIA NForce Storage Controller" and then press Enter. The driver disk for bootable RAID Array) 1.
... disk. 4. Copy all the contents in the :\\nVidia \System \C55+MCP51 \RAID to appear. 3. The follow the instruction below : Important Please follow - Insert the MSI CD into the CD-ROM drive. 2. Specify the NVIDIA drivers: (1) Insert the floppy that has the RAID driver, press S, then press Enter. nVidia RAID Installing...controller is done. (2) Select "NVIDIA RAID CLASS DRIVER" and then press Enter. (3) Press S again at the Specify Devices screen, then press Enter. (4) Select "NVIDIA NForce Storage Controller" and then press Enter. The driver disk for bootable RAID Array) 1.
User Guide
Page 100
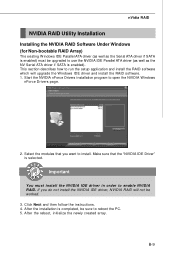
... run the setup application and install the RAID software which will not be sure to reboot the PC. 5. Start the NVIDIA nForce Drivers installation program to open the NVIDIA W indows nForce Drivers page. 2. Click Next and then follow the instructions. 4. B-9 Make sure that you do not install the NVIDIA IDE driver, NVIDIA...
... run the setup application and install the RAID software which will not be sure to reboot the PC. 5. Start the NVIDIA nForce Drivers installation program to open the NVIDIA W indows nForce Drivers page. 2. Click Next and then follow the instructions. 4. B-9 Make sure that you do not install the NVIDIA IDE driver, NVIDIA...