
User Guide
Page 18
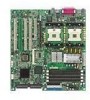
... you must use the same type of CPUs running at the same FSB frequency. Keep the following points in mind before turning on the CPU1 socket. Hardware Setup Central Processing Unit: CPU The mainboard supports Single/Dual Intel® Xeon™ processors and uses two CPU...
... you must use the same type of CPUs running at the same FSB frequency. Keep the following points in mind before turning on the CPU1 socket. Hardware Setup Central Processing Unit: CPU The mainboard supports Single/Dual Intel® Xeon™ processors and uses two CPU...

User Guide
Page 19
MS-9121 E-ATX Mainboard CPU Installation Procedures 1. Make sure to raise the lever up to your fingers pressing...Lever 2-4 Please note that any violation of the CPU to make sure the CPU is properly and completely embedded into the socket. Please turn off the power and unplug the power cord before installing the CPU. 2. The gold arrow should be seen.... Pull the lever sideways away from the socket. As the CPU is likely to move while the lever is correctly installed, the pins should point towards the lever pivot...
MS-9121 E-ATX Mainboard CPU Installation Procedures 1. Make sure to raise the lever up to your fingers pressing...Lever 2-4 Please note that any violation of the CPU to make sure the CPU is properly and completely embedded into the socket. Please turn off the power and unplug the power cord before installing the CPU. 2. The gold arrow should be seen.... Pull the lever sideways away from the socket. As the CPU is likely to move while the lever is correctly installed, the pins should point towards the lever pivot...

User Guide
Page 22
Then push it in until the golden finger on the memory module is properly inserted in the socket. 3. Volt Notch 2-7 Hardware Setup Memory modules can barely see the golden finger if the module is deeply inserted in pairs" -- {DIMM1 & DIMM2} {DIMM3 & DIMM4}. You ... 128MB~2GB DIMM2 128MB~2GB 128MB~2GB DIMM3 128MB~2GB 128MB~2GB DIMM4 128MB~2GB 128MB~2GB System Density 256MB~4GB 256MB~4GB 512MB~8GB MSI Reminds You... MSI Reminds You... The plastic clip at each side of module. The DDR DIMM has only one notch on DDR DIMMs "in the...
Then push it in until the golden finger on the memory module is properly inserted in the socket. 3. Volt Notch 2-7 Hardware Setup Memory modules can barely see the golden finger if the module is deeply inserted in pairs" -- {DIMM1 & DIMM2} {DIMM3 & DIMM4}. You ... 128MB~2GB DIMM2 128MB~2GB 128MB~2GB DIMM3 128MB~2GB 128MB~2GB DIMM4 128MB~2GB 128MB~2GB System Density 256MB~4GB 256MB~4GB 512MB~8GB MSI Reminds You... MSI Reminds You... The plastic clip at each side of module. The DDR DIMM has only one notch on DDR DIMMs "in the...

User Guide
Page 41
Locate the Mini PCI slot on the mainboard. MSI Reminds You... MS-9514 IEEE 1394 card Mini PCI slot 2. Place the card over the Mini PCI slot and gently insert both ends of the card slantways (at an angle of 45 degrees) into the slot until the golden finger of the card gets fully inserted into the slot. MS-9121 E-ATX Mainboard Mini PCI bus: This bus is properly inserted in the socket. 2-26 MS-9513 VGA card Installing the card: 1. You can barely see the golden finger if the card is used to connect the MS-9513 VGA card or MS-9514 IEEE 1394 card.
Locate the Mini PCI slot on the mainboard. MSI Reminds You... MS-9514 IEEE 1394 card Mini PCI slot 2. Place the card over the Mini PCI slot and gently insert both ends of the card slantways (at an angle of 45 degrees) into the slot until the golden finger of the card gets fully inserted into the slot. MS-9121 E-ATX Mainboard Mini PCI bus: This bus is properly inserted in the socket. 2-26 MS-9513 VGA card Installing the card: 1. You can barely see the golden finger if the card is used to connect the MS-9513 VGA card or MS-9514 IEEE 1394 card.

