
User Guide
Page 2
...index.php? Trademarks All trademarks are registered trademarks or trademarks of Microsoft Corporation. func=service Contact our technical staff at: http://ocss.msi.com.tw ii NVIDIA, the NVIDIA logo, DualNet, and nForce are the properties of purchase or local distributor. Copyright Notice The ... property of Phoenix Technologies Ltd. Intel® and Pentium® are registered trademarks of its contents. Revision History Revision V1.0 Revision History First release Date March 2008 Technical Support If a problem arises with your place of their respective owners.
...index.php? Trademarks All trademarks are registered trademarks or trademarks of Microsoft Corporation. func=service Contact our technical staff at: http://ocss.msi.com.tw ii NVIDIA, the NVIDIA logo, DualNet, and nForce are the properties of purchase or local distributor. Copyright Notice The ... property of Phoenix Technologies Ltd. Intel® and Pentium® are registered trademarks of its contents. Revision History Revision V1.0 Revision History First release Date March 2008 Technical Support If a problem arises with your place of their respective owners.
User Guide
Page 10
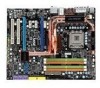
Designed to fit the advanced Intel® CoreTM 2 Extreme/Quad/Duo, Pentinum® Dual-Core and Celeron® LGA775 processor, the P45 Platinum Series deliver a high performance and professional desktop platform solution. 1-1 The P45 Platinum Series mainboards are based on Intel® P45 & ICH10R chipsets for choosing the P45 Platinum Series (MS7512 v1.X) ATX mainboard. Getting Started Chapter 1 Getting Started Thank you for optimal system efficiency.
Designed to fit the advanced Intel® CoreTM 2 Extreme/Quad/Duo, Pentinum® Dual-Core and Celeron® LGA775 processor, the P45 Platinum Series deliver a high performance and professional desktop platform solution. 1-1 The P45 Platinum Series mainboards are based on Intel® P45 & ICH10R chipsets for choosing the P45 Platinum Series (MS7512 v1.X) ATX mainboard. Getting Started Chapter 1 Getting Started Thank you for optimal system efficiency.
User Guide
Page 13
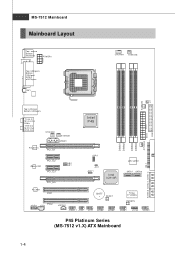
MS-7512 Mainboard Mainboard Layout To p : mouse Bo ttom: ke yboard POWER1 Top: USB po rts Bottom: 1394 port SPDIF eSATA port SW1 CPUFAN1 SYSFAN5 SYSFAN3 J2 ... T:RS-Out M:CS-Out B:SS-Out RTL8111C SYSFAN2 SYSFAN1 JPWR1 PCI_E1 PCI_E2 JB2 JB1 PCI_E3 PCI_E4 Intel P45 JSPI1 JCI1 JBAT1 Intel ICH10R SATA7 SATA8 IDE 1 SATA5-6 SATA2-4 SATA1-3 ALC888 PCI1 PCI2 JAUD1 JCD1 B AT T + RESET JSPDO1 J1394_1 JFP2 JFP1 JUSB3 JUSB2 PWRBTN JUSB1 JTPM1 JC OM1 P45 Platinum Series (MS-7512 v1.X) ATX Mainboard 1-4
MS-7512 Mainboard Mainboard Layout To p : mouse Bo ttom: ke yboard POWER1 Top: USB po rts Bottom: 1394 port SPDIF eSATA port SW1 CPUFAN1 SYSFAN5 SYSFAN3 J2 ... T:RS-Out M:CS-Out B:SS-Out RTL8111C SYSFAN2 SYSFAN1 JPWR1 PCI_E1 PCI_E2 JB2 JB1 PCI_E3 PCI_E4 Intel P45 JSPI1 JCI1 JBAT1 Intel ICH10R SATA7 SATA8 IDE 1 SATA5-6 SATA2-4 SATA1-3 ALC888 PCI1 PCI2 JAUD1 JCD1 B AT T + RESET JSPDO1 J1394_1 JFP2 JFP1 JUSB3 JUSB2 PWRBTN JUSB1 JTPM1 JC OM1 P45 Platinum Series (MS-7512 v1.X) ATX Mainboard 1-4
User Guide
Page 45
... as I = Intel, N = nVidia, and V = VIA. 7th - 8th digit refers to the date this chapter are under each BIOS category described in the format: A7512IMS V1.0 030807 where: 1st digit refers to BIOS maker as A = AMI, W = AWARD, and P = PHOENIX. 2nd - 5th digit refers to the model number. 6th digit... restart the system by turning it OFF and On or pressing the RESET button. The items under continuous update for reference only. 2. MS-7512 Mainboard Entering Setup Power on the screen, press key to enter Setup, restart the system by simultaneously pressing , , and keys. Important 1.
... as I = Intel, N = nVidia, and V = VIA. 7th - 8th digit refers to the date this chapter are under each BIOS category described in the format: A7512IMS V1.0 030807 where: 1st digit refers to BIOS maker as A = AMI, W = AWARD, and P = PHOENIX. 2nd - 5th digit refers to the model number. 6th digit... restart the system by turning it OFF and On or pressing the RESET button. The items under continuous update for reference only. 2. MS-7512 Mainboard Entering Setup Power on the screen, press key to enter Setup, restart the system by simultaneously pressing , , and keys. Important 1.


