User Guide
Page 4
... The power cord or plug is incorrectly replaced. Lay this User's Manual for technical guide, BIOS updates, driver updates, and other information: http://www.msi.com.tw & http://www.msi. All cautions and warnings on a reliable flat surface before inserting any add-on the enclosure are for further...Do not leave this equipment away from humidity. 4. com.tw/program/service/faq/faq/esc_faq_list.php h Contact our technical staff at: support@msi.com.tw Safety Instructions 1. Always Unplug the Power Cord before setting it . Never pour any of purchase or local distributor. h Liquid...
... The power cord or plug is incorrectly replaced. Lay this User's Manual for technical guide, BIOS updates, driver updates, and other information: http://www.msi.com.tw & http://www.msi. All cautions and warnings on a reliable flat surface before inserting any add-on the enclosure are for further...Do not leave this equipment away from humidity. 4. com.tw/program/service/faq/faq/esc_faq_list.php h Contact our technical staff at: support@msi.com.tw Safety Instructions 1. Always Unplug the Power Cord before setting it . Never pour any of purchase or local distributor. h Liquid...
User Guide
Page 7
... Instructions 5-3 Setting Up the NVRAID BIOS 5-3 NVIDIA RAID Utility Installation 5-7 Installing the NVIDIA RAID Software Under Windows (for Non-bootable RAID Array 5-7 Installing the RAID Driver (for AMD Processor 4-14 Audio Speaker Setting 4-16 Power on Agent 4-18 Power On 4-18 Power Off / Restart 4-19 Start With 4-19 Auto Login 4-20...
... Instructions 5-3 Setting Up the NVRAID BIOS 5-3 NVIDIA RAID Utility Installation 5-7 Installing the NVIDIA RAID Software Under Windows (for Non-bootable RAID Array 5-7 Installing the RAID Driver (for AMD Processor 4-14 Audio Speaker Setting 4-16 Power on Agent 4-18 Power On 4-18 Power Off / Restart 4-19 Start With 4-19 Auto Login 4-20...
User Guide
Page 12
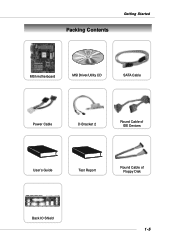
Packing Contents Getting Started MSI motherboard MSI Driver/Utility CD SATA Cable Power Cable D-Bracket 2 Round Cable of IDE Devices User's Guide Test Report Round Cable of Floppy Disk Back IO Shield 1-5
Packing Contents Getting Started MSI motherboard MSI Driver/Utility CD SATA Cable Power Cable D-Bracket 2 Round Cable of IDE Devices User's Guide Test Report Round Cable of Floppy Disk Back IO Shield 1-5
User Guide
Page 48
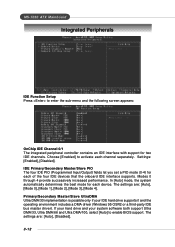
... device. If your hard drive and your IDE hard drive supports it and the operating environment includes a DMA driver (Windows 95 OSR2 or a third-party IDE bus master driver). Settings: [Enabled], [Disabled]. Primary/Secondary Master/Slave UltraDMA Ultra DMA/33 implementation is possible only if your... appears: OnChip IDE Channel 0/1 The integrated peripheral controller contains an IDE interface with support for two IDE channels. MS-7030 ATX Mainboard Integrated Peripherals IDE Function Setup Press to activate each of the four IDE devices that the onboard IDE interface supports.
... device. If your hard drive and your IDE hard drive supports it and the operating environment includes a DMA driver (Windows 95 OSR2 or a third-party IDE bus master driver). Settings: [Enabled], [Disabled]. Primary/Secondary Master/Slave UltraDMA Ultra DMA/33 implementation is possible only if your... appears: OnChip IDE Channel 0/1 The integrated peripheral controller contains an IDE interface with support for two IDE channels. MS-7030 ATX Mainboard Integrated Peripherals IDE Function Setup Press to activate each of the four IDE devices that the onboard IDE interface supports.
User Guide
Page 66
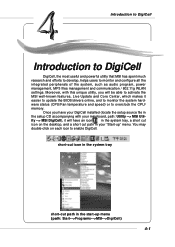
...Introduction to DigiCell DigiCell, the most useful and powerful utility that MSI has spent much research and efforts to develop, helps users to overclock the CPU/ memory. Moreover, with your "Start-up menu (path: Start-->Programs-->MSI-->DigiCell) 4-1 Once you will have your DigiCell installed (locate... setup source file in your mainboard, path: Utility --> MSI Util- ity --> MSI DigiCell), it will be able to activate the MSI well-known features, Live Update and Core Center, which makes it easier to update the BIOS/drivers online, and to monitor the system hard- You may ...
...Introduction to DigiCell DigiCell, the most useful and powerful utility that MSI has spent much research and efforts to develop, helps users to overclock the CPU/ memory. Moreover, with your "Start-up menu (path: Start-->Programs-->MSI-->DigiCell) 4-1 Once you will have your DigiCell installed (locate... setup source file in your mainboard, path: Utility --> MSI Util- ity --> MSI DigiCell), it will be able to activate the MSI well-known features, Live Update and Core Center, which makes it easier to update the BIOS/drivers online, and to monitor the system hard- You may ...
User Guide
Page 67
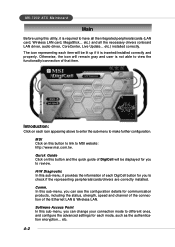
...icon will be lit up if it is required to have all the necessary drivers (onboard LAN driver, audio driver, CoreCenter, Live Update... MS-703M0SAI TFXeaMtuarienboard Main Before using this sub-menu, you can change your connection mode... to different ones, and configure the advanced settings for each mode, such as the authentication encryption... MSI Click on each icon appearing above to enter the sub-menu to MSI website: http://www.msi...
...icon will be lit up if it is required to have all the necessary drivers (onboard LAN driver, audio driver, CoreCenter, Live Update... MS-703M0SAI TFXeaMtuarienboard Main Before using this sub-menu, you can change your connection mode... to different ones, and configure the advanced settings for each mode, such as the authentication encryption... MSI Click on each icon appearing above to enter the sub-menu to MSI website: http://www.msi...
User Guide
Page 68
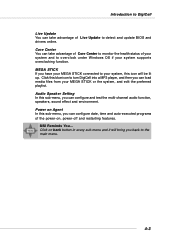
MSI Reminds You... Introduction to DigiCell Live Update You can take advantage of Core Center to monitor the health status of the power-on back button ... the system, and edit the preferred playlist. Click on , power-off and restarting features. MEGA STICK If you back to detect and update BIOS and drivers online. Power on Agent In this sub-menu, you can configure date, time and auto-executed programs of your system and to overclock under Windows...
MSI Reminds You... Introduction to DigiCell Live Update You can take advantage of Core Center to monitor the health status of the power-on back button ... the system, and edit the preferred playlist. Click on , power-off and restarting features. MEGA STICK If you back to detect and update BIOS and drivers online. Power on Agent In this sub-menu, you can configure date, time and auto-executed programs of your system and to overclock under Windows...
User Guide
Page 74
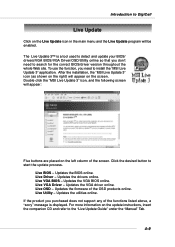
...on the screen. Updates the VGA BIOS online. Updates the firmware of the screen. Live Utility - Updates the drivers online. Updates the BIOS online. Updates the utilities online. After the installation, the "MSI Live Update 3" icon (as shown on the right) will be enabled. Double click the... BIOS - If the product you don't need to install the "MSI Live Update 3" application. The Live Update 3™ is displayed. To use the function, you need to detect and update your BIOS/ drivers/VGA BIOS/VGA Driver/OSD/Utility online so that you purchased does not support any of ...
...on the screen. Updates the VGA BIOS online. Updates the firmware of the screen. Live Utility - Updates the drivers online. Updates the BIOS online. Updates the utilities online. After the installation, the "MSI Live Update 3" icon (as shown on the right) will be enabled. Double click the... BIOS - If the product you don't need to install the "MSI Live Update 3" application. The Live Update 3™ is displayed. To use the function, you need to detect and update your BIOS/ drivers/VGA BIOS/VGA Driver/OSD/Utility online so that you purchased does not support any of ...
User Guide
Page 88
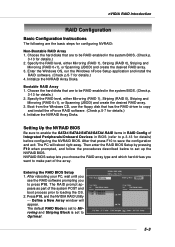
... and Mirroring (RAID 0+1), or Spanning (JBOD) and create the desired RAID array. 3. Entering the RAID BIOS Setup 1. Choose the hard disks that has the RAID driver to Optimal. 5-3
... and Mirroring (RAID 0+1), or Spanning (JBOD) and create the desired RAID array. 3. Entering the RAID BIOS Setup 1. Choose the hard disks that has the RAID driver to Optimal. 5-3
User Guide
Page 91
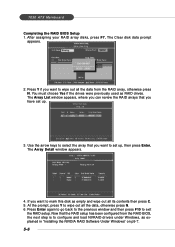
... setup. If you have set up . 3. Press Enter again to go back to the previous window and then press F10 to configure and load NVRAID drivers under Windows, as explained in "Installing the NVIDIA RAID Software Under Windows" on p5-7. 5-6 Now that you want to set up , then press Enter. You... disk as RAID drives. Press Y if you can review the RAID arrays that the RAID setup has been configured from the RAID array, otherwise press N. 7030 ATX Mainboard Completing the RAID BIOS Setup 1. The Array Detail window appears. 4.
... setup. If you have set up . 3. Press Enter again to go back to the previous window and then press F10 to configure and load NVRAID drivers under Windows, as explained in "Installing the NVIDIA RAID Software Under Windows" on p5-7. 5-6 Now that you want to set up , then press Enter. You... disk as RAID drives. Press Y if you can review the RAID arrays that the RAID setup has been configured from the RAID array, otherwise press N. 7030 ATX Mainboard Completing the RAID BIOS Setup 1. The Array Detail window appears. 4.
User Guide
Page 92
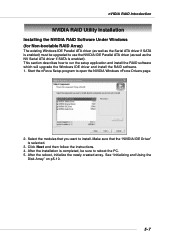
...Utility Installation Installing the NVIDIA RAID Software Under Windows (for Non-bootable RAID Array) The existing Windows IDE Parallel ATA driver (as well as the NV Serial ATA driver if SATA is selected. 3. Start the nForce Setup program to run the setup application and install the RAID software... which will upgrade the Windows IDE driver and install the RAID software. 1. After the installation is completed, be upgraded to install. See "Initializing and Using the Disk Array" on ...
...Utility Installation Installing the NVIDIA RAID Software Under Windows (for Non-bootable RAID Array) The existing Windows IDE Parallel ATA driver (as well as the NV Serial ATA driver if SATA is selected. 3. Start the nForce Setup program to run the setup application and install the RAID software... which will upgrade the Windows IDE driver and install the RAID software. 1. After the installation is completed, be upgraded to install. See "Initializing and Using the Disk Array" on ...
User Guide
Page 93
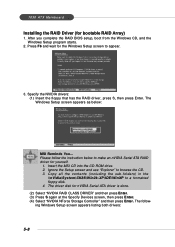
.... 3. Insert the MSI CD into the CD-ROM drive. 2. Copy all the contents (including the sub-folders) in the \\nVidia\System\CK8S\Win2k-XP\IDE\WinXP to appear. 3. 7030 ATX Mainboard Installing the RAID Driver (for nVIDIA Serial ATA driver is done. (2) Select "NVIDIA RAID CLASS DRIVER" and then press Enter...RAID BIOS setup, boot from the Windows CD, and the Windows Setup program starts. 2. The driver disk for bootable RAID Array) 1. Specify the NVIDIA drivers: (1) Insert the floppy that has the RAID driver, press S, then press Enter. Ignore the Setup screen and use "Explorer" to make an ...
.... 3. Insert the MSI CD into the CD-ROM drive. 2. Copy all the contents (including the sub-folders) in the \\nVidia\System\CK8S\Win2k-XP\IDE\WinXP to appear. 3. 7030 ATX Mainboard Installing the RAID Driver (for nVIDIA Serial ATA driver is done. (2) Select "NVIDIA RAID CLASS DRIVER" and then press Enter...RAID BIOS setup, boot from the Windows CD, and the Windows Setup program starts. 2. The driver disk for bootable RAID Array) 1. Specify the NVIDIA drivers: (1) Insert the floppy that has the RAID driver, press S, then press Enter. Ignore the Setup screen and use "Explorer" to make an ...
User Guide
Page 94
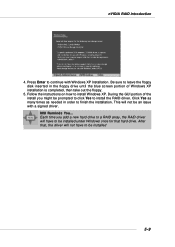
Follow the instructions on how to leave the floppy disk inserted in order to continue with a signed driver. MSI Reminds You... Be sure to install Windows XP. This will not have to install the RAID driver. After that hard drive. During the GUI portion of Windows XP installation is completed, then take out the... times as needed in the floppy drive until the blue screen portion of the install you add a new hard drive to a RAID array, the RAID driver will have to be installed under Windows once for that , the driver will not be prompted to click Yes to be installed 5-9
Follow the instructions on how to leave the floppy disk inserted in order to continue with a signed driver. MSI Reminds You... Be sure to install Windows XP. This will not have to install the RAID driver. After that hard drive. During the GUI portion of Windows XP installation is completed, then take out the... times as needed in the floppy drive until the blue screen portion of the install you add a new hard drive to a RAID array, the RAID driver will have to be installed under Windows once for that , the driver will not be prompted to click Yes to be installed 5-9

User Guide
Page 108
Installation of Driver & Utility Installation of Driver and Utility Chapter 6. Installation of Driver & Utility MSI provides a setup CD along with your mainboard, which contains the required drivers for your system, and many other useful and powerful utility to bring you the best experience for your office professional working and for your home leisure entertainment. 6-1
Installation of Driver & Utility Installation of Driver and Utility Chapter 6. Installation of Driver & Utility MSI provides a setup CD along with your mainboard, which contains the required drivers for your system, and many other useful and powerful utility to bring you the best experience for your office professional working and for your home leisure entertainment. 6-1
User Guide
Page 110
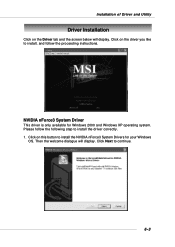
Click on this button to install the NVIDIA nForce3 System Drivers for Windows 2000 and Windows XP operating system. NVIDIA nForce3 System Driver This driver is only available for your Windows OS. Please follow the proceeding instructions. Then the welcome dialogue will display. Click on the driver you like to install, and follow the following step to continue. 6-3 Installation of Driver and Utility Driver Installation Click on the Driver tab and the screen below will display. Click Next to install the driver correctly. 1.
Click on this button to install the NVIDIA nForce3 System Drivers for Windows 2000 and Windows XP operating system. NVIDIA nForce3 System Driver This driver is only available for your Windows OS. Please follow the proceeding instructions. Then the welcome dialogue will display. Click on the driver you like to install, and follow the following step to continue. 6-3 Installation of Driver and Utility Driver Installation Click on the Driver tab and the screen below will display. Click Next to install the driver correctly. 1.
User Guide
Page 111
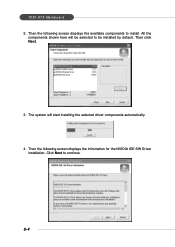
The system will be selected to be installed by default. Then click Next. 3. 7030 ATX Mainboard 2. All the components shown here will start installing the selected driver components automatically. 4. Then the following screen displays the information for the NVIDIA IDE SW Driver installation. Click Next to install. Then the following screen displays the available components to continue. 6-4
The system will be selected to be installed by default. Then click Next. 3. 7030 ATX Mainboard 2. All the components shown here will start installing the selected driver components automatically. 4. Then the following screen displays the information for the NVIDIA IDE SW Driver installation. Click Next to install. Then the following screen displays the available components to continue. 6-4

User Guide
Page 112
...PC name in the Control Panel. 7. It is a software firewall to search other PC with its IP address instead of NVIDIA IDE SW Driver. The following screen indicates that the installation is strongly suggested that you do not install this component, for you unistall it is complete. ...Then the following screen displays the installation of Driver and Utility 5. However, it by using the Add or Remove Programs function in your computer or click No to continue. If you accidentally...
...PC name in the Control Panel. 7. It is a software firewall to search other PC with its IP address instead of NVIDIA IDE SW Driver. The following screen indicates that the installation is strongly suggested that you do not install this component, for you unistall it is complete. ...Then the following screen displays the installation of Driver and Utility 5. However, it by using the Add or Remove Programs function in your computer or click No to continue. If you accidentally...

User Guide
Page 113
Then the welcome dialogue will launch automatically. 2. Click Yes to restart your computer or click No to continue. Click Next to restart it later. 6-6 Click on this button to install the Realtek AC97 Audio Driver. The following screen indicates the installation is complete. 7030 ATX Mainboard Realtek AC97 Audio Driver 1. The installation process will display.
Then the welcome dialogue will launch automatically. 2. Click Yes to restart your computer or click No to continue. Click Next to restart it later. 6-6 Click on this button to install the Realtek AC97 Audio Driver. The following screen indicates the installation is complete. 7030 ATX Mainboard Realtek AC97 Audio Driver 1. The installation process will display.


