User Guide
Page 5
Hardware Setup 2-1 Quick Components Guide 2-2 Central Processing Unit: CPU 2-2 CPU Installation Procedures for Socket 754 2-4 Installing AMD Athlon64 CPU Cooler Set 2-5 Memory ...2-7 Introduction to DDR SDRAM 2-7 DIMM Module Combination 2-7 Installing DDR Modules 2-8 Power Supply ...2-9 ATX 20-Pin Power Connector: JWR1 2-9 ATX 12V ...Mainboard Specifications 1-2 Mainboard Layout 1-4 Packing Contents 1-5 Chapter 2. CONTENTS FCC-B Radio Frequency Interference Statement ii Copyright Notice ...iii Revision History ...iii Safety Instructions ...iv Technical Support ...iv Chapter 1.
Hardware Setup 2-1 Quick Components Guide 2-2 Central Processing Unit: CPU 2-2 CPU Installation Procedures for Socket 754 2-4 Installing AMD Athlon64 CPU Cooler Set 2-5 Memory ...2-7 Introduction to DDR SDRAM 2-7 DIMM Module Combination 2-7 Installing DDR Modules 2-8 Power Supply ...2-9 ATX 20-Pin Power Connector: JWR1 2-9 ATX 12V ...Mainboard Specifications 1-2 Mainboard Layout 1-4 Packing Contents 1-5 Chapter 2. CONTENTS FCC-B Radio Frequency Interference Statement ii Copyright Notice ...iii Revision History ...iii Safety Instructions ...iv Technical Support ...iv Chapter 1.
User Guide
Page 9
... SATA Interface h Integrated SATA PHY, supporting up to 3GB (for 184-pin DDR DIMM modules h Supports the memory size up to 3400+. (For the latest information about CPU, please visit http://www.msi.com.tw/program/ products/mainboard/mbd/pro_mbd_cpu_support....php) Chipset h nVIDIA nForce3 250Gb - Supports K8 Athlon64 processor S-754, 800MHz Hypertransport interface. - Main Memory h Supports 3 slots for DDR333/266) / 2GB (For DDR400) . 7030 ATX Mainboard Mainboard Specifications CPU h Supports ...
... SATA Interface h Integrated SATA PHY, supporting up to 3GB (for 184-pin DDR DIMM modules h Supports the memory size up to 3400+. (For the latest information about CPU, please visit http://www.msi.com.tw/program/ products/mainboard/mbd/pro_mbd_cpu_support....php) Chipset h nVIDIA nForce3 250Gb - Supports K8 Athlon64 processor S-754, 800MHz Hypertransport interface. - Main Memory h Supports 3 slots for DDR333/266) / 2GB (For DDR400) . 7030 ATX Mainboard Mainboard Specifications CPU h Supports ...
User Guide
Page 15
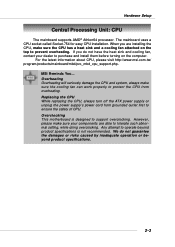
...Processing Unit: CPU The mainboard supports AMD® Athlon64 processor. For the latest information about CPU, please visit http://www.msi.com.tw/ program/products/mainboard/mbd/pro_mbd_cpu_support.php. MSI Reminds You... Overheating Overheating will seriously damage the CPU and system, always make sure the CPU has a... Replacing the CPU While replacing the CPU, always turn off the ATX power supply or unplug the power supply's power cord from grounded outlet first to protect the CPU from overheating. Overclocking This motherboard is not recommended. The mainboard uses a CPU socket called ...
...Processing Unit: CPU The mainboard supports AMD® Athlon64 processor. For the latest information about CPU, please visit http://www.msi.com.tw/ program/products/mainboard/mbd/pro_mbd_cpu_support.php. MSI Reminds You... Overheating Overheating will seriously damage the CPU and system, always make sure the CPU has a... Replacing the CPU While replacing the CPU, always turn off the ATX power supply or unplug the power supply's power cord from grounded outlet first to protect the CPU from overheating. Overclocking This motherboard is not recommended. The mainboard uses a CPU socket called ...

User Guide
Page 21
...power supply and have to work together to an ATX power supply. Hardware Setup Power Supply The mainboard supports ATX power supply for system stability. 2-9 Before inserting the power supply connector, always make sure the plug... This connector allows you to connect to ensure stable operation of the power supply is used to provide power to the CPU. 11 1 20 10 JWR1 JWR1 Pin Definition PIN SIGNAL PIN 1 3.3V 11 2 3.3V 12 3 GND 13... Pin Definition PIN SIGNAL 1 GND 2 GND 3 12V 4 12V MSI Reminds You... 1. To connect to ensure that all components are aligned.
...power supply and have to work together to an ATX power supply. Hardware Setup Power Supply The mainboard supports ATX power supply for system stability. 2-9 Before inserting the power supply connector, always make sure the plug... This connector allows you to connect to ensure stable operation of the power supply is used to provide power to the CPU. 11 1 20 10 JWR1 JWR1 Pin Definition PIN SIGNAL PIN 1 3.3V 11 2 3.3V 12 3 GND 13... Pin Definition PIN SIGNAL 1 GND 2 GND 3 12V 4 12V MSI Reminds You... 1. To connect to ensure that all components are aligned.

User Guide
Page 27
... +12V SENSOR C_FAN1 GND +12V NC S_FAN1 GND +12V NC S_FAN2 GND +12V Sensor NB_FAN1 MSI Reminds You... 1. Always consult the vendors for proper CPU cooling fan. 2. You can install Core Center utility that supports 360K, 720K, 1.2M, 1.44M and 2.88M floppy disk types. If the mainboard has ... you must use a specially designed fan with +12V. C_FAN1 supports the fan control. When connecting the wire to FDD, IDE HDD, case, LAN, USB Ports, IR module and CPU/System FAN. Please refer to the actual CPU temperature. 3. Hardware Setup Connectors The mainboard provides connectors to connect...
... +12V SENSOR C_FAN1 GND +12V NC S_FAN1 GND +12V NC S_FAN2 GND +12V Sensor NB_FAN1 MSI Reminds You... 1. Always consult the vendors for proper CPU cooling fan. 2. You can install Core Center utility that supports 360K, 720K, 1.2M, 1.44M and 2.88M floppy disk types. If the mainboard has ... you must use a specially designed fan with +12V. C_FAN1 supports the fan control. When connecting the wire to FDD, IDE HDD, case, LAN, USB Ports, IR module and CPU/System FAN. Please refer to the actual CPU temperature. 3. Hardware Setup Connectors The mainboard provides connectors to connect...
User Guide
Page 40
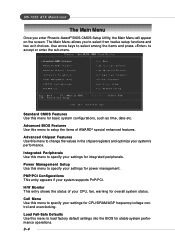
... status. Use arrow keys to select among the items and press to specify your CPU, fan, warning for integrated peripherals. Advanced BIOS Features Use this menu to specify your settings for CPU/DRAM/AGP frequency/voltage control and overclocking. PNP/PCI Configurations This entry appears if ...AWARD® special enhanced features. MS-7030 ATX Mainboard The Main Menu Once you to select from twelve setup functions and two exit choices. Power Management Setup Use this menu to change the values in the chipset registers and optimize your system supports PnP/PCI. Advanced Chipset Features...
... status. Use arrow keys to select among the items and press to specify your CPU, fan, warning for integrated peripherals. Advanced BIOS Features Use this menu to specify your settings for CPU/DRAM/AGP frequency/voltage control and overclocking. PNP/PCI Configurations This entry appears if ...AWARD® special enhanced features. MS-7030 ATX Mainboard The Main Menu Once you to select from twelve setup functions and two exit choices. Power Management Setup Use this menu to change the values in the chipset registers and optimize your system supports PnP/PCI. Advanced Chipset Features...
User Guide
Page 47
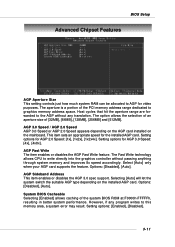
... Write The item enables or disables the AGP Fast Write feature. The Fast Write technology allows CPU to graphics memory address space. AGP Sideband Address This item enables or disables the AGP 3.0 spec support. AGP 3.0 Speed / AGP 2.0 Speed AGP 3.0 Speed or AGP 2.0 Speed appears depending ... resulting in better system performance. Options: [Disabled], [Auto]. Options: [Disabled], [Auto]. Select [Auto] only when your AGP card supports the feature. BIOS Setup Advanced Chipset Features AGP Aperture Size This setting controls just how much system RAM can be allocated to this memory ...
... Write The item enables or disables the AGP Fast Write feature. The Fast Write technology allows CPU to graphics memory address space. AGP Sideband Address This item enables or disables the AGP 3.0 spec support. AGP 3.0 Speed / AGP 2.0 Speed AGP 3.0 Speed or AGP 2.0 Speed appears depending ... resulting in better system performance. Options: [Disabled], [Auto]. Options: [Disabled], [Auto]. Select [Auto] only when your AGP card supports the feature. BIOS Setup Advanced Chipset Features AGP Aperture Size This setting controls just how much system RAM can be allocated to this memory ...

User Guide
Page 53
... the HDD Power Down item. In this section are three options for ACPI function. BIOS Setup Power Management Setup MSI Reminds You... There are available only when your operating system supports ACPI, such as Windows 98SE, Windows ME and Windows 2000, you can choose to enter the Standby mode in...=1 Min [User Define] Allows end users to the video buffer. 3-17 S3-related functions described in this state, no system context is lost (CPU or chipset) and hardware maintains all system context. [S3 (STR)] The S3 sleep mode is a lower power state where the information of this field.
... the HDD Power Down item. In this section are three options for ACPI function. BIOS Setup Power Management Setup MSI Reminds You... There are available only when your operating system supports ACPI, such as Windows 98SE, Windows ME and Windows 2000, you can choose to enter the Standby mode in...=1 Min [User Define] Allows end users to the video buffer. 3-17 S3-related functions described in this state, no system context is lost (CPU or chipset) and hardware maintains all system context. [S3 (STR)] The S3 sleep mode is a lower power state where the information of this field.

User Guide
Page 80
... MSI Reminds You... On the contrary, if the last character is "O" or after "O" (such as P, Q, R, and so on the top of CPU. Enter Power Options Properties tag, and select Minimal Power Management under AMD AthlonTM. If the last character is before "O", that means this CPU supports ...Cool'n'Quiet function. Enter Windows, and select [Start]->[Settings]->[Control Pannel]->[Power Options]. Or you may adjust the CPU fan speed. If you choose Cool'n'Quiet, the system will automatically increase...
... MSI Reminds You... On the contrary, if the last character is "O" or after "O" (such as P, Q, R, and so on the top of CPU. Enter Power Options Properties tag, and select Minimal Power Management under AMD AthlonTM. If the last character is before "O", that means this CPU supports ...Cool'n'Quiet function. Enter Windows, and select [Start]->[Settings]->[Control Pannel]->[Power Options]. Or you may adjust the CPU fan speed. If you choose Cool'n'Quiet, the system will automatically increase...


