User Manual
Page 11
Release History Version 2.1 Revision Note For Vista and XP version Date 12, 2007 XI Preface Trademarks All trademarks are registered trademarks of the Personal Notebook Memory Card International Association. w PCMCIA and CardBus are the properties of their respective owners. w Microsoft is a registered trademark of Microsoft Corporation. Windows® 2000/ XP/ Vista are registered trademarks of Microsoft Corporation.
Release History Version 2.1 Revision Note For Vista and XP version Date 12, 2007 XI Preface Trademarks All trademarks are registered trademarks of the Personal Notebook Memory Card International Association. w PCMCIA and CardBus are the properties of their respective owners. w Microsoft is a registered trademark of Microsoft Corporation. Windows® 2000/ XP/ Vista are registered trademarks of Microsoft Corporation.

User Manual
Page 25
... Power Button Power Button:Turn the notebook power ON and OFF. Rubber Pads Protect your notebook from the suspending mode, and also activate the Windows Media Player. Getting Started 1. Status LED Num Lock: Glowing Green when the Num Lock function is installed.
... Power Button Power Button:Turn the notebook power ON and OFF. Rubber Pads Protect your notebook from the suspending mode, and also activate the Windows Media Player. Getting Started 1. Status LED Num Lock: Glowing Green when the Num Lock function is installed.
User Manual
Page 26
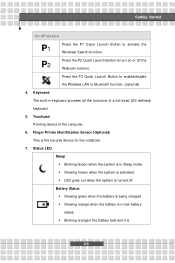
...) This is activated. w Glowing Green when the system is the security device for XP version P1 Press the P1 Quick Launch Button to activate the Windows Search function P2 Press the P2 Quick Launch Button to enable/disable the Wireless LAN or Bluetooth function. (optional) 4. Press the P3 Quick Launch Button...
...) This is activated. w Glowing Green when the system is the security device for XP version P1 Press the P1 Quick Launch Button to activate the Windows Search function P2 Press the P2 Quick Launch Button to enable/disable the Wireless LAN or Bluetooth function. (optional) 4. Press the P3 Quick Launch Button...

User Manual
Page 47
... functions, such as opening the Start menu and launching the shortcut menu. Getting Started Function Keys n Windows Keys You can find the Windows Logo key ( ) and one Application Logo key ( ) on the system configuration). 2-29 n [Fn] Key Switch the display output mode between the + LCD, external monitor and ... the built-in speaker's volume. + Disable the computer's audio function. + Force the computer into suspend mode + (depending on the keyboard, which are used to your Windows manual or online help.
... functions, such as opening the Start menu and launching the shortcut menu. Getting Started Function Keys n Windows Keys You can find the Windows Logo key ( ) and one Application Logo key ( ) on the system configuration). 2-29 n [Fn] Key Switch the display output mode between the + LCD, external monitor and ... the built-in speaker's volume. + Disable the computer's audio function. + Force the computer into suspend mode + (depending on the keyboard, which are used to your Windows manual or online help.

User Manual
Page 50
... comfortably. To configure the touchpad, you can use the standard Microsoft or IBM PS/2 driver in Control Panel allows you may want to meet your Windows operating system. Move the cursor by sliding your wrist on the screen. Using the Touchpad Put your fingertip.
... comfortably. To configure the touchpad, you can use the standard Microsoft or IBM PS/2 driver in Control Panel allows you may want to meet your Windows operating system. Move the cursor by sliding your wrist on the screen. Using the Touchpad Put your fingertip.

User Manual
Page 59
Customizing this Notebook 2. Alternately, you can change the display mode by pressing [Fn]+[F2]. If not, you can switch the display mode by configuring the settings in Display Properties of Windows operating system. 3-5 Connect the monitor's power cord and turn on the Notebook and the monitor should respond by default. Plug the monitor's D-type connector into the Notebook's VGA port. 3. Turn on the monitor. 4.
Customizing this Notebook 2. Alternately, you can change the display mode by pressing [Fn]+[F2]. If not, you can switch the display mode by configuring the settings in Display Properties of Windows operating system. 3-5 Connect the monitor's power cord and turn on the Notebook and the monitor should respond by default. Plug the monitor's D-type connector into the Notebook's VGA port. 3. Turn on the monitor. 4.

User Manual
Page 68
w System Information This item provides the information about the firmware, processor, and system memory. 4-6 Press [Enter] to bring up a window showing the detailed information of the IDE devices installed in the notebook. BIOS Setup w Serial_ATA / Primary IDE Master These items display the types of the device, including the device name, vendor, LBA mode, PIO mode and more.
w System Information This item provides the information about the firmware, processor, and system memory. 4-6 Press [Enter] to bring up a window showing the detailed information of the IDE devices installed in the notebook. BIOS Setup w Serial_ATA / Primary IDE Master These items display the types of the device, including the device name, vendor, LBA mode, PIO mode and more.

