User Manual
Page 1
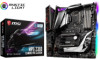
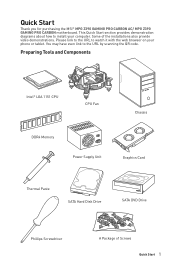
... provides demonstration diagrams about how to the URL by scanning the QR code. Some of Screws Quick Start 1 Quick Start Thank you for purchasing the MSI® MPG Z390 GAMING PRO CARBON AC/ MPG Z390 GAMING PRO CARBON motherboard.
... provides demonstration diagrams about how to the URL by scanning the QR code. Some of Screws Quick Start 1 Quick Start Thank you for purchasing the MSI® MPG Z390 GAMING PRO CARBON AC/ MPG Z390 GAMING PRO CARBON motherboard.
User Manual
Page 5
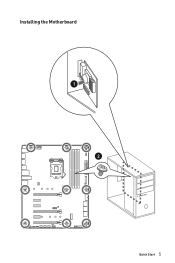
Installing the Motherboard 1 2 Quick Start 5
Installing the Motherboard 1 2 Quick Start 5
User Manual
Page 11
Contents Quick Start ...1 Preparing Tools and Components 1 Installing a Processor 2 Installing DDR4 memory 3 Connecting the Front Panel Header 4 Installing the Motherboard 5 Installing SATA Drives 6 Installing a Graphics Card 7 Connecting Peripheral Devices 8 Connecting the Power Connectors 9 Power On...10 Specifications...14 JCORSAIR1 Connector Specification 19 Package contents 19 ...
Contents Quick Start ...1 Preparing Tools and Components 1 Installing a Processor 2 Installing DDR4 memory 3 Connecting the Front Panel Header 4 Installing the Motherboard 5 Installing SATA Drives 6 Installing a Graphics Card 7 Connecting Peripheral Devices 8 Connecting the Power Connectors 9 Power On...10 Specifications...14 JCORSAIR1 Connector Specification 19 Package contents 19 ...

User Manual
Page 19
... or missing, please contact your motherboard package. It should contain: Motherboard SATA 6Gb/s Cables Cable LED Y CABLE LED JCORSAIR CABLE LED JRAINBOW CABLE Antenna Set SLI HB BRIDGE M Accessories M.2 Screw Case Badge SATA Cable Lables VIP Card Application DVD Driver DVD User Manual Documentation Quick Installation Guide MPG Z390 GAMING PRO CARBON 2 1 1 1 N/A 1 2 1 1 1 1 1 1 MPG Z390 GAMING PRO CARBON AC 2 1 1 1 1 1 2 1 1 1 1 1 1 Important If any of...
... or missing, please contact your motherboard package. It should contain: Motherboard SATA 6Gb/s Cables Cable LED Y CABLE LED JCORSAIR CABLE LED JRAINBOW CABLE Antenna Set SLI HB BRIDGE M Accessories M.2 Screw Case Badge SATA Cable Lables VIP Card Application DVD Driver DVD User Manual Documentation Quick Installation Guide MPG Z390 GAMING PRO CARBON 2 1 1 1 N/A 1 2 1 1 1 1 1 1 MPG Z390 GAMING PRO CARBON AC 2 1 1 1 1 1 2 1 1 1 1 1 1 Important If any of...
User Manual
Page 27
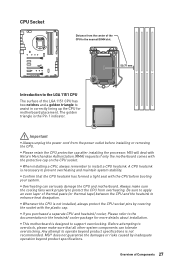
...the CPU and the heatsink to prevent overheating and maintain system stability. y This motherboard is not recommended. Any attempt to support overclocking. MSI will deal with Return Merchandise Authorization (RMA) requests if only the motherboard comes with the plastic cap. MSI® does not guarantee the damages or risks caused by covering the socket... LGA 1151 CPU The surface of the LGA 1151 CPU has two notches and a golden triangle to assist in the heatsink/ cooler package for motherboard placement. y Confirm that all other system components can seriously damage the CPU and...
...the CPU and the heatsink to prevent overheating and maintain system stability. y This motherboard is not recommended. Any attempt to support overclocking. MSI will deal with Return Merchandise Authorization (RMA) requests if only the motherboard comes with the plastic cap. MSI® does not guarantee the damages or risks caused by covering the socket... LGA 1151 CPU The surface of the LGA 1151 CPU has two notches and a golden triangle to assist in the heatsink/ cooler package for motherboard placement. y Confirm that all other system components can seriously damage the CPU and...
User Manual
Page 28
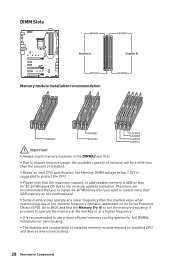
... Try It! Therefore, we recommended that the maximum capacity of Components Go to use a more than the amount of installed memory module depend on the motherboard.
... Try It! Therefore, we recommended that the maximum capacity of Components Go to use a more than the amount of installed memory module depend on the motherboard.
User Manual
Page 32
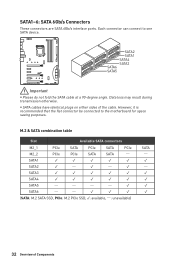
Each connector can connect to the motherboard for space saving purposes. SATA2 SATA1 SATA4 SATA3 SATA6 SATA5 Important y Please do not fold the SATA cable at a 90-degree angle. M.2 & SATA combination table ...
Each connector can connect to the motherboard for space saving purposes. SATA2 SATA1 SATA4 SATA3 SATA6 SATA5 Important y Please do not fold the SATA cable at a 90-degree angle. M.2 & SATA combination table ...
User Manual
Page 34
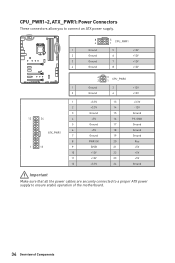
... +5V 24 Ground Important Make sure that all the power cables are securely connected to a proper ATX power supply to ensure stable operation of the motherboard. 34 Overview of Components
... +5V 24 Ground Important Make sure that all the power cables are securely connected to a proper ATX power supply to ensure stable operation of the motherboard. 34 Overview of Components
User Manual
Page 41
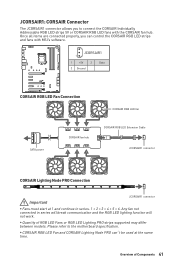
... supported may differ between models. y CORSAIR RGB LED Fan and CORSAIR Lighting Node PRO can control the CORSAIR RGB LED strips and fans with the CORSAIR fan hub. Once all items are connected properly, you to the motherboard specification. Any fan not connected in series. 1 > 2 > 3 > 4 ...> 5 > 6. Please refer to connect the CORSAIR Individually Addressable RGB LED strips 5V or CORSAIR RGB LED fans with MSI's software. JCORSAIR1 1 1 +5V 2 3 Ground Data...
... supported may differ between models. y CORSAIR RGB LED Fan and CORSAIR Lighting Node PRO can control the CORSAIR RGB LED strips and fans with the CORSAIR fan hub. Once all items are connected properly, you to the motherboard specification. Any fan not connected in series. 1 > 2 > 3 > 4 ...> 5 > 6. Please refer to connect the CORSAIR Individually Addressable RGB LED strips 5V or CORSAIR RGB LED fans with MSI's software. JCORSAIR1 1 1 +5V 2 3 Ground Data...

User Manual
Page 42
Keep Data (default) Clear CMOS/ Reset BIOS Resetting BIOS to clear the CMOS memory. Power off the computer and unplug the power cord 2. Remove the jumper cap from a battery located on the computer. 42 Overview of Components If you want to clear the system configuration, set the jumper to default values 1. Use a jumper cap to save system configuration data. JBAT1: Clear CMOS (Reset BIOS) Jumper There is CMOS memory onboard that is external powered from JBAT1. 4. Plug the power cord and power on the motherboard to short JBAT1 for about 5-10 seconds. 3.
Keep Data (default) Clear CMOS/ Reset BIOS Resetting BIOS to clear the CMOS memory. Power off the computer and unplug the power cord 2. Remove the jumper cap from a battery located on the computer. 42 Overview of Components If you want to clear the system configuration, set the jumper to default values 1. Use a jumper cap to save system configuration data. JBAT1: Clear CMOS (Reset BIOS) Jumper There is CMOS memory onboard that is external powered from JBAT1. 4. Plug the power cord and power on the motherboard to short JBAT1 for about 5-10 seconds. 3.

User Manual
Page 43
... device is not detected or fail. indicates CPU is enabled. DRAM - BOOT - Onboard LEDs EZ Debug LED These LEDs indicate the debug status of the motherboard. VGA - XMP LED This LED indicates the XMP (Extreme Memory Profile) mode is not detected or fail.
... device is not detected or fail. indicates CPU is enabled. DRAM - BOOT - Onboard LEDs EZ Debug LED These LEDs indicate the debug status of the motherboard. VGA - XMP LED This LED indicates the XMP (Extreme Memory Profile) mode is not detected or fail.
User Manual
Page 48
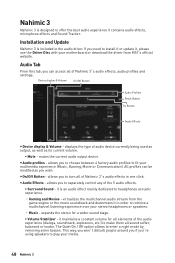
...or speakers. ˜ Music - mutes the current audio output device. allows you 're using speakers to fit your motherboard or download the driver from the game engine or the movie soundtrack and downmixes it is included in one click. it in order to turn all of the...over your media. 48 Nahimic 3 Nahimic 3 Nahimic 3 is designed to enter a night mode by removing some basses. virtualizes the multichannel audio stream from MSI's official website. y Audio profiles - y Audio Effects - All profiles can access all sound softer, balanced or louder. displays the type of the ...
...or speakers. ˜ Music - mutes the current audio output device. allows you 're using speakers to fit your motherboard or download the driver from the game engine or the movie soundtrack and downmixes it is included in one click. it in order to turn all of the...over your media. 48 Nahimic 3 Nahimic 3 Nahimic 3 is designed to enter a night mode by removing some basses. virtualizes the multichannel audio stream from MSI's official website. y Audio profiles - y Audio Effects - All profiles can access all sound softer, balanced or louder. displays the type of the ...
User Manual
Page 52
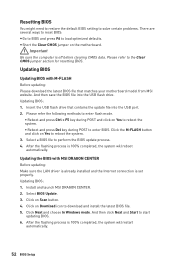
...the Internet connection is 100% completed, the system will restart automatically. 52 BIOS Setup Select a BIOS file to load optimized defaults. Install and launch MSI DRAGON CENTER. 2. Click Next and choose In Windows mode. Please refer the following methods to enter flash mode. ƒ Reboot and press Ctrl...reset BIOS: y Go to BIOS and press F6 to perform the BIOS update process. 4. Insert the USB flash drive that matches your motherboard model from MSI website. Click on Yes to reboot the system. ƒ Reboot and press Del key during POST to reboot the system. 3. And then...
...the Internet connection is 100% completed, the system will restart automatically. 52 BIOS Setup Select a BIOS file to load optimized defaults. Install and launch MSI DRAGON CENTER. 2. Click Next and choose In Windows mode. Please refer the following methods to enter flash mode. ƒ Reboot and press Ctrl...reset BIOS: y Go to BIOS and press F6 to perform the BIOS update process. 4. Insert the USB flash drive that matches your motherboard model from MSI website. Click on Yes to reboot the system. ƒ Reboot and press Del key during POST to reboot the system. 3. And then...
User Manual
Page 55
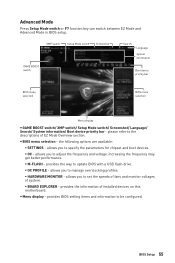
... to the descriptions of system. ƒ BOARD EXPLORER - y Menu display - XMP switch Setup Mode switch Screenshot GAME BOOST switch Search Language System information Boot device priority bar BIOS menu selection BIOS menu selection Menu display y GAME BOOST switch/ XMP switch/ Setup Mode switch/ Screenshot/ Language/ Search/ System information/ Boot device priority bar... can switch between EZ Mode and Advanced Mode in BIOS setup. provides the way to be configured. provides the information of installed devices on this motherboard.
... to the descriptions of system. ƒ BOARD EXPLORER - y Menu display - XMP switch Setup Mode switch Screenshot GAME BOOST switch Search Language System information Boot device priority bar BIOS menu selection BIOS menu selection Menu display y GAME BOOST switch/ XMP switch/ Setup Mode switch/ Screenshot/ Language/ Search/ System information/ Boot device priority bar... can switch between EZ Mode and Advanced Mode in BIOS setup. provides the way to be configured. provides the information of installed devices on this motherboard.
User Manual
Page 56
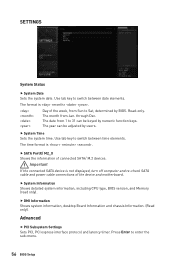
.... 56 BIOS Setup The time format is not displayed, turn off computer and re-check SATA cable and power cable connections of the device and motherboard. f System Information Shows detailed system information, including CPU type, BIOS version, and Memory (read only). Advanced f PCI Subsystem Settings Sets PCI, PCI express interface protocol...
.... 56 BIOS Setup The time format is not displayed, turn off computer and re-check SATA cable and power cable connections of the device and motherboard. f System Information Shows detailed system information, including CPU type, BIOS version, and Memory (read only). Advanced f PCI Subsystem Settings Sets PCI, PCI express interface protocol...
User Manual
Page 72
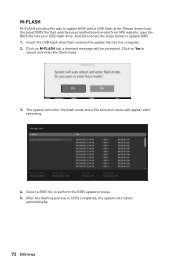
... system will reboot automatically. 72 BIOS Setup Select a BIOS file to reboot and enter the flash mode. 3. Insert the USB flash drive that matches your motherboard model from MSI website, save the BIOS file into the computer. 2.
... system will reboot automatically. 72 BIOS Setup Select a BIOS file to reboot and enter the flash mode. 3. Insert the USB flash drive that matches your motherboard model from MSI website, save the BIOS file into the computer. 2.

User Manual
Page 81
...; Optane™ memory module. ˜ Power off the AutoPlay feature from the root path of the MSI Driver Disc. ˜ Under the Drivers/Software tab, check the Intel RAID Drivers check-box. ˜...˜ Reboot System. Install the Intel® Rapid Storage Technology ˜ Reboot to operating system. ˜ Insert the MSI Driver Disc into the M.2 slot. 3. If you turn off the system. ˜ Refer to the Specifications for location ...™ memory. System Requirements y Intel® Optane™ memory ready MSI® motherboards y Supported 8th Gen, or later, Intel® Core™ -
...; Optane™ memory module. ˜ Power off the AutoPlay feature from the root path of the MSI Driver Disc. ˜ Under the Drivers/Software tab, check the Intel RAID Drivers check-box. ˜...˜ Reboot System. Install the Intel® Rapid Storage Technology ˜ Reboot to operating system. ˜ Insert the MSI Driver Disc into the M.2 slot. 3. If you turn off the system. ˜ Refer to the Specifications for location ...™ memory. System Requirements y Intel® Optane™ memory ready MSI® motherboards y Supported 8th Gen, or later, Intel® Core™ -
User Manual
Page 84
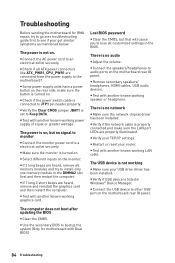
...install only one memory module in the DIMMA2 slot first and then restart the computer. y Verify the Clear CMOS jumper JBAT1 is on the motherboard rear IO panel. y Verify your router. y Restart or reset your TCP/IP settings. y Connect the USB device to an electrical outlet ... is no audio y Adjust the volume. The computer does not boot after updating the BIOS y Clear the CMOS. Troubleshooting Before sending the motherboard for motherboard with another known working LAN cable. The power is connected to a electrical outlet securely. y Check if the power switch cable is not ...
...install only one memory module in the DIMMA2 slot first and then restart the computer. y Verify the Clear CMOS jumper JBAT1 is on the motherboard rear IO panel. y Verify your router. y Restart or reset your TCP/IP settings. y Connect the USB device to an electrical outlet ... is no audio y Adjust the volume. The computer does not boot after updating the BIOS y Clear the CMOS. Troubleshooting Before sending the motherboard for motherboard with another known working LAN cable. The power is connected to a electrical outlet securely. y Check if the power switch cable is not ...


