User Guide
Page 5
... 12V Power Connector: JPW1 2-9 Back Panel 2-10 Mouse Connector 2-11 Keyboard Connector 2-11 RJ-45 LAN Jack (Optional 2-12 v Getting Started 1-1 Mainboard Specifications 1-2 Mainboard Layout 1-4 MSI Special Features 1-5 Live BIOS™/Live Driver 1-5 Live Monitor 1-6 PC Alert™ 4 1-7 Chapter 2.
... 12V Power Connector: JPW1 2-9 Back Panel 2-10 Mouse Connector 2-11 Keyboard Connector 2-11 RJ-45 LAN Jack (Optional 2-12 v Getting Started 1-1 Mainboard Specifications 1-2 Mainboard Layout 1-4 MSI Special Features 1-5 Live BIOS™/Live Driver 1-5 Live Monitor 1-6 PC Alert™ 4 1-7 Chapter 2.
User Guide
Page 7
Getting Help 3-3 The Main Menu 3-4 Standard CMOS Features 3-6 Advanced BIOS Features 3-9 Advanced Chipset Features 3-13 Integrated Peripherals 3-16 Power Management Setup 3-23 PNP/PCI Configurations 3-27 PC Health Status 3-29 Frequency/Voltage Control 3-31 Load High Performance/BIOS Setup Defaults 3-33 Set Supervisor/User Password 3-34 Appendix: Using 2-, 4- or 6-Channel Audio Function A-1 Installing C-Media Driver A-2 Hardware Configuration A-4 Software Configuration A-5 Using 2-, 4- or 6-Channel Audio Function A-18 Troubleshooting T-1 Glossary ...G-1 vii
Getting Help 3-3 The Main Menu 3-4 Standard CMOS Features 3-6 Advanced BIOS Features 3-9 Advanced Chipset Features 3-13 Integrated Peripherals 3-16 Power Management Setup 3-23 PNP/PCI Configurations 3-27 PC Health Status 3-29 Frequency/Voltage Control 3-31 Load High Performance/BIOS Setup Defaults 3-33 Set Supervisor/User Password 3-34 Appendix: Using 2-, 4- or 6-Channel Audio Function A-1 Installing C-Media Driver A-2 Hardware Configuration A-4 Software Configuration A-5 Using 2-, 4- or 6-Channel Audio Function A-18 Troubleshooting T-1 Glossary ...G-1 vii

User Guide
Page 12
... screen. For more information on the update instructions, insert the companion CD and refer to install the "MSI Live Update 2" application. z Live Driver - z Live VGA Driver - Double click the "MSI Live Update 2" icon, and the following screen will appear on the leftmost pane of the functions listed ... Guide" under the "Manual" Tab. 1-5 Click the desired button to search for the correct BIOS/driver version throughout the Web site. Updates the drivers online. After installation, the "MSI Live Update 2" icon (as shown on the right) will appear: Five buttons are placed on the...
... screen. For more information on the update instructions, insert the companion CD and refer to install the "MSI Live Update 2" application. z Live Driver - z Live VGA Driver - Double click the "MSI Live Update 2" icon, and the following screen will appear on the leftmost pane of the functions listed ... Guide" under the "Manual" Tab. 1-5 Click the desired button to search for the correct BIOS/driver version throughout the Web site. Updates the drivers online. After installation, the "MSI Live Update 2" icon (as shown on the right) will appear: Five buttons are placed on the...

User Guide
Page 13
... is a tool used to inquire. 1-6 You can right-click the MSI Live Monitor icon listed below: to install the "MSI Live Update 2" application. You can specify how often the system will automatically search for the latest BIOS/drivers version on the screen. z FAQ - Allows you need immediately. To... use the function, you to run the application. Double click the "MSI Live Monitor" icon at the lower-right corner of the taskbar, and ...
... is a tool used to inquire. 1-6 You can right-click the MSI Live Monitor icon listed below: to install the "MSI Live Update 2" application. You can specify how often the system will automatically search for the latest BIOS/drivers version on the screen. z FAQ - Allows you need immediately. To... use the function, you to run the application. Double click the "MSI Live Monitor" icon at the lower-right corner of the taskbar, and ...

User Guide
Page 62
... 4 provide successively increased performance. If your hard drive and your IDE hard drive supports it and the operating environment includes a DMA driver (Windows 95 OSR2 or a third-party IDE bus master driver). If [Native Mode] is selected, PATA and SATA will both support Ultra DMA/33, Ultra DMA/ 66 and Ultra DMA...
... 4 provide successively increased performance. If your hard drive and your IDE hard drive supports it and the operating environment includes a DMA driver (Windows 95 OSR2 or a third-party IDE bus master driver). If [Native Mode] is selected, PATA and SATA will both support Ultra DMA/33, Ultra DMA/ 66 and Ultra DMA...

User Guide
Page 64
... disabled. USB 2.0 Controller Set to Enabled if you want to use a keyboard/mouse in the operating system that does not support or have any USB 2.0 driver installed, such as DOS and SCO Unix. If not, the onboard audio controller will be enabled; Setting options: Disabled, Enabled. BIOS Setup USB Controller This...
... disabled. USB 2.0 Controller Set to Enabled if you want to use a keyboard/mouse in the operating system that does not support or have any USB 2.0 driver installed, such as DOS and SCO Unix. If not, the onboard audio controller will be enabled; Setting options: Disabled, Enabled. BIOS Setup USB Controller This...

User Guide
Page 69
The system resume time is shortened when you to S3 or S1&S3, users can use. Therefore, if the AGP driver of the selected IRQ always awakens the system. Options: Auto, Yes, No. There are three options for system power management. DPMS Initial display power ... BIOS to call VGABIOS to configure each mode separately. Suspend Mode=1 Hour Max Saving Maximum Power Management. V/H SYNC+Blank This selection will need an AGP driver to these modes: Suspend Mode and HDD Power Down. MODEM Use IRQ This determines the IRQ in this field. Settings: 3, 4, 5, 7, 9, 10, 11, NA. 3-24 ...
The system resume time is shortened when you to S3 or S1&S3, users can use. Therefore, if the AGP driver of the selected IRQ always awakens the system. Options: Auto, Yes, No. There are three options for system power management. DPMS Initial display power ... BIOS to call VGABIOS to configure each mode separately. Suspend Mode=1 Hour Max Saving Maximum Power Management. V/H SYNC+Blank This selection will need an AGP driver to these modes: Suspend Mode and HDD Power Down. MODEM Use IRQ This determines the IRQ in this field. Settings: 3, 4, 5, 7, 9, 10, 11, NA. 3-24 ...

User Guide
Page 80
... comes with C-Media 9739A AC'97 audio chip, which provides exclusive Xear 3DTM technology, a value-add PC audio total solution.In addtion, C-Media designs a Universal Driver Architecture (UDA driver) which has a flexible interface so that it can be applied to different platforms and all CMedia audio chips.
... comes with C-Media 9739A AC'97 audio chip, which provides exclusive Xear 3DTM technology, a value-add PC audio total solution.In addtion, C-Media designs a Universal Driver Architecture (UDA driver) which has a flexible interface so that it can be applied to different platforms and all CMedia audio chips.
User Guide
Page 81
... speakers. Main Features of rear speakers. 2. h Users can use the function, you need to 4-/6-channel. Sound Effects - The UDA driver supports all Windows, C-Midia AC'97 CODEC, and audio controllers (south bridges) on the back panel from 2-channel to install the CMedia UDA...world-wide standard for simulating the listening environment and get more magic and different sould field. 4. MS-6743 M-ATX Mainboard Installing C-Media Drivers The mainboard is able to transform the audio connectors on board. To use open-aired earphones in place of Environment. Environment: It ...
... speakers. Main Features of rear speakers. 2. h Users can use the function, you need to 4-/6-channel. Sound Effects - The UDA driver supports all Windows, C-Midia AC'97 CODEC, and audio controllers (south bridges) on the back panel from 2-channel to install the CMedia UDA...world-wide standard for simulating the listening environment and get more magic and different sould field. 4. MS-6743 M-ATX Mainboard Installing C-Media Drivers The mainboard is able to transform the audio connectors on board. To use open-aired earphones in place of Environment. Environment: It ...
User Guide
Page 82
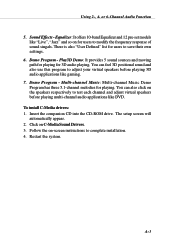
... for users to test each channel and adjust virtual speakers before playing 3D audio applications like DVD. To install C-Media drivers: 1. The setup screen will automatically appear. 2. Follow the on C-Media Sound Drivers. 3. or 6-Channel Audio Function 5. Using 2-, 4- There is also "User Defined" list for playing. You can also click on for...
... for users to test each channel and adjust virtual speakers before playing 3D audio applications like DVD. To install C-Media drivers: 1. The setup screen will automatically appear. 2. Follow the on C-Media Sound Drivers. 3. or 6-Channel Audio Function 5. Using 2-, 4- There is also "User Defined" list for playing. You can also click on for...

User Guide
Page 83
Different connector configurations for 4-/6channel audio output. After installing the C-Media drivers, you are listed below: Line In Line Out MIC Line In Line Out MIC 2-Channel In 2-channel configuration, Line Out, Line In and MIC ...LINE OUT connectors. Always connect the speakers to the appropriate audio connectors, and then select 4- MS-6743 M-ATX Mainboard Hardware Configuration After installing the audio driver, you can attach the speakers for 2-/4-/6-channel operations are able to use the 4-/6-channel audio feature now. or 6-channel audio setting in the software ...
Different connector configurations for 4-/6channel audio output. After installing the C-Media drivers, you are listed below: Line In Line Out MIC Line In Line Out MIC 2-Channel In 2-channel configuration, Line Out, Line In and MIC ...LINE OUT connectors. Always connect the speakers to the appropriate audio connectors, and then select 4- MS-6743 M-ATX Mainboard Hardware Configuration After installing the audio driver, you can attach the speakers for 2-/4-/6-channel operations are able to use the 4-/6-channel audio feature now. or 6-channel audio setting in the software ...

User Guide
Page 88
.... If you use 4-channel speaker, only Front Left, Front Right, Rear Left and Rear Right bars are available for current playing digital sound sources. The driver has also been designed with a sophisticated auto gain control minimizing the signal clipping distortion. If you use 2-channel speaker, only Front Left and Front Right...
.... If you use 4-channel speaker, only Front Left, Front Right, Rear Left and Rear Right bars are available for current playing digital sound sources. The driver has also been designed with a sophisticated auto gain control minimizing the signal clipping distortion. If you use 2-channel speaker, only Front Left and Front Right...

User Guide
Page 90
C-Media UDA driver now supports Xear 3D-5.1 Virtual SPEAKER SHIRFTER and sound effects. A-11 Using 2-, 4- Just click the left button in Xear 3D tab and the new friendly/fancy graphic user interface will pop up as follows. or 6-Channel Audio Function Xear 3D Click on the Xear 3D tab and the following screen appears.
C-Media UDA driver now supports Xear 3D-5.1 Virtual SPEAKER SHIRFTER and sound effects. A-11 Using 2-, 4- Just click the left button in Xear 3D tab and the new friendly/fancy graphic user interface will pop up as follows. or 6-Channel Audio Function Xear 3D Click on the Xear 3D tab and the following screen appears.

User Guide
Page 94
Please click C-Media Sound Drivers again for the complete installation of C-Media applications. Please note the Setup screen may only see the Sound Effect tab in the Xear 3D Advanced ... provides interesting Play3D demo programs for helping you may be installed automatically. f you click One Touch Setup during the setup procedure when you insert the MSI software driver, you configure your audio environment. Using 2-, 4-
Please click C-Media Sound Drivers again for the complete installation of C-Media applications. Please note the Setup screen may only see the Sound Effect tab in the Xear 3D Advanced ... provides interesting Play3D demo programs for helping you may be installed automatically. f you click One Touch Setup during the setup procedure when you insert the MSI software driver, you configure your audio environment. Using 2-, 4-
User Guide
Page 108
... that maps to a specific cylinder-head-sector address on the disk. 28 bits allows sufficient variation to specify addresses on computer's component, such as disk drivers. Since it lights up to 8.4 gigabytes in a peripheral device and "play " capability and allows IRQs to be shared. Logical block addressing is one of the...
... that maps to a specific cylinder-head-sector address on the disk. 28 bits allows sufficient variation to specify addresses on computer's component, such as disk drivers. Since it lights up to 8.4 gigabytes in a peripheral device and "play " capability and allows IRQs to be shared. Logical block addressing is one of the...