User Manual
Page 30
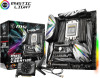
...socket with the CPU before installing or removing the CPU. Be sure to apply an even layer of Components Any attempt to support overclocking. y Please retain the protective caps after installing the processor. y Confirm that all other system components can seriously damage the CPU and...recommended. Then, tighten the bolts in a diagonal order to the documentation in the heatsink/ cooler package for more details about installation. MSI will deal with Return Merchandise Authorization (RMA) requests if only the motherboard comes with the mounting nuts on the CPU socket. A ...
...socket with the CPU before installing or removing the CPU. Be sure to apply an even layer of Components Any attempt to support overclocking. y Please retain the protective caps after installing the processor. y Confirm that all other system components can seriously damage the CPU and...recommended. Then, tighten the bolts in a diagonal order to the documentation in the heatsink/ cooler package for more details about installation. MSI will deal with Return Merchandise Authorization (RMA) requests if only the motherboard comes with the mounting nuts on the CPU socket. A ...
User Manual
Page 31
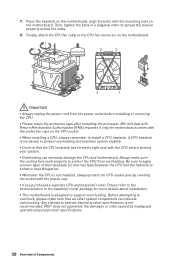
Power off the computer. 3. Set the GAME BOOST knob to select the overclocking stage as you desire. Rotate the GAME BOOST knob to hardware mode in BIOS Setup. 2. Ryzen Stage Threadripper CPU Frequency Ryzen Threadripper Ryzen Threadripper Ryzen ... your computer. The processor's voltage and frequency will be automatically adjusted after you to manually select a stage from number 0 (default) to number 11 (extreme) for overclocking the processor.
Power off the computer. 3. Set the GAME BOOST knob to select the overclocking stage as you desire. Rotate the GAME BOOST knob to hardware mode in BIOS Setup. 2. Ryzen Stage Threadripper CPU Frequency Ryzen Threadripper Ryzen Threadripper Ryzen ... your computer. The processor's voltage and frequency will be automatically adjusted after you to manually select a stage from number 0 (default) to number 11 (extreme) for overclocking the processor.

User Manual
Page 32
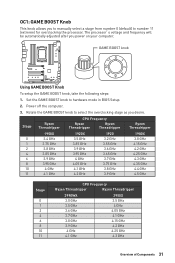
... knob to 0 and then power on. y The success of your computer. y We do not guarantee the GAME BOOST overclocking range or the damages/ risks caused by overclocking behavior. JOC_FS1: OC Force Enter BIOS Jumper When you selected. Rotate the GAME BOOST knob to HW mode in BIOS Setup... or with MSI COMMAND CENTER software. The configuration parameters will keep retrying OC items until it boot up successfully. 4. To disable ...
... knob to 0 and then power on. y The success of your computer. y We do not guarantee the GAME BOOST overclocking range or the damages/ risks caused by overclocking behavior. JOC_FS1: OC Force Enter BIOS Jumper When you selected. Rotate the GAME BOOST knob to HW mode in BIOS Setup... or with MSI COMMAND CENTER software. The configuration parameters will keep retrying OC items until it boot up successfully. 4. To disable ...
User Manual
Page 33
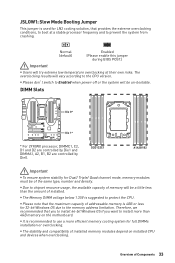
... y Please note that you to install 64-bit Windows OS if you want to install more efficient memory cooling system for full DIMMs installation or overclocking. Overview of the same type, number and density. y The stability and compatibility of addressable memory is used for LN2 cooling solution, that provides ...y Please don't switch to Enabled when power-off or the system will be a little less than 4GB memory on installed CPU and devices when overclocking. JSLOW1: Slow Mode Booting Jumper This jumper is 4GB or less for 32-bit Windows OS due to the memory address limitation. y Due to ...
... y Please note that you to install 64-bit Windows OS if you want to install more efficient memory cooling system for full DIMMs installation or overclocking. Overview of the same type, number and density. y The stability and compatibility of addressable memory is used for LN2 cooling solution, that provides ...y Please don't switch to Enabled when power-off or the system will be a little less than 4GB memory on installed CPU and devices when overclocking. JSLOW1: Slow Mode Booting Jumper This jumper is 4GB or less for 32-bit Windows OS due to the memory address limitation. y Due to ...

User Manual
Page 44
...# Ground Ground Ground Res +5V +5V +5V Ground Ground +5V Important y Make sure that connect both CPU_PWR1 and CPU_PWR2 to 12V power supply (especially when overclocking). y It is recommended that all the power cables are securely connected to a proper ATX power supply to ensure stable operation of Components
...# Ground Ground Ground Res +5V +5V +5V Ground Ground +5V Important y Make sure that connect both CPU_PWR1 and CPU_PWR2 to 12V power supply (especially when overclocking). y It is recommended that all the power cables are securely connected to a proper ATX power supply to ensure stable operation of Components
User Manual
Page 58
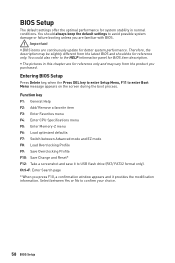
... avoid possible system damage or failure booting unless you are continuously update for reference only. Select between Advanced mode and EZ mode F8: Load Overclocking Profile F9: Save Overclocking Profile F10: Save Change and Reset* F12: Take a screenshot and save it provides the modification information. Ctrl+F: Enter Search page * When you purchased...
... avoid possible system damage or failure booting unless you are continuously update for reference only. Select between Advanced mode and EZ mode F8: Load Overclocking Profile F9: Save Overclocking Profile F10: Save Change and Reset* F12: Take a screenshot and save it provides the modification information. Ctrl+F: Enter Search page * When you purchased...
User Manual
Page 63
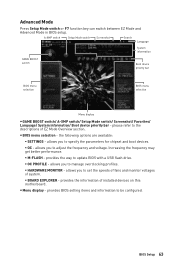
... F7 function key can switch between EZ Mode and Advanced Mode in BIOS setup. the following options are available: ƒ SETTINGS - allows you to manage overclocking profiles. ƒ HARDWARE MONITOR - provides BIOS setting items and information to adjust the frequency and voltage. provides the way to the descriptions of installed devices...
... F7 function key can switch between EZ Mode and Advanced Mode in BIOS setup. the following options are available: ƒ SETTINGS - allows you to manage overclocking profiles. ƒ HARDWARE MONITOR - provides BIOS setting items and information to adjust the frequency and voltage. provides the way to the descriptions of installed devices...
User Manual
Page 71
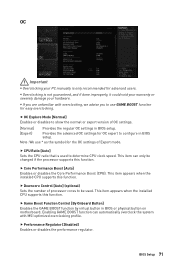
y Overclocking is not guaranteed, and if done improperly, it could void your warranty or severely damage your PC manually is used . Note: We use GAME BOOST ... be changed if the processor supports this function. OC Important y Overclocking your hardware. f OC Explore Mode [Normal] Enables or disables to use * as the symbol for easy overclocking. This item can automatically overclock the system with overclocking, we advise you are unfamiliar with MSI optimized overclocking profile. f Game Boost Function Control [By Onboard Button] Enables the...
y Overclocking is not guaranteed, and if done improperly, it could void your warranty or severely damage your PC manually is used . Note: We use GAME BOOST ... be changed if the processor supports this function. OC Important y Overclocking your hardware. f OC Explore Mode [Normal] Enables or disables to use * as the symbol for easy overclocking. This item can automatically overclock the system with overclocking, we advise you are unfamiliar with MSI optimized overclocking profile. f Game Boost Function Control [By Onboard Button] Enables the...
User Manual
Page 72
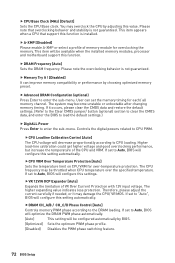
...installed memory modules, processor and motherboard support this function is not guaranteed. Higher load-line calibration could get higher voltage and good overclocking performance, but increase the temperature of VR Over Current Protection with 12V input voltage. The higher expanding value indicates less protection....sub-menu. fDRAM CH_A/B / CH_C/D Phase Control [Auto] Controls memory PWM phase according to CPU PWM. If set the memory timing for overclocking the memory. f A-XMP [Disabled] Please enable A-XMP or select a profile of memory module for each/ all memory channel. User can ...
...installed memory modules, processor and motherboard support this function is not guaranteed. Higher load-line calibration could get higher voltage and good overclocking performance, but increase the temperature of VR Over Current Protection with 12V input voltage. The higher expanding value indicates less protection....sub-menu. fDRAM CH_A/B / CH_C/D Phase Control [Auto] Controls memory PWM phase according to CPU PWM. If set the memory timing for overclocking the memory. f A-XMP [Disabled] Please enable A-XMP or select a profile of memory module for each/ all memory channel. User can ...
User Manual
Page 74
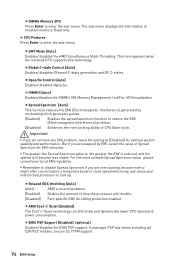
... have any EMI problem, leave the setting at [Disabled] for I/O Virtualization. fSMT Mode [Auto] Enables/ disables the AMD Simultaneous Multi-Threading. Important y If you are overclocking because even a slight jitter can effectively and dynamically lower CPU speed and power consumption. For the most suitable Spread Spectrum value, please consult your...
... have any EMI problem, leave the setting at [Disabled] for I/O Virtualization. fSMT Mode [Auto] Enables/ disables the AMD Simultaneous Multi-Threading. Important y If you are overclocking because even a slight jitter can effectively and dynamically lower CPU speed and power consumption. For the most suitable Spread Spectrum value, please consult your...

User Manual
Page 77
... f OC Profile Save to USB Save OC profile to enter the submenu. The USB flash drive should be FAT/ FAT32 format only. fLoad Overclocking Profile 1/ 2/ 3/ 4/ 5/ 6 Load the current overclocking profile. f OC Profile Load from ROM Load OC profile from the USB flash drive. OC PROFILE...
... f OC Profile Save to USB Save OC profile to enter the submenu. The USB flash drive should be FAT/ FAT32 format only. fLoad Overclocking Profile 1/ 2/ 3/ 4/ 5/ 6 Load the current overclocking profile. f OC Profile Load from ROM Load OC profile from the USB flash drive. OC PROFILE...


