User Manual
Page 1
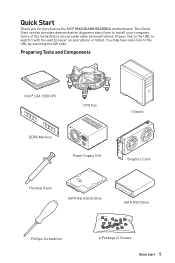
You may have even link to watch it with the web browser on your computer. Quick Start Thank you for purchasing the MSI® MAG B460M BAZOOKA motherboard. Preparing Tools and Components Intel® LGA 1200 CPU CPU Fan DDR4 Memory Power Supply Unit Chassis Graphics Card Thermal Paste SATA Hard Disk Drive SATA DVD Drive...
You may have even link to watch it with the web browser on your computer. Quick Start Thank you for purchasing the MSI® MAG B460M BAZOOKA motherboard. Preparing Tools and Components Intel® LGA 1200 CPU CPU Fan DDR4 Memory Power Supply Unit Chassis Graphics Card Thermal Paste SATA Hard Disk Drive SATA DVD Drive...

User Manual
Page 13
......47 SETTINGS Menu...48 OC Menu...51 M-FLASH Menu...55 OC PROFILE Menu 56 HARDWARE MONITOR Menu 57 RAID Configuration 59 Enabling Intel® Rapid Storage Technology 59 Creating RAID Volume 60 Removing a RAID Volume 61 Resetting Disks to Non-RAID 62 Rebuilding RAID ...Array 63 Installing RAID Driver 64 Installing Intel® Rapid Storage Technology Software 64 Intel® Optane™ Memory Configuration 65 System Requirements 65 Installing the Intel® Optane™ memory 65 Removing the Intel® Optane™ memory 67 Troubleshooting 68 Contents 13
......47 SETTINGS Menu...48 OC Menu...51 M-FLASH Menu...55 OC PROFILE Menu 56 HARDWARE MONITOR Menu 57 RAID Configuration 59 Enabling Intel® Rapid Storage Technology 59 Creating RAID Volume 60 Removing a RAID Volume 61 Resetting Disks to Non-RAID 62 Rebuilding RAID ...Array 63 Installing RAID Driver 64 Installing Intel® Rapid Storage Technology Software 64 Intel® Optane™ Memory Configuration 65 System Requirements 65 Installing the Intel® Optane™ memory 65 Removing the Intel® Optane™ memory 67 Troubleshooting 68 Contents 13
User Manual
Page 14
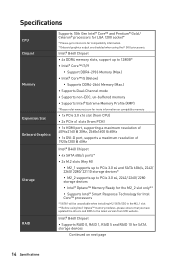
... Celeron® processors for LGA 1200 socket* * Please go to intel.com for SATA storage devices Continued on compatible memory ∙∙1x PCIe 3.0 x16 slot (from CPU) ∙∙2x PCIe x1 slots (from MSI website. Intel® B460 Chipset ∙∙Supports RAID 0, RAID 1, RAID ...5 and RAID 10 for compatibility information. * Onboard graphics output are disabled when using Intel® Optane™ memory modules, please ensure that you have ...
... Celeron® processors for LGA 1200 socket* * Please go to intel.com for SATA storage devices Continued on compatible memory ∙∙1x PCIe 3.0 x16 slot (from CPU) ∙∙2x PCIe x1 slots (from MSI website. Intel® B460 Chipset ∙∙Supports RAID 0, RAID 1, RAID ...5 and RAID 10 for compatibility information. * Onboard graphics output are disabled when using Intel® Optane™ memory modules, please ensure that you have ...

User Manual
Page 15
Continued from previous page LAN USB Audio Back Panel Connectors Internal Connectors LED Feature 1x Realtek® RTL8111H Gigabit LAN Controller ∙∙Intel® B460 Chipset ▪▪6x USB 3.2 Gen 1 5Gbps ports (4 Type-A ports on the back panel, 2 ports through the internal USB connector) ▪▪6x ...
Continued from previous page LAN USB Audio Back Panel Connectors Internal Connectors LED Feature 1x Realtek® RTL8111H Gigabit LAN Controller ∙∙Intel® B460 Chipset ▪▪6x USB 3.2 Gen 1 5Gbps ports (4 Type-A ports on the back panel, 2 ports through the internal USB connector) ▪▪6x ...

User Manual
Page 16
...;∙UEFI AMI BIOS ∙∙ACPI 6.2, SM BIOS 3.2 ∙∙ Multi-language ∙∙ Drivers ∙∙DRAGON CENTER ∙∙Intel Extreme Tuning Utility ∙∙CPU-Z MSI GAMING ∙∙Google Chrome™, Google Toolbar, Google Drive ∙∙Norton™ Internet Security Solution ∙∙LAN Manager ∙...; Monitor(Hardware Monitor) ∙∙True Color ∙∙Live Update ∙∙DPC Latency tuner ∙∙Speed Up Please refer to http://download.msi.
...;∙UEFI AMI BIOS ∙∙ACPI 6.2, SM BIOS 3.2 ∙∙ Multi-language ∙∙ Drivers ∙∙DRAGON CENTER ∙∙Intel Extreme Tuning Utility ∙∙CPU-Z MSI GAMING ∙∙Google Chrome™, Google Toolbar, Google Drive ∙∙Norton™ Internet Security Solution ∙∙LAN Manager ∙...; Monitor(Hardware Monitor) ∙∙True Color ∙∙Live Update ∙∙DPC Latency tuner ∙∙Speed Up Please refer to http://download.msi.

User Manual
Page 17
Special Features Continued from previous page ∙∙ Audio ▪▪Audio Boost ∙∙ Storage ▪▪Turbo M.2 ▪▪Intel® Optane Memory Ready ∙∙ Fan ▪▪Smart Fan Control ∙∙ LED ▪▪Mystic Light ▪▪Mystic Light Extension (RGB) &#...
Special Features Continued from previous page ∙∙ Audio ▪▪Audio Boost ∙∙ Storage ▪▪Turbo M.2 ▪▪Intel® Optane Memory Ready ∙∙ Fan ▪▪Smart Fan Control ∙∙ LED ▪▪Mystic Light ▪▪Mystic Light Extension (RGB) &#...

User Manual
Page 27
http://youtu.be/JCTFABytrYA ⚠⚠Important ∙∙Intel® RST only supports PCIe M.2 SSD with UEFI ROM. ∙∙Intel® Optane™ Memory Ready for the M2_2 slot only. M2_1~2: M.2 Slots (Key M) M2_1 M2_2 ⚽⚽Video Demonstration Watch the video to learn how to Install M.2 module. Loosen the screws of Components 27 Remove the M.2 SHIELD FROZR and remove the protective films from the thermal pads. 1 2 1 Overview of M.2 SHIELD FROZR heatsink. 2. Installing M.2 module 1.
http://youtu.be/JCTFABytrYA ⚠⚠Important ∙∙Intel® RST only supports PCIe M.2 SSD with UEFI ROM. ∙∙Intel® Optane™ Memory Ready for the M2_2 slot only. M2_1~2: M.2 Slots (Key M) M2_1 M2_2 ⚽⚽Video Demonstration Watch the video to learn how to Install M.2 module. Loosen the screws of Components 27 Remove the M.2 SHIELD FROZR and remove the protective films from the thermal pads. 1 2 1 Overview of M.2 SHIELD FROZR heatsink. 2. Installing M.2 module 1.

User Manual
Page 59
.... Skip this appendix. Press F10 to save configuration and exit, and then reboot and press Delete key to BIOS > SETTING > Advanced > Intel(R) Rapid Storage Technology submenu. Go to enter BIOS Setup menu. 6. Power on and press Delete key to create a combination of a RAID. Enabling... Intel® Rapid Storage Technology 1. Press F7 to switch to Enabled. 5. If you are using SATA storage devices. RAID Configuration 59 Go to BIOS ...
.... Skip this appendix. Press F10 to save configuration and exit, and then reboot and press Delete key to BIOS > SETTING > Advanced > Intel(R) Rapid Storage Technology submenu. Go to enter BIOS Setup menu. 6. Power on and press Delete key to create a combination of a RAID. Enabling... Intel® Rapid Storage Technology 1. Press F7 to switch to Enabled. 5. If you are using SATA storage devices. RAID Configuration 59 Go to BIOS ...

User Manual
Page 60
...4. The strip size should be chosen based on the planned drive usage. Go to the Create Volume field and press Enter to the Intel(R) Rapid Storage Technology menu. 60 RAID Configuration The available values range from 4KB to your usage model in the Capacity (MB) field. ...screen appears: 3. Select the capacity of 2 increments. The default value is the maximum volume capacity of the selected disks. 8. As previously mentioned, enable Intel(R) Rapid Storage Technology. 2. In the Select Disks field, press Space key or press Enter key and use the ↑↓ arrow keys to select...
...4. The strip size should be chosen based on the planned drive usage. Go to the Create Volume field and press Enter to the Intel(R) Rapid Storage Technology menu. 60 RAID Configuration The available values range from 4KB to your usage model in the Capacity (MB) field. ...screen appears: 3. Select the capacity of 2 increments. The default value is the maximum volume capacity of the selected disks. 8. As previously mentioned, enable Intel(R) Rapid Storage Technology. 2. In the Select Disks field, press Space key or press Enter key and use the ↑↓ arrow keys to select...

User Manual
Page 61
Select the Delete item and press Enter key to enter the RAID VOLUME INFO screen. 3. Select the RAID volume from the Intel(R) Rapid Storage Technology screen to delete the selected RAID volume. RAID Configuration 61 Select the Yes item and press Enter key to RAID and you ... the RAID volume, but please be noted that all data on RAID drives will become unbootable. 1. The following screen appears: 4. Go to BIOS > SETTING > Advanced > Intel(R) Rapid Storage Technology. 2.
Select the Delete item and press Enter key to enter the RAID VOLUME INFO screen. 3. Select the RAID volume from the Intel(R) Rapid Storage Technology screen to delete the selected RAID volume. RAID Configuration 61 Select the Yes item and press Enter key to RAID and you ... the RAID volume, but please be noted that all data on RAID drives will become unbootable. 1. The following screen appears: 4. Go to BIOS > SETTING > Advanced > Intel(R) Rapid Storage Technology. 2.

User Manual
Page 62
Go to enter PHYSICAL DISK INFO screen. 4. Select the disk and press Enter to BIOS > SETTING > Advanced > Intel(R) Rapid Storage Technology. 2. The following screen appears: 5. Resetting Disks to Non-RAID could include issues such as incompatible RAID configurations or a failed ...accept the disk reseting. ⚠⚠Important ∙∙You will lose all data on the RAID drives and any RAID structures from the Intel(R) Rapid Storage Technology screen to delete the RAID volume and remove any internal RAID structures when you perform this operation. ∙∙Possible reasons...
Go to enter PHYSICAL DISK INFO screen. 4. Select the disk and press Enter to BIOS > SETTING > Advanced > Intel(R) Rapid Storage Technology. 2. The following screen appears: 5. Resetting Disks to Non-RAID could include issues such as incompatible RAID configurations or a failed ...accept the disk reseting. ⚠⚠Important ∙∙You will lose all data on the RAID drives and any RAID structures from the Intel(R) Rapid Storage Technology screen to delete the RAID volume and remove any internal RAID structures when you perform this operation. ∙∙Possible reasons...

User Manual
Page 63
RAID Configuration 63 Select the Degraded RAID volume from the Intel(R) Rapid Storage Technology screen to rebuild the new hard drive. Select the Rebuild item and press Enter key to enter the RAID VOLUME INFO screen. 5. ... to the current situation. 1. Rebuilding RAID Array A RAID 1, RAID 5 or RAID 10 volume is reported as Degraded when one that corresponds to BIOS > SETTING > Advanced > Intel(R) Rapid Storage Technology. 4. Replace the failed hard drive with a new one of equal or greater capacity. 3. As a result, the system can only utilize the remaining...
RAID Configuration 63 Select the Degraded RAID volume from the Intel(R) Rapid Storage Technology screen to rebuild the new hard drive. Select the Rebuild item and press Enter key to enter the RAID VOLUME INFO screen. 5. ... to the current situation. 1. Rebuilding RAID Array A RAID 1, RAID 5 or RAID 10 volume is reported as Degraded when one that corresponds to BIOS > SETTING > Advanced > Intel(R) Rapid Storage Technology. 4. Replace the failed hard drive with a new one of equal or greater capacity. 3. As a result, the system can only utilize the remaining...
User Manual
Page 64
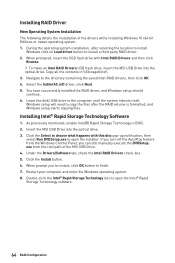
... setup starts copying files. Leave the disk/ USB drive in \\Storage\Intel\ 3. Click the Select to open the installer. Under the Drivers/Software tab, check the Intel RAID Drivers check-box. 5. Insert the MSI USB Drive into the optical drive. 3. exe from the Windows Control ... If you to restart, click OK button to open the Intel® Rapid Storage Technology software. 64 RAID Configuration You have successfully installed the RAID driver, and Windows setup should continue. 6. Insert the MSI USB Drive into the optical drive. Installing RAID Driver New Operating...
... setup starts copying files. Leave the disk/ USB drive in \\Storage\Intel\ 3. Click the Select to open the installer. Under the Drivers/Software tab, check the Intel RAID Drivers check-box. 5. Insert the MSI USB Drive into the optical drive. 3. exe from the Windows Control ... If you to restart, click OK button to open the Intel® Rapid Storage Technology software. 64 RAID Configuration You have successfully installed the RAID driver, and Windows setup should continue. 6. Insert the MSI USB Drive into the optical drive. Installing RAID Driver New Operating...
User Manual
Page 65
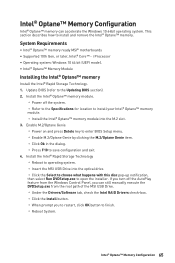
.... This section describes how to open the installer. System Requirements ∙∙Intel® Optane™ memory ready MSI® motherboards ∙∙Supported 10th Gen, or later, Intel® Core™ - Install the Intel® Rapid Storage Technology ▫▫Reboot to operating system. ▫▫...Optane™ memory module. ▫▫Power off the AutoPlay feature from the root path of the MSI USB Drive. ▫▫Under the Drivers/Software tab, check the Intel RAID Drivers check-box. ▫▫Click the Install button. ▫▫When prompt you to...
.... This section describes how to open the installer. System Requirements ∙∙Intel® Optane™ memory ready MSI® motherboards ∙∙Supported 10th Gen, or later, Intel® Core™ - Install the Intel® Rapid Storage Technology ▫▫Reboot to operating system. ▫▫...Optane™ memory module. ▫▫Power off the AutoPlay feature from the root path of the MSI USB Drive. ▫▫Under the Drivers/Software tab, check the Intel RAID Drivers check-box. ▫▫Click the Install button. ▫▫When prompt you to...

User Manual
Page 66
... older version of the BIOS. ∙∙ DO NOT remove the Intel® Optane™ memory module. ∙∙ DO NOT replace the CPU that is not supported by Intel® Optane™ Memory. 66 Intel® Optane™ Memory Configuration 5. Reboot System. ⚠⚠WARNING... Once you enable Intel® Optane™ memory, in order to prevent seriously damage your operating system,...
... older version of the BIOS. ∙∙ DO NOT remove the Intel® Optane™ memory module. ∙∙ DO NOT replace the CPU that is not supported by Intel® Optane™ Memory. 66 Intel® Optane™ Memory Configuration 5. Reboot System. ⚠⚠WARNING... Once you enable Intel® Optane™ memory, in order to prevent seriously damage your operating system,...

User Manual
Page 67
... Genie item. ▫▫Click Ok in the dialog. ▫▫Reboot System. 2. Remove the Intel® Optane™ memory module. ▫▫Power off the system. ▫▫Remove the Intel® Optane™ memory module. Intel® Optane™ Memory Configuration 67 Please follow the steps below to save configuration and...
... Genie item. ▫▫Click Ok in the dialog. ▫▫Reboot System. 2. Remove the Intel® Optane™ memory module. ▫▫Power off the system. ▫▫Remove the Intel® Optane™ memory module. Intel® Optane™ Memory Configuration 67 Please follow the steps below to save configuration and...
