

User Guide
Page 2
...and Pentium® are registered trademarks of M ICRO-STAR INTERNATIONAL. Revision History Revision V1.1 Revision History First release for K9NBPM2-FID Date September 2006 Technical Support If a problem arises with your system and no guarantee is a registered trademark of ...try the following help resources for FAQ, technical guide, BIOS updates, driver updates, and other countries. Netware® is a registered trademark of International Business Machines Corporation. Visit the MSI website for further guidance. Our products are registered trademarks of AMD Corporation...
...and Pentium® are registered trademarks of M ICRO-STAR INTERNATIONAL. Revision History Revision V1.1 Revision History First release for K9NBPM2-FID Date September 2006 Technical Support If a problem arises with your system and no guarantee is a registered trademark of ...try the following help resources for FAQ, technical guide, BIOS updates, driver updates, and other countries. Netware® is a registered trademark of International Business Machines Corporation. Visit the MSI website for further guidance. Our products are registered trademarks of AMD Corporation...

User Guide
Page 10
Setting Up the NVRAID BIOS B-3 Installing the RAID Driver (for bootable RAID Array B-7 NVIDIA IDE Driver/ RAID Utility Installation B-9 Installing the NVIDIA RAID Software Under Windows (for Non-bootable RAID Arr ay) ...B-9 Initializing and Using the Disk Array B-10 NVRAID Management ... One RAID Array to Another B-17 Hot Plug Array B-18 Initializing a RAID Array B-19 Rebuilding a RAID Array B-22 Synchronizing a RAID Array B-25 Appendix C nVidia System Driver C-1 nVidia System Driver Installation C-2 NVIDIA System Driver C-2 nVidia Utility Installation C-5 x
Setting Up the NVRAID BIOS B-3 Installing the RAID Driver (for bootable RAID Array B-7 NVIDIA IDE Driver/ RAID Utility Installation B-9 Installing the NVIDIA RAID Software Under Windows (for Non-bootable RAID Arr ay) ...B-9 Initializing and Using the Disk Array B-10 NVRAID Management ... One RAID Array to Another B-17 Hot Plug Array B-18 Initializing a RAID Array B-19 Rebuilding a RAID Array B-22 Synchronizing a RAID Array B-25 Appendix C nVidia System Driver C-1 nVidia System Driver Installation C-2 NVIDIA System Driver C-2 nVidia Utility Installation C-5 x

User Guide
Page 15
Packing Checklist Getting Started MSI motherboard MSI Driver/Utility CD Standard Cable for IDE Devices Power Cable SATA Cable Back IO Shield User's Guide * The pictures are for reference only and may vary from the packing contents of the product you purchased. 1-5
Packing Checklist Getting Started MSI motherboard MSI Driver/Utility CD Standard Cable for IDE Devices Power Cable SATA Cable Back IO Shield User's Guide * The pictures are for reference only and may vary from the packing contents of the product you purchased. 1-5

User Guide
Page 54
... and you disable the function, but if the button is pressed for more than four seconds, the computer is detected. Therefore, if the AGP driver of the card does not support the initialization feature, the display may work abnormally or not function after a power failure or interrupt occurs. Restore ... Event Setup Press and the following sub-menu appears. If you choose Specific Key, the power button on the case will need an AGP driver to initialize the VGA card. Resume From S3 by PS/2 MS This setting determines whether the system will reboot after resuming from what power ...
... and you disable the function, but if the button is pressed for more than four seconds, the computer is detected. Therefore, if the AGP driver of the card does not support the initialization feature, the display may work abnormally or not function after a power failure or interrupt occurs. Restore ... Event Setup Press and the following sub-menu appears. If you choose Specific Key, the power button on the case will need an AGP driver to initialize the VGA card. Resume From S3 by PS/2 MS This setting determines whether the system will reboot after resuming from what power ...

User Guide
Page 63
or 8- Click the audio icon from the Control Panel. It is also available to enable the audio driver by clicking the Azalia HD Sound Effect Manager from the system tray at the lower-right corner of the screen to use the 2-, 4-, 6- Double click / A-2 MS-7252 Mainboard Software Configuration After installing the NVIDIA C51/ MCP51NBP System Driver, you are able to activate the HD Audio Configuration. channel audio feature now.
or 8- Click the audio icon from the Control Panel. It is also available to enable the audio driver by clicking the Azalia HD Sound Effect Manager from the system tray at the lower-right corner of the screen to use the 2-, 4-, 6- Double click / A-2 MS-7252 Mainboard Software Configuration After installing the NVIDIA C51/ MCP51NBP System Driver, you are able to activate the HD Audio Configuration. channel audio feature now.

User Guide
Page 77
A-16 Switch it provides some information about this utility by choosing from the Language list. Also there is a selection Show icon in the system tray. MS-7252 Mainboard Information In this tab it on the icon and the Audio Accessories dialogue box will show in system tray. Right-click on and an icon will appear which provides several multimedia features for you to take advantage of this HD Audio Configuration utility, including Audio Driver Version, DirectX Version, Audio Controller & Audio Codec. You may also select the language of .
A-16 Switch it provides some information about this utility by choosing from the Language list. Also there is a selection Show icon in the system tray. MS-7252 Mainboard Information In this tab it on the icon and the Audio Accessories dialogue box will show in system tray. Right-click on and an icon will appear which provides several multimedia features for you to take advantage of this HD Audio Configuration utility, including Audio Driver Version, DirectX Version, Audio Controller & Audio Codec. You may also select the language of .
User Guide
Page 84
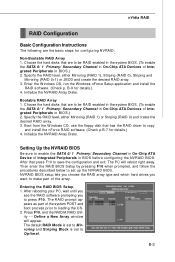
..., and the NVIDIA RAID Utility --- nVidia RAID RAID Configuration Basic Configuration Instructions The following are the basic steps for details.) 4. After that has the RAID driver to copy and install the nForce RAID software. (Check p.B-7 for details.) 4. Then enter the RAID BIOS Setup by pressing F10 when prompted, and follow the...
..., and the NVIDIA RAID Utility --- nVidia RAID RAID Configuration Basic Configuration Instructions The following are the basic steps for details.) 4. After that has the RAID driver to copy and install the nForce RAID software. (Check p.B-7 for details.) 4. Then enter the RAID BIOS Setup by pressing F10 when prompted, and follow the...

User Guide
Page 87
... press N. Now that you have set up . 3. Use the arrow keys to set up , then press Enter. If you want to configure and load NVRAID drivers under W indows, as empty and wipe out all its contents then press C. 5. At the prompt, press Y to wipe out all the data from the RAID...
... press N. Now that you have set up . 3. Use the arrow keys to set up , then press Enter. If you want to configure and load NVRAID drivers under W indows, as empty and wipe out all its contents then press C. 5. At the prompt, press Y to wipe out all the data from the RAID...

User Guide
Page 88
Insert the MSI CD into the CD-ROM drive. 2. The follow the instruction below to make an nVIDIA Serial ATA RAID driver for bootable RAID Array) 1. Copy all the contents in the :\\Chipset\nsip2KXP\IDE\Win XP or Win2K \sataraid to appear. 3. Press F6 and ... screen, then press Enter. (4) Select "NVIDIA NForce Storage Controller" and then press Enter. The W indows Setup screen appears as below: Important Please follow - The driver disk for the W indows Setup screen to a formatted floppy disk. 4. Click the "Browse CD" on the Setup screen. 3. ing W indows Setup screen appears ...
Insert the MSI CD into the CD-ROM drive. 2. The follow the instruction below to make an nVIDIA Serial ATA RAID driver for bootable RAID Array) 1. Copy all the contents in the :\\Chipset\nsip2KXP\IDE\Win XP or Win2K \sataraid to appear. 3. Press F6 and ... screen, then press Enter. (4) Select "NVIDIA NForce Storage Controller" and then press Enter. The W indows Setup screen appears as below: Important Please follow - The driver disk for the W indows Setup screen to a formatted floppy disk. 4. Click the "Browse CD" on the Setup screen. 3. ing W indows Setup screen appears ...

User Guide
Page 89
... W indows XP is completely installed, it is recommended that you add a new hard drive to a RAID array, the RAID driver will have to be installed under Windows once for that , the driver will not have to leave the floppy disk inserted in the floppy drive until the blue screen portion of W indows...
... W indows XP is completely installed, it is recommended that you add a new hard drive to a RAID array, the RAID driver will have to be installed under Windows once for that , the driver will not have to leave the floppy disk inserted in the floppy drive until the blue screen portion of W indows...

User Guide
Page 90
... Click Next and then follow the instructions. 4. After the reboot, initialize the newly created array. B-9 Select the modules that the "NVIDIA IDE Driver" is selected. Important You must be upgraded to run the setup application and install the RAID software which will not be sure to enable NVIDIA... installation is completed, be worked. 3. This section describes how to use the NVIDIA IDE Parallel ATA driver (as well as the Serial ATA driver if SATA is enabled) must install the NVIDIA IDE driver in order to reboot the PC. 5. Make sure that you do not install the NVIDIA IDE...
... Click Next and then follow the instructions. 4. After the reboot, initialize the newly created array. B-9 Select the modules that the "NVIDIA IDE Driver" is selected. Important You must be upgraded to run the setup application and install the RAID software which will not be sure to enable NVIDIA... installation is completed, be worked. 3. This section describes how to use the NVIDIA IDE Parallel ATA driver (as well as the Serial ATA driver if SATA is enabled) must install the NVIDIA IDE driver in order to reboot the PC. 5. Make sure that you do not install the NVIDIA IDE...

User Guide
Page 107
C-1 Installation of nVidia System Driver Appendix C nVidia System Driver MSI provides a setup CD along with your mainboard, which contains the required drivers for your system, and many other useful and powerful utility to bring you the best experience for your office professional working and for your home leisure entertainment.
C-1 Installation of nVidia System Driver Appendix C nVidia System Driver MSI provides a setup CD along with your mainboard, which contains the required drivers for your system, and many other useful and powerful utility to bring you the best experience for your office professional working and for your home leisure entertainment.

User Guide
Page 108
C-2 Click Next to install the driver correctly. 1. Please follow the following step to continue. Then the welcome dialogue will display. Click on the Driver tab and the screen below will display. NVIDIA System Driver This driver is only available for your W indows OS. MS-7252 Mainboard nVidia System Driver Installation Click on the NVIDIA C51/MCP51NBP System Driver button to install the NVIDIA System Drivers and Audio Driver for W indows 2000 and W indows XP operating system.
C-2 Click Next to install the driver correctly. 1. Please follow the following step to continue. Then the welcome dialogue will display. Click on the Driver tab and the screen below will display. NVIDIA System Driver This driver is only available for your W indows OS. MS-7252 Mainboard nVidia System Driver Installation Click on the NVIDIA C51/MCP51NBP System Driver button to install the NVIDIA System Drivers and Audio Driver for W indows 2000 and W indows XP operating system.

User Guide
Page 109
Then click Next. 3. All the components shown here will start installing the selected driver components automatically. 4. C-3 Click Next to be selected to continue. The system will be installed by default. Installation of nVidia System Driver 2. Then the following screen displays the available components to install. Then the following screen displays the information for the NVIDIA IDE SW Driver installation.
Then click Next. 3. All the components shown here will start installing the selected driver components automatically. 4. C-3 Click Next to be selected to continue. The system will be installed by default. Installation of nVidia System Driver 2. Then the following screen displays the available components to install. Then the following screen displays the information for the NVIDIA IDE SW Driver installation.

User Guide
Page 110
Click Yes to restart your computer or click No to continue. 6. MS-7252 Mainboard 5. Click Yes to restart it later. C-4 The following screen displays the installation of NVIDIA IDE SW Driver. Then the following screen indicates that the installation is complete.
Click Yes to restart your computer or click No to continue. 6. MS-7252 Mainboard 5. Click Yes to restart it later. C-4 The following screen displays the installation of NVIDIA IDE SW Driver. Then the following screen indicates that the installation is complete.

User Guide
Page 111
C-5 NVIDIA nTune Utility - Click on the NVIDIA Utility tab and the screen below will display. 3. Installation of nVidia System Driver nVidia Utility Installation 1. provides a safe and easy way to install it. Then click on the Utility tab and the screen below will display. 2. Click the nTune Utility icon to optimize PC performance.
C-5 NVIDIA nTune Utility - Click on the NVIDIA Utility tab and the screen below will display. 3. Installation of nVidia System Driver nVidia Utility Installation 1. provides a safe and easy way to install it. Then click on the Utility tab and the screen below will display. 2. Click the nTune Utility icon to optimize PC performance.


