
User Manual
Page 1
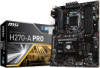
Motherboard Drivers & Utilities Disc Motherboard User Guide I/O Shield SATA Cable x2 Unpacking 1 Check to make sure your motherboard box contains the following items. If something is missing, contact your dealer as soon as possible. Unpacking Thank you for buying the MSI® H270-A PRO motherboard.
Motherboard Drivers & Utilities Disc Motherboard User Guide I/O Shield SATA Cable x2 Unpacking 1 Check to make sure your motherboard box contains the following items. If something is missing, contact your dealer as soon as possible. Unpacking Thank you for buying the MSI® H270-A PRO motherboard.

User Manual
Page 2
...can not step on it may cause the computer to not recognize a component or fail to the electrical outlet. y Keep this motherboard in an electrostatic shielding container or on the computer, ensure that your electrical outlet provides the same voltage as injury to prevent electrostatic...sure that there are prone to damage from electrostatic discharge (ESD). y Do not leave this user guide for future reference. y Store the motherboard in an environment above 60°C (140°F), it . y If any of the following instructions to avoid touching sensitive components. y Ensure...
...can not step on it may cause the computer to not recognize a component or fail to the electrical outlet. y Keep this motherboard in an electrostatic shielding container or on the computer, ensure that your electrical outlet provides the same voltage as injury to prevent electrostatic...sure that there are prone to damage from electrostatic discharge (ESD). y Do not leave this user guide for future reference. y Store the motherboard in an environment above 60°C (140°F), it . y If any of the following instructions to avoid touching sensitive components. y Ensure...

User Manual
Page 7
Installing the Motherboard 1 2 Quick Start 7 BAT1
Installing the Motherboard 1 2 Quick Start 7 BAT1

User Manual
Page 13
Contents Unpacking ...1 Safety Information 2 Quick Start ...3 Preparing Tools and Components 3 Installing a Processor 4 Installing DDR4 memory 5 Connecting the Front Panel Header 6 Installing the Motherboard 7 Installing SATA Drives 8 Installing a Graphics Card 9 Connecting Peripheral Devices 10 Connecting the Power Connectors 11 Power On...12 Specifications...15 Block Diagram ...19 Rear I/O Panel ......
Contents Unpacking ...1 Safety Information 2 Quick Start ...3 Preparing Tools and Components 3 Installing a Processor 4 Installing DDR4 memory 5 Connecting the Front Panel Header 6 Installing the Motherboard 7 Installing SATA Drives 8 Installing a Graphics Card 9 Connecting Peripheral Devices 10 Connecting the Power Connectors 11 Power On...12 Specifications...15 Block Diagram ...19 Rear I/O Panel ......
User Manual
Page 25
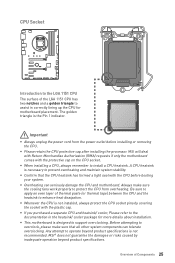
... to enhance heat dissipation. Be sure to apply an even layer of Components 25 MSI will deal with Return Merchandise Authorization (RMA) requests if only the motherboard comes with the plastic cap. MSI® does not guarantee the damages or risks caused by covering the socket with.... y Whenever the CPU is the Pin 1 indicator. y Confirm that all other system components can seriously damage the CPU and motherboard. y This motherboard is not recommended. y If you purchased a separate CPU and heatsink/ cooler, Please refer to support overclocking. The golden triangle is...
... to enhance heat dissipation. Be sure to apply an even layer of Components 25 MSI will deal with Return Merchandise Authorization (RMA) requests if only the motherboard comes with the plastic cap. MSI® does not guarantee the damages or risks caused by covering the socket with.... y Whenever the CPU is the Pin 1 indicator. y Confirm that all other system components can seriously damage the CPU and motherboard. y This motherboard is not recommended. y If you purchased a separate CPU and heatsink/ cooler, Please refer to support overclocking. The golden triangle is...

User Manual
Page 26
y Based on the motherboard. y It is recommended to the memory address limitation. y Please note that you to install 64-bit Windows OS if you want to install more efficient ...
y Based on the motherboard. y It is recommended to the memory address limitation. y Please note that you to install 64-bit Windows OS if you want to install more efficient ...
User Manual
Page 29
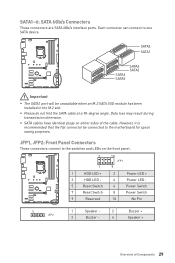
SATA2 SATA1 SATA6 SATA5 SATA4 SATA3 Important y The SATA1 port will be connected to the motherboard for space saving purposes. y Please do not fold the SATA cable at a 90-degree angle. y SATA cables have identical plugs on the front panel. 2 10 ...
SATA2 SATA1 SATA6 SATA5 SATA4 SATA3 Important y The SATA1 port will be connected to the motherboard for space saving purposes. y Please do not fold the SATA cable at a 90-degree angle. y SATA cables have identical plugs on the front panel. 2 10 ...

User Manual
Page 30
... to connect the optional serial port with bracket. 2 10 1 9 1 DCD 2 SIN 3 SOUT 4 DTR 5 Ground 6 DSR 7 RTS 8 CTS 9 RI 10 No Pin 30 Overview of the motherboard.
... to connect the optional serial port with bracket. 2 10 1 9 1 DCD 2 SIN 3 SOUT 4 DTR 5 Ground 6 DSR 7 RTS 8 CTS 9 RI 10 No Pin 30 Overview of the motherboard.
User Manual
Page 34
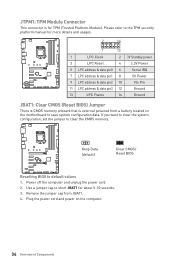
... located on the computer. 34 Overview of Components Power off the computer and unplug the power cord 2. Plug the power cord and power on the motherboard to the TPM security platform manual for more details and usages. 2 14 1 13 1 LPC Clock 2 3V Standby power 3 LPC Reset 4 5 LPC address & data pin0 6 3.3V...
... located on the computer. 34 Overview of Components Power off the computer and unplug the power cord 2. Plug the power cord and power on the motherboard to the TPM security platform manual for more details and usages. 2 14 1 13 1 LPC Clock 2 3V Standby power 3 LPC Reset 4 5 LPC address & data pin0 6 3.3V...
User Manual
Page 37
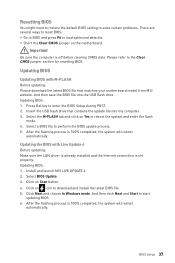
... for resetting BIOS. After the flashing process is off before clearing CMOS data. Insert the USB flash drive that matches your motherboard model from MSI website. Updating the BIOS with M-FLASH Before updating: Please download the latest BIOS file that contains the update file into the... drive. Updating BIOS: 1. Click on the motherboard. Select a BIOS file to load optimized defaults. And then click Next and Start to enter the BIOS Setup during POST. 2. And then save the BIOS file into the computer. 3. Install and launch MSI LIVE UPDATE 6. 2. Important Be sure the...
... for resetting BIOS. After the flashing process is off before clearing CMOS data. Insert the USB flash drive that matches your motherboard model from MSI website. Updating the BIOS with M-FLASH Before updating: Please download the latest BIOS file that contains the update file into the... drive. Updating BIOS: 1. Click on the motherboard. Select a BIOS file to load optimized defaults. And then click Next and Start to enter the BIOS Setup during POST. 2. And then save the BIOS file into the computer. 3. Install and launch MSI LIVE UPDATE 6. 2. Important Be sure the...

User Manual
Page 38
shows the CPU and motherboard temperatures. It allows you to select the language of BIOS setup. XMP switch Setup Mode switch Screenshot Search Language System information Temperature Boot device priority ...
shows the CPU and motherboard temperatures. It allows you to select the language of BIOS setup. XMP switch Setup Mode switch Screenshot Search Language System information Temperature Boot device priority ...

User Manual
Page 40
... get better performance. ƒ M-FLASH - provides the information of EZ Mode Overview section. y Menu display - please refer to the descriptions of installed devices on this motherboard. y BIOS menu selection - provides BIOS setting items and information to manage overclocking profiles. ƒ HARDWARE MONITOR - allows you to update BIOS with a USB flash drive...
... get better performance. ƒ M-FLASH - provides the information of EZ Mode Overview section. y Menu display - please refer to the descriptions of installed devices on this motherboard. y BIOS menu selection - provides BIOS setting items and information to manage overclocking profiles. ƒ HARDWARE MONITOR - allows you to update BIOS with a USB flash drive...

User Manual
Page 41
... keyed by BIOS. The time format is not displayed, turn off computer and re-check SATA cable and power cable connections of the device and motherboard. Important If the connected SATA device is . Read-only. The month from Sun to enter the sub-menu. Advanced f PCI Subsystem Settings Sets PCI, PCI...
... keyed by BIOS. The time format is not displayed, turn off computer and re-check SATA cable and power cable connections of the device and motherboard. Important If the connected SATA device is . Read-only. The month from Sun to enter the sub-menu. Advanced f PCI Subsystem Settings Sets PCI, PCI...
User Manual
Page 58
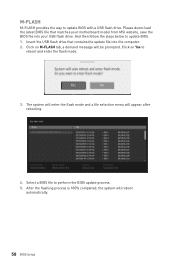
... mode. 3. Click on Yes to update BIOS with a USB flash drive. Please down-load the latest BIOS file that contains the update file into your motherboard model from MSI website, save the BIOS file into the computer. 2. Click on M-FLASH tab, a demand message will be prompted.
... mode. 3. Click on Yes to update BIOS with a USB flash drive. Please down-load the latest BIOS file that contains the update file into your motherboard model from MSI website, save the BIOS file into the computer. 2. Click on M-FLASH tab, a demand message will be prompted.

User Manual
Page 66
... threshold values. allows you press the Cooling button, all fans will pop-up. 66 Software Description y Record - y Sensor - When system detects the status over your motherboard temperature and fan speed with date and time. ƒ To make a history record: Select items and click the Record button. Option Buttons - When you to...
... threshold values. allows you press the Cooling button, all fans will pop-up. 66 Software Description y Record - y Sensor - When system detects the status over your motherboard temperature and fan speed with date and time. ƒ To make a history record: Select items and click the Record button. Option Buttons - When you to...

User Manual
Page 67
... Buttons - Gadget Mode COMMAND CENTER provides a gadget mode to the items. 3. Run MSI® COMMAND CENTER APP on your MSI® COMMAND CENTER APP to SoftAP with the built-in WiFi module. Information When click the Information button, The Motherboard, CPU, Memory and HW monitor icons will slide out. 2. Enable SoftAP Management. 4. Find...
... Buttons - Gadget Mode COMMAND CENTER provides a gadget mode to the items. 3. Run MSI® COMMAND CENTER APP on your MSI® COMMAND CENTER APP to SoftAP with the built-in WiFi module. Information When click the Information button, The Motherboard, CPU, Memory and HW monitor icons will slide out. 2. Enable SoftAP Management. 4. Find...

User Manual
Page 70
separately controls each segment of LEDs on your motherboard. y LED color - switches LEDs on your motherboard, graphics cards and extend LED strip. LED Area Selection LED ON/OFF y LED ON/OFF - y LED Area Selection - y Styles - select the LED style from the drop-down list. allows you to control LED lights on or off. applies the Styles settings to turn ON/ OFF the LED function. MYSTIC LIGHT MYSTIC function allows you change the LED color. allows you to LEDs. 70 Software Description y Apply Button - y LED effects -
separately controls each segment of LEDs on your motherboard. y LED color - switches LEDs on your motherboard, graphics cards and extend LED strip. LED Area Selection LED ON/OFF y LED ON/OFF - y LED Area Selection - y Styles - select the LED style from the drop-down list. allows you to control LED lights on or off. applies the Styles settings to turn ON/ OFF the LED function. MYSTIC LIGHT MYSTIC function allows you change the LED color. allows you to LEDs. 70 Software Description y Apply Button - y LED effects -

User Manual
Page 74
y Network Test - You can configure default internet upload and download bandwidth from the Network Test tab on the NETWORK MANAGER window. y Information - If your motherboard has a Wi-Fi module, NETWORK MANAGER provides virtual access point function for traffic shaping for your ping for online games. y Performance - y Advanced Setting - displays currently ...
y Network Test - You can configure default internet upload and download bandwidth from the Network Test tab on the NETWORK MANAGER window. y Information - If your motherboard has a Wi-Fi module, NETWORK MANAGER provides virtual access point function for traffic shaping for your ping for online games. y Performance - y Advanced Setting - displays currently ...

User Manual
Page 77
... memory type. y About Tab - y Caches Tab - y Memory Tab - CPU-Z CPU-Z is an utility that gathers information on your system. shows extended information related to the motherboard, including the size, type and frequency. shows memory type, memory size, channels, memory frequency. shows the CPU-Z version, Windows version, DirectX version and allows you...
... memory type. y About Tab - y Caches Tab - y Memory Tab - CPU-Z CPU-Z is an utility that gathers information on your system. shows extended information related to the motherboard, including the size, type and frequency. shows memory type, memory size, channels, memory frequency. shows the CPU-Z version, Windows version, DirectX version and allows you...
User Manual
Page 83
... volume. There is no network y Make sure the network chipset driver has been installed. y Verify if the network cable is turned on the motherboard rear IO panel. y Restart or reset your TCP/IP settings. y Check if all memory modules and try to go over troubleshooting guide first ...to install only one memory module in Windows® Device Manager. y Check if the power switch cable is set to the motherboard? y If 3 long beeps are heard, remove all ATX power connectors like ATX_PWR1, CPU_PWR1 are connected from the power supply to Keep DATA. ...
... volume. There is no network y Make sure the network chipset driver has been installed. y Verify if the network cable is turned on the motherboard rear IO panel. y Restart or reset your TCP/IP settings. y Check if all memory modules and try to go over troubleshooting guide first ...to install only one memory module in Windows® Device Manager. y Check if the power switch cable is set to the motherboard? y If 3 long beeps are heard, remove all ATX power connectors like ATX_PWR1, CPU_PWR1 are connected from the power supply to Keep DATA. ...


