
User Guide
Page 2
.... Alternatively, please try the following help resources for FAQ, technical guide, BIOS updates, driver updates, and other countries. Visit the MSI website for further guidance. Trademarks All trademarks are the properties of Intel Corporation. Our products are registered trademarks of American Megatrends Inc. ...we reserve the right to the correctness of NVIDIA Corporation in this document, but no solution can be obtained from the user's manual, please contact your system and no guarantee is given as to make changes without notice. AMI® is the intellectual property...
.... Alternatively, please try the following help resources for FAQ, technical guide, BIOS updates, driver updates, and other countries. Visit the MSI website for further guidance. Trademarks All trademarks are the properties of Intel Corporation. Our products are registered trademarks of American Megatrends Inc. ...we reserve the right to the correctness of NVIDIA Corporation in this document, but no solution can be obtained from the user's manual, please contact your system and no guarantee is given as to make changes without notice. AMI® is the intellectual property...

User Guide
Page 3
...equipment should be - Place the power cord such a way that could damage or cause electrical s h oc k . 11. iii Keep this User's Manual for air convection hence protects the equip- Always Unplug the Power Cord before setting it up. 5. Replac e only with the same or equivalent type ...ABOVE 600 C (1400F), IT MAYDAMAGE THE EQUIPMENT. Lay this equipment away from overheating. All cautions and warnings on it work according to User's Manual. † The equipment has dropped and damaged. † The equipment has obvious sign of the power source and adjust properly 110/220V be ...
...equipment should be - Place the power cord such a way that could damage or cause electrical s h oc k . 11. iii Keep this User's Manual for air convection hence protects the equip- Always Unplug the Power Cord before setting it up. 5. Replac e only with the same or equivalent type ...ABOVE 600 C (1400F), IT MAYDAMAGE THE EQUIPMENT. Lay this equipment away from overheating. All cautions and warnings on it work according to User's Manual. † The equipment has dropped and damaged. † The equipment has obvious sign of the power source and adjust properly 110/220V be ...

User Guide
Page 25
... if the memory module is properly seated. The memory module has only one notch on the memory module is deeply inserted in the DIMM slot. 3. Manually check if the memory module has been locked in the right orientation. 2. Insert the memory module vertically into the DIMM slot.
... if the memory module is properly seated. The memory module has only one notch on the memory module is deeply inserted in the DIMM slot. 3. Manually check if the memory module has been locked in the right orientation. 2. Insert the memory module vertically into the DIMM slot.

User Guide
Page 38
... usages. 12 11 21 Chassis Intrusion Connector: JCI1 This connector connects to a TPM (Trusted Platform Module) module (optional). Please refer to the TPM security platform manual for more details and usages. 2 14 1 13 Pin Signal Description 1 LCLK LPC clock 3 LRST# LPC reset 5 LAD0 LPC address & data pin0 7 LAD1 LPC address & data...
... usages. 12 11 21 Chassis Intrusion Connector: JCI1 This connector connects to a TPM (Trusted Platform Module) module (optional). Please refer to the TPM security platform manual for more details and usages. 2 14 1 13 Pin Signal Description 1 LCLK LPC clock 3 LRST# LPC reset 5 LAD0 LPC address & data pin0 7 LAD1 LPC address & data...

User Guide
Page 39
... 2 VCC 4 USB1- 6 USB1+ 8 GND 10 NC USB 2.0 Bracket Important Note that the pins of VCC and GND must be connected correctly to the GreenPower Genie manual for connecting high-speed USB interface peripherals such as USB HDD, digital cameras, MP3 players, printers, modems and the like. Please refer to avoid possible...
... 2 VCC 4 USB1- 6 USB1+ 8 GND 10 NC USB 2.0 Bracket Important Note that the pins of VCC and GND must be connected correctly to the GreenPower Genie manual for connecting high-speed USB interface peripherals such as USB HDD, digital cameras, MP3 players, printers, modems and the like. Please refer to avoid possible...

User Guide
Page 43
... Anti-aliasing. The following aspect appears in the Catalyst™ Control Center that needs to be enabled for more details, please consult the graphics card manual from the view drop menu. for CrossFire™ to operate.
... Anti-aliasing. The following aspect appears in the Catalyst™ Control Center that needs to be enabled for more details, please consult the graphics card manual from the view drop menu. for CrossFire™ to operate.

User Guide
Page 71
... synchronous DRAM is used to be determined by BIOS. tRAS This setting determines the time RAS takes to read command after receiving it. Setting to [Manual] allows you to run at 1N (N=clock cycles) rate. For further information please refer to set advanced memory timings. Memory Ratio This item allows you...
... synchronous DRAM is used to be determined by BIOS. tRAS This setting determines the time RAS takes to read command after receiving it. Setting to [Manual] allows you to run at 1N (N=clock cycles) rate. For further information please refer to set advanced memory timings. Memory Ratio This item allows you...
User Guide
Page 77
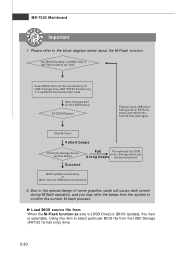
... file from " field Save changes and exit the BIOS setup SYSTEM Restart Please check USB drive/ Storage drive/ BIOS file status and reboot the system manually again. Using this item to [USB Drive] or [BIOS Update], this item is selectable. Due to the block diagram below about the M-Flash function...
... file from " field Save changes and exit the BIOS setup SYSTEM Restart Please check USB drive/ Storage drive/ BIOS file status and reboot the system manually again. Using this item to [USB Drive] or [BIOS Update], this item is selectable. Due to the block diagram below about the M-Flash function...

User Guide
Page 80
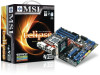
A-1 X-Fi Xtreme Audio Card Appendix A X-Fi Xtreme Audio Card The X-Fi Xtreme Audio card is powered by Creative CA0110 Audio chip. This manual will tell you about the specifications of the card, how to install it to a mainboard, how to connect 2, 4, 6, or 8 speakers to it, and to attach 2, 4, 6, or 8 speakers for better surround sound effect. It supports up to 8-channel & SPDIF audio effect and allows users to operate 2-, 4-, 6-, or 8-channel audio function.
A-1 X-Fi Xtreme Audio Card Appendix A X-Fi Xtreme Audio Card The X-Fi Xtreme Audio card is powered by Creative CA0110 Audio chip. This manual will tell you about the specifications of the card, how to install it to a mainboard, how to connect 2, 4, 6, or 8 speakers to it, and to attach 2, 4, 6, or 8 speakers for better surround sound effect. It supports up to 8-channel & SPDIF audio effect and allows users to operate 2-, 4-, 6-, or 8-channel audio function.

User Guide
Page 102
In the "System W arning" block, you can select desired values for manual overclocking. B-7 Click the arrow sign and the drop-down menu will appear below the button, then select a value. The system will appear. Simply click the ...
In the "System W arning" block, you can select desired values for manual overclocking. B-7 Click the arrow sign and the drop-down menu will appear below the button, then select a value. The system will appear. Simply click the ...


