
User Guide
Page 2
...trademark of American Megatrends Inc. func=service Contact our technical staff at: http://ocss.msi.com.tw ii Alternatively, please try the following help resources for FAQ, technical guide, BIOS updates, driver updates, and other countries. We take every care in the preparation of this document ...Intel® and Pentium® are registered trademarks or trademarks of NVIDIA Corporation in the United States and/or other information: http://global.msi.com.tw/index.php? Award® is the intellectual property of M ICRO-STAR INTERNATIONAL. AMD, Athlon™, Athlon™ XP,...
...trademark of American Megatrends Inc. func=service Contact our technical staff at: http://ocss.msi.com.tw ii Alternatively, please try the following help resources for FAQ, technical guide, BIOS updates, driver updates, and other countries. We take every care in the preparation of this document ...Intel® and Pentium® are registered trademarks or trademarks of NVIDIA Corporation in the United States and/or other information: http://global.msi.com.tw/index.php? Award® is the intellectual property of M ICRO-STAR INTERNATIONAL. AMD, Athlon™, Athlon™ XP,...

User Guide
Page 9
Appendix A X-Fi Xtreme Audio Card A-1 Introduction ...A-2 Hardware Installation A-4 Installing the Creative Audio Driver A-7 Software Configuration A-9 Appendix B Overclocking Center B-1 Activating Overclocking Center B-2 System Info ...B-3 DOT ...B-5 Appendix C Intel ICH10R SATA RAID C-1 Introduction ...C-2 BIOS Configuration C-3 Installing Driver C-10 Installing Software C-12 RAID Migration Instructions C-16 Recovery Volume Creation C-23 Degraded RAID Array C-27 Appendix D JMicron 362...
Appendix A X-Fi Xtreme Audio Card A-1 Introduction ...A-2 Hardware Installation A-4 Installing the Creative Audio Driver A-7 Software Configuration A-9 Appendix B Overclocking Center B-1 Activating Overclocking Center B-2 System Info ...B-3 DOT ...B-5 Appendix C Intel ICH10R SATA RAID C-1 Introduction ...C-2 BIOS Configuration C-3 Installing Driver C-10 Installing Software C-12 RAID Migration Instructions C-16 Recovery Volume Creation C-23 Degraded RAID Array C-27 Appendix D JMicron 362...
User Guide
Page 14
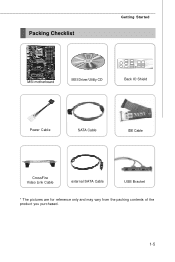
Packing Checklist Getting Started MSI motherboard MSI Driver/Utility CD Back IO Shield Power Cable SATA Cable IDE Cable CrossFire Video Link Cable external SATA Cable USB Bracket * The pictures are for reference only and may vary from the packing contents of the product you purchased. 1-5
Packing Checklist Getting Started MSI motherboard MSI Driver/Utility CD Back IO Shield Power Cable SATA Cable IDE Cable CrossFire Video Link Cable external SATA Cable USB Bracket * The pictures are for reference only and may vary from the packing contents of the product you purchased. 1-5
User Guide
Page 62
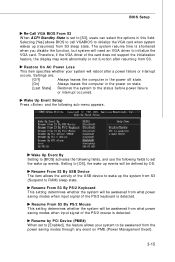
...card does not support the initialization feature, the display may work abnormally or not function after a power failure or interrupt occurs. Therefore, if the VGA driver of the PS/2 mouse is detected. Settings are: [Off] Always leaves the computer in the power off state. [On] Always leaves the computer...fields, and use the following sub-menu appears. Resume From S3 By PS/2 Keyboard This setting determines whether the system will need an VGA driver to RAM) sleep state. Resume From S3 By USB Device The item allows the activity of the PS/2 keyboard is shortened when you disable...
...card does not support the initialization feature, the display may work abnormally or not function after a power failure or interrupt occurs. Therefore, if the VGA driver of the PS/2 mouse is detected. Settings are: [Off] Always leaves the computer in the power off state. [On] Always leaves the computer...fields, and use the following sub-menu appears. Resume From S3 By PS/2 Keyboard This setting determines whether the system will need an VGA driver to RAM) sleep state. Resume From S3 By USB Device The item allows the activity of the PS/2 keyboard is shortened when you disable...

User Guide
Page 83
... your system. Select Audio Controller If your mainboard integrates audio function or an audio card installed, after installing the X-Fi Xtreme Audio Card and its driver, there will be selected and used at a time. Gently but firmly install the X-Fi Xtreme Audio Card to the computer. Reconnect the power cord to...
... your system. Select Audio Controller If your mainboard integrates audio function or an audio card installed, after installing the X-Fi Xtreme Audio Card and its driver, there will be selected and used at a time. Gently but firmly install the X-Fi Xtreme Audio Card to the computer. Reconnect the power cord to...
User Guide
Page 86
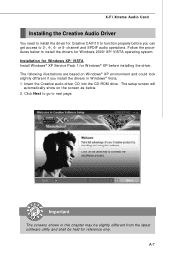
... The screens shown in W indows® Vista. 1. X-Fi Xtreme Audio Card Installing the Creative Audio Driver You need to install the driver for Creative CA0110 to function properly before installing the driver. Click Next to go to 2-, 4-, 6- The setup screen will automatically show on W indows®... A-7 or 8- Installation for Windows XP/ VISTA Install W indows® XP Service Pack 1 for W indows® XP before you install the drivers in this chapter may be slightly different from the latest software utility and shall be held for W indows 2000/ XP/ VISTA operating system. Insert ...
... The screens shown in W indows® Vista. 1. X-Fi Xtreme Audio Card Installing the Creative Audio Driver You need to install the driver for Creative CA0110 to function properly before installing the driver. Click Next to go to 2-, 4-, 6- The setup screen will automatically show on W indows®... A-7 or 8- Installation for Windows XP/ VISTA Install W indows® XP Service Pack 1 for W indows® XP before you install the drivers in this chapter may be slightly different from the latest software utility and shall be held for W indows 2000/ XP/ VISTA operating system. Insert ...

User Guide
Page 88
... corner of screen and a Creative MediaSource Go quick start bar Creative volume control icon A-9 X-Fi Xtreme Audio Card Software Configuration After installing the creative audio driver, you can move the mouse cursor to the top of the screen to activate the Sound Blaster X-Fi Xtreme Audio Applications, simply click on each...
... corner of screen and a Creative MediaSource Go quick start bar Creative volume control icon A-9 X-Fi Xtreme Audio Card Software Configuration After installing the creative audio driver, you can move the mouse cursor to the top of the screen to activate the Sound Blaster X-Fi Xtreme Audio Applications, simply click on each...
User Guide
Page 113
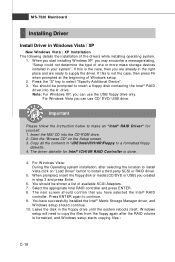
... a list of one or more mass storage devices installed in your system". Insert the MSI CD into the A: drive. You should continue. 10. The driver diskette for yourself. 1. Press the "S" key to continue. 9. MS-7520 Mainboard Installing Driver Install Driver in Windows Vista / XP † New Windows Vista / XP Installation The following details the...
... a list of one or more mass storage devices installed in your system". Insert the MSI CD into the A: drive. You should continue. 10. The driver diskette for yourself. 1. Press the "S" key to continue. 9. MS-7520 Mainboard Installing Driver Install Driver in Windows Vista / XP † New Windows Vista / XP Installation The following details the...
User Guide
Page 114
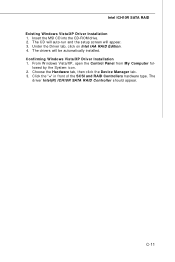
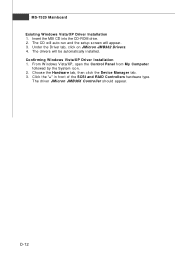
...then click the Device M anager tab. 3. From W indows Vista/XP, open the Control Panel from My Computer fol- The driver Intel(R) ICH10R SATA RAID Controller should appear. The drivers will appear. 3. Click the "+" in front of the SCSI and RAID Controllers hardware type. C-11 lowed by the System icon.... 2. Insert the MSI CD into the CD-ROM drive. 2. The CD will auto-run and the setup screen will be ...
...then click the Device M anager tab. 3. From W indows Vista/XP, open the Control Panel from My Computer fol- The driver Intel(R) ICH10R SATA RAID Controller should appear. The drivers will appear. 3. Click the "+" in front of the SCSI and RAID Controllers hardware type. C-11 lowed by the System icon.... 2. Insert the MSI CD into the CD-ROM drive. 2. The CD will auto-run and the setup screen will be ...
User Guide
Page 115
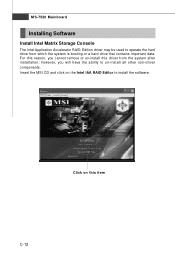
however, you cannot remove or un-install this driver from which the system is booting or a hard drive that contains important data. MS-7520 Mainboard Installing Software Install Intel Matrix Storage Console The Intel Application Accelerator RAID Edition driver may be used to un-install all other non-driver components. Click on the Intel IAA RAID Editor to install the software. For this item C-12 Insert the MSI CD and click on this reason, you will have the ability to operate the hard drive from the system after installation;
however, you cannot remove or un-install this driver from which the system is booting or a hard drive that contains important data. MS-7520 Mainboard Installing Software Install Intel Matrix Storage Console The Intel Application Accelerator RAID Edition driver may be used to un-install all other non-driver components. Click on the Intel IAA RAID Editor to install the software. For this item C-12 Insert the MSI CD and click on this reason, you will have the ability to operate the hard drive from the system after installation;
User Guide
Page 119
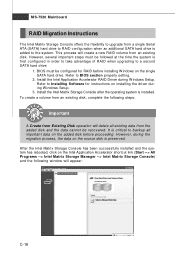
This process will delete all important data on installing the driver during W indows Setup. Refer to the system. To create a volume from an existing disk, complete the following window will appear: C-16 Install the Intel Matrix... is first configured in order to take advantage of RAID when upgrading to Installing Software for RAID before proceeding. Install the Intel Application Accelerator RAID Driver during W indows Setup. 3. MS-7520 Mainboard RAID Migration Instructions The Intel Matrix Storage Console offers the flexibility to upgrade from a single Serial ATA (SATA) hard...
This process will delete all important data on installing the driver during W indows Setup. Refer to the system. To create a volume from an existing disk, complete the following window will appear: C-16 Install the Intel Matrix... is first configured in order to take advantage of RAID when upgrading to Installing Software for RAID before proceeding. Install the Intel Application Accelerator RAID Driver during W indows Setup. 3. MS-7520 Mainboard RAID Migration Instructions The Intel Matrix Storage Console offers the flexibility to upgrade from a single Serial ATA (SATA) hard...
User Guide
Page 134
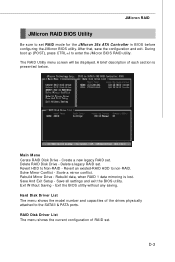
...configuration and exit. Exit the BIOS utiltiy without any saving. During boot up (POST), press CTRL+J to Non-RAID - Sovle a mirror conflict. Hard Disk Driver List The menu shows the model number and capacities of the drives physically attached to set . Delete RAID Disk Drive - Create a new legacy RAID set... Saving - JMicron RAID JMicron RAID BIOS Utility Be sure to the SATAII & PATA ports. Revert an existed-RAID HDD to non-RAID. RAID Disk Driver List The menu shows the current configuration of each section is lost. Save all settings and exit the BIOS utility.
...configuration and exit. Exit the BIOS utiltiy without any saving. During boot up (POST), press CTRL+J to Non-RAID - Sovle a mirror conflict. Hard Disk Driver List The menu shows the model number and capacities of the drives physically attached to set . Delete RAID Disk Drive - Create a new legacy RAID set... Saving - JMicron RAID JMicron RAID BIOS Utility Be sure to the SATAII & PATA ports. Revert an existed-RAID HDD to non-RAID. RAID Disk Driver List The menu shows the current configuration of each section is lost. Save all settings and exit the BIOS utility.
User Guide
Page 138
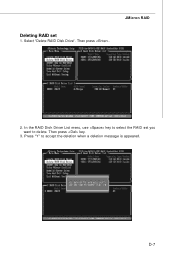
In the RAID Disk Driver List menu, use key to select the RAID set 1. Then press key. 3. Press "Y" to accept the deletion when a deletion message is appeared. Then press . D-7 Deleting RAID set you want to delete. JMicron RAID 2. Select "Delete RAID Disk Drive".
In the RAID Disk Driver List menu, use key to select the RAID set 1. Then press key. 3. Press "Y" to accept the deletion when a deletion message is appeared. Then press . D-7 Deleting RAID set you want to delete. JMicron RAID 2. Select "Delete RAID Disk Drive".
User Guide
Page 139
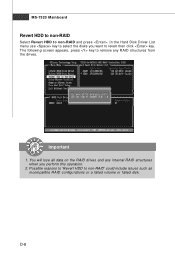
You will lose all data on the RAID drives and any RAID structures from the drives. Important 1. In the Hard Disk Driver List menu use key to revert then click key. The following screen appears, press key to remove any internal RAID structures when you want to select the disks you perform this operation. 2. D-8 Possible reasons to 'Revert HDD to non-RAID and press . MS-7520 Mainboard Revert HDD to non-RAID Select Revert HDD to non-RAID' could include issues such as incompatible RAID configurations or a failed volume or failed disk.
You will lose all data on the RAID drives and any RAID structures from the drives. Important 1. In the Hard Disk Driver List menu use key to revert then click key. The following screen appears, press key to remove any internal RAID structures when you want to select the disks you perform this operation. 2. D-8 Possible reasons to 'Revert HDD to non-RAID and press . MS-7520 Mainboard Revert HDD to non-RAID Select Revert HDD to non-RAID' could include issues such as incompatible RAID configurations or a failed volume or failed disk.
User Guide
Page 140
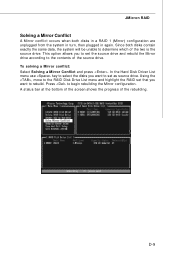
... Conflict and press . A status bar at the bottom of the screen shows the progress of the two is the source drive. In the Hard Disk Driver List menu use key to select the disks you want to set the source drive and rebuild the Mirror drive according to rebuild. D-9
... Conflict and press . A status bar at the bottom of the screen shows the progress of the two is the source drive. In the Hard Disk Driver List menu use key to select the disks you want to set the source drive and rebuild the Mirror drive according to rebuild. D-9

User Guide
Page 142
... prompted at the beginning of available SCSI Adapters. 6. Insert the MSI CD into the A: drive. W hen prompted, insert the floppy disk you can use the USB floppy drive only. Click the "Browse CD" on the "Load Driver" button to complete the RAID drive installation and the W indows... W indows Vista, please click on the Setup screen. 3. And then, follow the instruction below to insert a floppy disk containing the JMicron RAID driver into the CD-ROM drive. 2. Note: For W indows XP, you created in your system". Please refer the Important notice above to select "...
... prompted at the beginning of available SCSI Adapters. 6. Insert the MSI CD into the A: drive. W hen prompted, insert the floppy disk you can use the USB floppy drive only. Click the "Browse CD" on the "Load Driver" button to complete the RAID drive installation and the W indows... W indows Vista, please click on the Setup screen. 3. And then, follow the instruction below to insert a floppy disk containing the JMicron RAID driver into the CD-ROM drive. 2. Note: For W indows XP, you created in your system". Please refer the Important notice above to select "...
User Guide
Page 143
... followed by the System icon. 2. Insert the MSI CD into the CD-ROM drive. 2. Under the Driver tab, click on JMicron JMB362 Drivers. 4. The drivers will appear. 3. Choose the Hardware tab, then click the Device M anager tab. 3. The driver JMicron JM B36X Controller should appear. Click the ..."+" in front of the SCSI and RAID Controllers hardware type. D-12 The CD will auto-run and the setup screen will be automatically installed. † Confirming Windows Vista/XP Driver Installation 1. MS-7520 ...
... followed by the System icon. 2. Insert the MSI CD into the CD-ROM drive. 2. Under the Driver tab, click on JMicron JMB362 Drivers. 4. The drivers will appear. 3. Choose the Hardware tab, then click the Device M anager tab. 3. The driver JMicron JM B36X Controller should appear. Click the ..."+" in front of the SCSI and RAID Controllers hardware type. D-12 The CD will auto-run and the setup screen will be automatically installed. † Confirming Windows Vista/XP Driver Installation 1. MS-7520 ...
User Guide
Page 150
E-1 The DRIVER BOOSTER MANAGER solution supports RAID level 0 (striping), RAID level 1 (mirroring) and JBOD (Concatenate). JMicron RAID Appendix E Drive Booster Manager This appendix will assist users in configuring and enabling RAID functionality on platform.
E-1 The DRIVER BOOSTER MANAGER solution supports RAID level 0 (striping), RAID level 1 (mirroring) and JBOD (Concatenate). JMicron RAID Appendix E Drive Booster Manager This appendix will assist users in configuring and enabling RAID functionality on platform.
User Guide
Page 151
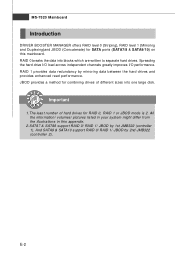
... data between the hard drives and provides enhanced read performance. And SATA9 & SATA10 support RAID 0/ RAID 1/ JBOD by 2nd JMB322 (controller 2). MS-7520 Mainboard Introduction DRIVER BOOSTER MANAGER offers RAID level 0 (Striping), RAID level 1 (Mirroring and Duplexing)and JBOD (Concatenate) for RAID 0, RAID 1 or JBOD mode is 2.
... data between the hard drives and provides enhanced read performance. And SATA9 & SATA10 support RAID 0/ RAID 1/ JBOD by 2nd JMB322 (controller 2). MS-7520 Mainboard Introduction DRIVER BOOSTER MANAGER offers RAID level 0 (Striping), RAID level 1 (Mirroring and Duplexing)and JBOD (Concatenate) for RAID 0, RAID 1 or JBOD mode is 2.


