User Manual
Page 14
Advanced Mode ...67 SETTINGS...68 Advanced...68 Boot...73 Security...74 Save & Exit...75 OC...77 M-FLASH...85 OC PROFILE...86 HARDWARE MONITOR 87 Nahimic 3...88 Installation and Update 88 Audio Tab...88 Microphone Tab...89 Sound Tracker Tab 90 Settings Tab...90 RAID Configuration 91 Enabling Intel® Rapid Storage Technology 91 Creating RAID Volume 92 Removing a RAID Volume 93 Resetting Disks to Non-RAID 94 Rebuilding RAID Array 95 Installing RAID Driver 96 Intel...
Advanced Mode ...67 SETTINGS...68 Advanced...68 Boot...73 Security...74 Save & Exit...75 OC...77 M-FLASH...85 OC PROFILE...86 HARDWARE MONITOR 87 Nahimic 3...88 Installation and Update 88 Audio Tab...88 Microphone Tab...89 Sound Tracker Tab 90 Settings Tab...90 RAID Configuration 91 Enabling Intel® Rapid Storage Technology 91 Creating RAID Volume 92 Removing a RAID Volume 93 Resetting Disks to Non-RAID 94 Rebuilding RAID Array 95 Installing RAID Driver 96 Intel...

User Manual
Page 57
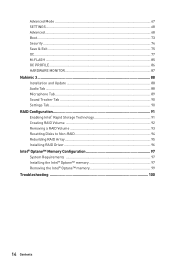
... module specific) DXE IPL is started CPU post-memory initialization. Configuring memory Memory initialization (other) Memory Installed CPU post-memory initialization is started Pre-memory PCH initialization (PCH module specific) Memory initialization. Boot Strap Processor (BSP) selection CPU post-memory initialization. Serial Presence Detect (SPD) data reading Memory initialization. Cache initialization CPU post-memory initialization. Debug Code LED Table SEC Progress Codes 01 Power on. Memory presence detection Memory initialization. Reset type detection (soft/hard) 02...
... module specific) DXE IPL is started CPU post-memory initialization. Configuring memory Memory initialization (other) Memory Installed CPU post-memory initialization is started Pre-memory PCH initialization (PCH module specific) Memory initialization. Boot Strap Processor (BSP) selection CPU post-memory initialization. Serial Presence Detect (SPD) data reading Memory initialization. Cache initialization CPU post-memory initialization. Debug Code LED Table SEC Progress Codes 01 Power on. Memory presence detection Memory initialization. Reset type detection (soft/hard) 02...
User Manual
Page 58
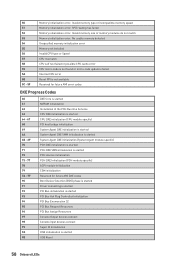
... PCH DXE Initialization (PCH module specific) ACPI module initialization CSM initialization Reserved for future AMI DXE codes Boot Device Selection (BDS) phase is started Driver connecting is started PCI Bus initialization is started PCI Bus Hot Plug Controller Initialization PCI Bus Enumeration 32 PCI Bus Request Resources PCI Bus Assign Resources Console Output devices connect Console input devices connect Super IO Initialization USB initialization is started USB Reset 58 Onboard LEDs Invalid memory size or memory modules do not match Memory initialization error. 50 51 52 53...
... PCH DXE Initialization (PCH module specific) ACPI module initialization CSM initialization Reserved for future AMI DXE codes Boot Device Selection (BDS) phase is started Driver connecting is started PCI Bus initialization is started PCI Bus Hot Plug Controller Initialization PCI Bus Enumeration 32 PCI Bus Request Resources PCI Bus Assign Resources Console Output devices connect Console input devices connect Super IO Initialization USB initialization is started USB Reset 58 Onboard LEDs Invalid memory size or memory modules do not match Memory initialization error. 50 51 52 53...
User Manual
Page 59
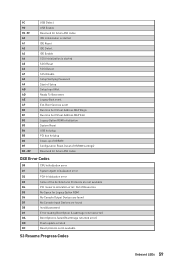
... settings) Reserved for Legacy Option ROM D6 No Console Output Devices are found D8 Invalid password D9 Error loading Boot Option (LoadImage returned error) DA Boot Option is failed (StartImage returned error) DB Flash update is failed DC Reset protocol is started SCSI Reset SCSI Detect SCSI Enable Setup Verifying Password Start of Setup Setup Input Wait Ready To Boot event Legacy Boot event Exit Boot Services event Runtime Set Virtual Address MAP Begin Runtime Set Virtual Address MAP End Legacy Option ROM Initialization System Reset USB hot plug PCI bus hot plug...
... settings) Reserved for Legacy Option ROM D6 No Console Output Devices are found D8 Invalid password D9 Error loading Boot Option (LoadImage returned error) DA Boot Option is failed (StartImage returned error) DB Flash update is failed DC Reset protocol is started SCSI Reset SCSI Detect SCSI Enable Setup Verifying Password Start of Setup Setup Input Wait Ready To Boot event Legacy Boot event Exit Boot Services event Runtime Set Virtual Address MAP Begin Runtime Set Virtual Address MAP End Legacy Option ROM Initialization System Reset USB hot plug PCI bus hot plug...
User Manual
Page 61
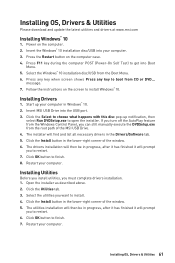
... the Windows® 10 installation disc/USB from the Boot Menu. 6. Click the Utilities tab. 3. Select the utilities you must complete drivers installation. 1. Restart your computer. Click the Install button in progress, after it has finished it will find and list all necessary drivers in Windows® 10. 2. Installing OS, Drivers & Utilities 61 Insert the Windows® 10 installation disc/USB into your computer in the Drivers/Software tab. 5. Power on the computer case. 4. Start...
... the Windows® 10 installation disc/USB from the Boot Menu. 6. Click the Utilities tab. 3. Select the utilities you must complete drivers installation. 1. Restart your computer. Click the Install button in progress, after it has finished it will find and list all necessary drivers in Windows® 10. 2. Installing OS, Drivers & Utilities 61 Insert the Windows® 10 installation disc/USB into your computer in the Drivers/Software tab. 5. Power on the computer case. 4. Start...

User Manual
Page 63
... press Del key during POST to enter BIOS. Updating BIOS: 1. Install and launch MSI CREATOR CENTER. 2. Click the M-FLASH button and click on Download icon to download and install the latest BIOS file. 5. Updating the BIOS with M-FLASH Before updating: Please download the latest BIOS file that contains the update file into the USB flash drive. And then click Next and Start to start recovering BIOS. 5. Updating BIOS Updating BIOS with MSI CREATOR CENTER Before updating: Make sure the LAN driver is already installed and the Internet connection is off before clearing CMOS data...
... press Del key during POST to enter BIOS. Updating BIOS: 1. Install and launch MSI CREATOR CENTER. 2. Click the M-FLASH button and click on Download icon to download and install the latest BIOS file. 5. Updating the BIOS with M-FLASH Before updating: Please download the latest BIOS file that contains the update file into the USB flash drive. And then click Next and Start to start recovering BIOS. 5. Updating BIOS Updating BIOS with MSI CREATOR CENTER Before updating: Make sure the LAN driver is already installed and the Internet connection is off before clearing CMOS data...
User Manual
Page 64
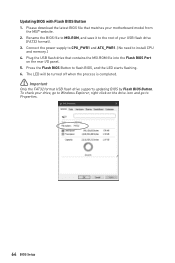
... format USB flash drive supports updating BIOS by Flash BIOS Button. Rename the BIOS file to MSI.ROM, and save it to Windows Explorer, right click on the rear I/O panel. 5. Connect the power supply to CPU_PWR1 and ATX_PWR1. (No need to flash BIOS, and the LED starts flashing. 6. Press the Flash BIOS Button to install CPU and memory.) 4. To check your drive, go to the root of your motherboard model from the MSI® website. 2. Please download the latest BIOS file that contains the MSI.ROM file into the Flash BIOS Port...
... format USB flash drive supports updating BIOS by Flash BIOS Button. Rename the BIOS file to MSI.ROM, and save it to Windows Explorer, right click on the rear I/O panel. 5. Connect the power supply to CPU_PWR1 and ATX_PWR1. (No need to flash BIOS, and the LED starts flashing. 6. Press the Flash BIOS Button to install CPU and memory.) 4. To check your drive, go to the root of your motherboard model from the MSI® website. 2. Please download the latest BIOS file that contains the MSI.ROM file into the Flash BIOS Port...

User Manual
Page 65
... any changes in the rightbottom corner. It allows you to configure the basic setting. BIOS Setup 65 EZ Mode At EZ mode, it to USB flash drive (FAT/ FAT32 format only). ∙∙ Search - The inner circle represents the current stage of BIOS setup. supported memory module is installed. ∙∙ Setup Mode switch - XMP switch Setup Mode switch Screenshot Search Language System information OC GENIE 4 switch Boot device priority bar Information display M-Flash Favorites Hardware Monitor Function buttons...
... any changes in the rightbottom corner. It allows you to configure the basic setting. BIOS Setup 65 EZ Mode At EZ mode, it to USB flash drive (FAT/ FAT32 format only). ∙∙ Search - The inner circle represents the current stage of BIOS setup. supported memory module is installed. ∙∙ Setup Mode switch - XMP switch Setup Mode switch Screenshot Search Language System information OC GENIE 4 switch Boot device priority bar Information display M-Flash Favorites Hardware Monitor Function buttons...

User Manual
Page 66
... LAN Option ROM, M.2/Optane Genie, Hardcore mode, AHCI, RAID, CPU Fan Fail Warning Control and BIOS Log Review by percentage. ∙∙ Favorites - Right-click or press F2 key. 3. The boot priority from favorite page 1. click on left to a favorite page (Favorite 1~5) 1. It allows you to manually control the fan speed by clicking on this button to display the Hardware Monitor menu that provides the way to maximize system performance. when enabled, set...
... LAN Option ROM, M.2/Optane Genie, Hardcore mode, AHCI, RAID, CPU Fan Fail Warning Control and BIOS Log Review by percentage. ∙∙ Favorites - Right-click or press F2 key. 3. The boot priority from favorite page 1. click on left to a favorite page (Favorite 1~5) 1. It allows you to manually control the fan speed by clicking on this button to display the Hardware Monitor menu that provides the way to maximize system performance. when enabled, set...

User Manual
Page 69
...Press Enter to utilize more than 4x GPUs. [Disabled] Disables this function. ▶▶ACPI Settings Sets ACPI parameters of onboard power LED behaviors. This item will appear when Onboard LAN Controller is enabled. [Enabled] Enables the onboard LAN Boot ROM. [Disabled] Disables the onboard LAN Boot ROM. ▶▶Network Stack [Disabled] Sets UEFI network stack for matching different installed devices. [Auto] This item will be configured automatically by BIOS. [Gen1] Enables PCIe Gen1 support only. [Gen2] Enables PCIe Gen2 support only. [Gen3] Enables PCIe Gen3 support only...
...Press Enter to utilize more than 4x GPUs. [Disabled] Disables this function. ▶▶ACPI Settings Sets ACPI parameters of onboard power LED behaviors. This item will appear when Onboard LAN Controller is enabled. [Enabled] Enables the onboard LAN Boot ROM. [Disabled] Disables the onboard LAN Boot ROM. ▶▶Network Stack [Disabled] Sets UEFI network stack for matching different installed devices. [Auto] This item will be configured automatically by BIOS. [Gen1] Enables PCIe Gen1 support only. [Gen2] Enables PCIe Gen2 support only. [Gen3] Enables PCIe Gen3 support only...

User Manual
Page 70
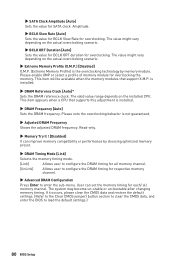
... USB Controller is enabled. [Enabled] Enables the Ipv6 PXE boot support. [Disabled] Disables the Ipv6 PXE boot support. ▶▶SATA Mode [AHCI Mode] Sets the operation mode of SATA storage device, such as Native Command Queuing (NCQ) and hot-plugging. [RAID Mode] Enables RAID function for SATA storage devices. ▶▶M2_X-RST Pcie Storage Remapping [Disabled] Enables or disables Intel Rapid Storage Technology for M.2 PCIe devices. ▶▶M.2/Optane Genie [Disabled] Enables or disables Intel RST support for M.2 SSDs or Optane memory. ▶▶SATAx Hot Plug [Disabled...
... USB Controller is enabled. [Enabled] Enables the Ipv6 PXE boot support. [Disabled] Disables the Ipv6 PXE boot support. ▶▶SATA Mode [AHCI Mode] Sets the operation mode of SATA storage device, such as Native Command Queuing (NCQ) and hot-plugging. [RAID Mode] Enables RAID function for SATA storage devices. ▶▶M2_X-RST Pcie Storage Remapping [Disabled] Enables or disables Intel Rapid Storage Technology for M.2 PCIe devices. ▶▶M.2/Optane Genie [Disabled] Enables or disables Intel RST support for M.2 SSDs or Optane memory. ▶▶SATAx Hot Plug [Disabled...

User Manual
Page 71
... enter BIOS setup if needed. It will not support S4 & S5 wake up by USB, PCI and PCIe devices. [Disabled] Disables this function. ▶▶Windows OS Configuration Sets Windows OS detailed configuration and behaviors. Press Enter to enter the sub-menu. ▶▶ErP Ready [Disabled] Enables or disables the system power consumption according to ErP regulation. [Enabled] Optimize the system power consumption according to boot the system. If set to Auto, BIOS will be disabled and fixed. [Disabled] Disables MSI Fast Boot...
... enter BIOS setup if needed. It will not support S4 & S5 wake up by USB, PCI and PCIe devices. [Disabled] Disables this function. ▶▶Windows OS Configuration Sets Windows OS detailed configuration and behaviors. Press Enter to enter the sub-menu. ▶▶ErP Ready [Disabled] Enables or disables the system power consumption according to ErP regulation. [Enabled] Optimize the system power consumption according to boot the system. If set to Auto, BIOS will be disabled and fixed. [Disabled] Disables MSI Fast Boot...

User Manual
Page 72
... BIOS UEFI/CSM Mode sets to UEFI. ▶▶Secure Boot Support [Disabled] Enables or disables secure boot support. [Enabled] Enables the secure boot function and allow you to set wake up events will automatically load the secure keys from BIOS. [Custom] Allows user to Custom. ▶▶Wake Up Event Setup Sets system wake up ) on a scheduled time/ date. [Disabled] Disables this function. ▶▶Secure Boot Mode [Standard] Selects the secure boot mode. Press Enter to enter the sub-menu. ▶▶Wake...
... BIOS UEFI/CSM Mode sets to UEFI. ▶▶Secure Boot Support [Disabled] Enables or disables secure boot support. [Enabled] Enables the secure boot function and allow you to set wake up events will automatically load the secure keys from BIOS. [Custom] Allows user to Custom. ▶▶Wake Up Event Setup Sets system wake up ) on a scheduled time/ date. [Disabled] Disables this function. ▶▶Secure Boot Mode [Standard] Selects the secure boot mode. Press Enter to enter the sub-menu. ▶▶Wake...

User Manual
Page 73
... any key on PS/2 keyboard is the best way to effectively wipe all data from a SSD. Boot Sets the sequence of system boot devices. ▶▶Resume By PCI-E Device [Disabled] Enables or disables the wake up function of installed PCI-E expansion cards, integrated LAN controllers or USB devices which are supported by third party integrated chips. [Enabled] Enables the system to be awakened from the power saving modes when activity or input signal of PCIe device...
... any key on PS/2 keyboard is the best way to effectively wipe all data from a SSD. Boot Sets the sequence of system boot devices. ▶▶Resume By PCI-E Device [Disabled] Enables or disables the wake up function of installed PCI-E expansion cards, integrated LAN controllers or USB devices which are supported by third party integrated chips. [Enabled] Enables the system to be awakened from the power saving modes when activity or input signal of PCIe device...
User Manual
Page 80
... (X.M.P.) [Disabled] X.M.P. (Extreme Memory Profile) is installed. ▶▶DRAM Frequency [Auto] Sets the DRAM frequency. Please note the overclocking behavior is installed. ▶▶DRAM Reference Clock [Auto]* Sets the DRAM reference clock. User can improve memory compatibility or performance by memory module. The system may become un-stable or un-bootable after changing memory timing. If it occurs, please clear the CMOS data and restore the default settings. (Refer to the Clear CMOS jumper/ button section to clear the CMOS data, and enter...
... (X.M.P.) [Disabled] X.M.P. (Extreme Memory Profile) is installed. ▶▶DRAM Frequency [Auto] Sets the DRAM frequency. Please note the overclocking behavior is installed. ▶▶DRAM Reference Clock [Auto]* Sets the DRAM reference clock. User can improve memory compatibility or performance by memory module. The system may become un-stable or un-bootable after changing memory timing. If it occurs, please clear the CMOS data and restore the default settings. (Refer to the Clear CMOS jumper/ button section to clear the CMOS data, and enter...

User Manual
Page 83
... a processor power management technology defined by ACPI. [Auto] This setting will be configured automatically by BIOS. [Enabled] Detects the idle state of C-state depend on the installed CPU. BIOS Setup 83 The options of system and reduce CPU power consumption accordingly. [Disabled] Disable this function. ▶▶Intel Adaptive Thermal Monitor [Enabled] Enables or disables the Intel adaptive thermal monitor function to the specific application. [Disabled] Enables the requested cache line only. ▶▶CPU AES Instructions [Enabled] Enables or disables...
... a processor power management technology defined by ACPI. [Auto] This setting will be configured automatically by BIOS. [Enabled] Detects the idle state of C-state depend on the installed CPU. BIOS Setup 83 The options of system and reduce CPU power consumption accordingly. [Disabled] Disable this function. ▶▶Intel Adaptive Thermal Monitor [Enabled] Enables or disables the Intel adaptive thermal monitor function to the specific application. [Disabled] Enables the requested cache line only. ▶▶CPU AES Instructions [Enabled] Enables or disables...
User Manual
Page 88
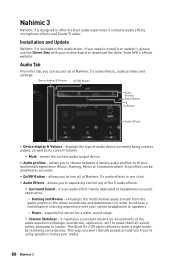
Device display & Volume On/Off Button Audio Profiles Reset Button Try Button Audio Effects ∙∙ Device display & Volume - If you need to retrieve a multichannel listening experience over your motherboard or download the driver from MSI's official website. virtualizes the multichannel audio stream from the game engine or the movie soundtrack and downmixes it in order to install it or update it, please use the Driver Disc with your stereo headphones...
Device display & Volume On/Off Button Audio Profiles Reset Button Try Button Audio Effects ∙∙ Device display & Volume - If you need to retrieve a multichannel listening experience over your motherboard or download the driver from MSI's official website. virtualizes the multichannel audio stream from the game engine or the movie soundtrack and downmixes it in order to install it or update it, please use the Driver Disc with your stereo headphones...
User Manual
Page 96
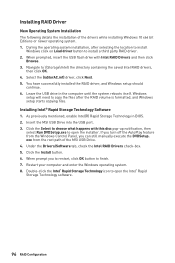
... the drivers while installing Windows 10 x64 bit Editions or newer operating system. 1. exe from the Windows Control Panel, you to restart, click OK button to open the Intel® Rapid Storage Technology software. 96 RAID Configuration Under the Drivers/Software tab, check the Intel RAID Drivers check-box. 5. When prompted, insert the USB flash drive with this disc pop-up notification, then select Run DVDSetup.exe to finish. 7. Windows setup will...
... the drivers while installing Windows 10 x64 bit Editions or newer operating system. 1. exe from the Windows Control Panel, you to restart, click OK button to open the Intel® Rapid Storage Technology software. 96 RAID Configuration Under the Drivers/Software tab, check the Intel RAID Drivers check-box. 5. When prompted, insert the USB flash drive with this disc pop-up notification, then select Run DVDSetup.exe to finish. 7. Windows setup will...
User Manual
Page 97
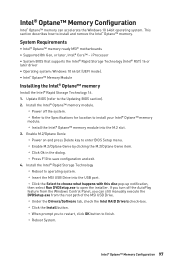
... later driver ∙∙Operating system: Windows 10 64 bit (UEFI mode). ∙∙Intel® Optane™ Memory Module Installing the Intel® Optane™ memory Install the Intel® Rapid Storage Technology 16. 1. Install the Intel® Rapid Storage Technology ▫▫Reboot to operating system. ▫▫Insert the MSI USB Drive into the M.2 slot. 3. Intel® Optane™ Memory Configuration Intel® Optane™ memory can still manually...
... later driver ∙∙Operating system: Windows 10 64 bit (UEFI mode). ∙∙Intel® Optane™ Memory Module Installing the Intel® Optane™ memory Install the Intel® Rapid Storage Technology 16. 1. Install the Intel® Rapid Storage Technology ▫▫Reboot to operating system. ▫▫Insert the MSI USB Drive into the M.2 slot. 3. Intel® Optane™ Memory Configuration Intel® Optane™ memory can still manually...
User Manual
Page 100
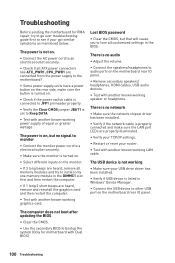
... the motherboard? ∙∙Some power supply units have a power button on the rear side, make sure the button is turned on. ∙∙Check if the power switch cable is connected to JFP1 pin header properly. ∙∙Verify the Clear CMOS jumper JBAT1 is properly connected and make sure the LAN port LEDs are heard, remove and reinstall the graphics card and then restart the computer. ∙∙Test with Dual BIOS) 100 Troubleshooting...
... the motherboard? ∙∙Some power supply units have a power button on the rear side, make sure the button is turned on. ∙∙Check if the power switch cable is connected to JFP1 pin header properly. ∙∙Verify the Clear CMOS jumper JBAT1 is properly connected and make sure the LAN port LEDs are heard, remove and reinstall the graphics card and then restart the computer. ∙∙Test with Dual BIOS) 100 Troubleshooting...


