User Guide
Page 2
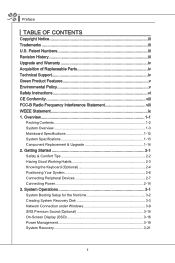
... Policy v Safety Instructions vi CE Conformity viii FCC-B Radio Frequency Interference Statement viii WEEE Statement ix 1. Patent Numbers iii Revision History iii Upgrade and Warranty iv Acquisition of contents Copyright Notice iii Trademarks iii U.S. System Operations 3-1 System Booting Setup for the first time 3-2 Creating System Recovery Disk 3-3 Network Connection under Windows 3-9 SRS Premium Sound (Optional 3-14 On-Screen Display (OSD 3-16 Power Management 3-19 System Recovery 3-21 ii
... Policy v Safety Instructions vi CE Conformity viii FCC-B Radio Frequency Interference Statement viii WEEE Statement ix 1. Patent Numbers iii Revision History iii Upgrade and Warranty iv Acquisition of contents Copyright Notice iii Trademarks iii U.S. System Operations 3-1 System Booting Setup for the first time 3-2 Creating System Recovery Disk 3-3 Network Connection under Windows 3-9 SRS Premium Sound (Optional 3-14 On-Screen Display (OSD 3-16 Power Management 3-19 System Recovery 3-21 ii
User Guide
Page 4
...; Visit the MSI website for FAQ, technical guide, BIOS updates, driver updates and other information via http://www.msi.com/index.php?func=service ◙ Contact our technical staff via http://www.msicomputer.com/msi_user/ msi_rma/ for the detailed information about the product users purchased, please contact the local dealer. To learn more about upgrade limitation, please refer to upgrade or replace any component...
...; Visit the MSI website for FAQ, technical guide, BIOS updates, driver updates and other information via http://www.msi.com/index.php?func=service ◙ Contact our technical staff via http://www.msicomputer.com/msi_user/ msi_rma/ for the detailed information about the product users purchased, please contact the local dealer. To learn more about upgrade limitation, please refer to upgrade or replace any component...
User Guide
Page 6
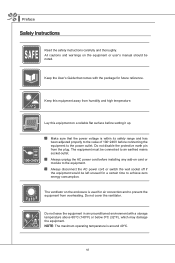
...card or module to the equipment. ◙ Always disconnect the AC power cord or switch the wall socket off if the equipment would be left unused for air convection and to the value of 100~240V before setting it up. ◙ Make ...cover the ventilator. All cautions and warnings on the enclosure is used for a certain time to the power outlet. Do not disable the protective earth pin from humidity and high temperature. The ventilator on the equipment or user's manual should be connected to an earthed mains socket-outlet. ◙ Always unplug the AC power cord before installing any add...
...card or module to the equipment. ◙ Always disconnect the AC power cord or switch the wall socket off if the equipment would be left unused for air convection and to the value of 100~240V before setting it up. ◙ Make ...cover the ventilator. All cautions and warnings on the enclosure is used for a certain time to the power outlet. Do not disable the protective earth pin from humidity and high temperature. The ventilator on the equipment or user's manual should be connected to an earthed mains socket-outlet. ◙ Always unplug the AC power cord before installing any add...

User Guide
Page 7
... drive. Replace only with ANSI/NFPA 70, the National Electrical Code (NEC), in particular Section 820.93, Grounding of Outer Conductive Shield of a Coaxial Cable. Always keep the strong magnetic or electrical objects away from the equipment. Place the power cord in accordance with the same or equivalent type recommended by service personnel: ◙ The power cord or plug...
... drive. Replace only with ANSI/NFPA 70, the National Electrical Code (NEC), in particular Section 820.93, Grounding of Outer Conductive Shield of a Coaxial Cable. Always keep the strong magnetic or electrical objects away from the equipment. Place the power cord in accordance with the same or equivalent type recommended by service personnel: ◙ The power cord or plug...

User Guide
Page 8
... the receiver is connected. ■ Consult the dealer or an experienced radio/television technician for help. This device complies with the instruction manual, may not cause harmful interference, and 2. Operation is in accordance with Part 15 of the FCC Rules. ▍ Preface CE Conformity Hereby, Micro Star International CO., LTD declares that this device is subject to the...
... the receiver is connected. ■ Consult the dealer or an experienced radio/television technician for help. This device complies with the instruction manual, may not cause harmful interference, and 2. Operation is in accordance with Part 15 of the FCC Rules. ▍ Preface CE Conformity Hereby, Micro Star International CO., LTD declares that this device is subject to the...
User Guide
Page 14
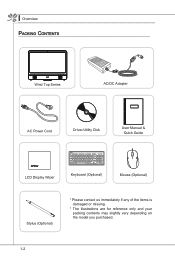
▍ Overview Packing Contents Wind Top Series AC/DC Adapter AC Power Cord Driver/Utility Disk User Manual & Quick Guide LCD Display Wiper Keyboard (Optional) Mouse (Optional) Stylus (Optional) * Please contact us immediately if any of the items is damaged or missing. * The illustrations are for reference only and your packing contents may slightly vary depending on the model you purchased. 1-2
▍ Overview Packing Contents Wind Top Series AC/DC Adapter AC Power Cord Driver/Utility Disk User Manual & Quick Guide LCD Display Wiper Keyboard (Optional) Mouse (Optional) Stylus (Optional) * Please contact us immediately if any of the items is damaged or missing. * The illustrations are for reference only and your packing contents may slightly vary depending on the model you purchased. 1-2
User Guide
Page 16
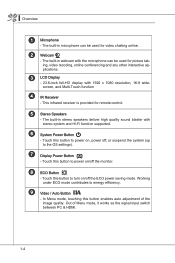
... function supported. 6 System Power Button - Working under ECO mode contributes to turn on , power off the monitor. 8 ECO Button - Touch this button enables auto adjustment of Menu mode, it works as the signal input switch between PC & HDMI. 1-4 Out of the image quality. ▍ Overview 1 Microphone - The built-in webcam with the microphone can be used for video chatting online. 2 Webcam - The built-in microphone can be used for remote control. 5 Stereo Speakers -
... function supported. 6 System Power Button - Working under ECO mode contributes to turn on , power off the monitor. 8 ECO Button - Touch this button enables auto adjustment of Menu mode, it works as the signal input switch between PC & HDMI. 1-4 Out of the image quality. ▍ Overview 1 Microphone - The built-in webcam with the microphone can be used for video chatting online. 2 Webcam - The built-in microphone can be used for remote control. 5 Stereo Speakers -

User Guide
Page 19
... avoid cable spaghetti when connecting devices. 6 Stand - The ventilator on a flat and stable surface. 7 Memory Compartment - Do not cover the ventilator. 2 B-CAS Card Reader Slot (Optional for B-CAS (Broadcast Satellite Conditional Access System) card. 3 Optical Disk Drive - This compartment stores system memory modules. 8 Mini PCI-E Card Compartment - This compartment stores mini PCI-E cards, such as mouse, keyboard, printer, scanner, camera, PDA or other USB-compatible devices. 5 Cable Routing Hole - The USB (Universal Serial Bus) port is optional.) 4 Card Reader Drive -
... avoid cable spaghetti when connecting devices. 6 Stand - The ventilator on a flat and stable surface. 7 Memory Compartment - Do not cover the ventilator. 2 B-CAS Card Reader Slot (Optional for B-CAS (Broadcast Satellite Conditional Access System) card. 3 Optical Disk Drive - This compartment stores system memory modules. 8 Mini PCI-E Card Compartment - This compartment stores mini PCI-E cards, such as mouse, keyboard, printer, scanner, camera, PDA or other USB-compatible devices. 5 Cable Routing Hole - The USB (Universal Serial Bus) port is optional.) 4 Card Reader Drive -
User Guide
Page 20
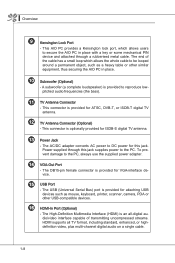
... Antenna Connector - The DB15-pin female connector is provided for VGA-interface device. 15 USB Port - ▍ Overview 9 Kensington Lock Port - This connector is an all TV format, including standard, enhanced, or highdefinition video, plus multi-channel digital audio on a single cable. 1-8 A subwoofer (a complete loudspeaker) is provided for ISDB-S digital TV antenna. 13 Power Jack - The end of transmitting uncompressed streams. HDMI supports all -digital audio/video...
... Antenna Connector - The DB15-pin female connector is provided for VGA-interface device. 15 USB Port - ▍ Overview 9 Kensington Lock Port - This connector is an all TV format, including standard, enhanced, or highdefinition video, plus multi-channel digital audio on a single cable. 1-8 A subwoofer (a complete loudspeaker) is provided for ISDB-S digital TV antenna. 13 Power Jack - The end of transmitting uncompressed streams. HDMI supports all -digital audio/video...

User Guide
Page 21
... power on the LAN. 10 Mbit/sec data rate is selected. 100 Mbit/sec data rate is selected. 1000 Mbit/sec data rate is provided for eSATA hard disk drives. 18 Headphone Jack - This connector is provided for connection to it. You can connect a network cable to the Local Area Network (LAN). The eSATA (external SATA) port is provided for headphones or speakers. 19 Microphone Jack - LAN...
... power on the LAN. 10 Mbit/sec data rate is selected. 100 Mbit/sec data rate is selected. 1000 Mbit/sec data rate is provided for eSATA hard disk drives. 18 Headphone Jack - This connector is provided for connection to it. You can connect a network cable to the Local Area Network (LAN). The eSATA (external SATA) port is provided for headphones or speakers. 19 Microphone Jack - LAN...

User Guide
Page 22
A DVD Super-Multi drive is integrated for your home entertainment. (Blu-ray is provided for Japanese ISDB-T/S only) - Insert a thin, straight object (such as a paper clip) into the eject hole to open the optical disk drive manually if the eject button does not work. 1-10 This slot is optional.) 3 Eject Button - Press the eject button to open the optical disk drive. 4 Eject Hole - ▍ Overview Side View 1 2 3 4 7 5 6 8 1 B-CAS Card Reader Slot (Optional for B-CAS (Broadcast Satellite Conditional Access System) card. 2 Optical Disk Drive -
A DVD Super-Multi drive is integrated for your home entertainment. (Blu-ray is provided for Japanese ISDB-T/S only) - Insert a thin, straight object (such as a paper clip) into the eject hole to open the optical disk drive manually if the eject button does not work. 1-10 This slot is optional.) 3 Eject Button - Press the eject button to open the optical disk drive. 4 Eject Hole - ▍ Overview Side View 1 2 3 4 7 5 6 8 1 B-CAS Card Reader Slot (Optional for B-CAS (Broadcast Satellite Conditional Access System) card. 2 Optical Disk Drive -

User Guide
Page 23
... is provided for attaching USB devices such as XD (eXtreme Digital), SD (Secure Digital), SDHC (SD High Capacity), MS (Memory Stick), MS Pro (Memory Stick Pro) or MMC (Multi-Media Card) cards that the supported memory cards may support various types of the HDD. The built-in devices like digital cameras, MP3 players, mobile phones and PDAs. Do not cover the ventilator. 8 Hard Disk Drive LED - Contact the local...
... is provided for attaching USB devices such as XD (eXtreme Digital), SD (Secure Digital), SDHC (SD High Capacity), MS (Memory Stick), MS Pro (Memory Stick Pro) or MMC (Multi-Media Card) cards that the supported memory cards may support various types of the HDD. The built-in devices like digital cameras, MP3 players, mobile phones and PDAs. Do not cover the ventilator. 8 Hard Disk Drive LED - Contact the local...
User Guide
Page 25
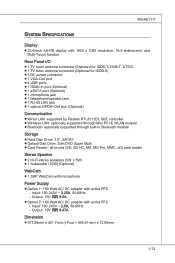
...1 DC power connector ■ 1 VGA-Out port ■ 4 USB ports ■ 1 HDMI-In port (Optional) ■ 1 eSATA port (Optional) ■ 1 microphone jack ■ 1 headphone/speaker jack ■ 1 RJ-45 LAN jack ■ 1 optical S/PDIF-Out jack (Optional) Communication ■ Wired LAN: supported by Realtek RTL8111DL GbE controller ■ Wireless LAN: optionally supported through Mini PCI-E WLAN module ■ Bluetooth: optionally supported through built-in Bluetooth module Storage ■ Hard Disk Drive: 3.5", SATAII ■ Optical Disk Drive: Slim DVD Super Multi ■ Card Reader...
...1 DC power connector ■ 1 VGA-Out port ■ 4 USB ports ■ 1 HDMI-In port (Optional) ■ 1 eSATA port (Optional) ■ 1 microphone jack ■ 1 headphone/speaker jack ■ 1 RJ-45 LAN jack ■ 1 optical S/PDIF-Out jack (Optional) Communication ■ Wired LAN: supported by Realtek RTL8111DL GbE controller ■ Wireless LAN: optionally supported through Mini PCI-E WLAN module ■ Bluetooth: optionally supported through built-in Bluetooth module Storage ■ Hard Disk Drive: 3.5", SATAII ■ Optical Disk Drive: Slim DVD Super Multi ■ Card Reader...
User Guide
Page 26
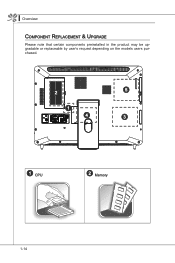
▍ Overview Component Replacement & Upgrade Please note that certain components preinstalled in the product may be upgradable or replaceable by user's request depending on the models users purchased. 2 5 1 4 3 1 CPU 2 Memory 1-14
▍ Overview Component Replacement & Upgrade Please note that certain components preinstalled in the product may be upgradable or replaceable by user's request depending on the models users purchased. 2 5 1 4 3 1 CPU 2 Memory 1-14

User Guide
Page 27
... replace any component of the product if you are not an authorized dealer or service center, since it may bring the product for repair along with the warranty card, purchase invoice or receipt to the MSI-authorized service center closest to your location for any further information on the product users purchased, please contact the local dealer. 3 Hard Disk Drive MS-AE1111 4 Mini PCI-E Card 5 Optical Disk Drive...
... replace any component of the product if you are not an authorized dealer or service center, since it may bring the product for repair along with the warranty card, purchase invoice or receipt to the MSI-authorized service center closest to your location for any further information on the product users purchased, please contact the local dealer. 3 Hard Disk Drive MS-AE1111 4 Mini PCI-E Card 5 Optical Disk Drive...

User Guide
Page 35
... for each device first if necessary, and then connect the device to the AIO PC. This AIO PC is capable of auto detecting the USB devices installed, and if there is no detection of the devices, please manually enable the USB devices by going to Start Menu / Control Panel / Add Hardware to connect peripheral devices. Connecting the USB Devices This AIO PC provides USB ports for connecting various USB devices, such as mouse, keyboard, digital camera, webcam, printer, external optical storage device,..
... for each device first if necessary, and then connect the device to the AIO PC. This AIO PC is capable of auto detecting the USB devices installed, and if there is no detection of the devices, please manually enable the USB devices by going to Start Menu / Control Panel / Add Hardware to connect peripheral devices. Connecting the USB Devices This AIO PC provides USB ports for connecting various USB devices, such as mouse, keyboard, digital camera, webcam, printer, external optical storage device,..

User Guide
Page 36
... supports standard, enhanced and high-definition video, plus multi-channel digital audio on a single cable. 2-8 HDMI (High Definition Multimedia Interface) is a graphics display system for PCs. ▍ Getting Started Connecting VGA-Out & HDMI-In Devices (Optional) This AIO PC provides a VGA port and an HDMI port for connection to carry analog video signals along with digital clock and data. VGA connectors and their associated cabling are always used solely to external monitors, projectors, set-top boxes, DVD...
... supports standard, enhanced and high-definition video, plus multi-channel digital audio on a single cable. 2-8 HDMI (High Definition Multimedia Interface) is a graphics display system for PCs. ▍ Getting Started Connecting VGA-Out & HDMI-In Devices (Optional) This AIO PC provides a VGA port and an HDMI port for connection to carry analog video signals along with digital clock and data. VGA connectors and their associated cabling are always used solely to external monitors, projectors, set-top boxes, DVD...
User Guide
Page 44
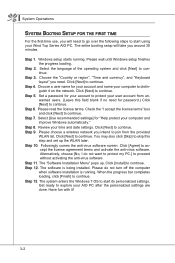
...", and "Keyboard layout" you need to go over the following steps to start its personalized settings. Click [Next] to join from unwanted users. (Leave this step and set up . Step 7. Review your computer and improve Windows automatically." Please choose a wireless network you intend to continue. Followingly comes the anti-virus software screen. The "Software Installation Menu" pops up the WLAN later. Step 12. Windows setup starts running . Step 3. Set a password for your...
...", and "Keyboard layout" you need to go over the following steps to start its personalized settings. Click [Next] to join from unwanted users. (Leave this step and set up . Step 7. Review your computer and improve Windows automatically." Please choose a wireless network you intend to continue. Followingly comes the anti-virus software screen. The "Software Installation Menu" pops up the WLAN later. Step 12. Windows setup starts running . Step 3. Set a password for your...

User Guide
Page 61
Power Management in Windows OS ■ [Power Options] in Windows OS allow you to sleep mode after a period of user inactivity. You may also finetune the settings by clicking [Change plan settings]. 3-19 To be energy efficient, turn off your display or set your PC to control the power management features of your personal needs. Then click on the [Power Options] link. Select a power plan that suits your display, hard drive, and battery. Go to save significant...
Power Management in Windows OS ■ [Power Options] in Windows OS allow you to sleep mode after a period of user inactivity. You may also finetune the settings by clicking [Change plan settings]. 3-19 To be energy efficient, turn off your display or set your PC to control the power management features of your personal needs. Then click on the [Power Options] link. Select a power plan that suits your display, hard drive, and battery. Go to save significant...

User Guide
Page 66
... no solution can be erased while all settings will format the whole HDD. Select [Hard Disk Recovery] only when your HDD is loading files ... 5. Select the [CD/DVD] device as the boot device and press [Enter] to boot from CD or DVD ... 4. The Windows OS starts loading files. Press any key to manufacturer default. The system recovery menu pops up. [Hard Disk Recovery] will be restored to reconfirm the selection when the following...
... no solution can be erased while all settings will format the whole HDD. Select [Hard Disk Recovery] only when your HDD is loading files ... 5. Select the [CD/DVD] device as the boot device and press [Enter] to boot from CD or DVD ... 4. The Windows OS starts loading files. Press any key to manufacturer default. The system recovery menu pops up. [Hard Disk Recovery] will be restored to reconfirm the selection when the following...


