
User Guide
Page 11
This is your best choice for purchasing the Wind Top AE1900 AIO PC. The feature packed platform also gives you an exciting PC experience. 1-1 It can easily be set anywhere. System Overview Chapter 1 System Overview Congratulations for all in one PC.
This is your best choice for purchasing the Wind Top AE1900 AIO PC. The feature packed platform also gives you an exciting PC experience. 1-1 It can easily be set anywhere. System Overview Chapter 1 System Overview Congratulations for all in one PC.

User Guide
Page 12
MS-6638 System Packing Contents Wind Top AE1900 AIO PC Power Adapter Power Cord MSI LCD Display Wiper Driver & Utility & Blank CD User M anual & Quick Guide Keyboard (Optional) Mouse (Optional) Stylus Touch Pen (Optional) * The blank CD is for system recovery backup. * Please contact us immediately if any of the item is damaged or missing. * The picture is for your reference only and your packing contents may slightly vary depending on the model you purchased. 1-2
MS-6638 System Packing Contents Wind Top AE1900 AIO PC Power Adapter Power Cord MSI LCD Display Wiper Driver & Utility & Blank CD User M anual & Quick Guide Keyboard (Optional) Mouse (Optional) Stylus Touch Pen (Optional) * The blank CD is for system recovery backup. * Please contact us immediately if any of the item is damaged or missing. * The picture is for your reference only and your packing contents may slightly vary depending on the model you purchased. 1-2

User Guide
Page 14
The built-in sleep mode and turns off . 1-4 The power indicator illuminates in green when the AIO PC is on, illuminates in orange when the AIO PC is off when the AIO PC is in stereo speakers deliver high quality sound blaster with stereo system and Hi-Fi function supported. 5 Power Indicator - MS-6638 System 4 Stereo Speakers -
The built-in sleep mode and turns off . 1-4 The power indicator illuminates in green when the AIO PC is on, illuminates in orange when the AIO PC is off when the AIO PC is in stereo speakers deliver high quality sound blaster with stereo system and Hi-Fi function supported. 5 Power Indicator - MS-6638 System 4 Stereo Speakers -
User Guide
Page 15
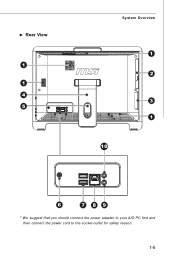
Rear View 1 1 4 5 System Overview 1 2 3 1 10 6 7 89 * We suggest that you should connect the power adapter to your AIO PC first and then connect the power cord to the socket-outlet for safety reason. 1-5
Rear View 1 1 4 5 System Overview 1 2 3 1 10 6 7 89 * We suggest that you should connect the power adapter to your AIO PC first and then connect the power cord to the socket-outlet for safety reason. 1-5

User Guide
Page 22
Step 2. Pull the stand open and tilt the LCD display to an angle of between 14 and 24 degrees to reduce your AIO PC on a flat and steady surface such as a table or desk. MS-6638 System Hardware Setup Positioning your preference. This helps to suit your AIO PC Step 1. Place your eye strain and muscle fatigue. 14 degrees 1-12 24 degrees
Step 2. Pull the stand open and tilt the LCD display to an angle of between 14 and 24 degrees to reduce your AIO PC on a flat and steady surface such as a table or desk. MS-6638 System Hardware Setup Positioning your preference. This helps to suit your AIO PC Step 1. Place your eye strain and muscle fatigue. 14 degrees 1-12 24 degrees

User Guide
Page 23
Step 3. Connect a network device to the LAN port and connect necessary audio devices to the USB ports on the rear panel. Connect a USB-interfaced mouse and keyboard to the audio jacks. NOTE: We suggest that you connect the power adapter to your AIO PC first and then connect the power cord to the power supply. Step 2. System Overview Connecting Peripheral Devices Step 1. Connect the power adapter to the socket-outlet for safety concerns. 1-13
Step 3. Connect a network device to the LAN port and connect necessary audio devices to the USB ports on the rear panel. Connect a USB-interfaced mouse and keyboard to the audio jacks. NOTE: We suggest that you connect the power adapter to your AIO PC first and then connect the power cord to the power supply. Step 2. System Overview Connecting Peripheral Devices Step 1. Connect the power adapter to the socket-outlet for safety concerns. 1-13

User Guide
Page 25
Getting Started Chapter 2 Getting Started Wind Top AE1900 AIO PC is accompanied with a glassy frame, which displays the simplicity of modern individualism and the comfort of cyberspace. 2-1 Furthermore, it is integrated in design, selecting an elegant black or white with the best computer features, such as instant message, low acoustics, energy saving and 802.11 b/ g/n wireless internet capability so you may roam freely in the realm of home.
Getting Started Chapter 2 Getting Started Wind Top AE1900 AIO PC is accompanied with a glassy frame, which displays the simplicity of modern individualism and the comfort of cyberspace. 2-1 Furthermore, it is integrated in design, selecting an elegant black or white with the best computer features, such as instant message, low acoustics, energy saving and 802.11 b/ g/n wireless internet capability so you may roam freely in the realm of home.

User Guide
Page 26
Step 2. MS-6638 System System Booting Setup for the First Time For the first-time use, you will take you need to go over the following steps to confirm the selected W indows version. 2-2 Select the language of operation system you around 25 minutes. Step 1. The entire booting setup will need . Click [OK] to start using your Wind Top Series AIO PC.
Step 2. MS-6638 System System Booting Setup for the First Time For the first-time use, you will take you need to go over the following steps to confirm the selected W indows version. 2-2 Select the language of operation system you around 25 minutes. Step 1. The entire booting setup will need . Click [OK] to start using your Wind Top Series AIO PC.

User Guide
Page 32
MS-6638 System Step 13. Wind Top Series AIO PC will automatically be ready for use from here. 2-8 Step 14. Click [Finish] and then the main page of MSI W ind Touch. Touch screen will be activated and post the default home page of W indows comes out.
MS-6638 System Step 13. Wind Top Series AIO PC will automatically be ready for use from here. 2-8 Step 14. Click [Finish] and then the main page of MSI W ind Touch. Touch screen will be activated and post the default home page of W indows comes out.
User Guide
Page 37
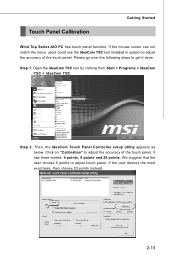
... has three modes: 4 points, 9 points and 25 points. Click on "Calibration" to adjust the accuracy of the touch panel. Step 2. Touch Panel Calibration Getting Started Wind Top Series AIO PC has touch panel function. Please go over the following steps to adjust touch panel.
... has three modes: 4 points, 9 points and 25 points. Click on "Calibration" to adjust the accuracy of the touch panel. Step 2. Touch Panel Calibration Getting Started Wind Top Series AIO PC has touch panel function. Please go over the following steps to adjust touch panel.
User Guide
Page 39
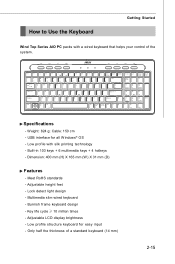
.... Low profile structure keyboard for all W indows® OS - USB interface for easy input - Multimedia slim wired keyboard - How to Use the Keyboard Getting Started Wind Top Series AIO PC packs with silk printing technology - W eight: 824 g;
.... Low profile structure keyboard for all W indows® OS - USB interface for easy input - Multimedia slim wired keyboard - How to Use the Keyboard Getting Started Wind Top Series AIO PC packs with silk printing technology - W eight: 824 g;
