User Guide
Page 2
...given as to make changes without notice. Alternatively, please try the following help resources for FAQ, technical guide, BIOS updates, driver updates, and other countries. W indows® 95/98/2000/NT/XP are registered trademarks or trademarks of NVIDIA Corporation in... and nForce are registered trademarks of Microsoft Corporation. PS/2 and OS®/2 are the properties of their respective owners. Visit the MSI website for further guidance. Award® is a registered trademark of American Megatrends Inc. Trademarks All trademarks are registered trademarks of International ...
...given as to make changes without notice. Alternatively, please try the following help resources for FAQ, technical guide, BIOS updates, driver updates, and other countries. W indows® 95/98/2000/NT/XP are registered trademarks or trademarks of NVIDIA Corporation in... and nForce are registered trademarks of Microsoft Corporation. PS/2 and OS®/2 are the properties of their respective owners. Visit the MSI website for further guidance. Award® is a registered trademark of American Megatrends Inc. Trademarks All trademarks are registered trademarks of International ...
User Guide
Page 10
...Failed Hard Drive Member B-21 Appendix C. Realtek ALC882M Audio D-1 Installation for W indows 2000/XP D-2 Installing the Realtek HD Audio Driver D-2 Software Configuration D-4 Sound Effect D-5 x Power On A-15 Power Off / Restart A-16 Auto Login A-17 Appendix B. ...Intel ICH7HD SATA RAID B-1 Using the Intel Matrix Stroage Manager Option ROM B-2 BIOS Configuration B-2 Installing Software B-8 Install Driver in W indows XP / 2000 B-9 Installation of Independent Disks C-2 RAID 0 (Striping C-2 RAID 1 (Mirroring C-2 JBOD (Concatenate C-2 Introduction ...
...Failed Hard Drive Member B-21 Appendix C. Realtek ALC882M Audio D-1 Installation for W indows 2000/XP D-2 Installing the Realtek HD Audio Driver D-2 Software Configuration D-4 Sound Effect D-5 x Power On A-15 Power Off / Restart A-16 Auto Login A-17 Appendix B. ...Intel ICH7HD SATA RAID B-1 Using the Intel Matrix Stroage Manager Option ROM B-2 BIOS Configuration B-2 Installing Software B-8 Install Driver in W indows XP / 2000 B-9 Installation of Independent Disks C-2 RAID 0 (Striping C-2 RAID 1 (Mirroring C-2 JBOD (Concatenate C-2 Introduction ...
User Guide
Page 16
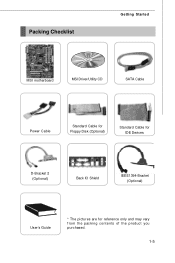
Packing Checklist Getting Started MSI motherboard MSI Driver/Utility CD SATA Cable Power Cable Standard Cable for Floppy Disk (Optional) Standard Cable for IDE Devices D-Bracket 2 (Optional) Back IO Shield IEEE1394-Bracket (Optional) User's Guide * The pictures are for reference only and may vary f rom the pac king c ontents of the product you p ur c h as ed . 1-5
Packing Checklist Getting Started MSI motherboard MSI Driver/Utility CD SATA Cable Power Cable Standard Cable for Floppy Disk (Optional) Standard Cable for IDE Devices D-Bracket 2 (Optional) Back IO Shield IEEE1394-Bracket (Optional) User's Guide * The pictures are for reference only and may vary f rom the pac king c ontents of the product you p ur c h as ed . 1-5
User Guide
Page 57
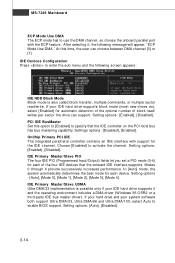
... of block read /write. Settings options: [Disabled], [Enabled]. Setting options : [Auto], [Mode 0], [Mode 1], [Mode 2], [Mode 3], [Mode 4]. After selecting it and the operating environment includes a DMA driver (W indows 95 OSR2 or a third-party IDE bus master driver). IDE Devices Configuration Press to activate the channel. Setting options: [Enabled], [Disabled].
... of block read /write. Settings options: [Disabled], [Enabled]. Setting options : [Auto], [Mode 0], [Mode 1], [Mode 2], [Mode 3], [Mode 4]. After selecting it and the operating environment includes a DMA driver (W indows 95 OSR2 or a third-party IDE bus master driver). IDE Devices Configuration Press to activate the channel. Setting options: [Enabled], [Disabled].

User Guide
Page 72
A-1 Moreover, with this unique utility, you will be able to activate the MSI well-known features, Live Update and Core Center, which makes it easier to update the BIOS/drivers online, and to monitor the system hardware status (CPU/Fan temperature and speed) or to monitor and configure all the integrated peripherals ..., MP3 files management and communication / 802.11g WLAN settings. Introduction to DigiCell Appendix A Introduction to DigiCell DigiCell, the most useful and powerful utility that MSI has spent much research and efforts to develop, helps users to overclock the CPU/memory.
A-1 Moreover, with this unique utility, you will be able to activate the MSI well-known features, Live Update and Core Center, which makes it easier to update the BIOS/drivers online, and to monitor the system hardware status (CPU/Fan temperature and speed) or to monitor and configure all the integrated peripherals ..., MP3 files management and communication / 802.11g WLAN settings. Introduction to DigiCell Appendix A Introduction to DigiCell DigiCell, the most useful and powerful utility that MSI has spent much research and efforts to develop, helps users to overclock the CPU/memory.
User Guide
Page 74
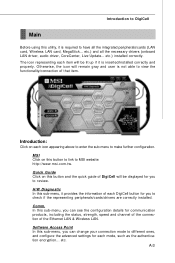
....tw. A-3 The icon representing each item will be displayed for you to review. MSI Click on this sub-menu, you can change your connection mode to different ones, and configure the advanced settings for each icon appearing above to... will remain gray and user is inserted/installed correctly and properly. Introduction: Click on this utility, it is required to have all the necessary drivers (onboard LAN driver, audio driver, CoreCenter, Live Update... H/W Diagnostic In this sub-menu, you can see the configuration details for communication products, including the status, strength, speed and...
....tw. A-3 The icon representing each item will be displayed for you to review. MSI Click on this sub-menu, you can change your connection mode to different ones, and configure the advanced settings for each icon appearing above to... will remain gray and user is inserted/installed correctly and properly. Introduction: Click on this utility, it is required to have all the necessary drivers (onboard LAN driver, audio driver, CoreCenter, Live Update... H/W Diagnostic In this sub-menu, you can see the configuration details for communication products, including the status, strength, speed and...
User Guide
Page 75
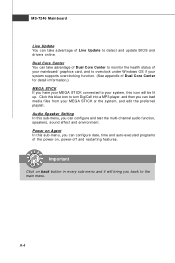
.... Power on Agent In this sub-menu, you can configure date, time and auto-executed programs of Live Update to detect and update BIOS and drivers online. A-4 MS-7246 Mainboard Live Update You can take advantage of Dual Core Center to monitor the health status of your mainboard/ graphics card, and...
.... Power on Agent In this sub-menu, you can configure date, time and auto-executed programs of Live Update to detect and update BIOS and drivers online. A-4 MS-7246 Mainboard Live Update You can take advantage of Dual Core Center to monitor the health status of your mainboard/ graphics card, and...
User Guide
Page 81
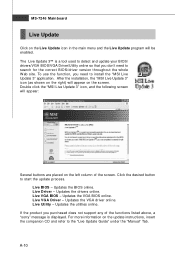
... the screen. Click the desired button to search for the correct BIOS/driver version throughout the whole W eb site. Live Driver - Updates the BIOS online. Updates the drivers online. Live VGA BIOS - Updates the VGA driver online. Live Utility - Double click the "MSI Live Update 3" icon, and the following screen will be enabled. To use...
... the screen. Click the desired button to search for the correct BIOS/driver version throughout the whole W eb site. Live Driver - Updates the BIOS online. Updates the drivers online. Live VGA BIOS - Updates the VGA driver online. Live Utility - Double click the "MSI Live Update 3" icon, and the following screen will be enabled. To use...
User Guide
Page 90
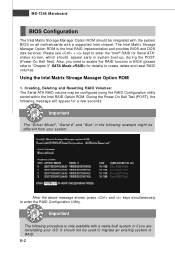
... and Resetting RAID Volumes: The Serial ATA RAID volume may be different from your OS. It should be integrated with the system BIOS on all motherboards with a newly-built system or if you need to enable the RAID function in BIOS (please refer to "Chapter 3" SATA Mode for Serial ATA...implementation and provides BIOS and DOS disk services. During the Power-On Self Test (POST), the following message will appear for a few seconds: Important The "Driver Model", "Serial #" and "Size" in system boot-up, during the POST (Power-On Self Test). MS-7246 Mainboard BIOS Configuration The Intel Matrix ...
... and Resetting RAID Volumes: The Serial ATA RAID volume may be different from your OS. It should be integrated with the system BIOS on all motherboards with a newly-built system or if you need to enable the RAID function in BIOS (please refer to "Chapter 3" SATA Mode for Serial ATA...implementation and provides BIOS and DOS disk services. During the Power-On Self Test (POST), the following message will appear for a few seconds: Important The "Driver Model", "Serial #" and "Size" in system boot-up, during the POST (Power-On Self Test). MS-7246 Mainboard BIOS Configuration The Intel Matrix ...
User Guide
Page 96
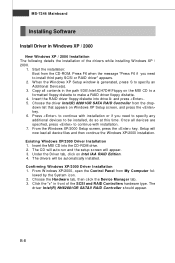
... to make a RAID driver floppy diskette. 4. Insert the MSI CD into drive A: and press . 5. The drivers will be installed, do so at this time. The driver Intel(R) NH82801GR SATAII RAID Controller should appear. Copy all contents in the path \IDE\Intel\ICH7DH\Floppy on the MSI CD to a formatted ...floppy diskette to specify an Additional Device(s). 3. down list that appears on Intel IAA RAID Edition. 4. Choose the Hardware tab, then click the Device M anager tab. 3. Choose the driver Intel(R) 82801GR SATA RAID Controller from...
... to make a RAID driver floppy diskette. 4. Insert the MSI CD into drive A: and press . 5. The drivers will be installed, do so at this time. The driver Intel(R) NH82801GR SATAII RAID Controller should appear. Copy all contents in the path \IDE\Intel\ICH7DH\Floppy on the MSI CD to a formatted ...floppy diskette to specify an Additional Device(s). 3. down list that appears on Intel IAA RAID Edition. 4. Choose the Hardware tab, then click the Device M anager tab. 3. Choose the driver Intel(R) 82801GR SATA RAID Controller from...
User Guide
Page 97
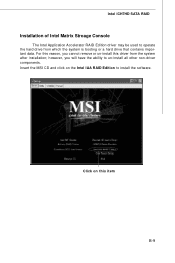
Click on the Intel IAA RAID Edition to install the software. For this reason, you will have the ability to operate the hard drive from the system after installation; however, you cannot remove or un-install this item B-9 Intel ICH7HD SATA RAID Installation of Intel Matrix Stroage Console The Intel Application Accelerator RAID Edition driver may be used to un-install all other non-driver components. Insert the MSI CD and click on this driver from which the system is booting or a hard drive that contains important data.
Click on the Intel IAA RAID Edition to install the software. For this reason, you will have the ability to operate the hard drive from the system after installation; however, you cannot remove or un-install this item B-9 Intel ICH7HD SATA RAID Installation of Intel Matrix Stroage Console The Intel Application Accelerator RAID Edition driver may be used to un-install all other non-driver components. Insert the MSI CD and click on this driver from which the system is booting or a hard drive that contains important data.
User Guide
Page 102
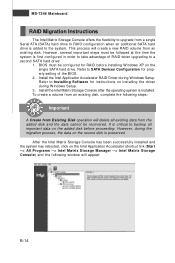
...at the time the system is first configured in order to take advantage of the BIOS. 2. Install the Intel Application Accelerator RAID Driver during W indows Setup. 3. After the Intel Matrix Storage Console has been successfully installed and the system has rebooted, click on the...following steps: Important A Create from Existing Disk operation will appear: B-14 However, during the migration process, the data on installing the driver during W indows Setup. Install the Intel Matrix Storage Console after the operating system is added to the system. Refer to SATA Devices ...
...at the time the system is first configured in order to take advantage of the BIOS. 2. Install the Intel Application Accelerator RAID Driver during W indows Setup. 3. After the Intel Matrix Storage Console has been successfully installed and the system has rebooted, click on the...following steps: Important A Create from Existing Disk operation will appear: B-14 However, during the migration process, the data on installing the driver during W indows Setup. Install the Intel Matrix Storage Console after the operating system is added to the system. Refer to SATA Devices ...
User Guide
Page 113
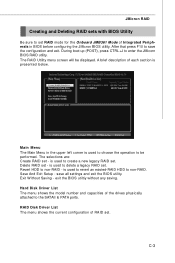
...press CTRL+J to non-RAID - Main Menu The Main Menu in BIOS before configuring the JMicron BIOS utility. Delete RAID set . RAID Disk Driver List The menu shows the current configuration of Integrated Peripherals in the upper left corner is used to create a new legacy RAID set . ... ports. The selections are: Create RAID set RAID mode for the Onboard JMB361 Mode of RAID set - Exit W ithout Saving - Hard Disk Driver List The menu shows the model number and capacities of each section is used to choose the operation to be displayed. is presented below. C-3 ...
...press CTRL+J to non-RAID - Main Menu The Main Menu in BIOS before configuring the JMicron BIOS utility. Delete RAID set . RAID Disk Driver List The menu shows the current configuration of Integrated Peripherals in the upper left corner is used to create a new legacy RAID set . ... ports. The selections are: Create RAID set RAID mode for the Onboard JMB361 Mode of RAID set - Exit W ithout Saving - Hard Disk Driver List The menu shows the model number and capacities of each section is used to choose the operation to be displayed. is presented below. C-3 ...
User Guide
Page 117
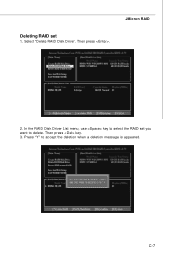
In the RAID Disk Driver List menu, use key to select the RAID set 1. Select "Delete RAID Disk Drive". C-7 Deleting RAID set you want to delete. Then press . JMicron RAID 2. Press "Y" to accept the deletion when a deletion message is appeared. Then press key. 3.
In the RAID Disk Driver List menu, use key to select the RAID set 1. Select "Delete RAID Disk Drive". C-7 Deleting RAID set you want to delete. Then press . JMicron RAID 2. Press "Y" to accept the deletion when a deletion message is appeared. Then press key. 3.
User Guide
Page 118
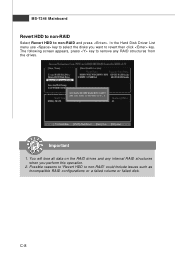
You will lose all data on the RAID drives and any RAID structures from the drives. Possible reasons to 'Revert HDD to non-RAID and press . C-8 The following screen appears, press key to remove any internal RAID structures when you want to select the disks you perform this operation. 2. Important 1. In the Hard Disk Driver List menu use key to revert then click key. MS-7246 Mainboard Revert HDD to non-RAID Select Revert HDD to non-RAID' could include issues such as incompatible RAID configurations or a failed volume or failed disk.
You will lose all data on the RAID drives and any RAID structures from the drives. Possible reasons to 'Revert HDD to non-RAID and press . C-8 The following screen appears, press key to remove any internal RAID structures when you want to select the disks you perform this operation. 2. Important 1. In the Hard Disk Driver List menu use key to revert then click key. MS-7246 Mainboard Revert HDD to non-RAID Select Revert HDD to non-RAID' could include issues such as incompatible RAID configurations or a failed volume or failed disk.
User Guide
Page 119
... set of the SCSI and RAID Controllers hardware type. Insert the MSI CD into drive A: and press . From W indows XP/2000, open the Control Panel from the CD-ROM. From the W indows XP/2000 Setup screen, press the key. The driver should be installed, do so at this time. Press F6 when...
... set of the SCSI and RAID Controllers hardware type. Insert the MSI CD into drive A: and press . From W indows XP/2000, open the Control Panel from the CD-ROM. From the W indows XP/2000 Setup screen, press the key. The driver should be installed, do so at this time. Press F6 when...
User Guide
Page 123
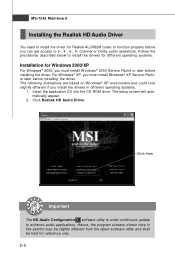
...look slightly different if you must install W indows® XP Service Pack1 or later before installing the driver. MS-7246 Mainboard Installing the Realtek HD Audio Driver You need to install the driver for Realtek ALC882M codec to function properly before you must install W indows® 2000 Service Pack4 ...or later before installing the driver. Hence, the program screens shown here in different operating systems. 1. For Windows® XP, you can get access to enhance audio ...
...look slightly different if you must install W indows® XP Service Pack1 or later before installing the driver. MS-7246 Mainboard Installing the Realtek HD Audio Driver You need to install the driver for Realtek ALC882M codec to function properly before you must install W indows® 2000 Service Pack4 ...or later before installing the driver. Hence, the program screens shown here in different operating systems. 1. For Windows® XP, you can get access to enhance audio ...
User Guide
Page 124
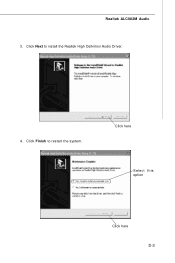
Click Finish to install the Realtek High Definition Audio Driver. 4. Click here Select this option Click here D-3 Click Next to restart the system. Realtek ALC882M Audio 3.
Click Finish to install the Realtek High Definition Audio Driver. 4. Click here Select this option Click here D-3 Click Next to restart the system. Realtek ALC882M Audio 3.
User Guide
Page 125
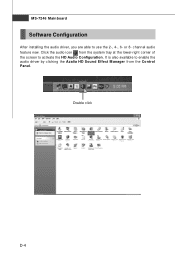
Click the audio icon from the Control Panel. It is also available to enable the audio driver by clicking the Azalia HD Sound Effect M anager from the system tray at the lower-right corner of the screen to use the 2-, 4-, 6- channel audio feature now. Double click D-4 MS-7246 Mainboard Software Configuration After installing the audio driver, you are able to activate the HD Audio Configuration. or 8-
Click the audio icon from the Control Panel. It is also available to enable the audio driver by clicking the Azalia HD Sound Effect M anager from the system tray at the lower-right corner of the screen to use the 2-, 4-, 6- channel audio feature now. Double click D-4 MS-7246 Mainboard Software Configuration After installing the audio driver, you are able to activate the HD Audio Configuration. or 8-
User Guide
Page 142
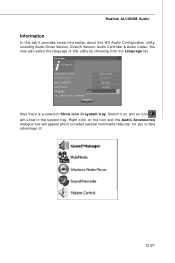
Realtek ALC882M Audio Information In this tab it on the icon and the Audio Accessories dialogue box will show in system tray. You may also select the language of . Switch it provides some information about this utility by choosing from the Language list. Right-click on and an icon will appear which provides several multimedia features for you to take advantage of this HD Audio Configuration utility, including Audio Driver Version, DirectX Version, Audio Controller & Audio Codec. Also there is a selection Show icon in the system tray. D-21
Realtek ALC882M Audio Information In this tab it on the icon and the Audio Accessories dialogue box will show in system tray. You may also select the language of . Switch it provides some information about this utility by choosing from the Language list. Right-click on and an icon will appear which provides several multimedia features for you to take advantage of this HD Audio Configuration utility, including Audio Driver Version, DirectX Version, Audio Controller & Audio Codec. Also there is a selection Show icon in the system tray. D-21


