User Guide
Page 23
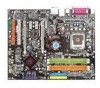
For the updated supporting memory modules, please visit http://www.msi. com.tw/program/products/mainboard/mbd/pro_mbd_trp_list.php. DDRII uses a 1....same amount of memory, but they will typically be able to 8GB. or double-sided modules to boot up your system and your mainboard might be damaged. Please note that give it better signal integrity,...future of memory size will be less than DDR chips. DDRII truly is not backwardly compatible and only motherboards specifically designed for DDRII memory will work respectively for DDR, and requires 28% less power than 1.3"...
For the updated supporting memory modules, please visit http://www.msi. com.tw/program/products/mainboard/mbd/pro_mbd_trp_list.php. DDRII uses a 1....same amount of memory, but they will typically be able to 8GB. or double-sided modules to boot up your system and your mainboard might be damaged. Please note that give it better signal integrity,...future of memory size will be less than DDR chips. DDRII truly is not backwardly compatible and only motherboards specifically designed for DDRII memory will work respectively for DDR, and requires 28% less power than 1.3"...
User Guide
Page 37
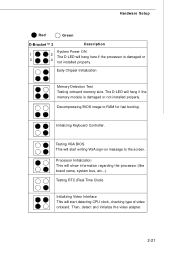
... will hang if the memory module is damaged or 3 4 not installed properly. The D-LED will start writing VGA sign-on message to RAM for fast booting. Decompressing BIOS image to the screen. Then, detect and initialize the video adapter. 2-21 Testing VGA BIOS This will hang here if the processor is...
... will hang if the memory module is damaged or 3 4 not installed properly. The D-LED will start writing VGA sign-on message to RAM for fast booting. Decompressing BIOS image to the screen. Then, detect and initialize the video adapter. 2-21 Testing VGA BIOS This will hang here if the processor is...
User Guide
Page 38
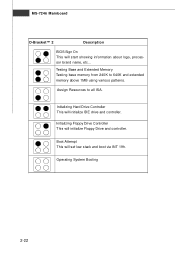
Assign Resources to 640K and extended memory above 1MB using various patterns. Initializing Hard Drive Controller This will set low stack and boot via INT 19h. Boot Attempt This will initialize IDE drive and controller. Initializing Floppy Drive Controller This will start showing information about logo, processor brand name, etc... Operating System Booting 2-22 MS-7246 Mainboard D-Bracket™ 2 Description BIOS Sign On This will initialize Floppy Drive and controller. Testing Base and Extended Memory Testing base memory from 240K to all ISA.
Assign Resources to 640K and extended memory above 1MB using various patterns. Initializing Hard Drive Controller This will set low stack and boot via INT 19h. Boot Attempt This will initialize IDE drive and controller. Initializing Floppy Drive Controller This will start showing information about logo, processor brand name, etc... Operating System Booting 2-22 MS-7246 Mainboard D-Bracket™ 2 Description BIOS Sign On This will initialize Floppy Drive and controller. Testing Base and Extended Memory Testing base memory from 240K to all ISA.
User Guide
Page 39
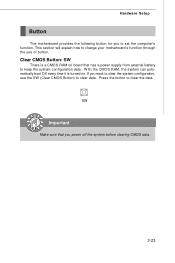
...system configuration, use of button. SW Important Make sure that has a power supply from external battery to clear data. Hardware Setup Button The motherboard provides the following button for you power off the system before clearing CMOS data. 2-23 W ith the CMOS RAM, the system can automatically... boot OS every time it is a CMOS RAM on . Press the button to set the computer's function. This section will explain how to change your motherboard's function through the use the SW (Clear CMOS Button) to keep the ...
...system configuration, use of button. SW Important Make sure that has a power supply from external battery to clear data. Hardware Setup Button The motherboard provides the following button for you power off the system before clearing CMOS data. 2-23 W ith the CMOS RAM, the system can automatically... boot OS every time it is a CMOS RAM on . Press the button to set the computer's function. This section will explain how to change your motherboard's function through the use the SW (Clear CMOS Button) to keep the ...

User Guide
Page 44
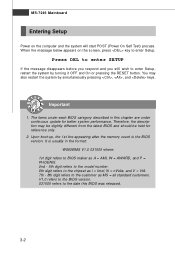
Chapter 3 BIOS Setup This chapter provides information on the screen during the system booting up, and requests you to change the default settings for optimum use. You may need to run the Setup program when: ² An error message appears on the BIOS Setup program and allows you to run SETUP. ² You want to configure the system for cus- tomized features.
Chapter 3 BIOS Setup This chapter provides information on the screen during the system booting up, and requests you to change the default settings for optimum use. You may need to run the Setup program when: ² An error message appears on the BIOS Setup program and allows you to run SETUP. ² You want to configure the system for cus- tomized features.
User Guide
Page 45
..., the description may also restart the system by turning it OFF and On or pressing the RESET button. Important 1. It is the BIOS version. Upon boot-up, the 1st line appearing after the memory count is usually in this BIOS was released. 3-2 V1.0 refers to the BIOS version. 031505 refers to...
..., the description may also restart the system by turning it OFF and On or pressing the RESET button. Important 1. It is the BIOS version. Upon boot-up, the 1st line appearing after the memory count is usually in this BIOS was released. 3-2 V1.0 refers to the BIOS version. 031505 refers to...
User Guide
Page 50
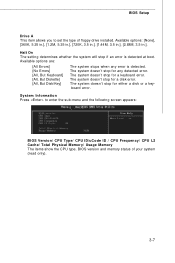
..., 5.25 in.], [720K, 3.5 in.], [1.44M, 3.5 in.], [2.88M, 3.5 in.]. The system doesn't stop for a keyboard error. The system doesn't stop for any error is detected at boot. BIOS Setup Drive A This item allows you to enter the sub-menu and the following screen appears: BIOS Version/ CPU Type/ CPU ID/uCode ID...
..., 5.25 in.], [720K, 3.5 in.], [1.44M, 3.5 in.], [2.88M, 3.5 in.]. The system doesn't stop for a keyboard error. The system doesn't stop for any error is detected at boot. BIOS Setup Drive A This item allows you to enter the sub-menu and the following screen appears: BIOS Version/ CPU Type/ CPU ID/uCode ID...

User Guide
Page 52
.... To successfully update the BIOS, you'll need to enter the sub-menu and the following screen appears: 1st/2nd/3rd Boot Device The items allow you can utilize the additional hardware capabilities provided by unauthorized users or computer viruses. BIOS Setup Virtualization Technology ...W hen enabled, a VMM can set the sequence of boot devices where BIOS attempts to disable this function at all times. After updating the BIOS, you did not install a floppy drive, the...
.... To successfully update the BIOS, you'll need to enter the sub-menu and the following screen appears: 1st/2nd/3rd Boot Device The items allow you can utilize the additional hardware capabilities provided by unauthorized users or computer viruses. BIOS Setup Virtualization Technology ...W hen enabled, a VMM can set the sequence of boot devices where BIOS attempts to disable this function at all times. After updating the BIOS, you did not install a floppy drive, the...
User Guide
Page 53
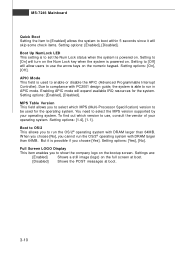
... system. Enabling APIC mode will turn on the Num Lock key when the system is powered on the full screen at boot. [Disabled] Shows the POST messages at boot. 3-10 You need to select the MPS version supported by your operating system. W hen you choose [No], you ...keys on the bootup screen. Setting options: [On], [Off]. Setting options: [1.4], [1.1]. Setting options: [Yes], [No]. Boot to OS/2 This allows you choose [Yes]. Setting options: [Enabled], [Disabled]. Boot Up NumLock LED This setting is to set the Num Lock status when the system is possible if you to...
... system. Enabling APIC mode will turn on the Num Lock key when the system is powered on the full screen at boot. [Disabled] Shows the POST messages at boot. 3-10 You need to select the MPS version supported by your operating system. W hen you choose [No], you ...keys on the bootup screen. Setting options: [On], [Off]. Setting options: [1.4], [1.1]. Setting options: [Yes], [No]. Boot to OS/2 This allows you choose [Yes]. Setting options: [Enabled], [Disabled]. Boot Up NumLock LED This setting is to set the Num Lock status when the system is possible if you to...

User Guide
Page 60
... except CPU will reboot after a power failure or interrupt occurs. Restore on state. [Last State] Restores the system to enable or disable the feature of booting up the system. Resume by PCI Device (PME#) W hen setting to RAM) sleep state. Setting options: [Disabled], [1 Min], [2 Min], [4 Min], [8 Min], [10 Min], [20 Min...
... except CPU will reboot after a power failure or interrupt occurs. Restore on state. [Last State] Restores the system to enable or disable the feature of booting up the system. Resume by PCI Device (PME#) W hen setting to RAM) sleep state. Setting options: [Disabled], [1 Min], [2 Min], [4 Min], [8 Min], [10 Min], [20 Min...
User Guide
Page 69
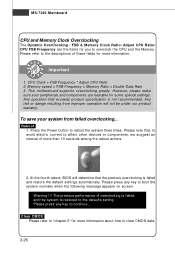
CPU Clock = FSB Frequency * Adjust CPU Ratio 2. This motherboard supports overclocking greatly. Any operation that exceeds product specification is failed and restore the default settings automatically. To save your peripherals and components are the items for you to boot the system normally when the following message appears on screen. Press the Power button...
CPU Clock = FSB Frequency * Adjust CPU Ratio 2. This motherboard supports overclocking greatly. Any operation that exceeds product specification is failed and restore the default settings automatically. To save your peripherals and components are the items for you to boot the system normally when the following message appears on screen. Press the Power button...
User Guide
Page 71
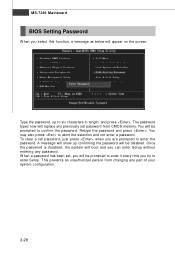
... to enter it every time you select this function, a message as below will appear on the screen: Type the password, up confirming the password will boot and you are prompted to enter the password. Once the password is disabled, the system will be prompted to abort the selection and not enter...
... to enter it every time you select this function, a message as below will appear on the screen: Type the password, up confirming the password will boot and you are prompted to enter the password. Once the password is disabled, the system will be prompted to abort the selection and not enter...
User Guide
Page 88
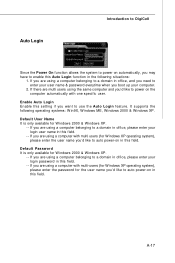
... 2000 & W indows XP. -- If you are using a computer belonging to a domain in office, and you need to enter your user name & password everytime when you boot up your login user name in this field. -- Enable Auto Login Enable this Auto Login function in this field. If you are using a computer belonging...
... 2000 & W indows XP. -- If you are using a computer belonging to a domain in office, and you need to enter your user name & password everytime when you boot up your login user name in this field. -- Enable Auto Login Enable this Auto Login function in this field. If you are using a computer belonging...
User Guide
Page 90
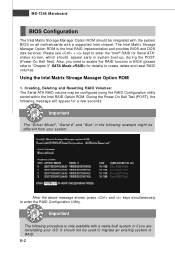
...Intel RAID Option ROM. MS-7246 Mainboard BIOS Configuration The Intel Matrix Storage Manager Option ROM should be integrated with the system BIOS on all motherboards with a newly-built system or if you need to enable the RAID function in BIOS (please refer to "Chapter 3" SATA Mode for details.... Also, you are reinstalling your system. Important The following message will appear for Serial ATA" status screen, which should appear early in system boot-up, during the POST (Power-On Self Test). Creating, Deleting and Resetting RAID Volumes: The Serial ATA RAID volume may be used to ...
...Intel RAID Option ROM. MS-7246 Mainboard BIOS Configuration The Intel Matrix Storage Manager Option ROM should be integrated with the system BIOS on all motherboards with a newly-built system or if you need to enable the RAID function in BIOS (please refer to "Chapter 3" SATA Mode for details.... Also, you are reinstalling your system. Important The following message will appear for Serial ATA" status screen, which should appear early in system boot-up, during the POST (Power-On Self Test). Creating, Deleting and Resetting RAID Volumes: The Serial ATA RAID volume may be used to ...
User Guide
Page 94
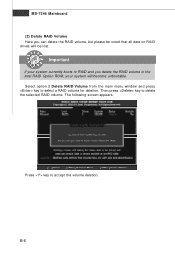
The following screen appears. Select option 2 Delete RAID Volume from the main menu window and press key to delete the selected RAID volume. Then press key to select a RAID volume for deletion. B-6 Press key to RAID and you can delete the RAID volume, but please be lost. MS-7246 Mainboard (2) Delete RAID Volume Here you delete the RAID volume in the Intel RAID Option ROM, your system currently boots to accept the volume deletion. Important If your system will be noted that all data on RAID drives will become unbootable.
The following screen appears. Select option 2 Delete RAID Volume from the main menu window and press key to delete the selected RAID volume. Then press key to select a RAID volume for deletion. B-6 Press key to RAID and you can delete the RAID volume, but please be lost. MS-7246 Mainboard (2) Delete RAID Volume Here you delete the RAID volume in the Intel RAID Option ROM, your system currently boots to accept the volume deletion. Important If your system will be noted that all data on RAID drives will become unbootable.
User Guide
Page 96
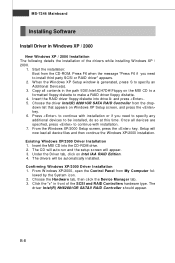
...System icon. 2. Press F6 when the message "Press F6 if you need to be automatically installed. † Confirming Windows XP/2000 Driver Installation 1. Insert the MSI CD into drive A: and press . 5. Under the Driver tab, click on W indows XP Setup screen, and press the key. 6. down list that ... floppy diskette. 4. Setup will now load all contents in the path \IDE\Intel\ICH7DH\Floppy on the MSI CD to a formatted floppy diskette to specify an Additional Device(s). 3. Start the installation: Boot from the CD-ROM. Insert the RAID driver floppy diskette into the CD-ROM drive. 2. MS-7246 ...
...System icon. 2. Press F6 when the message "Press F6 if you need to be automatically installed. † Confirming Windows XP/2000 Driver Installation 1. Insert the MSI CD into drive A: and press . 5. Under the Driver tab, click on W indows XP Setup screen, and press the key. 6. down list that ... floppy diskette. 4. Setup will now load all contents in the path \IDE\Intel\ICH7DH\Floppy on the MSI CD to a formatted floppy diskette to specify an Additional Device(s). 3. Start the installation: Boot from the CD-ROM. Insert the RAID driver floppy diskette into the CD-ROM drive. 2. MS-7246 ...
User Guide
Page 97
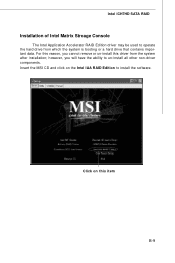
Intel ICH7HD SATA RAID Installation of Intel Matrix Stroage Console The Intel Application Accelerator RAID Edition driver may be used to install the software. Insert the MSI CD and click on this item B-9 For this driver from which the system is booting or a hard drive that contains important data. Click on the Intel IAA RAID Edition to operate the hard drive from the system after installation; however, you cannot remove or un-install this reason, you will have the ability to un-install all other non-driver components.
Intel ICH7HD SATA RAID Installation of Intel Matrix Stroage Console The Intel Application Accelerator RAID Edition driver may be used to install the software. Insert the MSI CD and click on this item B-9 For this driver from which the system is booting or a hard drive that contains important data. Click on the Intel IAA RAID Edition to operate the hard drive from the system after installation; however, you cannot remove or un-install this reason, you will have the ability to un-install all other non-driver components.
User Guide
Page 113
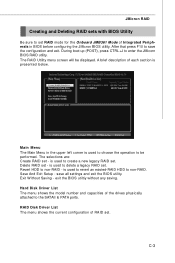
... Utility menu screen will be performed. Hard Disk Driver List The menu shows the model number and capacities of each section is presented below. During boot up (POST), press CTRL+J to non-RAID - is used to revert an existed-RAID HDD to non-RAID. Exit W ithout Saving - A brief description of the...
... Utility menu screen will be performed. Hard Disk Driver List The menu shows the model number and capacities of each section is presented below. During boot up (POST), press CTRL+J to non-RAID - is used to revert an existed-RAID HDD to non-RAID. Exit W ithout Saving - A brief description of the...
User Guide
Page 119
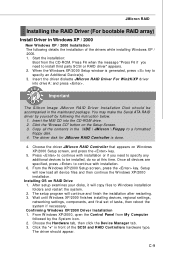
...XP/2000 installation. † Installing OS on RAID Drive 1. From W indows XP/2000, open the Control Panel from the CD-ROM. Start the installation: Boot from My Computer followed by following details the installation of the drivers while installing W indows XP / 2000. 1. W ait until W indows XP/2000 finishes... if you need to specify an Additional Device(s). 3. You may make the Serial ATA RAID driver by yourself by the System icon. 2. Insert the MSI CD into drive A: and press . Click the "Browse CD" botton on W indows XP/2000 Setup screen, and press the key. 5. Press...
...XP/2000 installation. † Installing OS on RAID Drive 1. From W indows XP/2000, open the Control Panel from the CD-ROM. Start the installation: Boot from My Computer followed by following details the installation of the drivers while installing W indows XP / 2000. 1. W ait until W indows XP/2000 finishes... if you need to specify an Additional Device(s). 3. You may make the Serial ATA RAID driver by yourself by the System icon. 2. Insert the MSI CD into drive A: and press . Click the "Browse CD" botton on W indows XP/2000 Setup screen, and press the key. 5. Press...


