
User Guide
Page 2
... Technology Inc. ■ iPad, iPhone, and iPod are trademarks of Apple Inc. Our products are properties of their respective owners. ■ MSI® is registered trademark of Micro-Star Int'l Co.,Ltd. ■ NVIDIA® is registered trademark of NVIDIA Corporation. ■ ATI®...VIA Technologies, Inc. ■ ASMedia® is the intellectual property of its contents. Trademarks All trademarks in the preparation of this manual are under continual improvement and we reserve the right to the correctness of MICRO-STAR INTERNATIONAL. We take every care in this document,...
... Technology Inc. ■ iPad, iPhone, and iPod are trademarks of Apple Inc. Our products are properties of their respective owners. ■ MSI® is registered trademark of Micro-Star Int'l Co.,Ltd. ■ NVIDIA® is registered trademark of NVIDIA Corporation. ■ ATI®...VIA Technologies, Inc. ■ ASMedia® is the intellectual property of its contents. Trademarks All trademarks in the preparation of this manual are under continual improvement and we reserve the right to the correctness of MICRO-STAR INTERNATIONAL. We take every care in this document,...
User Guide
Page 3
...checked by service personnel: ◯ The power cord or plug is at : http://support.msi.com Safety Instructions ■ Always read the safety instructions carefully. ■ Keep this User's Manual for future reference. ■ Keep this equipment away from humidity. ■ Lay this ...protects the equipment from overheating. Visit the MSI website for technical guide, BIOS updates, driver updates, and other information: http://www.msi.com/service/download Contact our technical staff at 110/220V before connecting the equipment to User's Manual. ◯ The equipment has been dropped...
...checked by service personnel: ◯ The power cord or plug is at : http://support.msi.com Safety Instructions ■ Always read the safety instructions carefully. ■ Keep this User's Manual for future reference. ■ Keep this equipment away from humidity. ■ Lay this ...protects the equipment from overheating. Visit the MSI website for technical guide, BIOS updates, driver updates, and other information: http://www.msi.com/service/download Contact our technical staff at 110/220V before connecting the equipment to User's Manual. ◯ The equipment has been dropped...

User Guide
Page 25
... package. The locations of the mainboard. 1-13 Important • Install the mainboard on a flat surface free from unnecessary debris. • To prevent damage to the manual that came with the holes on the mainboard are no loose metal components on the mainboard or within the computer case that came with your...
... package. The locations of the mainboard. 1-13 Important • Install the mainboard on a flat surface free from unnecessary debris. • To prevent damage to the manual that came with the holes on the mainboard are no loose metal components on the mainboard or within the computer case that came with your...
User Guide
Page 28
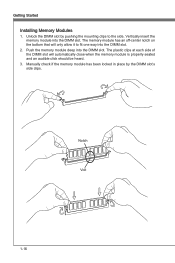
... the memory module is properly seated and an audible click should be heard. 3. Notch Volt 1-16 Push the memory module deep into the DIMM slot. Manually check if the memory module has been locked in place by pushing the mounting clips to fit one way into the DIMM slot. Getting Started...
... the memory module is properly seated and an audible click should be heard. 3. Notch Volt 1-16 Push the memory module deep into the DIMM slot. Manually check if the memory module has been locked in place by pushing the mounting clips to fit one way into the DIMM slot. Getting Started...
User Guide
Page 30
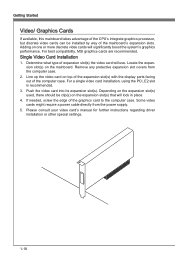
... is recommended. 3. Some video cards might require a power cable directly from the computer case. 2. Please consult your video card's manual for further instructions regarding driver installation or other special settings. 1-18 Single Video Card Installation 1. Locate the expansion slot(s) on top of...will use. Push the video card into its expansion slot(s). Line up the video card on the mainboard. For best compatibility, MSI graphics cards are recommended. Getting Started Video/ Graphics Cards If available, this mainboard takes advantage of the CPU's integrate graphics ...
... is recommended. 3. Some video cards might require a power cable directly from the computer case. 2. Please consult your video card's manual for further instructions regarding driver installation or other special settings. 1-18 Single Video Card Installation 1. Locate the expansion slot(s) on top of...will use. Push the video card into its expansion slot(s). Line up the video card on the mainboard. For best compatibility, MSI graphics cards are recommended. Getting Started Video/ Graphics Cards If available, this mainboard takes advantage of the CPU's integrate graphics ...
User Guide
Page 32
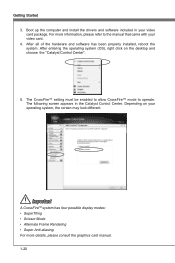
For more details, please consult the graphics card manual. 1-20 For more information, please refer to operate. After all of the hardware and software has been properly installed, reboot the system. Important A CrossFireTM system ... install the drivers and software included in the Catalyst Control Center. The CrossFire™ setting must be enabled to allow CrossFire™ mode to the manual that came with your video card. 4. Getting Started 3. The following screen appears in your operating system, the screen may look different. Depending on the desktop...
For more details, please consult the graphics card manual. 1-20 For more information, please refer to operate. After all of the hardware and software has been properly installed, reboot the system. Important A CrossFireTM system ... install the drivers and software included in the Catalyst Control Center. The CrossFire™ setting must be enabled to allow CrossFire™ mode to the manual that came with your video card. 4. Getting Started 3. The following screen appears in your operating system, the screen may look different. Depending on the desktop...
User Guide
Page 33
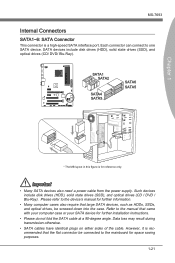
... drives (SSD), and optical drives (CD / DVD / Blu-Ray). However, it is recommended that the flat connector be connected to the manual that came with your computer case or your SATA device for further information. • Many computer cases also require that large SATA devices, such...Chapter 1 MS-7693 Internal Connectors SATA1~6: SATA Connector This connector is for space saving purposes. 1-21 Each connector can connect to the device's manual for further installation instructions. • Please do not fold the SATA cable at a 90-degree angle. SATA devices include disk drives (HDD),...
... drives (SSD), and optical drives (CD / DVD / Blu-Ray). However, it is recommended that the flat connector be connected to the manual that came with your computer case or your SATA device for further information. • Many computer cases also require that large SATA devices, such...Chapter 1 MS-7693 Internal Connectors SATA1~6: SATA Connector This connector is for space saving purposes. 1-21 Each connector can connect to the device's manual for further installation instructions. • Please do not fold the SATA cable at a 90-degree angle. SATA devices include disk drives (HDD),...
User Guide
Page 39
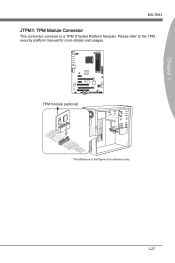
Chapter 1 115V MS-7693 JTPM1: TPM Module Connector This connector connects to the TPM security platform manual for reference only. 1-27 Please refer to a TPM (Trusted Platform Module). TPM module (optional) 2.34V.36S..3tS8aVe.n15Prd0iVaob1.NlwyP2I1o.eRopG4rwoPQ.rwGeionreurornudnd 1.L3P.L5CP.LCC7P.loLRC9cP.eLka1CsPd1e1ad.CtL3drPea.dLsdCrPsedasCr&edsFdsd&sraraedt&amsasdpteaa&intpa0dinap1tian2pin3 * The MB layout in this figure is for more details and usages.
Chapter 1 115V MS-7693 JTPM1: TPM Module Connector This connector connects to the TPM security platform manual for reference only. 1-27 Please refer to a TPM (Trusted Platform Module). TPM module (optional) 2.34V.36S..3tS8aVe.n15Prd0iVaob1.NlwyP2I1o.eRopG4rwoPQ.rwGeionreurornudnd 1.L3P.L5CP.LCC7P.loLRC9cP.eLka1CsPd1e1ad.CtL3drPea.dLsdCrPsedasCr&edsFdsd&sraraedt&amsasdpteaa&intpa0dinap1tian2pin3 * The MB layout in this figure is for more details and usages.

User Guide
Page 53
.... ▶ Current CPU/ DRAM Frequency These items show the current clocks of the processor. This feature can void your warranty or severely damage your PC manually is used to determine internal clock speed of CPU and Memory speed. OC MS-7693 Chapter 2 Important • Overclocking your hardware. • If you are...
.... ▶ Current CPU/ DRAM Frequency These items show the current clocks of the processor. This feature can void your warranty or severely damage your PC manually is used to determine internal clock speed of CPU and Memory speed. OC MS-7693 Chapter 2 Important • Overclocking your hardware. • If you are...
User Guide
Page 55
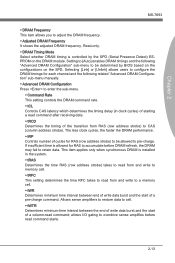
... timing is installed in clock cycles) of a pre-charge command. Setting to [Auto] enables DRAM timings and the following related "Advanced DRAM Configuration" sub-menu manually. ▶ Advanced DRAM Configuration Press to enter the sub-menu. ▶ Command Rate This setting controls the DRAM command rate. ▶ tCL Controls CAS latency...
... timing is installed in clock cycles) of a pre-charge command. Setting to [Auto] enables DRAM timings and the following related "Advanced DRAM Configuration" sub-menu manually. ▶ Advanced DRAM Configuration Press to enter the sub-menu. ▶ Command Rate This setting controls the DRAM command rate. ▶ tCL Controls CAS latency...
User Guide
Page 61
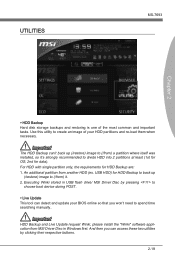
An additional partition from MSI Driver Disc in USB flash drive/ MSI Driver Disc by pressing to choose boot device during POST. ▶ Live Update This tool can detect and update your HDD partitions and re-load ... request Winki, please install the "Winki" software application from another HDD (ex. Important The HDD Backup can't back up (/restore) image to spend time searching manually. And then you won't need to (/from ) a partition where itself was installed, so it . 2. UTILITIES MS-7693 Chapter 2 ▶ HDD Backup Hard disk storage backups...
An additional partition from MSI Driver Disc in USB flash drive/ MSI Driver Disc by pressing to choose boot device during POST. ▶ Live Update This tool can detect and update your HDD partitions and re-load ... request Winki, please install the "Winki" software application from another HDD (ex. Important The HDD Backup can't back up (/restore) image to spend time searching manually. And then you won't need to (/from ) a partition where itself was installed, so it . 2. UTILITIES MS-7693 Chapter 2 ▶ HDD Backup Hard disk storage backups...
User Guide
Page 74
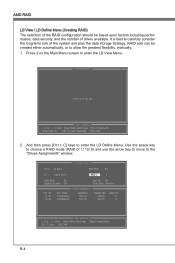
... RAID LD View / LD Define Menu (Creating RAID) The selection of the RAID configuration should be created either automatically, or to allow the greatest flexibility, manually. 1. And then press [Ctrl + C] keys to the "Drives Assignments" window. Press 2 on the Main Menu screen to enter the LD View Menu. 2. RAID sets can...
... RAID LD View / LD Define Menu (Creating RAID) The selection of the RAID configuration should be created either automatically, or to allow the greatest flexibility, manually. 1. And then press [Ctrl + C] keys to the "Drives Assignments" window. Press 2 on the Main Menu screen to enter the LD View Menu. 2. RAID sets can...
User Guide
Page 76
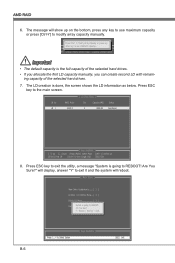
... Sure?" AMD RAID 6. ing capacity of the selected hard drives. • If you allocate the first LD capacity manually, you can create second LD with remain- Press ESC key to modify array capacity manually. The LD creation is going to exit the utility, a message "System is done, the screen shows the LD...
... Sure?" AMD RAID 6. ing capacity of the selected hard drives. • If you allocate the first LD capacity manually, you can create second LD with remain- Press ESC key to modify array capacity manually. The LD creation is going to exit the utility, a message "System is done, the screen shows the LD...


