

User Guide
Page 5
CONTENTS Chapter 1. Hardware Setup 2-1 Quick Components Guide 2-2 Central Processing Unit: CPU 2-3 Introduction of LGA 775 CPU 2-3 CPU, Heatsink & Fan Installation 2-4 Memory 2-7 Introduction to DDR SDRAM 2-7 DIMM Module Combination 2-8 Installing DDR Modules 2-8 Power Supply 2-9 ATX 24-Pin Power Connector: ATX1 2-9 ATX 12V Power ...
CONTENTS Chapter 1. Hardware Setup 2-1 Quick Components Guide 2-2 Central Processing Unit: CPU 2-3 Introduction of LGA 775 CPU 2-3 CPU, Heatsink & Fan Installation 2-4 Memory 2-7 Introduction to DDR SDRAM 2-7 DIMM Module Combination 2-8 Installing DDR Modules 2-8 Power Supply 2-9 ATX 24-Pin Power Connector: ATX1 2-9 ATX 12V Power ...
User Guide
Page 7
Chapter 5. Introduction to DigiCell 5-1 Main...5-2 Introduction 5-2 H/W Diagnostic 5-4 Communication 5-5 Software Access Point 5-6 Terminology 5-6 Access Point Mode 5-7 W LAN Card Mode 5-8 Live Update 5-9 MEGA STICK 5-10 Basic Function 5-10 Non-Unicode programs supported 5-12 Core Center (for Pentium 4 CPU 5-14 Left-wing: Current system status 5-15 Right-wing: PC hardware status during real time operation..........5-15 Audio Speaker Setting 5-16 Power on Agent 5-18 Power On 5-18 Power Off / Restart 5-19 Start With 5-19 Auto Login 5-20 vii
Chapter 5. Introduction to DigiCell 5-1 Main...5-2 Introduction 5-2 H/W Diagnostic 5-4 Communication 5-5 Software Access Point 5-6 Terminology 5-6 Access Point Mode 5-7 W LAN Card Mode 5-8 Live Update 5-9 MEGA STICK 5-10 Basic Function 5-10 Non-Unicode programs supported 5-12 Core Center (for Pentium 4 CPU 5-14 Left-wing: Current system status 5-15 Right-wing: PC hardware status during real time operation..........5-15 Audio Speaker Setting 5-16 Power on Agent 5-18 Power On 5-18 Power Off / Restart 5-19 Start With 5-19 Auto Login 5-20 vii
User Guide
Page 9
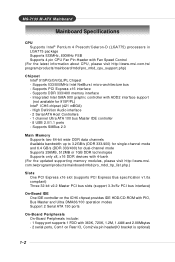
... DDR 333/400 memory interface - Integrated Intel GMA 900 graphic controller with 4-bank (For the updated supporting memory modules, please visit http://www.msi. Supports SMBus 2.0 Main Memory † Supports two 64-bit wide DDR data channels † Available bandwidth up to 3.2GB/s (DDR 333...Board Peripherals † On-Board Peripherals include: - 1 floppy port supports 1 FDD with Fan Speed Control (For the latest information about CPU, please visit http://www.msi.com.tw/ prog ram/produc ts / mainboard/mbd/ pro_mbd _c pu_s upport. Supports PCI Express x16 interface - php) Chipset †...
... DDR 333/400 memory interface - Integrated Intel GMA 900 graphic controller with 4-bank (For the updated supporting memory modules, please visit http://www.msi. Supports SMBus 2.0 Main Memory † Supports two 64-bit wide DDR data channels † Available bandwidth up to 3.2GB/s (DDR 333...Board Peripherals † On-Board Peripherals include: - 1 floppy port supports 1 FDD with Fan Speed Control (For the latest information about CPU, please visit http://www.msi.com.tw/ prog ram/produc ts / mainboard/mbd/ pro_mbd _c pu_s upport. Supports PCI Express x16 interface - php) Chipset †...

User Guide
Page 13
While doing the installation, be careful in holding the components and follow the installation procedures. 2-1 Hardware Setup Hardware Setup This chapter tells you how to setup the jumpers on connecting the peripheral devices, such as how to install the CPU, memory modules, and expansion cards, as well as the mouse, keyboard, etc. Hardware Setup Chapter 2. Also, it provides the instructions on the mainboard.
While doing the installation, be careful in holding the components and follow the installation procedures. 2-1 Hardware Setup Hardware Setup This chapter tells you how to setup the jumpers on connecting the peripheral devices, such as how to install the CPU, memory modules, and expansion cards, as well as the mouse, keyboard, etc. Hardware Setup Chapter 2. Also, it provides the instructions on the mainboard.
User Guide
Page 15
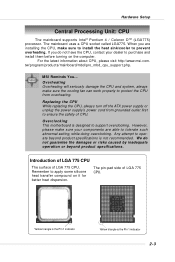
For the latest information about CPU, please visit http://www.msi.com. We do not have the CPU, contact your components are installing the CPU, make sure the cooling fan can work properly to protect the CPU from grounded outlet first to purchase and install them before turning on it ...or unplug the power supply's power cord from overheating. However, please make sure your dealer to ensure the safety of CPU. If you are able to apply some silicone heat transfer compound on the computer. MSI Reminds You... Any attempt to support overclocking. Introduction of LGA 775...
For the latest information about CPU, please visit http://www.msi.com. We do not have the CPU, contact your components are installing the CPU, make sure the cooling fan can work properly to protect the CPU from grounded outlet first to purchase and install them before turning on it ...or unplug the power supply's power cord from overheating. However, please make sure your dealer to ensure the safety of CPU. If you are able to apply some silicone heat transfer compound on the computer. MSI Reminds You... Any attempt to support overclocking. Introduction of LGA 775...

User Guide
Page 16
... sink/cooler fan for better heatsinking. Remove the cap from lever hinge side (as the arrow shows). 3. Follow the steps below to install the CPU & cooling fan correctly. W rong installation will cause the damage of socket reveal. 4. Always cover it to protect the socket pin until you are... installing the CPU, make sure the CPU has a heat sink/ cooler fan attached on it to protect the contac t f rom damage. Open the load lever. 2-4 Meanwhile, do ...
... sink/cooler fan for better heatsinking. Remove the cap from lever hinge side (as the arrow shows). 3. Follow the steps below to install the CPU & cooling fan correctly. W rong installation will cause the damage of socket reveal. 4. Always cover it to protect the socket pin until you are... installing the CPU, make sure the CPU has a heat sink/ cooler fan attached on it to protect the contac t f rom damage. Open the load lever. 2-4 Meanwhile, do ...

User Guide
Page 17
If not, take out the CPU with purely vertical motion and reload it again. 8. Note that the alignment keys are matched. Visually inspect if the CPU is seated well into the socket. Hardware Setup 5. Rotate the load plate onto the p ac kage. 2-5 Be sure to grape on the edge of the substrate. Lift the load lever up and open the load plate. 6. After confirming the CPU direction for correction mating, put down the CPU in the socket housing frame. alignment key 7.
If not, take out the CPU with purely vertical motion and reload it again. 8. Note that the alignment keys are matched. Visually inspect if the CPU is seated well into the socket. Hardware Setup 5. Rotate the load plate onto the p ac kage. 2-5 Be sure to grape on the edge of the substrate. Lift the load lever up and open the load plate. 6. After confirming the CPU direction for correction mating, put down the CPU in the socket housing frame. alignment key 7.
User Guide
Page 18
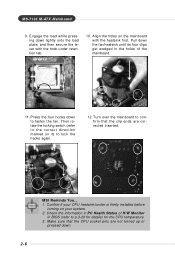
M S-7133 M -ATX M ainboard 9. Engage the load while pressing down to lock the hooks again. 12. Pull down . 2-6 locking switch MSI Reminds You... 1. Confirm if your system. 2. Press the four hooks down lightly onto the load plate, and then secure the lever with the heatsink first. ...Then rotate the locking switch (refer to the correct direction marked on your CPU heatsink/cooler is firmly installed before turning on it) to fasten the fan. Make sure that the clip-ends are not turned up or pressed...
M S-7133 M -ATX M ainboard 9. Engage the load while pressing down to lock the hooks again. 12. Pull down . 2-6 locking switch MSI Reminds You... 1. Confirm if your system. 2. Press the four hooks down lightly onto the load plate, and then secure the lever with the heatsink first. ...Then rotate the locking switch (refer to the correct direction marked on your CPU heatsink/cooler is firmly installed before turning on it) to fasten the fan. Make sure that the clip-ends are not turned up or pressed...

User Guide
Page 21
...-Pin Power Connector: ATX1 This connector allows you like. To con- JPW1 Pin Definition 2 1 JPW1 4 3 PIN SIGNAL 1 GND 2 GND 3 12V 4 12V MSI Reminds You... 1. Before inserting the power supply connector, always make sure the plug of the mainboard. 2. Power supply of 350 watts (and above) is also... a foolproof design on pin 11, 12, 23 & 24 to the CPU. Then push down the power supply firmly into the connector. There is highly recommended for the power system. You may use the ATX power ...
...-Pin Power Connector: ATX1 This connector allows you like. To con- JPW1 Pin Definition 2 1 JPW1 4 3 PIN SIGNAL 1 GND 2 GND 3 12V 4 12V MSI Reminds You... 1. Before inserting the power supply connector, always make sure the plug of the mainboard. 2. Power supply of 350 watts (and above) is also... a foolproof design on pin 11, 12, 23 & 24 to the CPU. Then push down the power supply firmly into the connector. There is highly recommended for the power system. You may use the ATX power ...

User Guide
Page 26
Always consult the vendors for proper CPU cooling fan. 2. Floppy Disk Drive Connector: FDD1 The mainboard provides a standard ...to the +12V, the black wire is Ground and should be connected to the connectors, always take advantage of the CPU fan control. If the mainboard has a System Hardware Monitor chipset on-board, you must use a specially designed fan ...disk types. M S-7133 M -ATX M ainboard Connectors The mainboard provides connectors to connect to the recommended CPU fans at Intel® official website. 2-14 Please refer to FDD, IDE HDD, case, LAN, USB Ports, IR module and...
Always consult the vendors for proper CPU cooling fan. 2. Floppy Disk Drive Connector: FDD1 The mainboard provides a standard ...to the +12V, the black wire is Ground and should be connected to the connectors, always take advantage of the CPU fan control. If the mainboard has a System Hardware Monitor chipset on-board, you must use a specially designed fan ...disk types. M S-7133 M -ATX M ainboard Connectors The mainboard provides connectors to connect to the recommended CPU fans at Intel® official website. 2-14 Please refer to FDD, IDE HDD, case, LAN, USB Ports, IR module and...
User Guide
Page 39
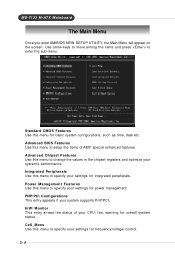
... this menu to specify your settings for integrated peripherals. Cell_Menu Use this menu for overall system status. PNP/PCI Configurations This entry appears if your CPU, fan, warning for basic system configurations, such as time, date etc. Standard CMOS Features Use this menu to specify your settings for power management. Power...
... this menu to specify your settings for integrated peripherals. Cell_Menu Use this menu for overall system status. PNP/PCI Configurations This entry appears if your CPU, fan, warning for basic system configurations, such as time, date etc. Standard CMOS Features Use this menu to specify your settings for power management. Power...
User Guide
Page 42
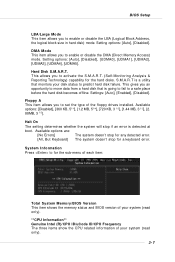
...: [Auto], [Disabled]. This gives you an opportunity to move data from a hard disk that monitors your system (read only). **CPU Information** Genuine Intel (R)/CPU ID/uCode ID/CPU Frequency The three items show the CPU related information of your disk status to set the type of your system (read only). 3-7 Available options: [Disabled], [360...
...: [Auto], [Disabled]. This gives you an opportunity to move data from a hard disk that monitors your system (read only). **CPU Information** Genuine Intel (R)/CPU ID/uCode ID/CPU Frequency The three items show the CPU related information of your disk status to set the type of your system (read only). 3-7 Available options: [Disabled], [360...

User Guide
Page 44
... find out which MPS (Multi-Processor Specification) version to enable or disable the APIC (Advanced Programmable Interrupt Controller). Settings: [1.4], [1.1]. BIOS Setup MSI Reminds You... For more information on Hyper-threading Technology, go to use, consult the vendor of your operating system. Intel(R) SpeedStep(tm) tech.... Settings: [Enabled], [Disabled]. M PS Table Version This field allows you can prevent viruses from proliferating. C1E Support When The CPU ID>0F40 and is able to show the company logo on the full screen at boot. [Disabled] Shows the POST messages at boot...
... find out which MPS (Multi-Processor Specification) version to enable or disable the APIC (Advanced Programmable Interrupt Controller). Settings: [1.4], [1.1]. BIOS Setup MSI Reminds You... For more information on Hyper-threading Technology, go to use, consult the vendor of your operating system. Intel(R) SpeedStep(tm) tech.... Settings: [Enabled], [Disabled]. M PS Table Version This field allows you can prevent viruses from proliferating. C1E Support When The CPU ID>0F40 and is able to show the company logo on the full screen at boot. [Disabled] Shows the POST messages at boot...

User Guide
Page 50
...Interface) Function. In this section are : [S1/POS] The S1 sleep mode is a low power state. BIOS Setup Power Management Features MSI Reminds You... The information stored in this state, no system context is to enter the Standby mode in this field. Settings: [Enabled] ... [10], 3-15 S3-related functions described in memory will be used to save energy. ACPI Function This item is lost (CPU or chipset) and hardware maintains all devices except CPU will be shut off to restore the system when a "wake up" event occurs. [Auto] BIOS determines the best setting automatically...
...Interface) Function. In this section are : [S1/POS] The S1 sleep mode is a low power state. BIOS Setup Power Management Features MSI Reminds You... The information stored in this state, no system context is to enter the Standby mode in this field. Settings: [Enabled] ... [10], 3-15 S3-related functions described in memory will be used to save energy. ACPI Function This item is lost (CPU or chipset) and hardware maintains all devices except CPU will be shut off to restore the system when a "wake up" event occurs. [Auto] BIOS determines the best setting automatically...

User Guide
Page 53
... default settings. If a PCI Express graphic card is not available, it is booted up and then set to operate at speeds nearing the speed the CPU itself uses when communicating with its special components. This section covers some very technical items and it will reset ESCD NVRAM right after the system...
... default settings. If a PCI Express graphic card is not available, it is booted up and then set to operate at speeds nearing the speed the CPU itself uses when communicating with its special components. This section covers some very technical items and it will reset ESCD NVRAM right after the system...

User Guide
Page 55
...ME/XP. on the screen and halt the boot-up for cooling down its speed to the CPU fan power connector, we recommend disabling this feature. CPU Shutdown Temp select If the CPU temperature reaches the limit preset in the next setting, the system will shutdown automatically. If you to...[Enabled], [Disabled]. Setting options: [Enabled], [Disabled]. M S-7133 M -ATX M ainboard H/W Monitor This section shows the status of the CPU fan reaches the value you to avoid the CPU damage; If it detects that the CPU fan is not rotating, the system will show an error message on the contrary, if the...
...ME/XP. on the screen and halt the boot-up for cooling down its speed to the CPU fan power connector, we recommend disabling this feature. CPU Shutdown Temp select If the CPU temperature reaches the limit preset in the next setting, the system will shutdown automatically. If you to...[Enabled], [Disabled]. Setting options: [Enabled], [Disabled]. M S-7133 M -ATX M ainboard H/W Monitor This section shows the status of the CPU fan reaches the value you to avoid the CPU damage; If it detects that the CPU fan is not rotating, the system will show an error message on the contrary, if the...

User Guide
Page 56
... your mainboard has JCI1 jumper. Setting options: [3 PINS], [4 PINS]. To clear the warning message, set the field to [Enabled] later. CPU/System Temperature, CPU/SYSTEM FAN Speed, Vcore, +3.3V, +5.0V, +12.0V, +5VSB These items display the current status of all fans' speeds. 3-21...Reset], [Disabled]. PC Health Status Press and the following sub-menu appears. The setting of the monitored hardware devices/components such as CPU voltages, temperatures and all of the field will automatically return to [Reset]. Chassis Intrusion The field enables or disables the feature of ...
... your mainboard has JCI1 jumper. Setting options: [3 PINS], [4 PINS]. To clear the warning message, set the field to [Enabled] later. CPU/System Temperature, CPU/SYSTEM FAN Speed, Vcore, +3.3V, +5.0V, +12.0V, +5VSB These items display the current status of all fans' speeds. 3-21...Reset], [Disabled]. PC Health Status Press and the following sub-menu appears. The setting of the monitored hardware devices/components such as CPU voltages, temperatures and all of the field will automatically return to [Reset]. Chassis Intrusion The field enables or disables the feature of ...

User Guide
Page 57
...plagued by EMI, activate the Spread Spectrum for optimal system stability and performance. Adjust CPU FSB Frequency This item allows you are reduced to flatter curves. Setting options: For CPU FSB200: [200]~[500] For CPU FSB133: [133]~[500] 3-22 M S-7133 M -ATX M ainboard Cell Menu... can introduce a temporary boost in Cell Menu includes some important settings of the pulses are familiar with the chipset. MSI Reminds You... Current CPU Clock, Current DDR Memory Frequency These two items show the current clocks of the pulses creates EMI (Electromagnetic Interference). ...
...plagued by EMI, activate the Spread Spectrum for optimal system stability and performance. Adjust CPU FSB Frequency This item allows you are reduced to flatter curves. Setting options: For CPU FSB200: [200]~[500] For CPU FSB133: [133]~[500] 3-22 M S-7133 M -ATX M ainboard Cell Menu... can introduce a temporary boost in Cell Menu includes some important settings of the pulses are familiar with the chipset. MSI Reminds You... Current CPU Clock, Current DDR Memory Frequency These two items show the current clocks of the pulses creates EMI (Electromagnetic Interference). ...

User Guide
Page 58
... faster than this setting may be unstable. Please note you must reboot the system to let the change in the instability of Adjust CPU FSB Frequency and CPU Ratio CMOS Setting. Gray: Default setting. Please note you must reboot the system to let the change in High Performance M ode, user can increase... fastest speed which will automatically change take effect. Adjust DDR Voltage (V) Adjusting the DDR voltage can place an artificial memory clock limit on the system. MSI Reminds You... Setting options: For DDR1: [Auto], [333], [400].
... faster than this setting may be unstable. Please note you must reboot the system to let the change in the instability of Adjust CPU FSB Frequency and CPU Ratio CMOS Setting. Gray: Default setting. Please note you must reboot the system to let the change in High Performance M ode, user can increase... fastest speed which will automatically change take effect. Adjust DDR Voltage (V) Adjusting the DDR voltage can place an artificial memory clock limit on the system. MSI Reminds You... Setting options: For DDR1: [Auto], [333], [400].

User Guide
Page 86
...- ity --> MSI DigiCell), it easier to update the BIOS/drivers online, and to DigiCell Chapter 24. short-cut icon in the start-up " menu. ware status (CPU/Fan temperature and speed) or to monitor and configure all the integrated peripherals of the system, ...such as audio program, power management, MP3 files management and communication / 802.11g W LAN settings. HInatroddwuacrteioSnettuopDigiCell Introduction to DigiCell DigiCell, the most useful and powerful utility that MSI...
...- ity --> MSI DigiCell), it easier to update the BIOS/drivers online, and to DigiCell Chapter 24. short-cut icon in the start-up " menu. ware status (CPU/Fan temperature and speed) or to monitor and configure all the integrated peripherals of the system, ...such as audio program, power management, MP3 files management and communication / 802.11g W LAN settings. HInatroddwuacrteioSnettuopDigiCell Introduction to DigiCell DigiCell, the most useful and powerful utility that MSI...

