User Guide
Page 8
... Equipment) Statement v Chapter 1 Getting Started 1-1 Mainboard Specifications 1-2 Mainboard Layout 1-4 Packing Checklist 1-5 Chapter 2 Hardware Setup 2-1 Quick Components Guide 2-2 CPU (Central Processing Unit 2-3 Memory 2-6 Power Supply 2-8 Back Panel 2-9 Connectors 2-11 Jumpers 2-17 Switch 2-18 Slots 2-19 LED Status Indicators 2-20 Chapter 3 BIOS Setup 3-1 Entering Setup 3-2 The Main Menu 3-4 Standard CMOS Features 3-6 Advanced BIOS...
... Equipment) Statement v Chapter 1 Getting Started 1-1 Mainboard Specifications 1-2 Mainboard Layout 1-4 Packing Checklist 1-5 Chapter 2 Hardware Setup 2-1 Quick Components Guide 2-2 CPU (Central Processing Unit 2-3 Memory 2-6 Power Supply 2-8 Back Panel 2-9 Connectors 2-11 Jumpers 2-17 Switch 2-18 Slots 2-19 LED Status Indicators 2-20 Chapter 3 BIOS Setup 3-1 Entering Setup 3-2 The Main Menu 3-4 Standard CMOS Features 3-6 Advanced BIOS...
User Guide
Page 12
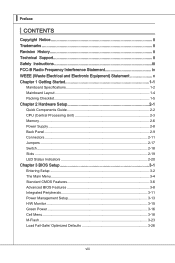
...+ package ■ AMD® processors in AM3 package ■ Up to 6000+ and higher CPU (For the latest information about CPU, please visit http://www.msi.com/index.php?func=cpuform2) HyperTransport ■ Supports HyperTransport(HT) 3.0 Technology Chipset ■ North Bridge: AMD® 785G chipset ■ South Bridge: AMD®...■ Supports RAID 0/ 1/ 0+1/ JBOD mode by SB710 Floppy ■ 1 floppy port ■ Supports 1 FDD with 360KB, 720KB, 1.2MB, 1.44MB and 2.88MB Connectors ■ Back panel - 1 PS/2 mouse port - 1 PS/2 keyboard port - 1 VGA port - 1 DVI-D port - 1 HDMI port 1-2
...+ package ■ AMD® processors in AM3 package ■ Up to 6000+ and higher CPU (For the latest information about CPU, please visit http://www.msi.com/index.php?func=cpuform2) HyperTransport ■ Supports HyperTransport(HT) 3.0 Technology Chipset ■ North Bridge: AMD® 785G chipset ■ South Bridge: AMD®...■ Supports RAID 0/ 1/ 0+1/ JBOD mode by SB710 Floppy ■ 1 floppy port ■ Supports 1 FDD with 360KB, 720KB, 1.2MB, 1.44MB and 2.88MB Connectors ■ Back panel - 1 PS/2 mouse port - 1 PS/2 keyboard port - 1 VGA port - 1 DVI-D port - 1 HDMI port 1-2
User Guide
Page 25
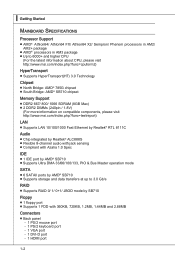
...-D (Digital Visual Interface-Digital) connector allows you to connect a LCD monitor. It provides a high-speed digital interconnection between the computer and its display device. Back Panel Mouse VGA Port MS-7549 LAN Line-In RS-Out Line-Out CS-Out Keyboard DVI-D Port HDMI Port USB Ports Mic SS-Out ▶...
...-D (Digital Visual Interface-Digital) connector allows you to connect a LCD monitor. It provides a high-speed digital interconnection between the computer and its display device. Back Panel Mouse VGA Port MS-7549 LAN Line-In RS-Out Line-Out CS-Out Keyboard DVI-D Port HDMI Port USB Ports Mic SS-Out ▶...

User Guide
Page 29
...9D.RDReLseEesDrevteSdwitch SpeakeBr2uz.z-e4r.+6.-8.+ JFP2 1.G3.rSo5uu.Psn7opd.NweonedrPLLinEEDD Front USB Connector: JUSB1 ~ 4 This connector, compliant with Intel® Front Panel I /O Connectivity Design Guide, is ideal for electrical connection to avoid possible damage. 2-13 The JFP1 is compliant with Intel® I... /O Connectivity Design Guide. MS-7549 Front Panel Connector: JFP1, JFP2 This connector is for connecting high-speed USB interface peripherals such as USB HDD, digital cameras, MP3 players...
...9D.RDReLseEesDrevteSdwitch SpeakeBr2uz.z-e4r.+6.-8.+ JFP2 1.G3.rSo5uu.Psn7opd.NweonedrPLLinEEDD Front USB Connector: JUSB1 ~ 4 This connector, compliant with Intel® Front Panel I /O Connectivity Design Guide, is ideal for electrical connection to avoid possible damage. 2-13 The JFP1 is compliant with Intel® I... /O Connectivity Design Guide. MS-7549 Front Panel Connector: JFP1, JFP2 This connector is for connecting high-speed USB interface peripherals such as USB HDD, digital cameras, MP3 players...

User Guide
Page 30
To clear the warning, you must enter the BIOS utility and clear the record. 1.C2.IGNTroRuUnd Front Panel Audio Connector: JAUD1 This connector allows you to the chassis intrusion switch cable. The system will be activated. You can attach a ... for external audio input. 4.R3.G2.rG1o.urLonudnd Chassis Intrusion Connector: JCI1 This connector connects to connect the front panel audio and is compliant with Intel® Front Panel I/O Connectivity Design Guide. 2.G4r.oP6uR.Mn8Ed.1INSC0Eo.DHNPeeCitnaeEdc#tPiohnone Detection 1.M3.IMC5.ILHC7e.RS9a.EdHNPeShaEodn_PeShERoNneDL Serial Port Connector:...
To clear the warning, you must enter the BIOS utility and clear the record. 1.C2.IGNTroRuUnd Front Panel Audio Connector: JAUD1 This connector allows you to the chassis intrusion switch cable. The system will be activated. You can attach a ... for external audio input. 4.R3.G2.rG1o.urLonudnd Chassis Intrusion Connector: JCI1 This connector connects to connect the front panel audio and is compliant with Intel® Front Panel I/O Connectivity Design Guide. 2.G4r.oP6uR.Mn8Ed.1INSC0Eo.DHNPeeCitnaeEdc#tPiohnone Detection 1.M3.IMC5.ILHC7e.RS9a.EdHNPeShaEodn_PeShERoNneDL Serial Port Connector:...
User Guide
Page 55
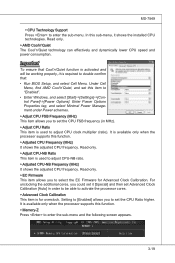
... that : • Run BIOS Setup, and select Cell Menu. For unclocking the additional cores, you to "Enabled". • Enter Windows, and select [Start]->[Settings]->[Control Panel]->[Power Options]. It is activated and will be able to be working properly, it shows the installed CPU technologies. MS-7549 ▶ CPU Technology Support...
... that : • Run BIOS Setup, and select Cell Menu. For unclocking the additional cores, you to "Enabled". • Enter Windows, and select [Start]->[Settings]->[Control Panel]->[Power Options]. It is activated and will be able to be working properly, it shows the installed CPU technologies. MS-7549 ▶ CPU Technology Support...

User Guide
Page 66
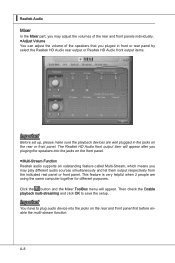
▍ Realtek Audio Software Configuration After installing the audio driver, you are able to activate the HD Audio Configuration. Click the audio icon from the Control Panel. channel audio feature now. It is also available to enable the audio driver by clicking the Realtek HD Audio Manager from the system tray at the lower-right corner of the screen to use the 2-, 4-, 6- or 8- Double click A-4
▍ Realtek Audio Software Configuration After installing the audio driver, you are able to activate the HD Audio Configuration. Click the audio icon from the Control Panel. channel audio feature now. It is also available to enable the audio driver by clicking the Realtek HD Audio Manager from the system tray at the lower-right corner of the screen to use the 2-, 4-, 6- or 8- Double click A-4
User Guide
Page 70
...have to save the setup. Then check the Enable playback multi-streaming and click OK to plug audio device into the jacks on the front panel. ■ Multi-Stream Function Realtek audio supports an outstanding feature called Multi-Stream, which means you may adjust the volumes of the rear... purposes. A-8 Click the button and the Mixer ToolBox menu will appear after you pluging the speakers into the jacks on the rear and front panel first before enable the multi-stream function. ▍ Realtek Audio Mixer In the Mixer part, you may play different audio sources simultaneously and let...
...have to save the setup. Then check the Enable playback multi-streaming and click OK to plug audio device into the jacks on the front panel. ■ Multi-Stream Function Realtek audio supports an outstanding feature called Multi-Stream, which means you may adjust the volumes of the rear... purposes. A-8 Click the button and the Mixer ToolBox menu will appear after you pluging the speakers into the jacks on the rear and front panel first before enable the multi-stream function. ▍ Realtek Audio Mixer In the Mixer part, you may play different audio sources simultaneously and let...

User Guide
Page 71
You will find that the second audio source (MP3 music) will be played from the Line-Out audio jack of Front Panel. A-9 MS-7549 When you must to select the Realtek HD Audio 2nd output from the scroll list first, and use a different program to play the second audio source (for example: use Winamp to play MP3 files). Then you are playing the first audio source (for example: use Windows Media Player to play DVD/VCD), the output will come out from the rear panel, which is the default setting.
You will find that the second audio source (MP3 music) will be played from the Line-Out audio jack of Front Panel. A-9 MS-7549 When you must to select the Realtek HD Audio 2nd output from the scroll list first, and use a different program to play the second audio source (for example: use Winamp to play MP3 files). Then you are playing the first audio source (for example: use Windows Media Player to play DVD/VCD), the output will come out from the rear panel, which is the default setting.

User Guide
Page 72
...; Realtek Audio ■ Playback control Tool Mute Playback device This function is to let you can have music (stream 2 from back panel) in play. Tool - At any given period, you freely decide which volume control items to be able to output the sound. ... displayed. - And this function, you freely decide which ports to have an audio chat with your friends via headphone (stream 1 from front panel) while still have maximum 2 streams operating simultaneously. Show the following volume controls This is essential when multistreaming playback enabled. - Enable playback multi-...
...; Realtek Audio ■ Playback control Tool Mute Playback device This function is to let you can have music (stream 2 from back panel) in play. Tool - At any given period, you freely decide which volume control items to be able to output the sound. ... displayed. - And this function, you freely decide which ports to have an audio chat with your friends via headphone (stream 1 from front panel) while still have maximum 2 streams operating simultaneously. Show the following volume controls This is essential when multistreaming playback enabled. - Enable playback multi-...
User Guide
Page 75
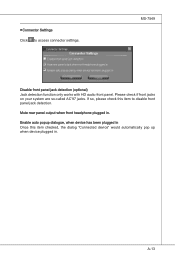
If so, please check this item checked, the dialog "Connected device" would automatically pop up when device plugged in . A-13 ■ Connector Settings Click to disable front panel jack detection. Enable auto popup dialogue, when device has been plugged in Once this item to access connector settings. MS-7549 Disable front panel jack detection (optional) Jack detection function only works with HD audio front panel. Mute rear panel output when front headphone plugged in . Please check if front jacks on your system are so-called AC'97 jacks.
If so, please check this item checked, the dialog "Connected device" would automatically pop up when device plugged in . A-13 ■ Connector Settings Click to disable front panel jack detection. Enable auto popup dialogue, when device has been plugged in Once this item to access connector settings. MS-7549 Disable front panel jack detection (optional) Jack detection function only works with HD audio front panel. Mute rear panel output when front headphone plugged in . Please check if front jacks on your system are so-called AC'97 jacks.

