User Guide
Page 4
...radio or television reception, which the receiver is encouraged to try to correct the interference by the party responsible for help. Micro-Star International MS-7549 This device complies with Part 15 of the FCC Rules. power cord, if any interference received, ...including interference that interference will not occur in a residential installation. Notice 2 Shielded interface cables and A.C. Operation is no guarantee that may cause undesired operation. These limits are designed to provide reasonable...
...radio or television reception, which the receiver is encouraged to try to correct the interference by the party responsible for help. Micro-Star International MS-7549 This device complies with Part 15 of the FCC Rules. power cord, if any interference received, ...including interference that interference will not occur in a residential installation. Notice 2 Shielded interface cables and A.C. Operation is no guarantee that may cause undesired operation. These limits are designed to provide reasonable...

User Guide
Page 9
MS-7549 Appendix A Realtek Audio A-1 Installing the Realtek HD Audio Driver A-2 Software Configuration A-4 Hardware Setup A-19 Appendix B SB710 RAID B-1 RAID Configuration B-2 Appendix C Dual Core Center C-1 Activating Dual Core Center C-2 Main C-3 DOT (Dynamic OverClocking C-5 Clock C-6 Voltage C-7 FAN Speed C-8 Temperature C-9 User Profile C-10 ix
MS-7549 Appendix A Realtek Audio A-1 Installing the Realtek HD Audio Driver A-2 Software Configuration A-4 Hardware Setup A-19 Appendix B SB710 RAID B-1 RAID Configuration B-2 Appendix C Dual Core Center C-1 Activating Dual Core Center C-2 Main C-3 DOT (Dynamic OverClocking C-5 Clock C-6 Voltage C-7 FAN Speed C-8 Temperature C-9 User Profile C-10 ix

User Guide
Page 17
Use a grounded wrist strap before handling computer components. For some components, if you with the information about hardware setup procedures. Chapter 2 Hardware Setup This chapter provides you install in holding the components and follow the installation procedures. While doing the installation, be careful in the wrong orientation, the components will not work properly. Static electricity may damage the components. 2-2-1
Use a grounded wrist strap before handling computer components. For some components, if you with the information about hardware setup procedures. Chapter 2 Hardware Setup This chapter provides you install in holding the components and follow the installation procedures. While doing the installation, be careful in the wrong orientation, the components will not work properly. Static electricity may damage the components. 2-2-1
User Guide
Page 19
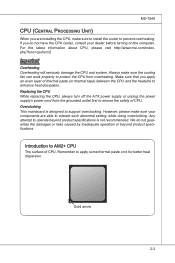
... while doing overclocking. If you apply an even layer of CPU. Always make sure to install the cooler to prevent overheating. Overclocking This mainboard is not recommended. We do not have the CPU cooler, consult...to AM2+ CPU The surface of CPU. Replacing the CPU While replacing the CPU, always turn off the ATX power supply or unplug the power supply's power cord from overheating. php?func=cpuform2 Important Overheating Overheating will ...heat dispersion. For the latest information about CPU, please visit http://www.msi.com/index. Introduction to support overclocking.
... while doing overclocking. If you apply an even layer of CPU. Always make sure to install the cooler to prevent overheating. Overclocking This mainboard is not recommended. We do not have the CPU cooler, consult...to AM2+ CPU The surface of CPU. Replacing the CPU While replacing the CPU, always turn off the ATX power supply or unplug the power supply's power cord from overheating. php?func=cpuform2 Important Overheating Overheating will ...heat dispersion. For the latest information about CPU, please visit http://www.msi.com/index. Introduction to support overclocking.

User Guide
Page 20
...the socket and can only fit in the picture. Pull the lever sideways away from the socket. Make sure to raise the lever up to install the CPU & cooler correctly. Look for better heat dispersion. The gold arrow should be seen. Please note that any violation of your fingers... pressing tightly on top of the CPU to prevent overheating. ▍ Hardware Setup CPU & Cooler Installation When you are installing the CPU, make sure the CPU is properly and completely embedded into the socket and close the lever with your CPU & mainboard. 1. ...
...the socket and can only fit in the picture. Pull the lever sideways away from the socket. Make sure to raise the lever up to install the CPU & cooler correctly. Look for better heat dispersion. The gold arrow should be seen. Please note that any violation of your fingers... pressing tightly on top of the CPU to prevent overheating. ▍ Hardware Setup CPU & Cooler Installation When you are installing the CPU, make sure the CPU is properly and completely embedded into the socket and close the lever with your CPU & mainboard. 1. ...

User Guide
Page 21
... the Safety Hook is disconnected from the fixed bolt, it . 7. Position the cooling set on the mainboard. MS-7549 5. Hook one end of the cooler installation for Socket AM2+ CPUs only. Attach the CPU Fan cable to hook first. 6. The appearance of the retention mechanism.
... the Safety Hook is disconnected from the fixed bolt, it . 7. Position the cooling set on the mainboard. MS-7549 5. Hook one end of the cooler installation for Socket AM2+ CPUs only. Attach the CPU Fan cable to hook first. 6. The appearance of the retention mechanism.
User Guide
Page 22
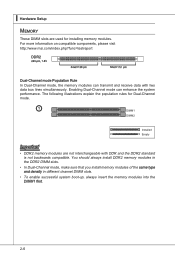
... data with DDR and the DDR2 standard is not backwards compatible. For more information on compatible components, please visit http://www.msi.com/index.php?func=testreport DDR2 240-pin, 1.8V 64x2=128 pin 56x2=112 pin Dual-Channel mode Population Rule In ...enhance the system performance. The following illustrations explain the population rules for Dual-Channel mode. 1 DIMM1 DIMM2 Installed Empty Important • DDR2 memory modules are used for installing memory modules. ▍ Hardware Setup Memory These DIMM slots are not interchangeable with two data bus lines simultaneously...
... data with DDR and the DDR2 standard is not backwards compatible. For more information on compatible components, please visit http://www.msi.com/index.php?func=testreport DDR2 240-pin, 1.8V 64x2=128 pin 56x2=112 pin Dual-Channel mode Population Rule In ...enhance the system performance. The following illustrations explain the population rules for Dual-Channel mode. 1 DIMM1 DIMM2 Installed Empty Important • DDR2 memory modules are used for installing memory modules. ▍ Hardware Setup Memory These DIMM slots are not interchangeable with two data bus lines simultaneously...

User Guide
Page 23
... orientation. 2. Insert the memory module vertically into the DIMM slot. Manually check if the memory module has been locked in the DIMM slot. MS-7549 Installing Memory Modules 1. The memory module has only one notch on the memory module is properly inserted in place by the DIMM slot clips at each...
... orientation. 2. Insert the memory module vertically into the DIMM slot. Manually check if the memory module has been locked in the DIMM slot. MS-7549 Installing Memory Modules 1. The memory module has only one notch on the memory module is properly inserted in place by the DIMM slot clips at each...

User Guide
Page 27
... K dk ldkddfkkakfskkdskkdakaddfdddffdfka-ddkdfdfldkddj adfdsdddjdfddf fkadadsf dddffdfadasfadfsddsddadasdsaddsdafsddadsdddfdsadddffffafsfsdafsdf ff df 3 1/2" Fl oppy Disk Dr i veConnector CD-RMOSMI Kdkldkddfkkakfskkdskkdakaddfdddffdfkadd-kdffdldkddjdafdsdddjdfddfdfkaadsfdddffdfadasfsadfddsddadasdsaddsdafsddadsdddfdsadddfffaffsfsdasfdfffdf 3 1/2" F loppy Di sk D r ive Connector Important If you install two IDE devices on the same cable, you must configure the drives separately to IDE device's documentation supplied by setting jumpers. Refer to master / slave...
... K dk ldkddfkkakfskkdskkdakaddfdddffdfka-ddkdfdfldkddj adfdsdddjdfddf fkadadsf dddffdfadasfadfsddsddadasdsaddsdafsddadsdddfdsadddffffafsfsdafsdf ff df 3 1/2" Fl oppy Disk Dr i veConnector CD-RMOSMI Kdkldkddfkkakfskkdskkdakaddfdddffdfkadd-kdffdldkddjdafdsdddjdfddfdfkaadsfdddffdfadasfsadfddsddadasdsaddsdafsddadsdddfdsadddfffaffsfsdasfdfffdf 3 1/2" F loppy Di sk D r ive Connector Important If you install two IDE devices on the same cable, you must configure the drives separately to IDE device's documentation supplied by setting jumpers. Refer to master / slave...

User Guide
Page 28
... should be connected to the recommended CPU fans at processor's official website or consult the vendors for the SYSFAN1 in BIOS. 2-12 Each connector can install Dual Core Center utility that the red wire is the positive and should be connected to take advantage of speed for proper CPU cooling fan...
... should be connected to the recommended CPU fans at processor's official website or consult the vendors for the SYSFAN1 in BIOS. 2-12 Each connector can install Dual Core Center utility that the red wire is the positive and should be connected to take advantage of speed for proper CPU cooling fan...

User Guide
Page 54
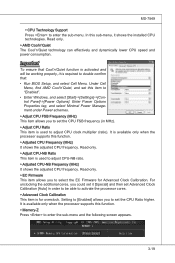
This submenu shows the information of CPU and Memory speed. Read-only. ▶ CPU Specifications Press to enter the sub-menu and the following screen appears. ▍ BIOS Setup Cell Menu Important Change these settings only if you are familiar with the chipset. ▶ Current CPU/ DRAM Frequency These items show the current clocks of installed CPU. 3-18
This submenu shows the information of CPU and Memory speed. Read-only. ▶ CPU Specifications Press to enter the sub-menu and the following screen appears. ▍ BIOS Setup Cell Menu Important Change these settings only if you are familiar with the chipset. ▶ Current CPU/ DRAM Frequency These items show the current clocks of installed CPU. 3-18
User Guide
Page 55
... Firmware This item allows you could set it [Special] and then set the CPU FSB frequency (in order to be working properly, it shows the installed CPU technologies.
... Firmware This item allows you could set it [Special] and then set the CPU FSB frequency (in order to be working properly, it shows the installed CPU technologies.

User Guide
Page 56
...; HT Link Speed This item allows you to set this field to [Auto], the system will appear and selectable. This submenu displays the information of installed memory. ▶ Advance DRAM Configuration Press to enter the sub-menu and the following screen appears. DCT 0 controls channel A and DCT1 controls channel B. ▶ 1T...
...; HT Link Speed This item allows you to set this field to [Auto], the system will appear and selectable. This submenu displays the information of installed memory. ▶ Advance DRAM Configuration Press to enter the sub-menu and the following screen appears. DCT 0 controls channel A and DCT1 controls channel B. ▶ 1T...

User Guide
Page 64
...here in different operating systems. 1. The following illustrations are based on Windows® XP environment and could look slightly different if you install the drivers in this section may be slightly different from the latest software utility and shall be held for Windows® XP For ...Windows® XP, you must install Windows® XP Service Pack3 or later before you can get access to 2-, 4-, 6-, 8- A-2 Follow the procedures described below to enhance audio ...
...here in different operating systems. 1. The following illustrations are based on Windows® XP environment and could look slightly different if you install the drivers in this section may be slightly different from the latest software utility and shall be held for Windows® XP For ...Windows® XP, you must install Windows® XP Service Pack3 or later before you can get access to 2-, 4-, 6-, 8- A-2 Follow the procedures described below to enhance audio ...

User Guide
Page 65
Click Next to restart the system. MS-7549 4. Click Finish to install the Realtek High Definition Audio Driver. Click here Select this option Click here Click here A-3 3.
Click Next to restart the system. MS-7549 4. Click Finish to install the Realtek High Definition Audio Driver. Click here Select this option Click here Click here A-3 3.

User Guide
Page 66
▍ Realtek Audio Software Configuration After installing the audio driver, you are able to activate the HD Audio Configuration. channel audio feature now. It is also available to enable the audio driver by clicking the Realtek HD Audio Manager from the system tray at the lower-right corner of the screen to use the 2-, 4-, 6- Double click A-4 Click the audio icon from the Control Panel. or 8-
▍ Realtek Audio Software Configuration After installing the audio driver, you are able to activate the HD Audio Configuration. channel audio feature now. It is also available to enable the audio driver by clicking the Realtek HD Audio Manager from the system tray at the lower-right corner of the screen to use the 2-, 4-, 6- Double click A-4 Click the audio icon from the Control Panel. or 8-

User Guide
Page 84
A-22 ▍ Realtek Audio ■ 8-Channel Mode for Stereo-Speaker Output 1] Line In 2] Line Out (Front channels) 3] MIC 4] Line Out (Rear channels) 5] Line Out (Center and Subwoofer channel) 6] Line Out (Side channels) Important To enable 7.1 channel audio-out function on Vista operating system, you have to install the Realtek Audio Driver. Or, the mainboard will support 5.1 channel audio-out only.
A-22 ▍ Realtek Audio ■ 8-Channel Mode for Stereo-Speaker Output 1] Line In 2] Line Out (Front channels) 3] MIC 4] Line Out (Rear channels) 5] Line Out (Center and Subwoofer channel) 6] Line Out (Side channels) Important To enable 7.1 channel audio-out function on Vista operating system, you have to install the Realtek Audio Driver. Or, the mainboard will support 5.1 channel audio-out only.
User Guide
Page 92
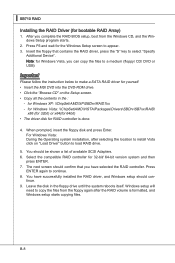
...for 32bit) or x64(for 64bit) • The driver disk for yourself. • Insert the MSI DVD into the DVD-ROM drive. • Click the "Browse CD" on "Load Driver" button to install Vista click on the Setup screen. • Copy all the contents in the floppy drive until ... RAID controller for Windows XP: \\ChipSet\AMD\XP\SBDrv\RAID7xx - Press F6 and wait for bootable RAID Array) 1. For Windows Vista: During the Operating system installation, after the RAID volume is done. 4. Press ENTER again to appear. 3. B-8 for 32-bit/ 64-bit version system and then press ENTER. 7. tinue....
...for 32bit) or x64(for 64bit) • The driver disk for yourself. • Insert the MSI DVD into the DVD-ROM drive. • Click the "Browse CD" on "Load Driver" button to install Vista click on the Setup screen. • Copy all the contents in the floppy drive until ... RAID controller for Windows XP: \\ChipSet\AMD\XP\SBDrv\RAID7xx - Press F6 and wait for bootable RAID Array) 1. For Windows Vista: During the Operating system installation, after the RAID volume is done. 4. Press ENTER again to appear. 3. B-8 for 32-bit/ 64-bit version system and then press ENTER. 7. tinue....
User Guide
Page 93
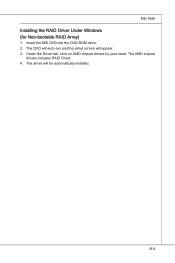
The DVD will auto-run and the setup screen will be automatically installed. B-9 Insert the MSI DVD into the DVD-ROM drive. 2. The driver will appear. 3. The AMD chipset drivers includes RAID Driver. 4. Under the Driver tab, click on AMD chipset drivers by your need. MS-7549 Installing the RAID Driver Under Windows (for Non-bootable RAID Array) 1.
The DVD will auto-run and the setup screen will be automatically installed. B-9 Insert the MSI DVD into the DVD-ROM drive. 2. The driver will appear. 3. The AMD chipset drivers includes RAID Driver. 4. Under the Driver tab, click on AMD chipset drivers by your need. MS-7549 Installing the RAID Driver Under Windows (for Non-bootable RAID Array) 1.
User Guide
Page 95
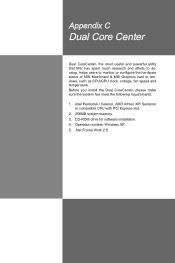
CD-ROM drive for software installation. 4. Appendix C Dual Core Center Dual CoreCenter, the most useful and powerful utility that MSI has spent much research and efforts to develop, helps users to monitor or configure the hardware status of MSI Mainboard & MSI Graphics card in windows, such as CPU/...GPU clock, voltage, fan speed and temperature. Before you install the Dual CoreCenter, please make sure the system has meet the following requirements: ...
CD-ROM drive for software installation. 4. Appendix C Dual Core Center Dual CoreCenter, the most useful and powerful utility that MSI has spent much research and efforts to develop, helps users to monitor or configure the hardware status of MSI Mainboard & MSI Graphics card in windows, such as CPU/...GPU clock, voltage, fan speed and temperature. Before you install the Dual CoreCenter, please make sure the system has meet the following requirements: ...


