User Guide
Page 8
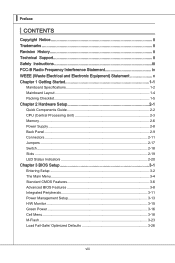
... Interference Statement iv WEEE (Waste Electrical and Electronic Equipment) Statement v Chapter 1 Getting Started 1-1 Mainboard Specifications 1-2 Mainboard Layout 1-4 Packing Checklist 1-5 Chapter 2 Hardware Setup 2-1 Quick Components Guide 2-2 CPU (Central Processing Unit 2-3 Memory 2-6 Power Supply 2-8 Back Panel 2-9 Connectors 2-11 Jumpers 2-17 Switch 2-18 Slots 2-19 LED Status Indicators 2-20 Chapter 3 BIOS Setup 3-1 Entering Setup...
... Interference Statement iv WEEE (Waste Electrical and Electronic Equipment) Statement v Chapter 1 Getting Started 1-1 Mainboard Specifications 1-2 Mainboard Layout 1-4 Packing Checklist 1-5 Chapter 2 Hardware Setup 2-1 Quick Components Guide 2-2 CPU (Central Processing Unit 2-3 Memory 2-6 Power Supply 2-8 Back Panel 2-9 Connectors 2-11 Jumpers 2-17 Switch 2-18 Slots 2-19 LED Status Indicators 2-20 Chapter 3 BIOS Setup 3-1 Entering Setup...
User Guide
Page 12
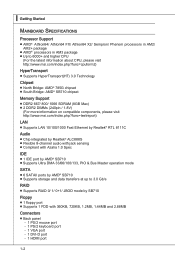
... processors in AM2/ AM2+ package ■ AMD® processors in AM3 package ■ Up to 6000+ and higher CPU (For the latest information about CPU, please visit http://www.msi.com/index.php?func=cpuform2) HyperTransport ■ Supports HyperTransport(HT) 3.0 Technology Chipset ■ North Bridge: AMD® 785G... 800/ 1066 SDRAM (8GB Max) ■ 2 DDR2 DIMMs (240pin / 1.8V) (For more information on compatible components, please visit http://www.msi.com/index.php?func=testreport) LAN ■ Supports LAN 10/100/1000 Fast Ethernet by Realtek® RTL 8111C Audio ■ Chip integrated by ...
... processors in AM2/ AM2+ package ■ AMD® processors in AM3 package ■ Up to 6000+ and higher CPU (For the latest information about CPU, please visit http://www.msi.com/index.php?func=cpuform2) HyperTransport ■ Supports HyperTransport(HT) 3.0 Technology Chipset ■ North Bridge: AMD® 785G... 800/ 1066 SDRAM (8GB Max) ■ 2 DDR2 DIMMs (240pin / 1.8V) (For more information on compatible components, please visit http://www.msi.com/index.php?func=testreport) LAN ■ Supports LAN 10/100/1000 Fast Ethernet by Realtek® RTL 8111C Audio ■ Chip integrated by ...
User Guide
Page 19
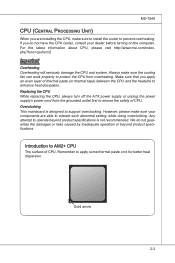
...the damages or risks caused by inadequate operation or beyond product specifications is designed to support overclocking. Replacing the CPU While replacing the CPU, always turn off the ATX power supply or unplug the power supply's power cord from overheating. If you are able to enhance heat ...to ensure the safety of thermal paste (or thermal tape) between the CPU and the heatsink to tolerate such abnormal setting, while doing overclocking. For the latest information about CPU, please visit http://www.msi.com/index. However, please make sure to install the cooler to ...
...the damages or risks caused by inadequate operation or beyond product specifications is designed to support overclocking. Replacing the CPU While replacing the CPU, always turn off the ATX power supply or unplug the power supply's power cord from overheating. If you are able to enhance heat ...to ensure the safety of thermal paste (or thermal tape) between the CPU and the heatsink to tolerate such abnormal setting, while doing overclocking. For the latest information about CPU, please visit http://www.msi.com/index. However, please make sure to install the cooler to ...

User Guide
Page 20
..., do not forget to apply some thermal paste on the top to prevent overheating. The CPU can not be seen. ▍ Hardware Setup CPU & Cooler Installation When you are installing the CPU, make sure the CPU is correctly installed, the pins should point as shown in the correct orientation. 3. Pull ...lever sideways away from the socket. Wrong installation will cause the damage of your fingers pressing tightly on top of the CPU. Look for better heat dispersion. If the CPU is properly and completely embedded into the socket. 2-4 Make sure to raise the lever up to make sure the...
..., do not forget to apply some thermal paste on the top to prevent overheating. The CPU can not be seen. ▍ Hardware Setup CPU & Cooler Installation When you are installing the CPU, make sure the CPU is correctly installed, the pins should point as shown in the correct orientation. 3. Pull ...lever sideways away from the socket. Wrong installation will cause the damage of your fingers pressing tightly on top of the CPU. Look for better heat dispersion. If the CPU is properly and completely embedded into the socket. 2-4 Make sure to raise the lever up to make sure the...

User Guide
Page 21
... the fixed bolt, it . 7. Locate the Fix Lever and lift up it is necessary to keep an eye on the mainboard. Attach the CPU Fan cable to the CPU fan connector on your mainboard may vary depending on the model you purchase. • While disconnecting the Safety Hook from the fixed bolt...
... the fixed bolt, it . 7. Locate the Fix Lever and lift up it is necessary to keep an eye on the mainboard. Attach the CPU Fan cable to the CPU fan connector on your mainboard may vary depending on the model you purchase. • While disconnecting the Safety Hook from the fixed bolt...
User Guide
Page 24
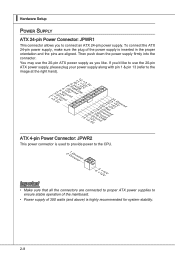
...S1+O1B.1+K2211.V+3213.V+4.133.-5V.113.2G6V1V.rP7o1.SuG81-n.rO9Gdo2.NurG0o2n#.ruR1do2n.eu+2ds2n5.+3dV2.5+4V5.GVround ATX 4-pin Power Connector: JPWR2 This power connector is used to provide power to the CPU. 2.G1.rGouronudnd 4.+31.+21V2V Important • Make sure that all the connectors are connected to ...proper ATX power supplies to connect an ATX 24-pin power supply. If you'd like . To connect the ATX 24-pin power supply, make sure the plug...
...S1+O1B.1+K2211.V+3213.V+4.133.-5V.113.2G6V1V.rP7o1.SuG81-n.rO9Gdo2.NurG0o2n#.ruR1do2n.eu+2ds2n5.+3dV2.5+4V5.GVround ATX 4-pin Power Connector: JPWR2 This power connector is used to provide power to the CPU. 2.G1.rGouronudnd 4.+31.+21V2V Important • Make sure that all the connectors are connected to ...proper ATX power supplies to connect an ATX 24-pin power supply. If you'd like . To connect the ATX 24-pin power supply, make sure the plug...

User Guide
Page 28
...cable into 90-degree angle. Fan Power Connectors: CPUFAN1, SYSFAN1 The fan power connectors support system cooling fan with speed sensor to the recommended CPU fans at processor's official website or consult the vendors for the SYSFAN1 in BIOS. 2-12 CPUFAN1 SYSFAN1 4.3C.oS2n.e+1tnr.1osG2lorVround 3.S2.e+1n1...and should be connected to one Serial ATA device. When connecting the wire to the connectors, always note that will automatically control the CPU fan speed according to GND. Each connector can install Dual Core Center utility that the red wire is a high-speed Serial ATA interface ...
...cable into 90-degree angle. Fan Power Connectors: CPUFAN1, SYSFAN1 The fan power connectors support system cooling fan with speed sensor to the recommended CPU fans at processor's official website or consult the vendors for the SYSFAN1 in BIOS. 2-12 CPUFAN1 SYSFAN1 4.3C.oS2n.e+1tnr.1osG2lorVround 3.S2.e+1n1...and should be connected to one Serial ATA device. When connecting the wire to the connectors, always note that will automatically control the CPU fan speed according to GND. Each connector can install Dual Core Center utility that the red wire is a high-speed Serial ATA interface ...
User Guide
Page 36
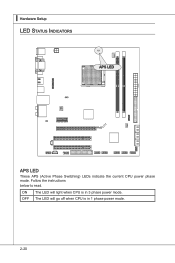
Follow the instructions below to read. The LED will light when CPU is in 3 phase power mode. ON OFF The LED will go off when CPU is in 1 phase power mode. 2-20 ▍ Hardware Setup LED Status Indicators APS LED APS LED These APS (Active Phase Switching) LEDs indicate the current CPU power phase mode.
Follow the instructions below to read. The LED will light when CPU is in 3 phase power mode. ON OFF The LED will go off when CPU is in 1 phase power mode. 2-20 ▍ Hardware Setup LED Status Indicators APS LED APS LED These APS (Active Phase Switching) LEDs indicate the current CPU power phase mode.

User Guide
Page 39
... you will see is displayed at the bottom of the screen. If you can call up this field. You can make changes General Help Enter CPU Specifications submenu Enter Memory-Z submenu Load Optimized Defaults Load Fail-Safe Defaults Save all the CMOS changes and exit Getting Help After entering the Setup...
... you will see is displayed at the bottom of the screen. If you can call up this field. You can make changes General Help Enter CPU Specifications submenu Enter Memory-Z submenu Load Optimized Defaults Load Fail-Safe Defaults Save all the CMOS changes and exit Getting Help After entering the Setup...
User Guide
Page 43
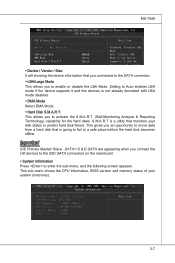
... gives you an opportunity to move data from a hard disk that is going to fail to predict hard disk failure. This sub-menu shows the CPU information, BIOS version and memory status of your disk status to a safe place before the hard disk becomes offline. Setting to enable or disable the...
... gives you an opportunity to move data from a hard disk that is going to fail to predict hard disk failure. This sub-menu shows the CPU information, BIOS version and memory status of your disk status to a safe place before the hard disk becomes offline. Setting to enable or disable the...
User Guide
Page 45
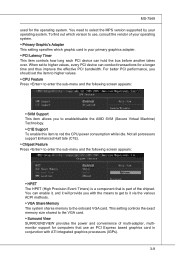
When set the item to higher values. ▶ CPU Feature Press to select the MPS version supported by your operating system. Not all porcessors support Enhanced Halt tate (C1E). ▶ Chipset Feature Press to ... in conjunction with the means to get to it via the various ACPI methods. ▶ VGA Share Memory The system shares memory to red the CPU power consumption while idle. You can conduct transactions for a longer time and thus improve the effective PCI bandwidth. MS-7549 used for computers that is...
When set the item to higher values. ▶ CPU Feature Press to select the MPS version supported by your operating system. Not all porcessors support Enhanced Halt tate (C1E). ▶ Chipset Feature Press to ... in conjunction with the means to get to it via the various ACPI methods. ▶ VGA Share Memory The system shares memory to red the CPU power consumption while idle. You can conduct transactions for a longer time and thus improve the effective PCI bandwidth. MS-7549 used for computers that is...

User Guide
Page 49
Power Management Setup MS-7549 Important S3-related functions described in this state, no system context is lost (CPU or chipset) and hardware maintains all system context. [S3] The S3 sleep mode is a lower power state where the in S1(POS) or S3(STR) ...
Power Management Setup MS-7549 Important S3-related functions described in this state, no system context is lost (CPU or chipset) and hardware maintains all system context. [S3] The S3 sleep mode is a lower power state where the in S1(POS) or S3(STR) ...
User Guide
Page 51
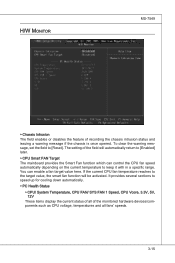
...]. To clear the warning message, set the field to speed up for cooling down automatically. ▶ PC Health Status ▶ CPU/ System Temperature, CPU FAN/ SYS FAN 1 Speed, CPU Vcore, 3.3V, 5V, 12V These items display the current status of all of the monitored hardware devices/components such as...here. H/W Monitor MS-7549 ▶ Chassis Intrusion The field enables or disables the feature of the field will be activated. If the current CPU fan temperature reaches to the target value, the smart fan function will automatically return to keep it with in a specific range. The setting ...
...]. To clear the warning message, set the field to speed up for cooling down automatically. ▶ PC Health Status ▶ CPU/ System Temperature, CPU FAN/ SYS FAN 1 Speed, CPU Vcore, 3.3V, 5V, 12V These items display the current status of all of the monitored hardware devices/components such as...here. H/W Monitor MS-7549 ▶ Chassis Intrusion The field enables or disables the feature of the field will be activated. If the current CPU fan temperature reaches to the target value, the smart fan function will automatically return to keep it with in a specific range. The setting ...

User Guide
Page 52
▍ BIOS Setup Green Power ▶ CPU Phase Control When set to [Auto], the hardware will auto adjust the CPU power phase according to the loading of CPU to reach the best power saving function. ▶ LED Power Control This item is used to enable/ disable the power phase LEDs of the mainboard. 3-16
▍ BIOS Setup Green Power ▶ CPU Phase Control When set to [Auto], the hardware will auto adjust the CPU power phase according to the loading of CPU to reach the best power saving function. ▶ LED Power Control This item is used to enable/ disable the power phase LEDs of the mainboard. 3-16

User Guide
Page 54
Read-only. ▶ CPU Specifications Press to enter the sub-menu and the following screen appears. ▍ BIOS Setup Cell Menu Important Change these settings only if you are familiar with the chipset. ▶ Current CPU/ DRAM Frequency These items show the current clocks of installed CPU. 3-18 This submenu shows the information of CPU and Memory speed.
Read-only. ▶ CPU Specifications Press to enter the sub-menu and the following screen appears. ▍ BIOS Setup Cell Menu Important Change these settings only if you are familiar with the chipset. ▶ Current CPU/ DRAM Frequency These items show the current clocks of installed CPU. 3-18 This submenu shows the information of CPU and Memory speed.
User Guide
Page 55
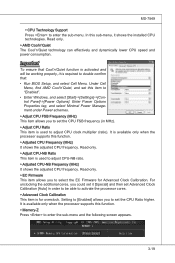
... processor cores. ▶ Advanced Clock Calibration This item is available only when the processor supports this function. ▶ Adjusted CPU Frequency (MHz) It shows the adjusted CPU frequency. It is for Advanced Clock Calibration. Important To ensure that : • Run BIOS Setup, and select Cell Menu...and the following screen appears. 3-19 Read only. ▶ AMD Cool'n'Quiet The Cool'n'Quiet technology can effectively and dynamically lower CPU speed and power consumption. Read-only. ▶ EC Firmware This item allows you to set Advanced Clock Calibration [Auto] in MHz). ...
... processor cores. ▶ Advanced Clock Calibration This item is available only when the processor supports this function. ▶ Adjusted CPU Frequency (MHz) It shows the adjusted CPU frequency. It is for Advanced Clock Calibration. Important To ensure that : • Run BIOS Setup, and select Cell Menu...and the following screen appears. 3-19 Read only. ▶ AMD Cool'n'Quiet The Cool'n'Quiet technology can effectively and dynamically lower CPU speed and power consumption. Read-only. ▶ EC Firmware This item allows you to set Advanced Clock Calibration [Auto] in MHz). ...
User Guide
Page 95
Before you install the Dual CoreCenter, please make sure the system has meet the following requirements: 1. Intel Pentium4 / Celeron, AMD Athlon XP/ Sempron or compatible CPU with PCI Express slot. 2. 256MB system memory. 3. CD-ROM drive for software installation. 4. Operation system: Windows XP. 5. .Net Frame Work 2.0 B-C-1 ...Appendix C Dual Core Center Dual CoreCenter, the most useful and powerful utility that MSI has spent much research and efforts to develop, helps users to monitor or configure the hardware status of...
Before you install the Dual CoreCenter, please make sure the system has meet the following requirements: 1. Intel Pentium4 / Celeron, AMD Athlon XP/ Sempron or compatible CPU with PCI Express slot. 2. 256MB system memory. 3. CD-ROM drive for software installation. 4. Operation system: Windows XP. 5. .Net Frame Work 2.0 B-C-1 ...Appendix C Dual Core Center Dual CoreCenter, the most useful and powerful utility that MSI has spent much research and efforts to develop, helps users to monitor or configure the hardware status of...

User Guide
Page 97
VGA Click VGA button to read current CPU temperature, FSB and CPU clock of the MSI mainboard would be available. If you : only when installing the MSI V044 (V044 has to execute the function. Introduction: Click each button appearing above to enter sub-menu to make further configuration or to install with ...
VGA Click VGA button to read current CPU temperature, FSB and CPU clock of the MSI mainboard would be available. If you : only when installing the MSI V044 (V044 has to execute the function. Introduction: Click each button appearing above to enter sub-menu to make further configuration or to install with ...
User Guide
Page 99
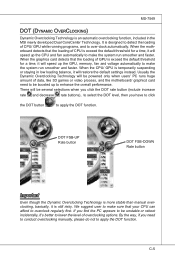
...Usually the Dynamic Overclocking Technology will speed up the CPU and fan automatically to make sure that the loading of GPU is exceed the default threshold for a time, it is temporarily suspending or staying in the MSI newly developed Dual CoreCenter Technology. By the way, ... automatically to make the system run smoother and faster. C-5 When the motherboard detects that the loading of CPU is more stable than manual overclocking, basically, it will restore the default settings instead. When the CPU/ GPU is still risky. MS-7549 DOT (Dynamic OverClocking) Dynamic Overclocking...
...Usually the Dynamic Overclocking Technology will speed up the CPU and fan automatically to make sure that the loading of GPU is exceed the default threshold for a time, it is temporarily suspending or staying in the MSI newly developed Dual CoreCenter Technology. By the way, ... automatically to make the system run smoother and faster. C-5 When the motherboard detects that the loading of CPU is more stable than manual overclocking, basically, it will restore the default settings instead. When the CPU/ GPU is still risky. MS-7549 DOT (Dynamic OverClocking) Dynamic Overclocking...

User Guide
Page 100
... you can save the changes to apply the values adjusted. Important In the user profile, clicking the Save button can see clock status (including FSB/ CPU clock of mainboard and GPU/ memory clock of graphics card) of your system. There will be several items for you to cancel. And finally, click...
... you can save the changes to apply the values adjusted. Important In the user profile, clicking the Save button can see clock status (including FSB/ CPU clock of mainboard and GPU/ memory clock of graphics card) of your system. There will be several items for you to cancel. And finally, click...

