User Guide
Page 8
... Processing Unit 2-3 Memory 2-6 Power Supply 2-8 Back Panel 2-9 Connectors 2-11 Jumpers 2-18 Switch 2-19 Slots 2-20 LED Status Indicators 2-23 Chapter 3 BIOS Setup 3-1 Entering Setup 3-2 The Main Menu 3-4 Standard CMOS Features 3-6 Advanced BIOS Features 3-9 Integrated Peripherals 3-12 Power Management Setup 3-14 H/W Monitor 3-16 Green Power 3-17 BIOS Setting Password 3-18 Cell Menu...
... Processing Unit 2-3 Memory 2-6 Power Supply 2-8 Back Panel 2-9 Connectors 2-11 Jumpers 2-18 Switch 2-19 Slots 2-20 LED Status Indicators 2-23 Chapter 3 BIOS Setup 3-1 Entering Setup 3-2 The Main Menu 3-4 Standard CMOS Features 3-6 Advanced BIOS Features 3-9 Integrated Peripherals 3-12 Power Management Setup 3-14 H/W Monitor 3-16 Green Power 3-17 BIOS Setting Password 3-18 Cell Menu...
User Guide
Page 42
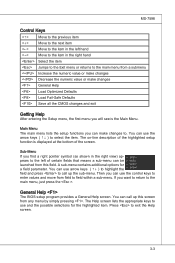
... item Jumps to the Exit menu or returns to . Then you will see is displayed at the bottom of the highlighted setup function is the Main Menu. The on-line description of the screen. You can use the arrow keys ( ↑↓ ) to field within a sub-menu. A sub-menu contains additional... the control keys to enter values and move from any menu by simply pressing . You can use and the possible selections for a field parameter. MS-7596 Control Keys Move to the previous item Move to the next item Move to the item in the left of certain fields that means a sub...
... item Jumps to the Exit menu or returns to . Then you will see is displayed at the bottom of the highlighted setup function is the Main Menu. The on-line description of the screen. You can use the arrow keys ( ↑↓ ) to field within a sub-menu. A sub-menu contains additional... the control keys to enter values and move from any menu by simply pressing . You can use and the possible selections for a field parameter. MS-7596 Control Keys Move to the previous item Move to the next item Move to the item in the left of certain fields that means a sub...

User Guide
Page 43
▍ BIOS Setup The Main Menu ▶ Standard CMOS Features Use this menu for basic system configurations, such as time, date etc. ▶ Advanced BIOS Features Use this menu to ...
▍ BIOS Setup The Main Menu ▶ Standard CMOS Features Use this menu for basic system configurations, such as time, date etc. ▶ Advanced BIOS Features Use this menu to ...
User Guide
Page 53
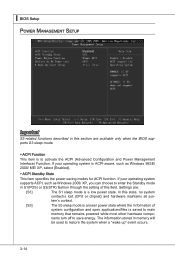
... to enter the Standby mode in S1(POS) or S3(STR) fashion through the setting of system configuration and open applications/files is saved to main memory that remains powered while most other hardware components turn off to restore the system when a "wake up" event occurs. 3-14 ▍ BIOS Setup Power...
... to enter the Standby mode in S1(POS) or S3(STR) fashion through the setting of system configuration and open applications/files is saved to main memory that remains powered while most other hardware components turn off to restore the system when a "wake up" event occurs. 3-14 ▍ BIOS Setup Power...
User Guide
Page 67
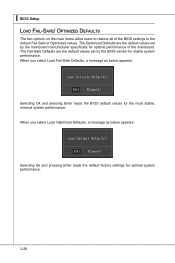
▍ BIOS Setup Load Fail-Safe/ Optimized Defaults The two options on the main menu allow users to the default Fail-Safe or Optimized values. The Fail-Safe Defaults are the default values set by the mainboard manufacturer specifically ...
▍ BIOS Setup Load Fail-Safe/ Optimized Defaults The two options on the main menu allow users to the default Fail-Safe or Optimized values. The Fail-Safe Defaults are the default values set by the mainboard manufacturer specifically ...

User Guide
Page 91
The FastBuild menu screen will appear for SATA device in the RAID BIOS. B-2 Press to be performed. ▍ SB710 RAID RAID Configuration Creating and deleting RAID set and performing other RAID setting up , a screen similar to the one below will appear. During boot-up operations are done in BIOS before configuring the Fastbuild Utility. The Main Menu is used to choose the operation to enter FastBuild utility. Important Be sure to enable the RAID function for about few seconds.
The FastBuild menu screen will appear for SATA device in the RAID BIOS. B-2 Press to be performed. ▍ SB710 RAID RAID Configuration Creating and deleting RAID set and performing other RAID setting up , a screen similar to the one below will appear. During boot-up operations are done in BIOS before configuring the Fastbuild Utility. The Main Menu is used to choose the operation to enter FastBuild utility. Important Be sure to enable the RAID function for about few seconds.

User Guide
Page 93
It is best to carefully consider the long-term role of drives available. Press 2 on the Main Menu screen to the "Drives Assignments" window. B-4 On the next screen, use the space key to choose a RAID mode (RAID 0/ 1/ 10) and use the arrow ...key to move to enter the Define LD Menu. 2. ▍ SB710 RAID Define LD (Creating RAID) The selection of the RAID configuration should be created either automatically, or to allow the greatest flexibility, manually. 1. RAID sets...
It is best to carefully consider the long-term role of drives available. Press 2 on the Main Menu screen to the "Drives Assignments" window. B-4 On the next screen, use the space key to choose a RAID mode (RAID 0/ 1/ 10) and use the arrow ...key to move to enter the Define LD Menu. 2. ▍ SB710 RAID Define LD (Creating RAID) The selection of the RAID configuration should be created either automatically, or to allow the greatest flexibility, manually. 1. RAID sets...

User Guide
Page 95
Are You Sure?" B-6 Press ESC key to exit it and the system will reboot. The LD creation is going to exit the utility, a message "System is done, the screen shows the LD information as below. will display, answer "Y" to the main screen. 7. ▍ SB710 RAID 6. Press ESC key to REBOOT!
Are You Sure?" B-6 Press ESC key to exit it and the system will reboot. The LD creation is going to exit the utility, a message "System is done, the screen shows the LD information as below. will display, answer "Y" to the main screen. 7. ▍ SB710 RAID 6. Press ESC key to REBOOT!

User Guide
Page 96
Press "Ctrl+Y" to abort it. B-7 On the next screen, a message will display to inform you want to delete and press "Del" or "Alt+D" delete the RAID set or other key to complete the deletion. Choose a LD No you , press "Ctrl+Y" to delete the RAID set . 3. MS-7596 Delete LD (Deleting RAID) 1. Select "Delete LD" on the main screen. 2.
Press "Ctrl+Y" to abort it. B-7 On the next screen, a message will display to inform you want to delete and press "Del" or "Alt+D" delete the RAID set or other key to complete the deletion. Choose a LD No you , press "Ctrl+Y" to delete the RAID set . 3. MS-7596 Delete LD (Deleting RAID) 1. Select "Delete LD" on the main screen. 2.

