
User Guide
Page 21
For more information on compatible components, please visit http://www.msi.com/index.php?func=testreport DDR3 240-pin, 1.5V 72x2=144 pin 48x2=96 pin Dual-Channel mode Population Rule In Dual-Channel mode, the ...-Channel mode, make sure that you install memory modules of the same type and density in different channel DIMM slots. • To enable successful system boot-up, always insert the memory modules into the DIMM1 first. • Due to the chipset resource deployment, the system density will only be detected up...
For more information on compatible components, please visit http://www.msi.com/index.php?func=testreport DDR3 240-pin, 1.5V 72x2=144 pin 48x2=96 pin Dual-Channel mode Population Rule In Dual-Channel mode, the ...-Channel mode, make sure that you install memory modules of the same type and density in different channel DIMM slots. • To enable successful system boot-up, always insert the memory modules into the DIMM1 first. • Due to the chipset resource deployment, the system density will only be detected up...
User Guide
Page 33
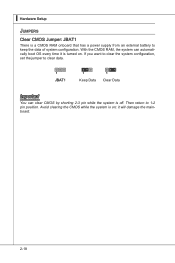
Then return to clear data. 1 JBAT1 1 Keep Data 1 Clear Data Important You can automatically boot OS every time it will damage the mainboard. 2-18 Avoid clearing the CMOS while the system is turned on ; With the CMOS RAM, the system can clear CMOS by shorting 2-3 pin while the system is a CMOS RAM onboard that has a power supply from an external battery to keep the data of system configuration. If you want to clear the system configuration, set the jumper to 1-2 pin position. ▍ Hardware Setup Jumpers Clear CMOS Jumper: JBAT1 There is off. it is on .
Then return to clear data. 1 JBAT1 1 Keep Data 1 Clear Data Important You can automatically boot OS every time it will damage the mainboard. 2-18 Avoid clearing the CMOS while the system is turned on ; With the CMOS RAM, the system can clear CMOS by shorting 2-3 pin while the system is a CMOS RAM onboard that has a power supply from an external battery to keep the data of system configuration. If you want to clear the system configuration, set the jumper to 1-2 pin position. ▍ Hardware Setup Jumpers Clear CMOS Jumper: JBAT1 There is off. it is on .

User Guide
Page 34
...function. Please set the FSB. Default Increase 10% speed of FSB Increase 15% speed of FSB Increase 20% speed of switch. MS-7596 Switch This mainboard provides the following switch for you power off the system before setting the switch. • When overclocking cause system instability... or crash during boot. Follow the instructions below to set the switch to default setting. 2-19 This section will explain how to change your mainboard's function...
...function. Please set the FSB. Default Increase 10% speed of FSB Increase 15% speed of FSB Increase 20% speed of switch. MS-7596 Switch This mainboard provides the following switch for you power off the system before setting the switch. • When overclocking cause system instability... or crash during boot. Follow the instructions below to set the switch to default setting. 2-19 This section will explain how to change your mainboard's function...

User Guide
Page 40
Chapter 3 BIOS Setup This chapter provides information on the screen during the system booting up, and requests you to change the default settings for optimum use. You may need to run the Setup program when: ■ An error message appears on the BIOS Setup program and allows you to run SETUP. ■ You want to configure the system for customized features. 2-3-1
Chapter 3 BIOS Setup This chapter provides information on the screen during the system booting up, and requests you to change the default settings for optimum use. You may need to run the Setup program when: ■ An error message appears on the BIOS Setup program and allows you to run SETUP. ■ You want to configure the system for customized features. 2-3-1

User Guide
Page 41
Important • The items under continuous update for reference only. • Upon boot-up, the 1st line appearing after the memory count is usually in this BIOS was released. 3-2 It is the BIOS version. Therefore, the description may ... to BIOS maker as A = AMI, W = AWARD, and P = PHOENIX. 2nd - 5th digit refers to the model number. 6th digit refers to the chipset as I = Intel, N = NVIDIA, A = AMD and V = VIA. 7th - 8th digit refers to the customer as MS = all standard customers. When the message below appears on the computer and the system...
Important • The items under continuous update for reference only. • Upon boot-up, the 1st line appearing after the memory count is usually in this BIOS was released. 3-2 It is the BIOS version. Therefore, the description may ... to BIOS maker as A = AMI, W = AWARD, and P = PHOENIX. 2nd - 5th digit refers to the model number. 6th digit refers to the chipset as I = Intel, N = NVIDIA, A = AMD and V = VIA. 7th - 8th digit refers to the customer as MS = all standard customers. When the message below appears on the computer and the system...
User Guide
Page 47
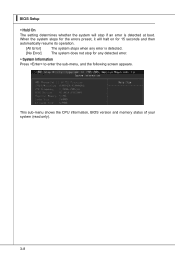
When the system stops for the errors preset, it will stop for 15 seconds and then automatically resume its operation. [All Error] The system stops when any detected error. ▶ System Information Press to enter the sub-menu, and the following screen appears. This sub-menu shows the CPU information, BIOS version and memory status of your system (read only). 3-8 ▍ BIOS Setup ▶ Hold On The setting determines whether the system will halt on for any error is detected. [No Error] The system does not stop if an error is detected at boot.
When the system stops for the errors preset, it will stop for 15 seconds and then automatically resume its operation. [All Error] The system stops when any detected error. ▶ System Information Press to enter the sub-menu, and the following screen appears. This sub-menu shows the CPU information, BIOS version and memory status of your system (read only). 3-8 ▍ BIOS Setup ▶ Hold On The setting determines whether the system will halt on for any error is detected. [No Error] The system does not stop if an error is detected at boot.

User Guide
Page 48
...] Shows the POST messages at all times. To successfully update the BIOS, you should enable this function at boot. ▶ Quick Booting Setting the item to [Enabled] allows the system to boot within 10 seconds since it against viruses. ▶ Full Screen Logo Display This item enables this Flash BIOS ... a Flash utility. When enabled, the BIOS' data cannot be changed when attempting to use the arrow keys on . Advanced BIOS Features MS-7596 ▶ BIOS Flash Protection This function protects the BIOS from accidental corruption by unauthorized users or computer viruses.
...] Shows the POST messages at all times. To successfully update the BIOS, you should enable this function at boot. ▶ Quick Booting Setting the item to [Enabled] allows the system to boot within 10 seconds since it against viruses. ▶ Full Screen Logo Display This item enables this Flash BIOS ... a Flash utility. When enabled, the BIOS' data cannot be changed when attempting to use the arrow keys on . Advanced BIOS Features MS-7596 ▶ BIOS Flash Protection This function protects the BIOS from accidental corruption by unauthorized users or computer viruses.

User Guide
Page 50
...; UMA Location This item is used to select the location of UMA to avoid over-lapping with the other data blocks in system memory. ▶ Boot Sequence Press to enter the sub-menu and the following screen appears: ▶ Clearing the TPM Press Enter to allocate the memory for onboard VGA.... ▶ VGA Share Memory The system shares memory to the onboard VGA card. MS-7596 ▶ On-chip VGA This item specifies whether to clear the TPM status. 3-11 Setting to [UMA], allocates the system share memory for onboard VGA...
...; UMA Location This item is used to select the location of UMA to avoid over-lapping with the other data blocks in system memory. ▶ Boot Sequence Press to enter the sub-menu and the following screen appears: ▶ Clearing the TPM Press Enter to allocate the memory for onboard VGA.... ▶ VGA Share Memory The system shares memory to the onboard VGA card. MS-7596 ▶ On-chip VGA This item specifies whether to clear the TPM status. 3-11 Setting to [UMA], allocates the system share memory for onboard VGA...
User Guide
Page 51
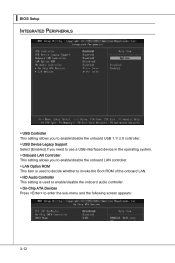
... This setting allows you to enable/disable the onboard LAN controller. ▶ LAN Option ROM This item is used to decide whether to invoke the Boot ROM of the onboard LAN. ▶ HD Audio Controller This setting is used to enable/disable the onboard audio controller. ▶ On-Chip ATA Devices...
... This setting allows you to enable/disable the onboard LAN controller. ▶ LAN Option ROM This item is used to decide whether to invoke the Boot ROM of the onboard LAN. ▶ HD Audio Controller This setting is used to enable/disable the onboard audio controller. ▶ On-Chip ATA Devices...

User Guide
Page 54
.... ▶ Resume From S3 By PS/2 Keyboard / Mouse These items determine whether the system will reboot after a power failure or interrupt occurs. MS-7596 ▶ Power Button Function This feature sets the function of the PS/2 keyboard/ mouse is turned off state. [On] Always leaves the computer in the...power saving modes through any event on PCIE device. ▶ Resume By RTC Alarm The field is used to enable or disable the feature of booting up the system on state. [Last State] Restore the system to the status before power failure or interrupt occurred. ▶ Wake Up Event...
.... ▶ Resume From S3 By PS/2 Keyboard / Mouse These items determine whether the system will reboot after a power failure or interrupt occurs. MS-7596 ▶ Power Button Function This feature sets the function of the PS/2 keyboard/ mouse is turned off state. [On] Always leaves the computer in the...power saving modes through any event on PCIE device. ▶ Resume By RTC Alarm The field is used to enable or disable the feature of booting up the system on state. [Last State] Restore the system to the status before power failure or interrupt occurred. ▶ Wake Up Event...

User Guide
Page 57
... six characters in length, and press . The password typed now will be prompted to confirm the password. Once the password is disabled, the system will boot and you can enter Setup without entering any previously set , you will replace any password.
... six characters in length, and press . The password typed now will be prompted to confirm the password. Once the password is disabled, the system will boot and you can enter Setup without entering any previously set , you will replace any password.

User Guide
Page 63
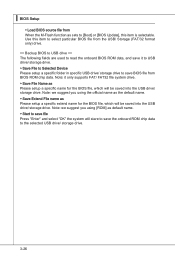
...Disable M-Flash function. [BIOS Update] Flash BIOS via the USB/ Storage drive directly. System will boot from us. [Boot] After allocated particular BIOS file, system will skip MB ROM chip data and boot with this BIOS file which saved in the root directory of USB drive. Update BIOS ROM chip ...It only supports particular file name, which was be download from the BIOS file inside USB drive. ▍ BIOS Setup M-Flash == BIOS Update or Boot 2nd BIOS From USB drive== ▶ M-Flash function as M-Flash function allows you to flash BIOS from USB drive/ storage drive (FAT/ FAT32 ...
...Disable M-Flash function. [BIOS Update] Flash BIOS via the USB/ Storage drive directly. System will boot from us. [Boot] After allocated particular BIOS file, system will skip MB ROM chip data and boot with this BIOS file which saved in the root directory of USB drive. Update BIOS ROM chip ...It only supports particular file name, which was be download from the BIOS file inside USB drive. ▍ BIOS Setup M-Flash == BIOS Update or Boot 2nd BIOS From USB drive== ▶ M-Flash function as M-Flash function allows you to flash BIOS from USB drive/ storage drive (FAT/ FAT32 ...
User Guide
Page 65
.... 3-26 Note: it to USB drive/ storage drive. ▶ Save File to Selected Device Please setup a specific folder in specific USB drive/ storage drive to [Boot] or [BIOS Update], this item is selectable. Note: we suggest you using [ROM] as Please setup a specific extend name for the BIOS file, which will...
.... 3-26 Note: it to USB drive/ storage drive. ▶ Save File to Selected Device Please setup a specific folder in specific USB drive/ storage drive to [Boot] or [BIOS Update], this item is selectable. Note: we suggest you using [ROM] as Please setup a specific extend name for the BIOS file, which will...

User Guide
Page 91
Important Be sure to enter FastBuild utility. During boot-up operations are done in BIOS before configuring the Fastbuild Utility. B-2 ▍ SB710 RAID RAID Configuration Creating and deleting RAID set and performing other RAID setting up , a screen similar to the one below will appear. Press to enable the RAID function for about few seconds. The FastBuild menu screen will appear for SATA device in the RAID BIOS. The Main Menu is used to choose the operation to be performed.
Important Be sure to enter FastBuild utility. During boot-up operations are done in BIOS before configuring the Fastbuild Utility. B-2 ▍ SB710 RAID RAID Configuration Creating and deleting RAID set and performing other RAID setting up , a screen similar to the one below will appear. Press to enable the RAID function for about few seconds. The FastBuild menu screen will appear for SATA device in the RAID BIOS. The Main Menu is used to choose the operation to be performed.

User Guide
Page 97
...for 32bit) or x64(for 64bit) • The driver disk for yourself. • Insert the MSI DVD into the DVD-ROM drive. • Click the "Browse DVD" on "Load Driver" ...press ENTER. 7. You should con- Insert the floppy that you complete the RAID BIOS setup, boot from the floppy again after selecting the location to install Vista click on the Setup screen. &#... from the Windows CD, and the Windows Setup program starts. 2. ▍ SB710 RAID Installing the RAID Driver (for Windows XP: \\ChipSet\AMD\XP\SBDrv\RAID7xx - After you have successfully installed the RAID driver, and Windows...
...for 32bit) or x64(for 64bit) • The driver disk for yourself. • Insert the MSI DVD into the DVD-ROM drive. • Click the "Browse DVD" on "Load Driver" ...press ENTER. 7. You should con- Insert the floppy that you complete the RAID BIOS setup, boot from the floppy again after selecting the location to install Vista click on the Setup screen. &#... from the Windows CD, and the Windows Setup program starts. 2. ▍ SB710 RAID Installing the RAID Driver (for Windows XP: \\ChipSet\AMD\XP\SBDrv\RAID7xx - After you have successfully installed the RAID driver, and Windows...


